Conditional properties using React with TypeScript
In React with TypeScript, you can use conditional rendering to select what to render based on conditions. This is useful when displaying different content or components based on specific criteria. There are a few different ways to implement conditional rendering in React using TypeScript. One way is to use the conditional operator (also called the ternary operator). This operator accepts a condition and returns a value if the condition is true or another value if the condition is false.
You can also conditionally render components based on conditions using the && operators. The operator evaluates to true if the value on the left side of the operator is true; if the value on the left side of the operator is false, the operator evaluates to false.
Another way to implement conditional rendering is to use a switch statement, which allows you to test a value for multiple conditions and execute different blocks of code depending on which condition matches the value.
Generally speaking, when implementing conditional rendering, it is best to use the most straightforward method that meets your needs. This can make the code easier to read and understand.
Conditional attributes
In React, properties pass data from parent components to child components. Conditional properties are only set on a component under certain conditions.
By using TypeScript with React, you can type-check your code and provide type definitions for the properties your components expect to receive. This can help catch errors and make your code easier to understand and maintain.
To create a conditional property in a React component using TypeScript, you can use an "if" statement or the ternary operator to set the value of a property based on a condition. For example, you might have a component that requires a "color" property, but you only want to set the "color" property when a specific condition is met. In this case, you can use a conditional statement to set the 'color' property only when the condition is met.
Example steps
Create a new React TypeScript project using the following command -
npx create-react-app my-app --template typescript
Create a new component named "MyComponent" in the src folder of the React project, named "MyComponent.tsx".
Then we need to define the Props interface to use TypeScript data conventions in React.
We can conditionally display the passed properties using the ternary operator or the && operator.
From "App.tsx", we import MyComponent and use it multiple times. We use the component with different property values and check the results on the web page.
Example
In this example, we demonstrate conditional properties using React and TypeScript. We get the property values in MyComponent through props. We take two attributes, "userId" and "username". Logically, if useId is not equal to 0, we try to display the userId on the web page using the ternary operator and use the && operator to display the username only if the username is not an empty string.
App.tsx
import React from 'react'
import MyComponent from './MyComponent'

export const App: React.FC = () => {
   return (
      <div style={{ padding: '10px' }}>
         <h2> Conditional Properties Using React with TypeScript </h2>
         <div>
            <h4> userId: 123 username: 'ABC' </h4>
            <MyComponent userId={123} username="ABC" />

            <h4> userId: 456 username: '' </h4>
            <MyComponent userId={456} username="" />

            <h4> userId: 0 username: 'XYZ' </h4>
            <MyComponent userId={0} username="XYZ" />

            <h4> userId: 0 username: '' </h4>
            <MyComponent userId={0} username="" />
         </div>
      </div>
  )
}
export default App
MyComponent.tsx
import React from 'react'

type Props = {
   userId: number
   username: string
}

const MyComponent: React.FC<Props> = ({ userId, username }) => {
   return (
      <div style={{ border: '1px solid black', padding: '5px' }}>
         {userId !== 0 ? <p>User ID: {userId}</p> : <p>User ID Not Defined!</p>}
         {username !== '' && <p>User ID: {username}</p>}
      </div>
   )
}
export default MyComponent
Output
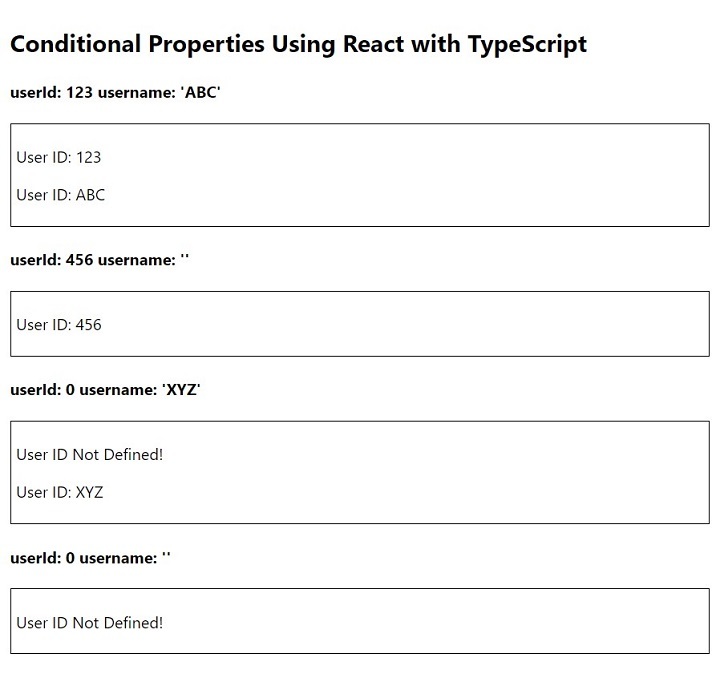
Example
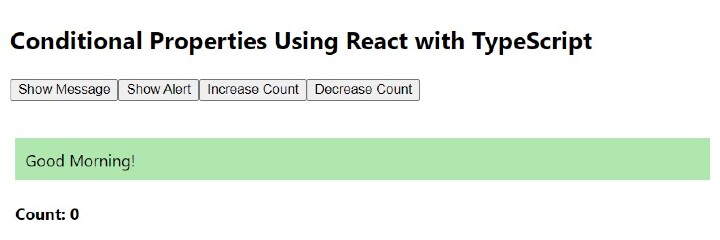
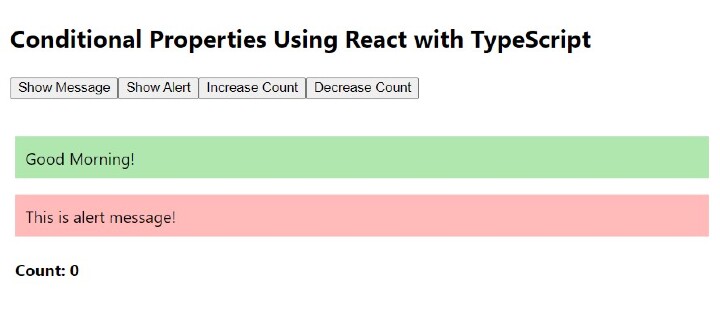
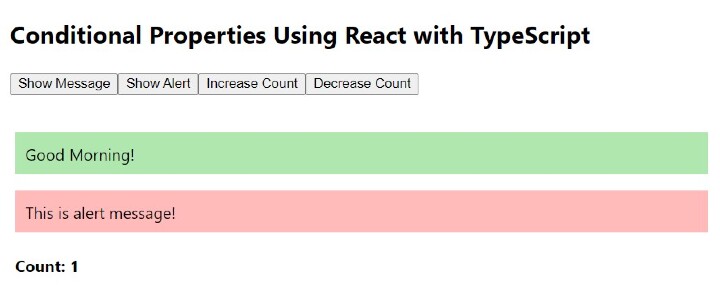
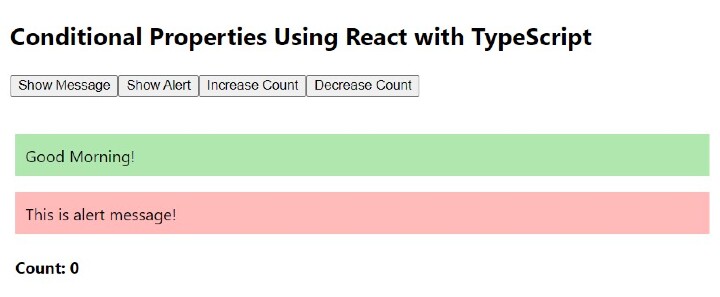
In this example, we will see conditional properties more efficiently and interactively. We will accept user input to display messages and data on the web page. We take three properties: "showMessgae", "showAlert" and "count". Logically, we will pass these properties dynamically in MyComponent using user-triggered events. In App.tsx we have four buttons "Show Message", "Show Alert", "Increase Count" and "Decrease Count". We also have some states in App.tsx for displaying messages, alerts and storing counter values. Logically, we are switching state to change properties in MyComponent.
App.tsx
import React, { useState } from 'react'
import MyComponent from './MyComponent'

export const App: React.FC = () => {
   const [showMessage, setShowMessage] = useState<Boolean>(false)
   const [showAlert, setShowAlert] = useState<Boolean>(false)
   const [count, setCount] = useState<number>(0)
   return (
      <div style={{ padding: '10px' }}>
         <h2> Conditional Properties Using React with TypeScript </h2>
         <p>
            <button onClick={() => setShowMessage(!showMessage)}>Show Message</button>
            <button onClick={() => setShowAlert(!showAlert)}> Show Alert </button>
            <button onClick={() => setCount(count + 1)}> Increase Count </button>
            <button onClick={() => setCount(count + 1)}> Decrease Count </button>
         </p>
         <MyComponent
            showMessage={showMessage}
            showAlert={showAlert}
            count={count}
         />
      </div>
  )
}
export default App
MyComponent.tsx
import React from 'react'

type Props = {
   showMessage: Boolean
   showAlert: Boolean
   count: number
}

const MyComponent: React.FC<Props> = ({ showMessage, showAlert, count }) => {
   return (
      <div style={{ padding: '5px' }}>
         {showMessage && (
            <p style={{ backgroundColor: '#afe7af', padding: '10px' }}>
               Good Morning!
            </p>
         )}
         {showAlert && (
            <p style={{ backgroundColor: '#ffbaba', padding: '10px' }}>
               This is alert message!
            </p>
         )}
         <h4>Count: {count}</h4>
      </div>
   )
}
export default MyComponent
Output

Click the "Show Message" button
Click the "Show Alert" button
Click the "Increase Count" button
Click the "Reduce Count" button
Conditional properties using React and TypeScript are a very powerful and interactive way to build any web application. This is a necessity for modern web development.
The above is the detailed content of Conditional properties using React with TypeScript. For more information, please follow other related articles on the PHP Chinese website!

Hot AI Tools

Undresser.AI Undress
AI-powered app for creating realistic nude photos

AI Clothes Remover
Online AI tool for removing clothes from photos.

Undress AI Tool
Undress images for free

Clothoff.io
AI clothes remover

AI Hentai Generator
Generate AI Hentai for free.

Hot Article

Hot Tools

Notepad++7.3.1
Easy-to-use and free code editor

SublimeText3 Chinese version
Chinese version, very easy to use

Zend Studio 13.0.1
Powerful PHP integrated development environment

Dreamweaver CS6
Visual web development tools

SublimeText3 Mac version
God-level code editing software (SublimeText3)

Hot Topics
 1378
1378
 52
52
 How do I create and publish my own JavaScript libraries?
Mar 18, 2025 pm 03:12 PM
Article discusses creating, publishing, and maintaining JavaScript libraries, focusing on planning, development, testing, documentation, and promotion strategies.
 How do I optimize JavaScript code for performance in the browser?
Mar 18, 2025 pm 03:14 PM
The article discusses strategies for optimizing JavaScript performance in browsers, focusing on reducing execution time and minimizing impact on page load speed.
 What should I do if I encounter garbled code printing for front-end thermal paper receipts?
Apr 04, 2025 pm 02:42 PM
Frequently Asked Questions and Solutions for Front-end Thermal Paper Ticket Printing In Front-end Development, Ticket Printing is a common requirement. However, many developers are implementing...
 How do I debug JavaScript code effectively using browser developer tools?
Mar 18, 2025 pm 03:16 PM
The article discusses effective JavaScript debugging using browser developer tools, focusing on setting breakpoints, using the console, and analyzing performance.
 Who gets paid more Python or JavaScript?
Apr 04, 2025 am 12:09 AM
There is no absolute salary for Python and JavaScript developers, depending on skills and industry needs. 1. Python may be paid more in data science and machine learning. 2. JavaScript has great demand in front-end and full-stack development, and its salary is also considerable. 3. Influencing factors include experience, geographical location, company size and specific skills.
 How do I use source maps to debug minified JavaScript code?
Mar 18, 2025 pm 03:17 PM
The article explains how to use source maps to debug minified JavaScript by mapping it back to the original code. It discusses enabling source maps, setting breakpoints, and using tools like Chrome DevTools and Webpack.
 Getting Started With Chart.js: Pie, Doughnut, and Bubble Charts
Mar 15, 2025 am 09:19 AM
This tutorial will explain how to create pie, ring, and bubble charts using Chart.js. Previously, we have learned four chart types of Chart.js: line chart and bar chart (tutorial 2), as well as radar chart and polar region chart (tutorial 3). Create pie and ring charts Pie charts and ring charts are ideal for showing the proportions of a whole that is divided into different parts. For example, a pie chart can be used to show the percentage of male lions, female lions and young lions in a safari, or the percentage of votes that different candidates receive in the election. Pie charts are only suitable for comparing single parameters or datasets. It should be noted that the pie chart cannot draw entities with zero value because the angle of the fan in the pie chart depends on the numerical size of the data point. This means any entity with zero proportion
 The difference in console.log output result: Why are the two calls different?
Apr 04, 2025 pm 05:12 PM
In-depth discussion of the root causes of the difference in console.log output. This article will analyze the differences in the output results of console.log function in a piece of code and explain the reasons behind it. �...


