

Convert your WordPress theme to HTML5

HTML5 introduces a range of great new features and simple options. Soon it will be fully supported by most browsers used today. Eventually everyone will have to convert their WordPress themes from XHTML to HTML5. After Google’s Panda update, your website needs clearer, easier-to-read code to rank better on Google. I'll teach you how to convert your theme from XHTML to HTML5. We will also take care of the 2% of internet users who have JavaScript disabled (for backwards compatibility).
Our goal
In this tutorial, we will focus on converting a WordPress theme from XHTML to HTML5. We'll walk through the changes step by step through the files listed below (these files are located in your theme folder, i.e. wp-content/themes/yourtheme/here!)
- header.php
- index.php
- sidebar.php:
- footer.php
- single.php(optional)
Basic HTML5 layout
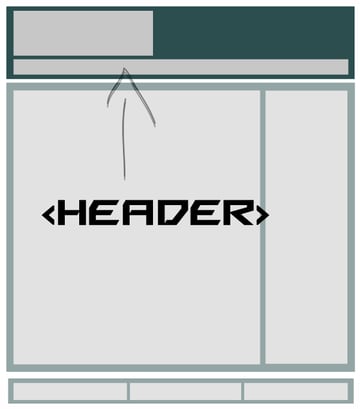
Let's take a look at the basic HTML5 layout we're going to build. HTML5 is more than just a document type at the beginning of the code. Several newly introduced elements help us style and code in an efficient way with less markup (this is one of the reasons why HTML5 is better).
<!DOCTYPE html>
<html lang="en">
<head>
	<title>TITLE | Slogan!</title>
</head>
<body>
	<nav role="navigation"></nav>
<!--Ending header.php-->
<!--Begin  index.php-->
	<section id="content">
		<article role="main">
			<h1>Title of the Article</h1>
			<time datetime="YYYY-MM-DD"></time>
			<p>Some lorem ispum text of your post goes here.</p>
			<p>The article's text ends.</p>
		</article>

		<aside role="sidebar">
			<h2>Some Widget in The Sidebar</h2>
		</aside>
	</section>
<!--Ending index.php-->
<!--begin  footer.php-->
	<footer role="foottext">
		<small>Some Copyright info</small>
	</footer>
</body>
</html>
Now we just need to know the new HTML5 for header, footer, nav, section and article Just place the label wherever you want. In contrast to div structured XHTML, the names of the newly introduced tags are self-explanatory.
Step 1 Convert header.php to HTML5
Now I will show you the code commonly used in header.php of XHTML WordPress themes.
XHTML theme header.php
<!DOCTYPE html PUBLIC "-//W3C//DTD XHTML 1.0 Transitional//EN" "https://www.w3.org/TR/xhtml1/DTD/xhtml1-transitional.dtd">
<html xmlns="http://www.w3.org/1999/xhtml">
<head>
<title>My  Blog</title>
<?php wp_head(); ?>
</head>
<body>
<!-- Header  -->
<div class="header">
	<div class="container">
		<h1><a href="<?php bloginfo('url');?>">My Blog is Working Great.</a></h1>
	</div><!-- End  Container -->
</div><!-- End  Header -->


<!-- Navigation Bar Starts -->
<div class="navbar">
	<div class="container">
		<ul class="grid nav_bar">
			<?php wp_list_categories('navs_li='); ?>
	     </ul>
	</div>
</div>
<!-- Navigation Bar Ends -->
<div class="container">
Someone must ask why we do all this? The answer is simple, it is the semantic markup of HTML5. It reduces markup making it very easy to understand and manage.
HTML5 header.php (conversion)
Read the code, then follow the instructions below to convert your theme's header.php to HTML5.
<!doctype html>
<html>
<head>
<title>My Blog</title>
<?php wp_head(); ?>
</head>
<body>
<!-- Header -->
<header>
    <div class="container">
        <h1 class="grid"><a href="<?php bloginfo('url');?>">My Blog is Working Great.</a></h1>
    </div>
</header>
<!-- End Header  -->

<!-- Navigation Bar Starts-->
<nav>
    <div class="navbar">
        <ul class="grid nav_bar">
            <?php wp_list_categories('title_li='); ?>
         </ul>
    </div>
</nav>
<!-- Navigation Bar Ends -->
<section class="container">
As you can see, the converted code is very similar to the XHTML code. Let's discuss these changes.
-
<!doctype html>– HTML5 has a very simple doctype, but it contains many new semantic tags -
<header>– Semantic markup for the header part -
<nav>– We replaced the navbar’sdivcode with a new semantic tag for controlling the navbar in HTML5.
Note: Some people include the section tag in the header. There's a lot of debate about this. I personally object to including the section tag in the header as it ruins the aesthetics of HTML5. Of course you can use the old div there.
What about scripts and stylesheets?
When converting a WordPress theme to HTML5, the scripts and stylesheets included in the header are really simple. In HTML5, we only use the <script> and <link> tags. So remove type="text/javascript" - all browsers will treat the <script> tag as JavaScript unless you explicitly write its type. Likewise, remove the type="text/css" from the <link> tag in the stylesheet.
Consider old browsers!
Contains HTML shiv to support older browsers. This is a simple JavaScript file. Some examples of shivs are Remy Sharp's HTML5 script or Modernizr script. Let's use Modernizr.
We need to enqueue the script from our functions.php file like this:
function html5_scripts()
{
	// Register the Modernizr script
	wp_register_script( 'modernizr', get_template_directory_uri() . '/js/Modernizr-1.6.min.js' );

	// Enqueue Modernizr
	wp_enqueue_script( 'modernizr' );
}
add_action( 'wp_enqueue_scripts', 'html5_scripts', 1 );
Tips: Put consecutive title tags into <hgroup>
Note: This script needs to be placed at the very top inside the <?php wp_head();?> tag, that's why we gave add_action has priority 1.


Step 2Convert index.php to HTML5
Common XHTML index.php consists of the following tags. I will go through the conversion step by step and explain the entire process after conversion.
NOTE: I won't add the entire code here as it will make the post longer for no reason.
XHTML索引.php
<div id="container">
<div id="content">
<div id="entries">
<div id="post">...</div>

</div><!--Ending Entries-->
<?php get_sidebar(); ?>
</div><!--Ending content-->
</div><!--Ending container-->
<?php get_footer(); ?>
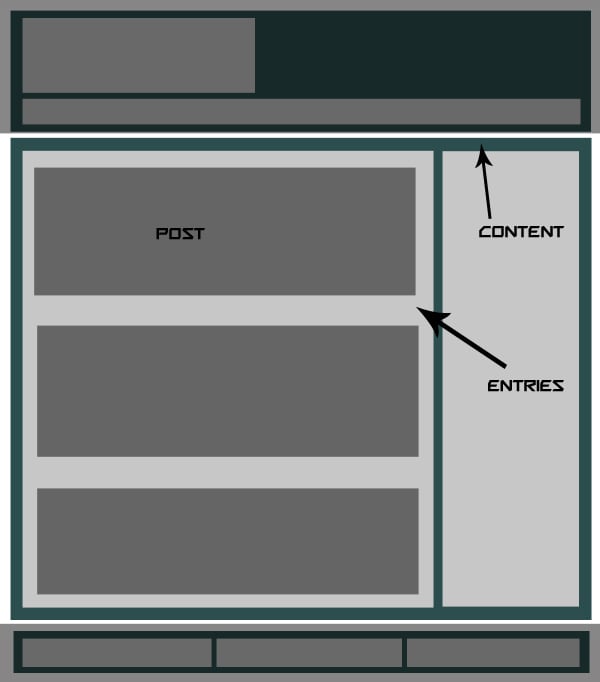


HTML5 index.php(转换)
<div id="container">
	<div id="content">
		<section id="entries">
			<article id="post">...</article>
		</section><!--end entries-->
		<?php get_sidebar(); ?>
	</div><!--end content-->
</div><!--end wrap-->
<?php get_footer(); ?>
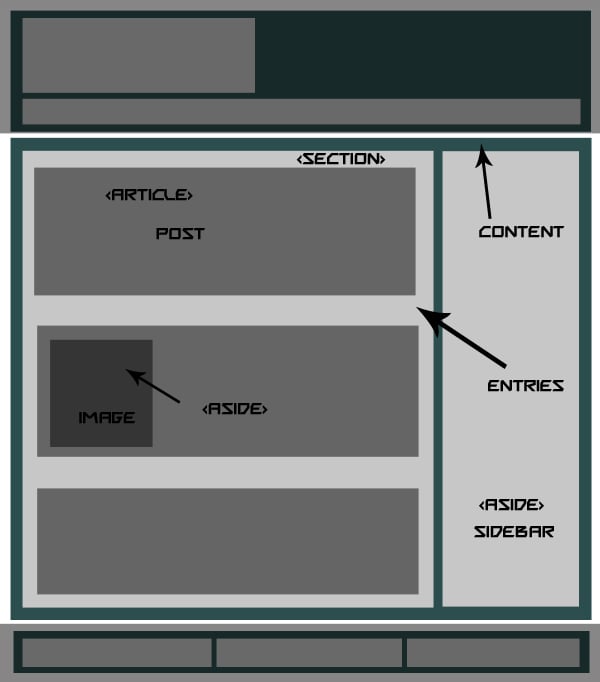
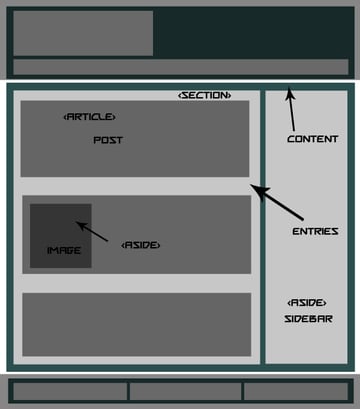
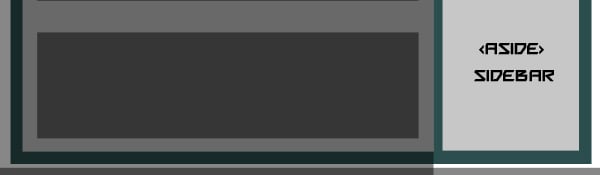
在看我们所做的更改之前,我们必须知道HTML5为我们提供了三个基本的布局建模标签:Section、article和aside。 Section 将替换条目的 div,article 将替换帖子的 div,稍后 aside 将用于我们的侧边栏。
-
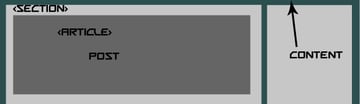
<section>– HTML5 有一个名为section的布局标签,用于分隔其中使用的代码块 -
<article>– 帖子部分的语义标签,类似于section -
<aside>– 帖子图像的语义标记,用于将其放在一边和侧边栏 -
面包屑和页面导航– 如果我们的主题有面包屑,那么它们将在div中使用,例如<div class="breadcrumbs">...</div>,对于页面导航,我们将使用<nav id="pgnav"php cngtphpcn...< /nav>

HTML5 中的完整 Index.php
注意: 我粘贴了一个通用的index.php,如下所示,下面是一些转换为 HTML5 的完整代码。
<section class="entries">
  <?php if (have_posts()) : while (have_posts()) : the_post();

<article class="post" id="post-<?php the_ID(); ?>">
    <aside class="post_image">
        <?php
        if ( has_post_thumbnail() ) {
            the_post_thumbnail();
        } else { ?>
            <a href="<?php the_permalink() ?>"><img src="<?php bloginfo('template_directory');?>/images/noImage.gif" title="<?php the_title(); ?>" /></a>
        <?php }?>
    </aside>
    <section class="post_content">
        <h1><a href="<?php the_permalink() ?>" rel="bookmark" title="<?php the_title(); ?>"><?php the_title(); ?></a></h1>
        <p><?php echo get_the_excerpt(); ?></p>
        <a href="<?php the_permalink() ?>" rel="bookmark" title="<?php the_title(); ?>" class="read_more ">Read More</a>
    </section>
    <section class="meta">

    <p> <?php the_category(',') ?></p>

    <p><?php the_tags(""); ?></p>

    </section>
</article>
  <?php endwhile; else: ?>
  <p>
    <?php _e('Sorry, no posts matched your criteria.'); ?>
  </p>
  <?php endif; ?>

  <?php posts_nav_link(' ⏼ ', __('« Newer Posts'), __('Older Posts »')); ?>
</section>
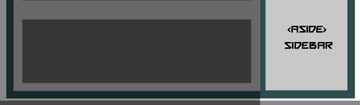
第 3 步 处理 sidebar.php
我们将在侧边栏中使用 <aside> 而不是 div,例如:
XHTML 中的 sidebar.php
<div id="sidebar">...</div>
使用<aside>后变成如下。
HTML5 中的 sidebar.php
<aside id="sidebar">...</aside<
这很简单!

第 4 步 footer.php 编辑
我们将在 footer.php 中使用 <footer> 语义标签而不是简单的 div,例如:
XHTML 中的 footer.php
<div id="footer">
<div id="foot_widgets">...</div>
<div id="copyright">...</div>
</div>
<?php wp_footer(); ?>
</body>
</html>


HTML5 中的 footer.php
<footer id="footer">
<section id="foot_widgets">...</section>
<section id="foot_widgets">...</section>
<section id="foot_widgets">...</section>
<div id="copyright">...</div>
</footer>
<?php wp_footer(); ?>
</body>
</html>
第 5 步处理 single.php
single.php 没有什么特别的变化,所以我只是粘贴更改后的代码,这可能对一些初学者有帮助。我在其中使用了 section 和 article 标签。如果您愿意,您还可以使用 <time> 标签。
XHTML 中的 single.php
<?php get_header(); ?>
<?php if (have_posts()) : while (have_posts()) : the_post(); ?>

<div class="container">
<div class="breadcrumbs"><?php the_breadcrumb(''); ?></div>
    <div class="content">
        <h1><a href="<?php the_permalink() ?>" rel="bookmark" title="<?php the_title(); ?>"><?php the_title(); ?></a></h1>

        <div id="entry-content-single">
          <?php the_content('<p >Read More</p>'); ?>
        </div>
        <div class="meta"> Posted by:
          <?php the_author() ?>
          <?php edit_post_link(__('Edit This')); ?>

          <p><?php the_tags(""); ?></p>
        </div>
        <div class="clearfix"></div>
    </div>

  <!-- End of post -->
</div></div>


<?php get_footer(); ?>


HTML5 中的 single.php
<?php get_header(); ?>
<?php if (have_posts()) : while (have_posts()) : the_post(); ?>

<section class="content">
<div class="breadcrumbs"><?php the_breadcrumb(''); ?></div>
    <article class="box">
        <h1><a href="<?php the_permalink() ?>" rel="bookmark" title="<?php the_title(); ?>"><?php the_title(); ?></a></h1>

        <section id="entry-content-single">
          <?php the_content('<p>Read More</p>'); ?>
        </section>
        <section class="meta"> Posted by:
          <?php the_author() ?>
          <?php edit_post_link(__('Edit This')); ?>

          <p><?php the_tags(""); ?></p>
        </section>
        <div class="clearfix"></div>
    </article>
  <!-- end post -->
</section></div>

<?php get_footer(); ?>
注意: 关于SEO,有些人在帖子标题之前使用 <header class="entry-header"> ,这也是一个很好的做法。
第6步最后是style.css
最终我们关心的是向后兼容性问题。出于对旧版浏览器的安全考虑,HTML5 元素应使用 display: block 样式显示为块。只需将以下代码放在 style.css 的顶部即可:
header, nav, section, article, aside, figure, footer { display: block; }
附加说明
如果您使用嵌入到模板文件中的音频或视频,则必须使用 HTML5 音频和视频元素。可以在下面的备忘单中查看更多标签。每当您添加一些新功能时,请研究一下如何使用其语义标签将其添加到 HTML5 中。
HTML5 资源
- HTML5 备忘单
- HTML5 教程
- HTML5 演示
一些 HTML5 免费主题
- 二十一点
- Yoko
- 15 个主题和框架
现在轮到你了
您要使用 HTML5 吗?您是否已更改为 HTML5?这些更改是否会影响您的 SEO 排名?请在下面的评论中告诉我们!
The above is the detailed content of Convert your WordPress theme to HTML5. For more information, please follow other related articles on the PHP Chinese website!

Hot AI Tools

Undresser.AI Undress
AI-powered app for creating realistic nude photos

AI Clothes Remover
Online AI tool for removing clothes from photos.

Undress AI Tool
Undress images for free

Clothoff.io
AI clothes remover

Video Face Swap
Swap faces in any video effortlessly with our completely free AI face swap tool!

Hot Article
Hot Tools

Notepad++7.3.1
Easy-to-use and free code editor

SublimeText3 Chinese version
Chinese version, very easy to use

Zend Studio 13.0.1
Powerful PHP integrated development environment

Dreamweaver CS6
Visual web development tools

SublimeText3 Mac version
God-level code editing software (SublimeText3)
Hot Topics
 1387
1387
 52
52

 Is WordPress easy for beginners?
Apr 03, 2025 am 12:02 AM
Is WordPress easy for beginners?
Apr 03, 2025 am 12:02 AM
WordPress is easy for beginners to get started. 1. After logging into the background, the user interface is intuitive and the simple dashboard provides all the necessary function links. 2. Basic operations include creating and editing content. The WYSIWYG editor simplifies content creation. 3. Beginners can expand website functions through plug-ins and themes, and the learning curve exists but can be mastered through practice.
 How To Begin A WordPress Blog: A Step-By-Step Guide For Beginners
Apr 17, 2025 am 08:25 AM
How To Begin A WordPress Blog: A Step-By-Step Guide For Beginners
Apr 17, 2025 am 08:25 AM
Blogs are the ideal platform for people to express their opinions, opinions and opinions online. Many newbies are eager to build their own website but are hesitant to worry about technical barriers or cost issues. However, as the platform continues to evolve to meet the capabilities and needs of beginners, it is now starting to become easier than ever. This article will guide you step by step how to build a WordPress blog, from theme selection to using plugins to improve security and performance, helping you create your own website easily. Choose a blog topic and direction Before purchasing a domain name or registering a host, it is best to identify the topics you plan to cover. Personal websites can revolve around travel, cooking, product reviews, music or any hobby that sparks your interests. Focusing on areas you are truly interested in can encourage continuous writing
 What is the WordPress good for?
Apr 07, 2025 am 12:06 AM
What is the WordPress good for?
Apr 07, 2025 am 12:06 AM
WordPressisgoodforvirtuallyanywebprojectduetoitsversatilityasaCMS.Itexcelsin:1)user-friendliness,allowingeasywebsitesetup;2)flexibilityandcustomizationwithnumerousthemesandplugins;3)SEOoptimization;and4)strongcommunitysupport,thoughusersmustmanageper
 Can I learn WordPress in 3 days?
Apr 09, 2025 am 12:16 AM
Can I learn WordPress in 3 days?
Apr 09, 2025 am 12:16 AM
Can learn WordPress within three days. 1. Master basic knowledge, such as themes, plug-ins, etc. 2. Understand the core functions, including installation and working principles. 3. Learn basic and advanced usage through examples. 4. Understand debugging techniques and performance optimization suggestions.
 How much does WordPress cost?
Apr 05, 2025 am 12:13 AM
How much does WordPress cost?
Apr 05, 2025 am 12:13 AM
WordPress itself is free, but it costs extra to use: 1. WordPress.com offers a package ranging from free to paid, with prices ranging from a few dollars per month to dozens of dollars; 2. WordPress.org requires purchasing a domain name (10-20 US dollars per year) and hosting services (5-50 US dollars per month); 3. Most plug-ins and themes are free, and the paid price ranges from tens to hundreds of dollars; by choosing the right hosting service, using plug-ins and themes reasonably, and regularly maintaining and optimizing, the cost of WordPress can be effectively controlled and optimized.
 Should I use Wix or WordPress?
Apr 06, 2025 am 12:11 AM
Should I use Wix or WordPress?
Apr 06, 2025 am 12:11 AM
Wix is suitable for users who have no programming experience, and WordPress is suitable for users who want more control and expansion capabilities. 1) Wix provides drag-and-drop editors and rich templates, making it easy to quickly build a website. 2) As an open source CMS, WordPress has a huge community and plug-in ecosystem, supporting in-depth customization and expansion.
 Is WordPress still free?
Apr 04, 2025 am 12:06 AM
Is WordPress still free?
Apr 04, 2025 am 12:06 AM
The core version of WordPress is free, but other fees may be incurred during use. 1. Domain names and hosting services require payment. 2. Advanced themes and plug-ins may be charged. 3. Professional services and advanced features may be charged.
 Why would anyone use WordPress?
Apr 02, 2025 pm 02:57 PM
Why would anyone use WordPress?
Apr 02, 2025 pm 02:57 PM
People choose to use WordPress because of its power and flexibility. 1) WordPress is an open source CMS with strong ease of use and scalability, suitable for various website needs. 2) It has rich themes and plugins, a huge ecosystem and strong community support. 3) The working principle of WordPress is based on themes, plug-ins and core functions, and uses PHP and MySQL to process data, and supports performance optimization.
