

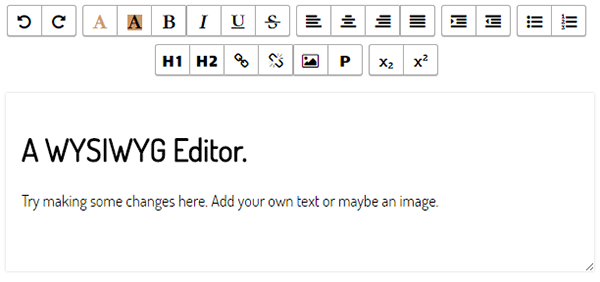
Create a WYSIWYG editor using the contentEditable property

WYSIWYG editors are very popular. You've probably also used one of these at some point. There are many libraries available to help you set up your own editor. Although they are quick to set up, there are drawbacks to using these libraries. First, they are bloated. Most of them have fancy features that you probably won't use. Additionally, customizing the appearance of these editors can be a headache.
In this tutorial, we will build our own lightweight WYSIWYG editor. By the end of this tutorial, you will have an editor with basic formatting capabilities that you can style to your liking.
We first introduce execCommand. We will use this command to implement our editor extensively.
Document.execCommand()
execCommand is a method of the document object. It allows us to manipulate the contents of the editable area. When used with contentEditable, it can help us create rich text editors. There are many commands available, such as adding links, setting the selection to Bold or Italic, and changing the font size or color. The method follows the following syntax:
document.execCommand(CommandName, ShowDefaultUI, ValueArgument);
CommandName is a string specifying the name of the command to be executed. ShowDefaultUI is a Boolean value indicating whether the support interface should be displayed. This option is not fully implemented yet and is best set to false. ValueArgument is a string that provides information such as an image URL or foreColor. This parameter is set to null when the command does not require a value to take effect.
We need to use different versions of this method to achieve various functions. In the next few paragraphs I will review them one by one.
Command without value parameter
Commands such as bold, align, undo and redo do not require a ValueArgument. In this case we use the following syntax:
document.execCommand(commandName, false, null);
CommandName is just the name of the command, such as justifyCenter, justifyRight, bold, etc.
Commands with value parameters
Commands like insertImage, createLink and foreColor require a third argument to work properly. For these commands you need the following syntax:
document.execCommand(commandName, false, value);
For insertImage, the value is the URL of the image to be inserted. For foreColor, it will be a color value like #FF9966 or a name like blue.
Command to add block style tag
Adding HTML block style tags requires using formatBlock as commandName and the tag name as valueArgument. The syntax is similar to:
document.execCommand('formatBlock', false, tagName);
This method will add HTML block style tags around the row containing the current selection. It will also replace any tags that are already there. tagName can be any title tag (h1-h6), p, or
I have discussed the most commonly used commands here. You can visit Mozilla for a list of all available commands.
Create toolbar
After the basics are completed, it’s time to create the toolbar. I will use Font Awesome icon for the button. You may have noticed that, aside from a few differences, all execCommand have a similar structure. We can take advantage of this by using the following markup for the toolbar buttons:
<a href="#" data-command='commandName'><i class='fa fa-icon'></i></a>
This way, whenever the user clicks the button, we can determine which version of execCommand to use based on the value of the data-command attribute. Here are a few buttons for reference:
<a href="#" data-command='h2'>H2</a>
<a href="#" data-command='undo'><i class='fa fa-undo'></i></a>
<a href="#" data-command='createlink'><i class='fa fa-link'></i></a>
<a href="#" data-command='justifyLeft'><i class='fa fa-align-left'></i></a>
<a href="#" data-command='superscript'><i class='fa fa-superscript'></i></a>
The data-command attribute value of the first button is h2. After checking this value in JavaScript, we will use the formatBlock version of the execCommand method. Likewise, for the last button, superscript recommends that we use the execCommand version without the valueArgument.
Creating the foreColor and backColor buttons is another story. They pose two problems. Depending on the number of colors we offer the user to choose from, writing so much code can be annoying and error-prone. To solve this problem, we can use the following JavaScript code:
var colorPalette = ['000000', 'FF9966', '6699FF', '99FF66','CC0000', '00CC00', '0000CC', '333333', '0066FF', 'FFFFFF'];

var forePalette = $('.fore-palette');

for (var i = 0; i < colorPalette.length; i++) {
  forePalette.append('<a href="#" data-command="forecolor" data-value="' + '#' + colorPalette[i] + '" style="background-color:' + '#' + colorPalette[i] + ';" class="palette-item"></a>');
}
请注意,我还为每种颜色设置了一个 data-value 属性。稍后它将在 execCommand 方法中用作 valueArgument。
第二个问题是我们不能一直显示那么多颜色,因为这会占用大量空间并导致糟糕的用户体验。使用一点CSS,我们可以确保只有当用户将鼠标悬停在相应按钮上时才会出现调色板。这些按钮的标记也需要更改为以下内容:
<div class="fore-wrapper"><i class='fa fa-font'></i>
  <div class="fore-palette">
  </div>
</div>
要仅在 hover 上显示调色板,我们需要以下 CSS:
.fore-palette,
.back-palette {
  display: none;
}

.fore-wrapper:hover .fore-palette,
.back-wrapper:hover .back-palette {
  display: block;
  float: left;
  position: absolute;
}
CodePen 演示中还有许多其他 CSS 规则可以使工具栏更漂亮,但这就是核心功能所需的全部。
向编辑器添加功能
现在,是时候让我们的编辑器发挥作用了。这样做所需的代码非常小。
$('.toolbar a').click(function(e) {

  var command = $(this).data('command');

  if (command == 'h1' || command == 'h2' || command == 'p') {
    document.execCommand('formatBlock', false, command);
  }

  if (command == 'forecolor' || command == 'backcolor') {
    document.execCommand($(this).data('command'), false, $(this).data('value'));
  }

  if (command == 'createlink' || command == 'insertimage') {
    url = prompt('Enter the link here: ','http:\/\/');
    document.execCommand($(this).data('command'), false, url);
  }

  else document.execCommand($(this).data('command'), false, null);

});
我们首先将单击事件附加到所有工具栏按钮。每当单击工具栏按钮时,我们都会将相应按钮的 data-command 属性的值存储在变量 command 中。稍后将用于调用 execCommand 方法的适当版本。它有助于编写简洁的代码并避免重复。
设置 foreColor 和 backColor 时,我使用 data-value 属性作为第三个参数。 createLink 和 insertImage 没有常量 url 值,因此我们使用提示从用户获取值。您可能还想执行其他检查以确保 url 有效。如果command变量不满足任何if块,我们运行第一个版本的execCommand。
这就是我们所见即所得编辑器的样子。
您还可以使用我在上次讨论的 localStorage 来实现自动保存功能教程。
跨浏览器差异
各种浏览器在实现上存在细微差异。例如,请记住,使用 formatBlock 时,Internet Explorer 仅支持标题标签 h1 - h6、address 和 pre。在指定 commandName 时,您还需要包含标记分隔符,例如 <h3></h3>。
并非所有浏览器都支持所有命令。 Internet Explorer 不支持 insertHTML 和 hiliteColor 等命令。同样,只有 Firefox 支持 insertBrOnReturn。您可以在此 GitHub 页面上了解有关浏览器不一致的更多信息。
最终想法
创建您自己的所见即所得编辑器可以是一次很好的学习体验。在本教程中,我介绍了很多命令并使用了一些 CSS 来进行基本样式设置。作为练习,我建议您尝试实现一个工具栏按钮来设置文本选择的 font。该实现与 foreColor 按钮的实现类似。
我希望您喜欢本教程并学到一些新东西。如果您从头开始创建了自己的所见即所得编辑器,请随时在评论部分链接到它。
The above is the detailed content of Create a WYSIWYG editor using the contentEditable property. For more information, please follow other related articles on the PHP Chinese website!

Hot AI Tools

Undresser.AI Undress
AI-powered app for creating realistic nude photos

AI Clothes Remover
Online AI tool for removing clothes from photos.

Undress AI Tool
Undress images for free

Clothoff.io
AI clothes remover

Video Face Swap
Swap faces in any video effortlessly with our completely free AI face swap tool!

Hot Article
Hot Tools

Notepad++7.3.1
Easy-to-use and free code editor

SublimeText3 Chinese version
Chinese version, very easy to use

Zend Studio 13.0.1
Powerful PHP integrated development environment

Dreamweaver CS6
Visual web development tools

SublimeText3 Mac version
God-level code editing software (SublimeText3)
Hot Topics
 1392
1392
 52
36
110
52
36
110

 Is HTML easy to learn for beginners?
Apr 07, 2025 am 12:11 AM
Is HTML easy to learn for beginners?
Apr 07, 2025 am 12:11 AM
HTML is suitable for beginners because it is simple and easy to learn and can quickly see results. 1) The learning curve of HTML is smooth and easy to get started. 2) Just master the basic tags to start creating web pages. 3) High flexibility and can be used in combination with CSS and JavaScript. 4) Rich learning resources and modern tools support the learning process.
 The Roles of HTML, CSS, and JavaScript: Core Responsibilities
Apr 08, 2025 pm 07:05 PM
The Roles of HTML, CSS, and JavaScript: Core Responsibilities
Apr 08, 2025 pm 07:05 PM
HTML defines the web structure, CSS is responsible for style and layout, and JavaScript gives dynamic interaction. The three perform their duties in web development and jointly build a colorful website.
 What is an example of a starting tag in HTML?
Apr 06, 2025 am 12:04 AM
What is an example of a starting tag in HTML?
Apr 06, 2025 am 12:04 AM
AnexampleofastartingtaginHTMLis,whichbeginsaparagraph.StartingtagsareessentialinHTMLastheyinitiateelements,definetheirtypes,andarecrucialforstructuringwebpagesandconstructingtheDOM.
 Understanding HTML, CSS, and JavaScript: A Beginner's Guide
Apr 12, 2025 am 12:02 AM
Understanding HTML, CSS, and JavaScript: A Beginner's Guide
Apr 12, 2025 am 12:02 AM
WebdevelopmentreliesonHTML,CSS,andJavaScript:1)HTMLstructurescontent,2)CSSstylesit,and3)JavaScriptaddsinteractivity,formingthebasisofmodernwebexperiences.
 Gitee Pages static website deployment failed: How to troubleshoot and resolve single file 404 errors?
Apr 04, 2025 pm 11:54 PM
Gitee Pages static website deployment failed: How to troubleshoot and resolve single file 404 errors?
Apr 04, 2025 pm 11:54 PM
GiteePages static website deployment failed: 404 error troubleshooting and resolution when using Gitee...
 How to implement adaptive layout of Y-axis position in web annotation?
Apr 04, 2025 pm 11:30 PM
How to implement adaptive layout of Y-axis position in web annotation?
Apr 04, 2025 pm 11:30 PM
The Y-axis position adaptive algorithm for web annotation function This article will explore how to implement annotation functions similar to Word documents, especially how to deal with the interval between annotations...
 How to use CSS3 and JavaScript to achieve the effect of scattering and enlarging the surrounding pictures after clicking?
Apr 05, 2025 am 06:15 AM
How to use CSS3 and JavaScript to achieve the effect of scattering and enlarging the surrounding pictures after clicking?
Apr 05, 2025 am 06:15 AM
To achieve the effect of scattering and enlarging the surrounding images after clicking on the image, many web designs need to achieve an interactive effect: click on a certain image to make the surrounding...
 HTML, CSS, and JavaScript: Essential Tools for Web Developers
Apr 09, 2025 am 12:12 AM
HTML, CSS, and JavaScript: Essential Tools for Web Developers
Apr 09, 2025 am 12:12 AM
HTML, CSS and JavaScript are the three pillars of web development. 1. HTML defines the web page structure and uses tags such as, etc. 2. CSS controls the web page style, using selectors and attributes such as color, font-size, etc. 3. JavaScript realizes dynamic effects and interaction, through event monitoring and DOM operations.
