As a developer, it’s always exciting to build custom content in any framework, and the same is true for the OpenCart plugin.
In this two-part series, I will explain custom plugin development in OpenCart. We'll go over the details of extension development in OpenCart from a novice developer's perspective. We will also create a small custom plugin to demonstrate various aspects of the OpenCart plugin structure.
In the first part, we will build a custom plugin for displaying the latest products on the store frontend and you will be able to configure product quantities from the backend itself. That's the purpose of this article - to develop a backend plugin with a configuration form.
I assume you have set up the latest version of OpenCart, which at the time of writing is 2.1.0.2. Before we move on to developing the actual plugin, I'll introduce you to OpenCart's basic plugin architecture in the next section.
OpenCart is developed using one of the most popular web development patterns (MVC pattern) but with some slight changes, or rather I would say it is an addition. The added form is the language component, making it MVCL in the OpenCart world. You may have heard of this pattern, but for starters I'm going to quickly summarize what it's all about.
The M in MVC stands for model, which is where most of the business logic resides. In the context of OpenCart, it's the model that interacts with the database abstraction layer to do all the heavy lifting required to run a store. You'll find yourself working as a developer in this field most of the time.
Next, V stands for View, which represents the presentation layer of the application. As the name suggests, it only handles the presentation logic of any page, and most of the time it receives input from other layers and produces XHTML output. The application's business logic should stay away from this layer; it should only care about what is done and not how it is done.
The C (Controller) in MVC is in front of everything and is responsible for handling each request and processing it accordingly. This area contains most of the application logic, from processing and validating user input to loading the correct model and view components to prepare page output.
Finally, there is an additional component L, which represents language. It makes building multilingual websites a breeze.
This is a quick view of the OpenCart architecture, it will make more sense as we continue to explain each component in depth.
Let’s take a quick look at the list of files that need to be implemented for the custom backend plugin.
admin/language/english/module/recent_products.php: This is a file that holds static tags used throughout the admin application area. admin/controller/module/recent_products.php: It is a controller file that holds the application logic of our module. admin/view/template/module/recent_products.tpl: This is a view template file that contains XHTML code. In the next section, we will create each of the above files and explain them in depth.
As usual, we need to place the custom plug-in files in the module directory. In this case, the directory under admin will hold our files when we develop the backend plugin. Of course, according to the OpenCart architecture shown above, the files are distributed in different directories or components.
In this section, we will start creating module files. First, we will create a language file admin/language/english/module/recent_products.php with the following content. From an OpenCart perspective, this is an important file as it is required for OpenCart to detect your plugin.
<?php
// admin/language/english/module/recent_products.php
// Heading
$_['heading_title']    = 'Recent Products';

// Text
$_['text_module']      = 'Modules';
$_['text_success']     = 'Success: You have modified Recent Products module!';
$_['text_edit']        = 'Edit Recent Products Module';

// Entry
$_['entry_name']       = 'Module Name';
$_['entry_limit']      = 'Limit';
$_['entry_status']     = 'Status';

// Error
$_['error_permission'] = 'Warning: You do not have permission to modify Recent Products module!';
$_['error_name']       = 'Module Name must be between 3 and 64 characters!';
As you can see, we assign static tags to PHP arrays. Later, when the arrays are converted to PHP variables, you will be able to access these variables in the view template file.
You may also notice that the file is created in the english directory since that is the default language of the store. Of course, with a multilingual website, you need to make sure you create it for other languages as well. For example, a French version of the same file should be created at admin/language/french/module/recent_products.php.
Next, we will create one of the most important plug-in files - the controller file. Let’s go ahead and create admin/controller/module/recent_products.php with the following content.
<?php
// admin/controller/module/recent_products.php
class ControllerModuleRecentProducts extends Controller {
    private $error = array();

    public function index() {
        $this->load->language('module/recent_products');

        $this->document->setTitle($this->language->get('heading_title'));

        $this->load->model('extension/module');

        if (($this->request->server['REQUEST_METHOD'] == 'POST') && $this->validate()) {
            if (!isset($this->request->get['module_id'])) {
                $this->model_extension_module->addModule('recent_products', $this->request->post);
            } else {
                $this->model_extension_module->editModule($this->request->get['module_id'], $this->request->post);
            }

            $this->session->data['success'] = $this->language->get('text_success');

            $this->response->redirect($this->url->link('extension/module', 'token=' . $this->session->data['token'], 'SSL'));
        }

        $data['heading_title'] = $this->language->get('heading_title');

        $data['text_edit'] = $this->language->get('text_edit');
        $data['text_enabled'] = $this->language->get('text_enabled');
        $data['text_disabled'] = $this->language->get('text_disabled');

        $data['entry_name'] = $this->language->get('entry_name');
        $data['entry_limit'] = $this->language->get('entry_limit');
        $data['entry_status'] = $this->language->get('entry_status');

        $data['button_save'] = $this->language->get('button_save');
        $data['button_cancel'] = $this->language->get('button_cancel');

        if (isset($this->error['warning'])) {
            $data['error_warning'] = $this->error['warning'];
        } else {
            $data['error_warning'] = '';
        }

        if (isset($this->error['name'])) {
            $data['error_name'] = $this->error['name'];
        } else {
            $data['error_name'] = '';
        }

        $data['breadcrumbs'] = array();

        $data['breadcrumbs'][] = array(
            'text' => $this->language->get('text_home'),
            'href' => $this->url->link('common/dashboard', 'token=' . $this->session->data['token'], 'SSL')
        );

        $data['breadcrumbs'][] = array(
            'text' => $this->language->get('text_module'),
            'href' => $this->url->link('extension/module', 'token=' . $this->session->data['token'], 'SSL')
        );

        if (!isset($this->request->get['module_id'])) {
            $data['breadcrumbs'][] = array(
                'text' => $this->language->get('heading_title'),
                'href' => $this->url->link('module/recent_products', 'token=' . $this->session->data['token'], 'SSL')
            );
        } else {
            $data['breadcrumbs'][] = array(
                'text' => $this->language->get('heading_title'),
                'href' => $this->url->link('module/recent_products', 'token=' . $this->session->data['token'] . '&module_id=' . $this->request->get['module_id'], 'SSL')
            );
        }

        if (!isset($this->request->get['module_id'])) {
            $data['action'] = $this->url->link('module/recent_products', 'token=' . $this->session->data['token'], 'SSL');
        } else {
            $data['action'] = $this->url->link('module/recent_products', 'token=' . $this->session->data['token'] . '&module_id=' . $this->request->get['module_id'], 'SSL');
        }

        $data['cancel'] = $this->url->link('extension/module', 'token=' . $this->session->data['token'], 'SSL');

        if (isset($this->request->get['module_id']) && ($this->request->server['REQUEST_METHOD'] != 'POST')) {
            $module_info = $this->model_extension_module->getModule($this->request->get['module_id']);
        }

        if (isset($this->request->post['name'])) {
            $data['name'] = $this->request->post['name'];
        } elseif (!empty($module_info)) {
            $data['name'] = $module_info['name'];
        } else {
            $data['name'] = '';
        }

        if (isset($this->request->post['limit'])) {
            $data['limit'] = $this->request->post['limit'];
        } elseif (!empty($module_info)) {
            $data['limit'] = $module_info['limit'];
        } else {
            $data['limit'] = 5;
        }

        if (isset($this->request->post['status'])) {
            $data['status'] = $this->request->post['status'];
        } elseif (!empty($module_info)) {
            $data['status'] = $module_info['status'];
        } else {
            $data['status'] = '';
        }

        $data['header'] = $this->load->controller('common/header');
        $data['column_left'] = $this->load->controller('common/column_left');
        $data['footer'] = $this->load->controller('common/footer');

        $this->response->setOutput($this->load->view('module/recent_products.tpl', $data));
    }

    protected function validate() {
        if (!$this->user->hasPermission('modify', 'module/recent_products')) {
            $this->error['warning'] = $this->language->get('error_permission');
        }

        if ((utf8_strlen($this->request->post['name']) < 3) || (utf8_strlen($this->request->post['name']) > 64)) {
            $this->error['name'] = $this->language->get('error_name');
        }

        return !$this->error;
    }
}
It defines a new class for our custom plugin, which extends the base Controller class. By convention, the name of the class should mimic the directory structure in which the file is located. Therefore, the path controller/module/recent_products.php is converted to ControllerModuleRecentProducts by replacing slash and underscore characters according to the camelCase naming convention!
接下来,有一个事实上的 index 方法,当插件加载到前端时会调用该方法。所以,它是一个索引方法,定义了插件的大部分应用逻辑。
在当前应用程序的上下文中,简写 $this->load->language 加载相应的语言文件。在我们的例子中,它加载前面部分中定义的语言文件。语法非常简单,您只需传递前缀为 module/ 的插件名称即可。语言变量可以通过 $this->language->get 方法访问。
接下来,它使用文档对象的 setTitle 方法设置页面标题。
继续,简写 $this->load->model 用于加载模块模型。它是模型类,提供实用方法来保存模块参数等。
接下来,有一个重要的代码片段,如下所示,用于检查是否是 POST 数据提交,并在这种情况下保存模块配置。
if (($this->request->server['REQUEST_METHOD'] == 'POST') && $this->validate()) {
    if (!isset($this->request->get['module_id'])) {
        $this->model_extension_module->addModule('recent_products', $this->request->post);
    } else {
        $this->model_extension_module->editModule($this->request->get['module_id'], $this->request->post);
    }

    $this->session->data['success'] = $this->language->get('text_success');
    $this->response->redirect($this->url->link('extension/module', 'token=' . $this->session->data['token'], 'SSL'));
}
此外,我们还将 heading_title 和 text_edit 等语言标签分配给 $data 数组,以便我们可以使用它们在视图模板文件中。
接下来,有一个片段可以为配置页面构建正确的面包屑链接。
$data['breadcrumbs'] = array();

$data['breadcrumbs'][] = array(
    'text' => $this->language->get('text_home'),
    'href' => $this->url->link('common/dashboard', 'token=' . $this->session->data['token'], 'SSL')
);

$data['breadcrumbs'][] = array(
    'text' => $this->language->get('text_module'),
    'href' => $this->url->link('extension/module', 'token=' . $this->session->data['token'], 'SSL')
);

if (!isset($this->request->get['module_id'])) {
    $data['breadcrumbs'][] = array(
        'text' => $this->language->get('heading_title'),
        'href' => $this->url->link('module/recent_products', 'token=' . $this->session->data['token'], 'SSL')
    );
} else {
    $data['breadcrumbs'][] = array(
        'text' => $this->language->get('heading_title'),
        'href' => $this->url->link('module/recent_products', 'token=' . $this->session->data['token'] . '&module_id=' . $this->request->get['module_id'], 'SSL')
    );
}
如果模块之前已配置并处于编辑模式,则以下代码片段将填充默认模块配置。
if (isset($this->request->get['module_id']) && ($this->request->server['REQUEST_METHOD'] != 'POST')) {
    $module_info = $this->model_extension_module->getModule($this->request->get['module_id']);
}
最后,我们加载常见的页面元素,例如页眉、页脚和左侧边栏。另外,它是加载实际视图文件 recent_products.tpl 并显示配置表单的 $this->load->view 简写。
控制器文件中有一些重要的注释需要记住。您会看到很多类似 $this->load->ELEMENT 的调用,其中 ELEMENT 可以是视图、模型或语言。它加载相应的视图、模型和语言组件。
今天文章的下一个也是最后一个文件是视图模板文件admin/view/template/module/recent_products.tpl。继续创建它!
<!-- admin/view/template/module/recent_products.tpl -->
<?php echo $header; ?><?php echo $column_left; ?>
<div id="content">
<div class="page-header">
<div class="container-fluid">
<div class="pull-right">
<button type="submit" form="form-recent-products" data-toggle="tooltip" title="<?php echo $button_save; ?>" class="btn btn-primary"><i class="fa fa-save"></i></button>
<a href="<?php echo $cancel; ?>" data-toggle="tooltip" title="<?php echo $button_cancel; ?>" class="btn btn-default"><i class="fa fa-reply"></i></a></div>
<h1><?php echo $heading_title; ?></h1>
<ul class="breadcrumb">
<?php foreach ($breadcrumbs as $breadcrumb) { ?>
<li><a href="<?php echo $breadcrumb['href']; ?>"><?php echo $breadcrumb['text']; ?></a></li>
<?php } ?>
</ul>
</div>
</div>
<div class="container-fluid">
<?php if ($error_warning) { ?>
<div class="alert alert-danger"><i class="fa fa-exclamation-circle"></i> <?php echo $error_warning; ?>
<button type="button" class="close" data-dismiss="alert">×</button>
</div>
<?php } ?>
<div class="panel panel-default">
<div class="panel-heading">
<h3 class="panel-title"><i class="fa fa-pencil"></i> <?php echo $text_edit; ?></h3>
</div>
<div class="panel-body">
<form action="<?php echo $action; ?>" method="post" enctype="multipart/form-data" id="form-recent-products" class="form-horizontal">
<div class="form-group">
<label class="col-sm-2 control-label" for="input-name"><?php echo $entry_name; ?></label>
<div class="col-sm-10">
<input type="text" name="name" value="<?php echo $name; ?>" placeholder="<?php echo $entry_name; ?>" id="input-name" class="form-control" />
<?php if ($error_name) { ?>
<div class="text-danger"><?php echo $error_name; ?></div>
<?php } ?>
</div>
</div>
<div class="form-group">
<label class="col-sm-2 control-label" for="input-limit"><?php echo $entry_limit; ?></label>
<div class="col-sm-10">
<input type="text" name="limit" value="<?php echo $limit; ?>" placeholder="<?php echo $entry_limit; ?>" id="input-limit" class="form-control" />
</div>
</div>
<div class="form-group">
<label class="col-sm-2 control-label" for="input-status"><?php echo $entry_status; ?></label>
<div class="col-sm-10">
<select name="status" id="input-status" class="form-control">
<?php if ($status) { ?>
<option value="1" selected="selected"><?php echo $text_enabled; ?></option>
<option value="0"><?php echo $text_disabled; ?></option>
<?php } else { ?>
<option value="1"><?php echo $text_enabled; ?></option>
<option value="0" selected="selected"><?php echo $text_disabled; ?></option>
<?php } ?>
</select>
</div>
</div>
</form>
</div>
</div>
</div>
</div>
<?php echo $footer; ?>
眼尖的用户已经注意到它只是显示从控制器文件传递的变量。除此之外,它是显示配置表单的简单 XHTML 代码,最重要的是它具有开箱即用的响应能力。
所以,这就是我们后端自定义插件的文件设置。
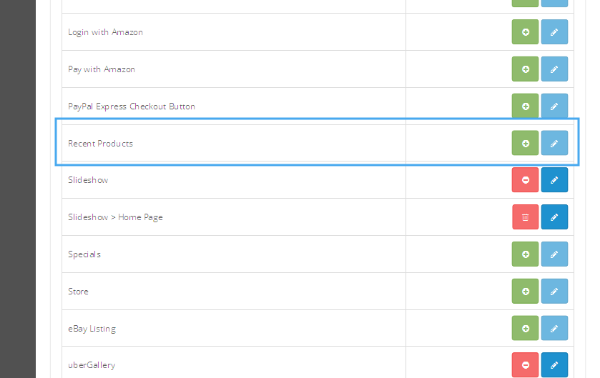
前往 OpenCart 后端并导航至扩展 > 模块。您应该在列表中看到最近的产品。单击+符号安装模块,如以下屏幕截图所示。

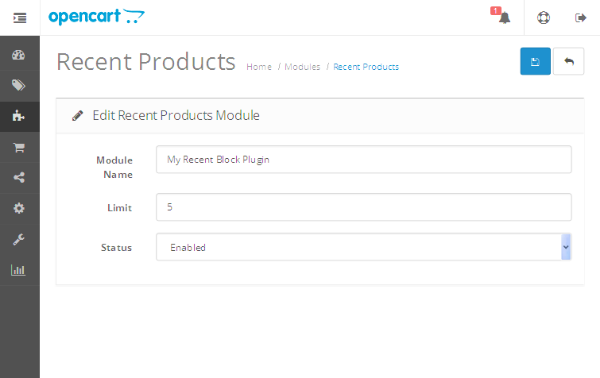
安装后,您将看到一个编辑图标。单击该按钮可打开模块配置表单。

在配置表单中,您可以设置要在前端块中显示的最近产品的数量。另外,不要忘记将状态字段设置为启用!保存模块,它应该看起来像这样。

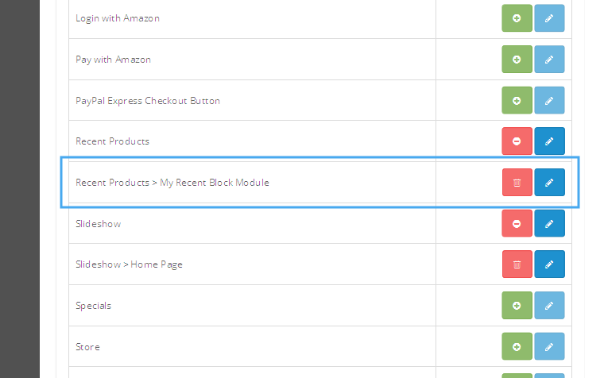
模块中有一个新条目,标题为最近的产品 > 我最近的块插件。原因是您可以为不同的页面多次复制它!
所以,我们快完成了!我们在 OpenCart 中制作了一个成熟的后端自定义插件。在下一部分中,我们将介绍它的前端对应部分,它在前端显示一个漂亮的产品块!
今天,我们讨论了 OpenCart 中的自定义插件开发。在这个由两部分组成的系列的第一部分中,我们完成了后端插件开发并创建了一个提供配置表单的工作自定义插件。
如果您正在寻找可在自己的项目或自己的教育中使用的其他 OpenCart 工具、实用程序、扩展程序等,请查看我们在市场上提供的产品。
在下一部分中,我们将通过创建在前端显示产品列表的前端部分来完成该插件。如有任何疑问和反馈,请使用下面的评论源。
The above is the detailed content of Part One: How to create a custom plugin in OpenCart 2.1.x.x. For more information, please follow other related articles on the PHP Chinese website!


