

Fixed: Cursor keeps moving to the left while typing on Windows 11

Irregular or unintentional mouse movements can disrupt tasks and be irritating. In some cases, users find that the cursor keeps moving to the left when typing in Windows 11. It stands out even more when naming or renaming files.
Surprisingly, according to reports on forums, this problem is quite common. But more often than not, it turns out to be a problem on the user side, although we can't rule out a problem with the operating system.
Why does my cursor keep moving to the left?
- Mouse settings misconfiguration
- You keep tapping the touchpad, or your hand brushes against it.
- Outdated, corrupted, or incompatible mouse driver.
- Bug in the installed version of Windows 11.
- Third-party applications that trigger conflicts.
How to stop the cursor from jumping around while typing on Windows 11?
Before we get into the slightly more complicated ones, here are some quick fixes to try:
- Connect the mouse to another USB port, or forget the device and re-establish the wireless connection. Also, plug it into another PC to verify if the problem is with the peripheral or the computer.
- Check if the files are being synced by OneDrive. In this case, wait until the process is completed, or you can disable synchronization completely.
- If using a laptop, make sure your hands are not touching the touchpad and check the back of the laptop for any pressure.
- Update Windows and unpin all apps from the taskbar, including MS Paint.
- If the typing cursor keeps moving to the left when renaming a file, right-click it > Select Properties > Enter the file name in the text field > and click OK.
If none of them work, go to the solutions listed below.
1. Disable Touchpad
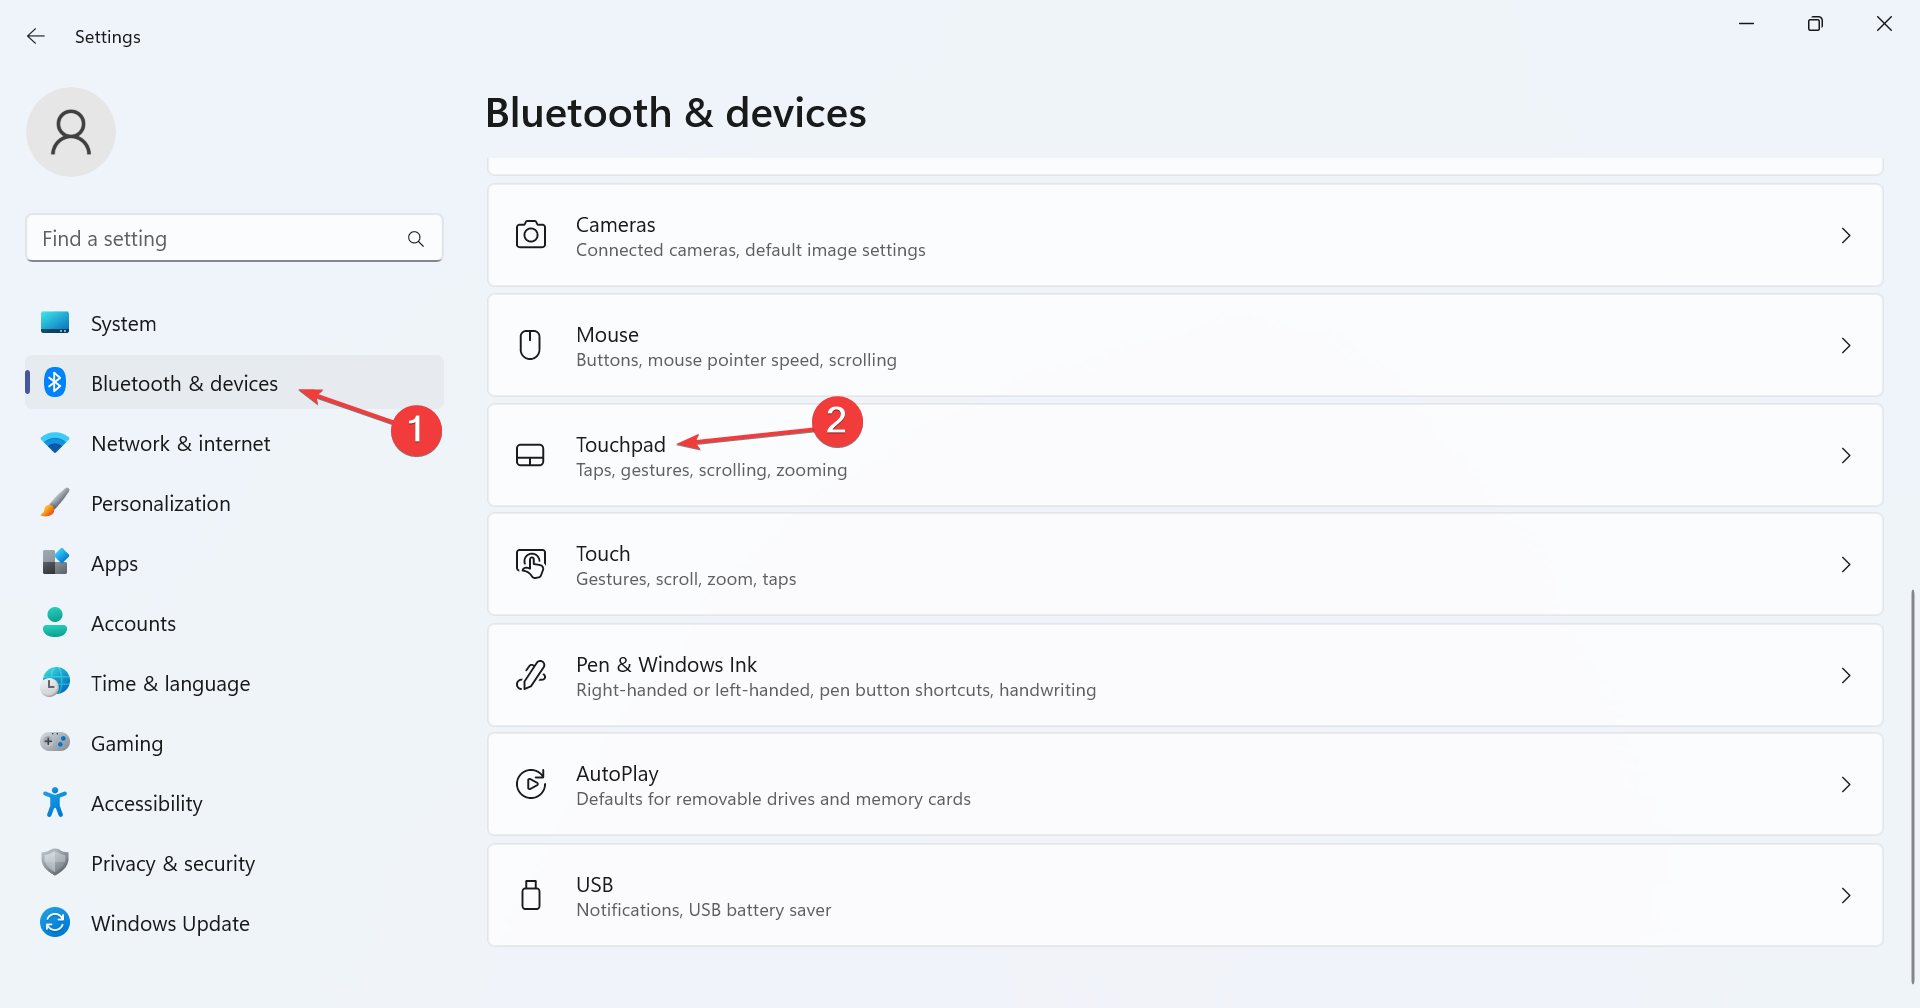
- Press to open Settings, go to Bluetooth and Devices from the navigation pane, and click Touchpad. WindowsI

- Now, disable the touchpad toggle.
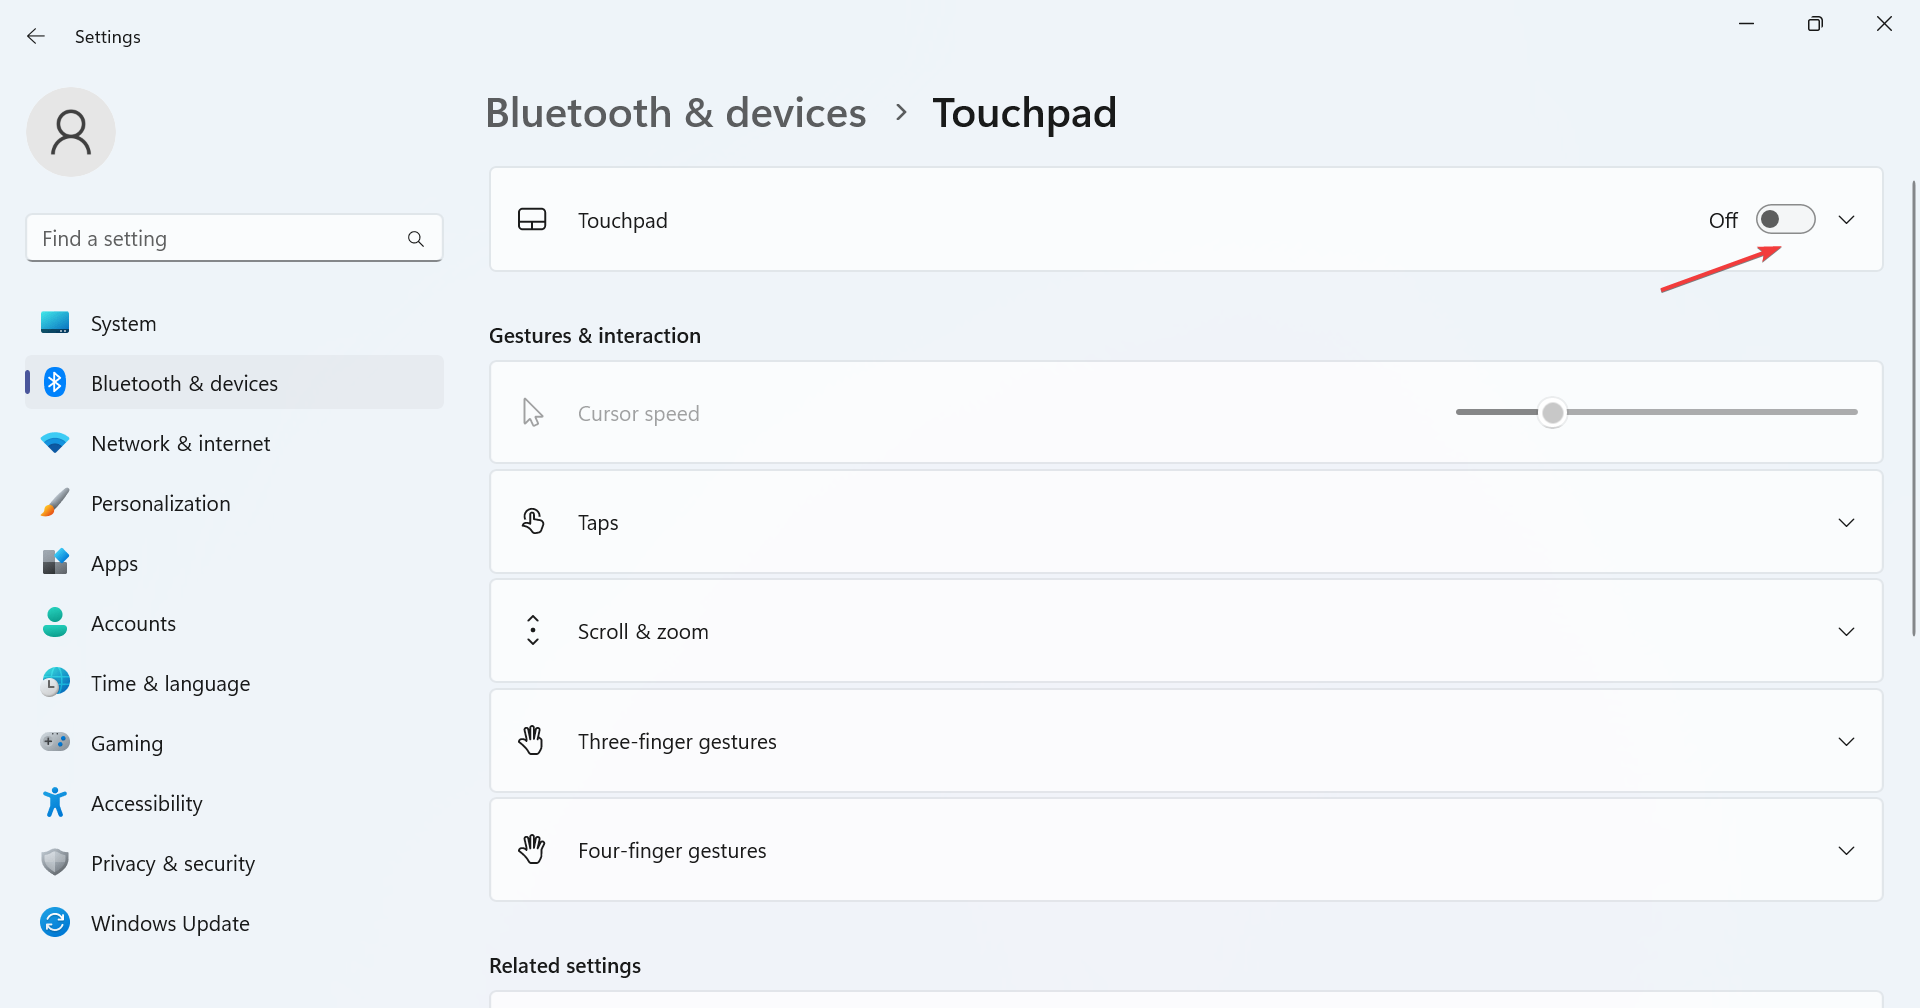
When the cursor jumps or moves on its own in a Windows 11 laptop, you may be using a touchpad and an external mouse at the same time. Verify and disable the touchpad.
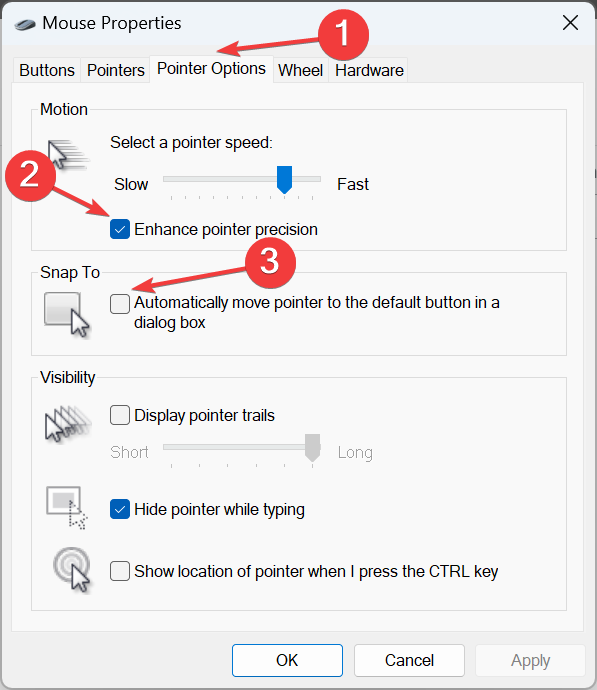
2. Change mouse settings
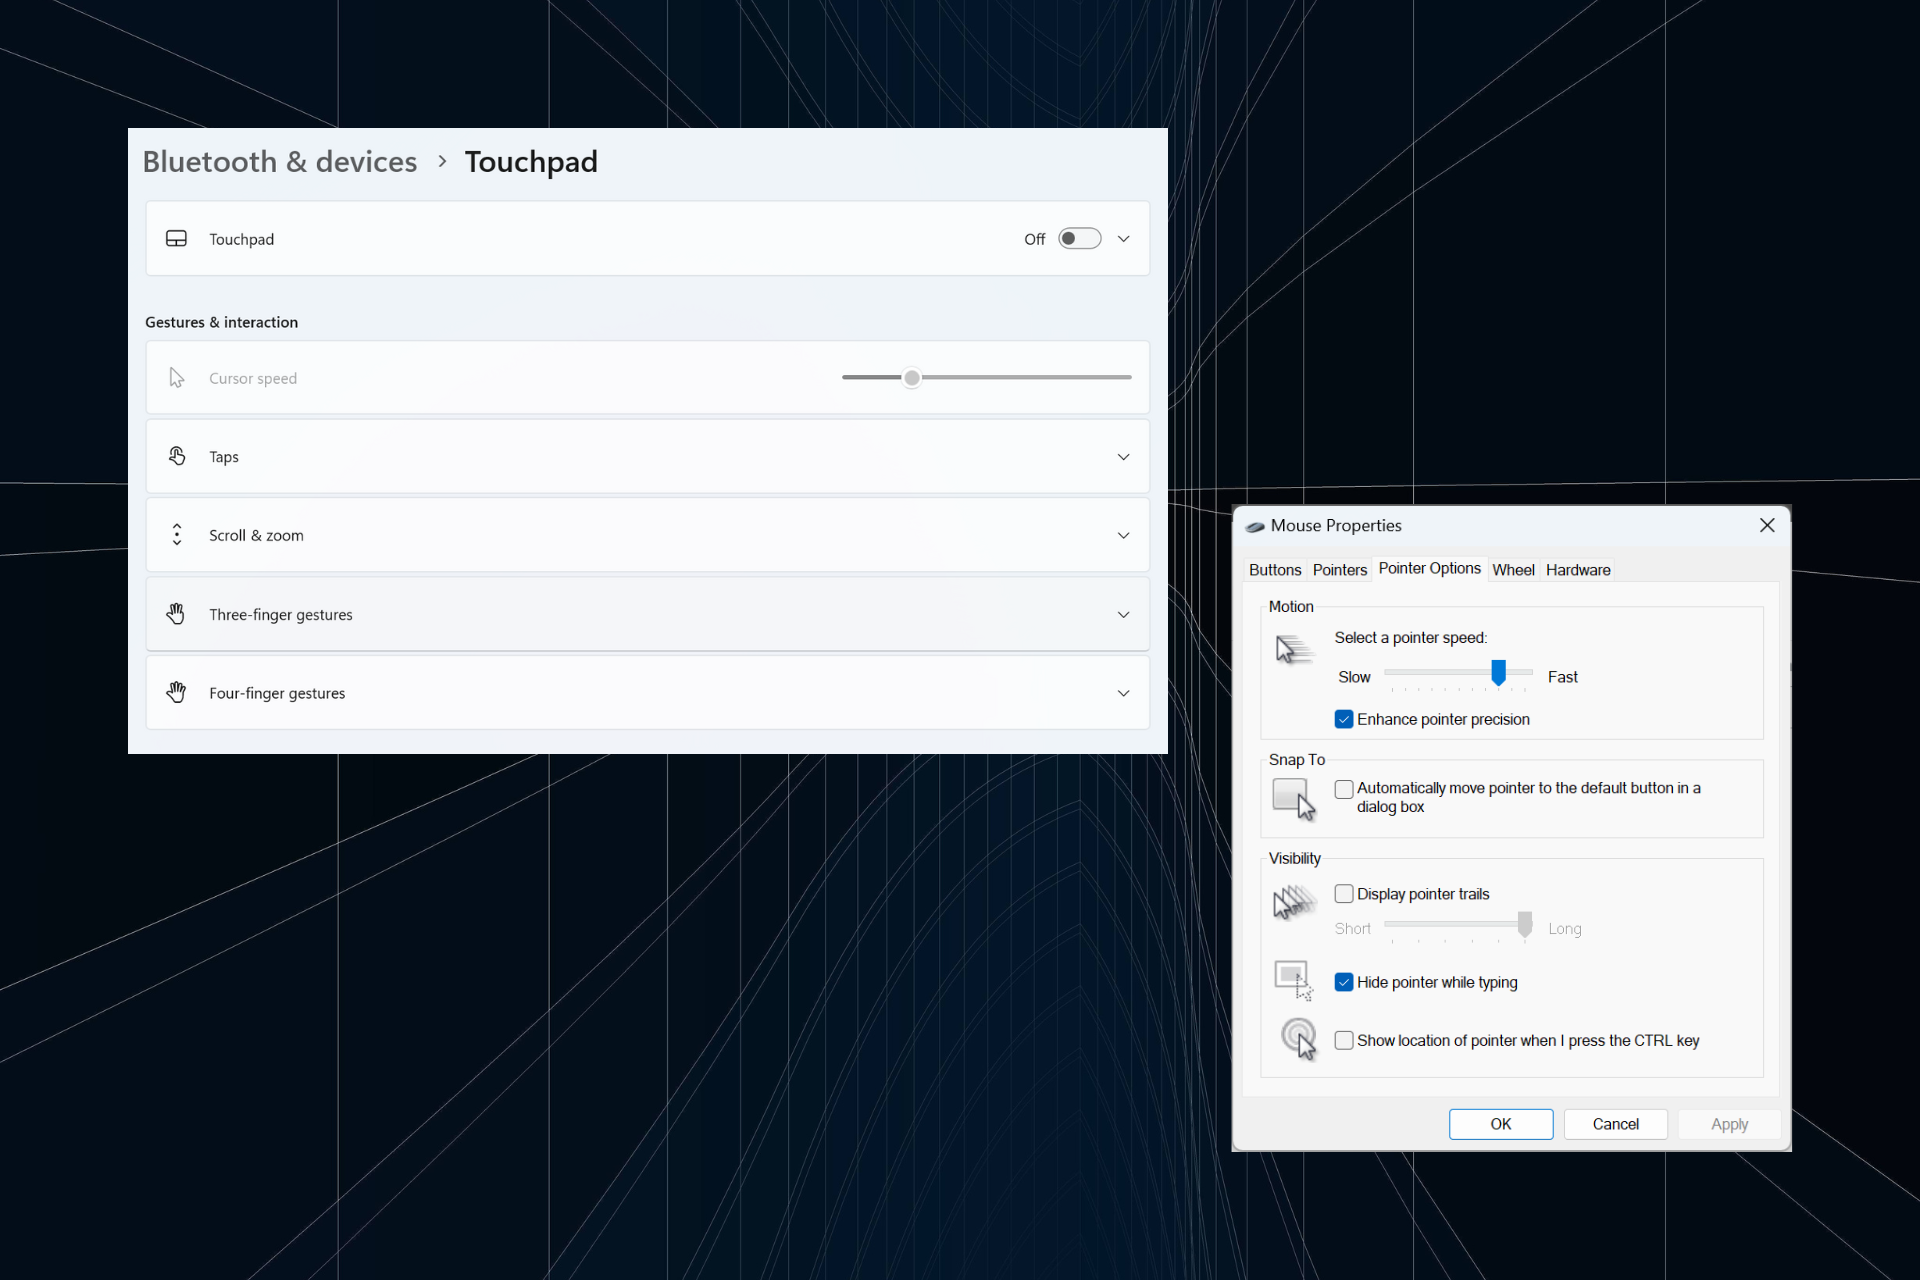
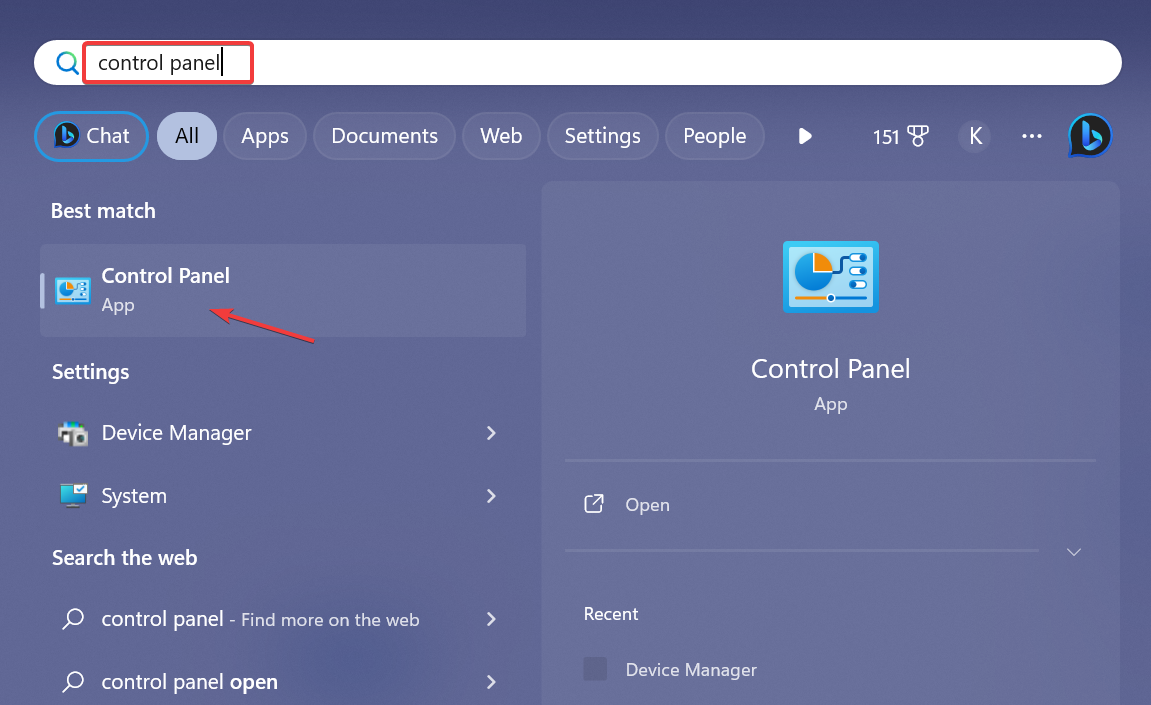
- Press to open Search, type "Control Panel" in the text field, and then click on the relevant search results. WindowsS
- Click Hardware and Sound.
- Now, click Mouse under "Devices and Printers".
- Go to the "Pointer Options" tab, check the "EnhancePointerPrecision" checkbox under "Motion", and then uncheck " "Automatically move pointer to default button" in the dialog box under Alignment.
- When finished, click "OK" to save the changes, then restart your computer and check if the problem is resolved.

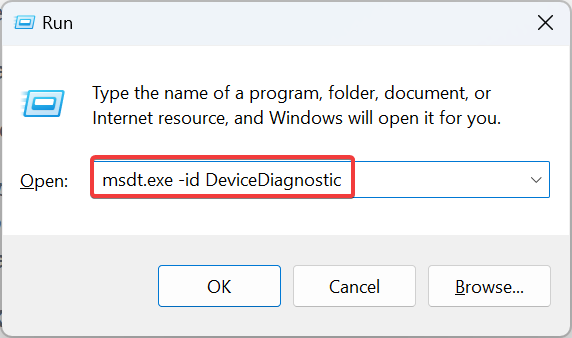
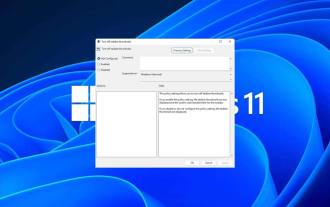
3. Run the Hardware and Devices Troubleshooter
- Press Open Run, paste the following commands, and click: WindowsREnter
<strong>msdt.exe -id DeviceDiagnostic</strong>
- Click Advanced options and check the checkbox Automatically apply Repair.
- Click Next to continue troubleshooting and let the tool identify and fix the problem.

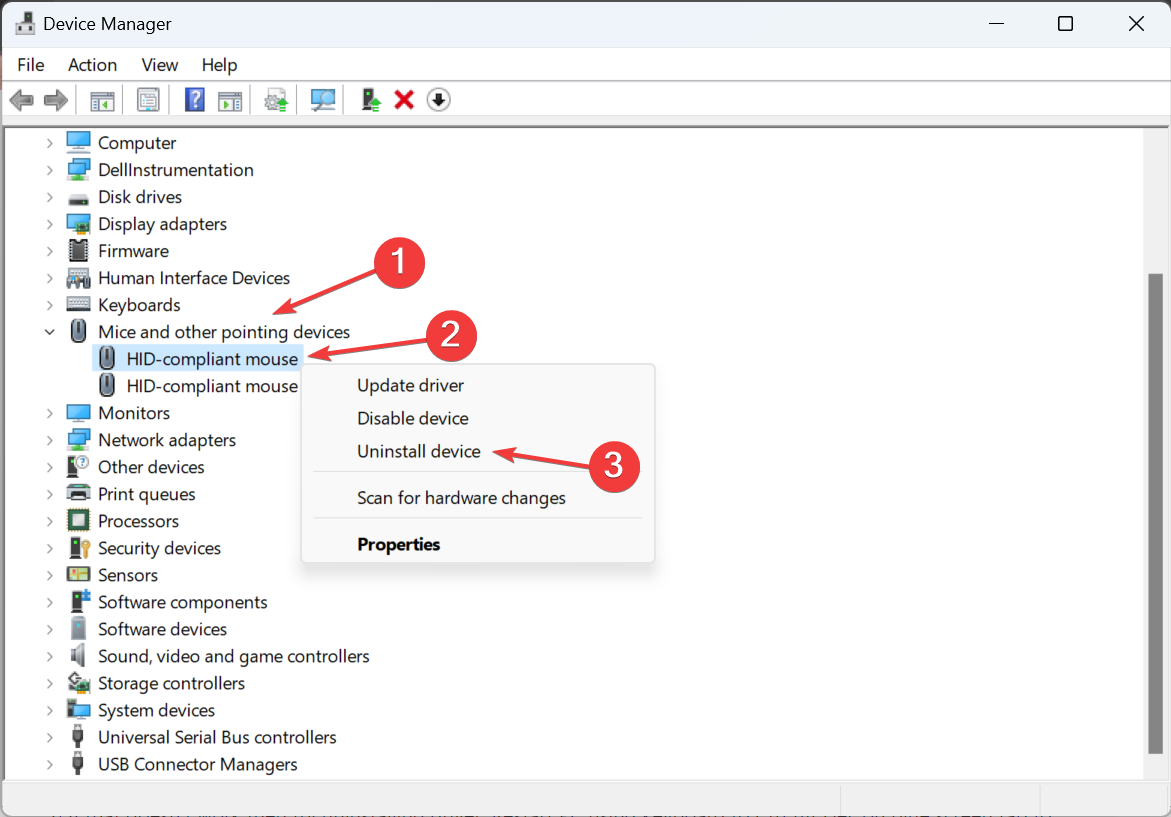
4. Reinstall the mouse driver
- Press to open the "Power User" menu and select "Device Manager" from the list of options . WindowsX
- Expand the entry for Mouse and other pointing devices, right-click the affected mouse/touchpad, and select Uninstall Device.
- If available, check the Try removing the driver for this device check box and click and then click Uninstall.
- When finished, restart your computer and verify that the cursor still moves backwards as you type.
5. Update mouse driver
- Press to open Run, type devmgmt.msc in the text field, and click OK ". WindowsR
- Double-click on mice and other pointing devices, right-click on the problematic mouse/touchpad, and select Update Driver.
- Click Search for Drivers Automatically to let Windowssearch the PC and install the best driver available.
- Finally, restart your computer for the changes to take effect.
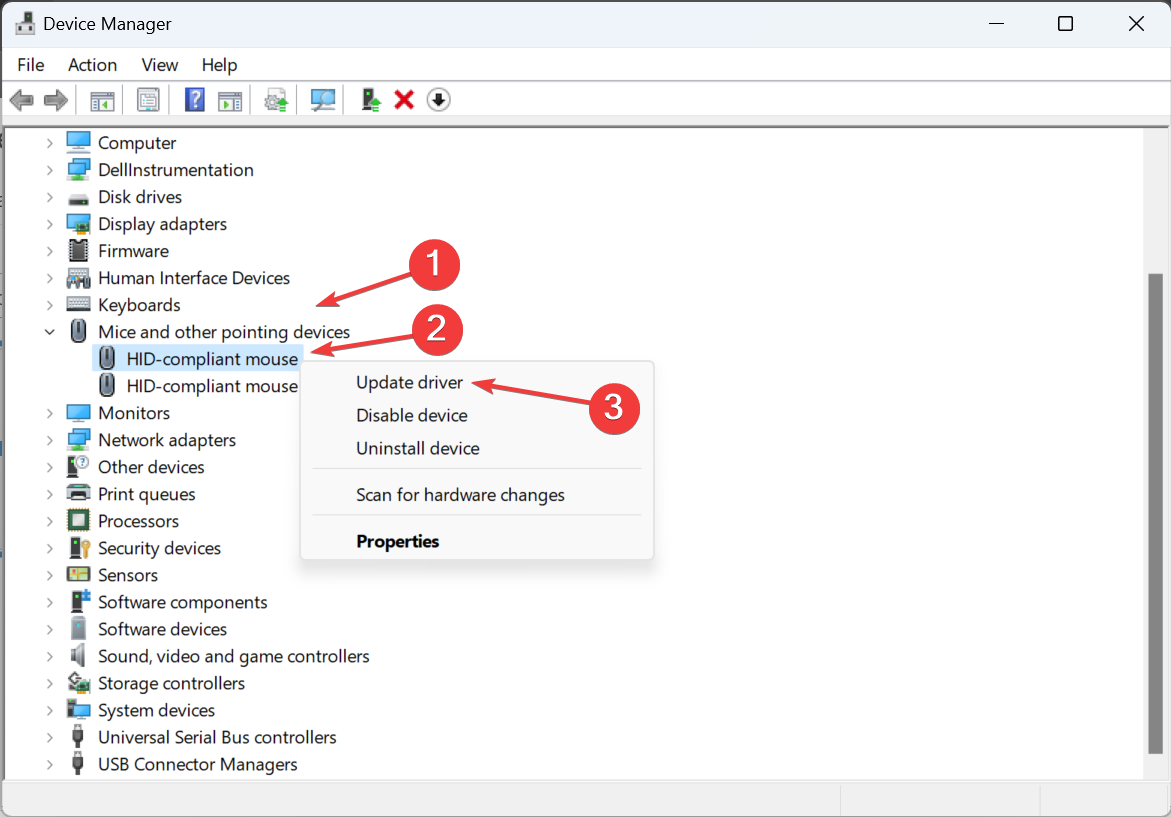
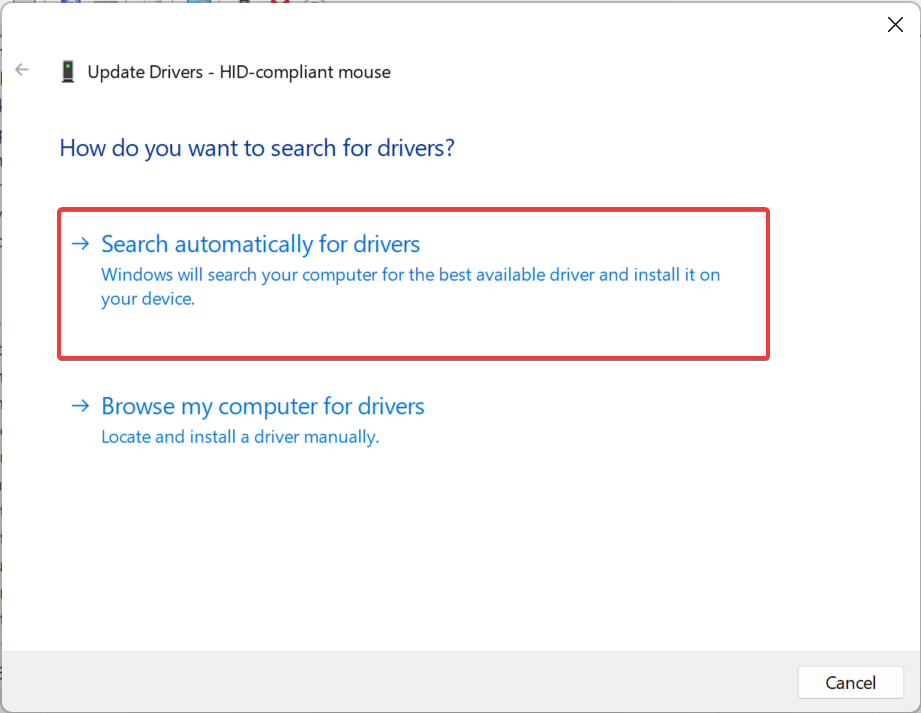
If your mouse cursor keeps moving to the left when typing in Windows 11, a quick fix is to update your mouse driver. If a newer driver is not available locally, go to the manufacturer's website, find the latest version and install the device driver manually.
For users using wireless mice, please update the Bluetooth driver at the same time.
6. Uninstall conflicting applications
- Press to open Run, type appwiz.cpl in the text field, and then click . WindowsREnter
- Select any application you think may conflict with your mouse and click Uninstall.
- Follow the on-screen instructions to complete the process.
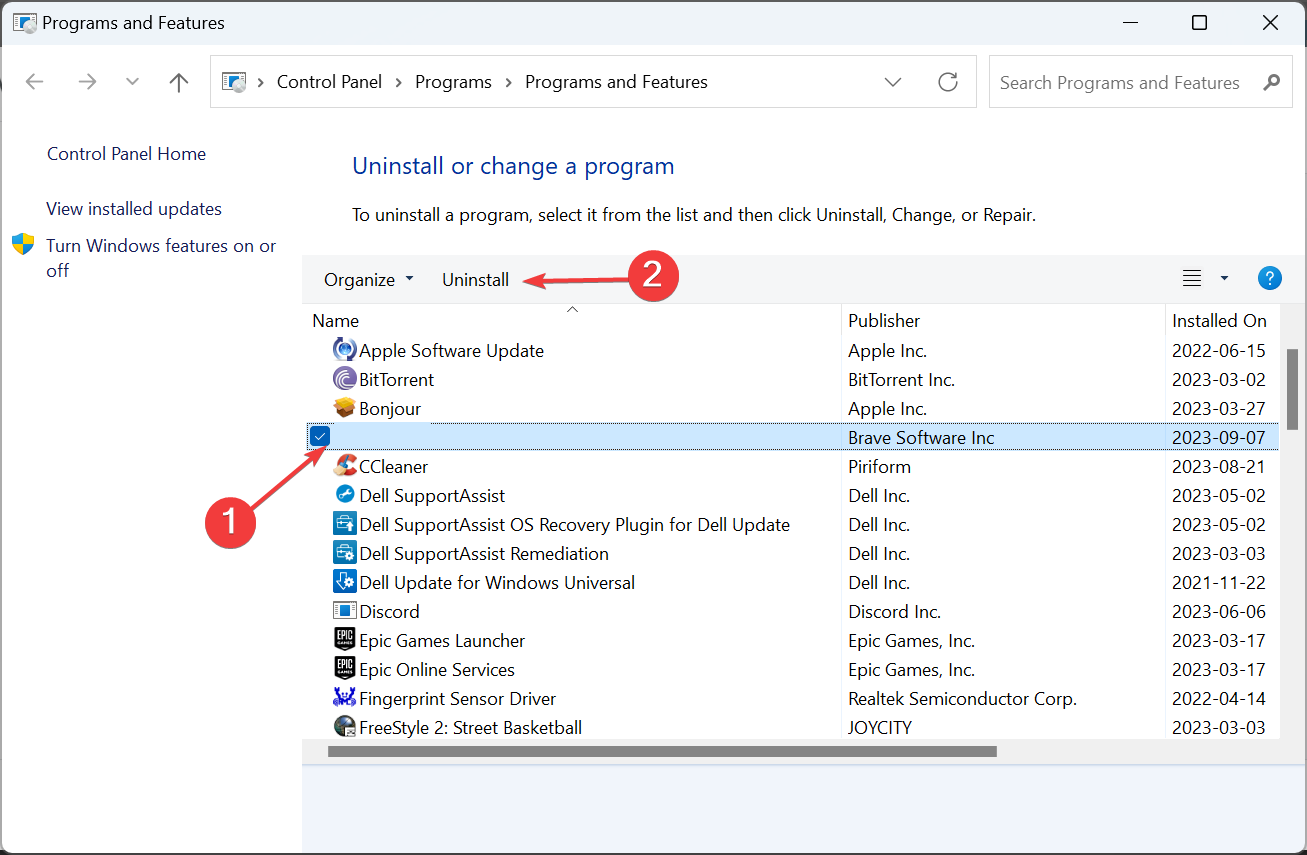
If the text cursor moves to the left on its own and the mouse selects everything, a third-party application may be to blame. So, uninstall the app to get things running.
For complete removal, we recommend using an effective uninstaller tool to clean out any remaining files and registry entries.
7. Perform an in-place upgrade
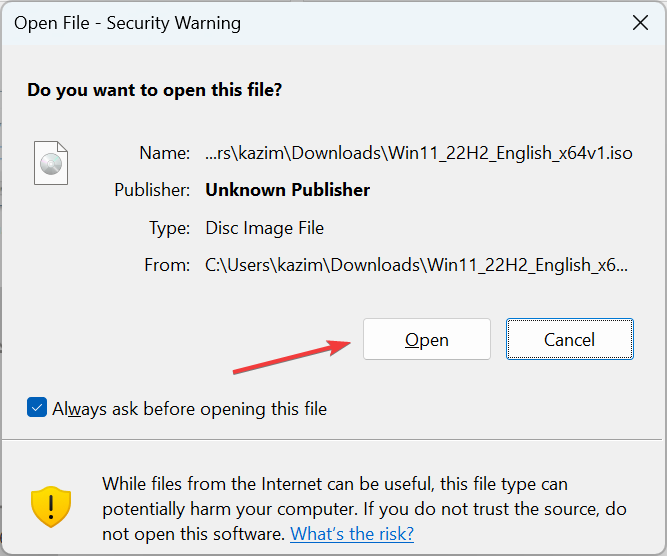
- Go to Microsoft's official website, select the installed operating system version and product language, and download the Windows 11 ISO.
- After downloading, double-click the ISO file and click Open.
- Run the installer .exe file.
- Now, click Yes at the UAC prompt.
- Click Next to continue.
- Click "Accept" to agree to the license terms.
- Finally, verify that the installer is "Preserve personal files and apps" and click Install to start the repair upgrade.
- It may take several hours to complete the repair.
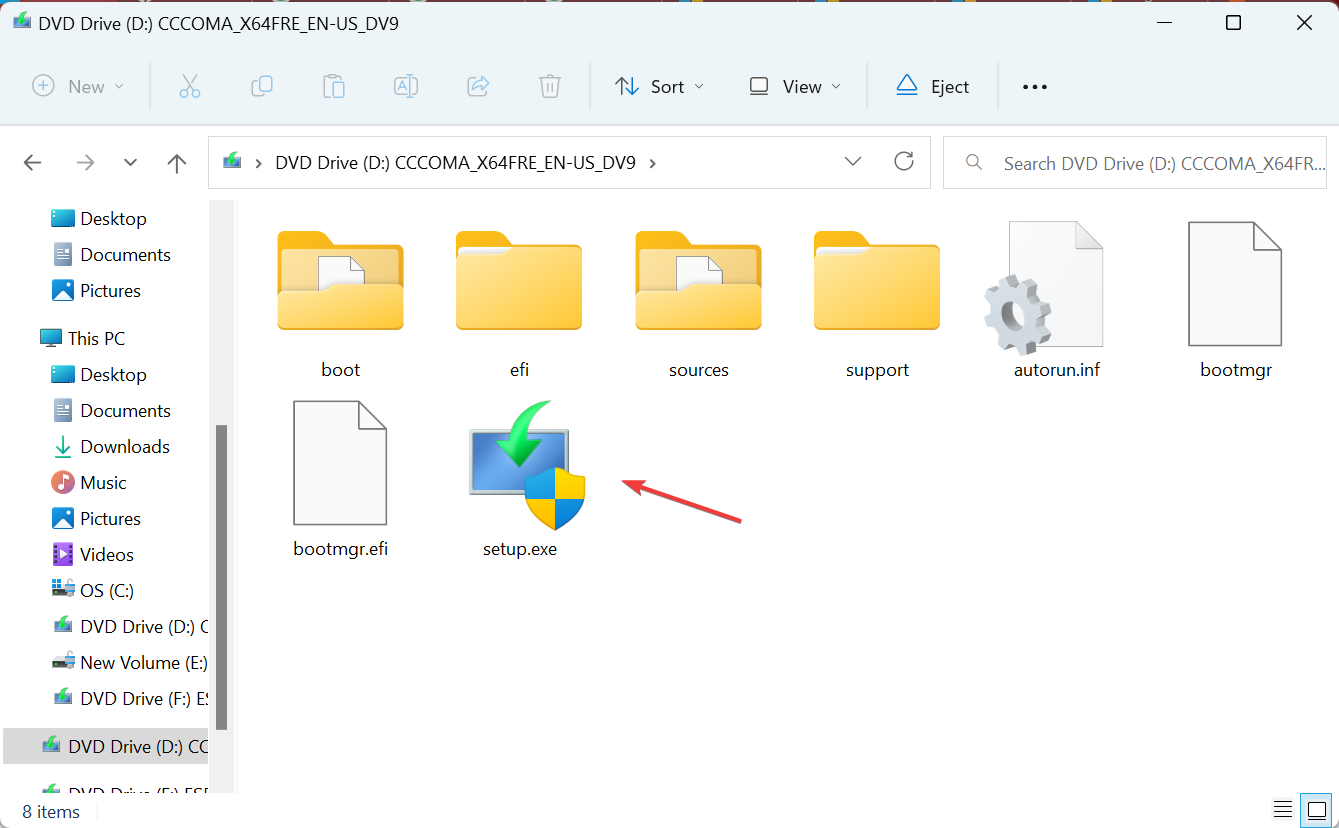

To troubleshoot any software issues, we must perform an in-place upgrade. This will reinstall all Windows files without clearing installed applications or personal data.
 Tip When none of the fixes work, it may be caused by a hardware problem and we recommend replacing your mouse. If only the touchpad is connected, have it looked at by a certified service professional.
If your mouse cursor keeps moving to the left when typing in Windows 11, check your hardware and software. Keep in mind that according to our research, most uses require a mouse replacement. If you are facing a similar situation, use a wired USB mouse.
Also, if the mouse keeps freezing or disappearing, these two issues may be related. Verify this and eliminate both problems in one fell swoop!
The above is the detailed content of Fixed: Cursor keeps moving to the left while typing on Windows 11. For more information, please follow other related articles on the PHP Chinese website!

Hot AI Tools

Undresser.AI Undress
AI-powered app for creating realistic nude photos

AI Clothes Remover
Online AI tool for removing clothes from photos.

Undress AI Tool
Undress images for free

Clothoff.io
AI clothes remover

Video Face Swap
Swap faces in any video effortlessly with our completely free AI face swap tool!

Hot Article
Hot Tools

Notepad++7.3.1
Easy-to-use and free code editor

SublimeText3 Chinese version
Chinese version, very easy to use

Zend Studio 13.0.1
Powerful PHP integrated development environment

Dreamweaver CS6
Visual web development tools

SublimeText3 Mac version
God-level code editing software (SublimeText3)
Hot Topics
 1386
1386
 52
52

 How to disable taskbar thumbnail preview in Win11? Turn off the taskbar icon display thumbnail technique by moving the mouse
Feb 29, 2024 pm 03:20 PM
How to disable taskbar thumbnail preview in Win11? Turn off the taskbar icon display thumbnail technique by moving the mouse
Feb 29, 2024 pm 03:20 PM
This article will introduce how to turn off the thumbnail function displayed when the mouse moves the taskbar icon in Win11 system. This feature is turned on by default and displays a thumbnail of the application's current window when the user hovers the mouse pointer over an application icon on the taskbar. However, some users may find this feature less useful or disruptive to their experience and want to turn it off. Taskbar thumbnails can be fun, but they can also be distracting or annoying. Considering how often you hover over this area, you may have inadvertently closed important windows a few times. Another drawback is that it uses more system resources, so if you've been looking for a way to be more resource efficient, we'll show you how to disable it. but
 HP launches Professor 1 three-mode soft mouse: 4000DPI, Blue Shadow RAW3220, initial price 99 yuan
Apr 01, 2024 am 09:11 AM
HP launches Professor 1 three-mode soft mouse: 4000DPI, Blue Shadow RAW3220, initial price 99 yuan
Apr 01, 2024 am 09:11 AM
According to news from this website on March 31, HP recently launched a Professor1 three-mode Bluetooth mouse on JD.com, available in black and white milk tea colors, with an initial price of 99 yuan, and a deposit of 10 yuan is required. According to reports, this mouse weighs 106 grams, adopts ergonomic design, measures 127.02x79.59x51.15mm, has seven optional 4000DPI levels, is equipped with a Blue Shadow RAW3220 sensor, and uses a 650 mAh battery. It is said that it can be used on a single charge. 2 months. The mouse parameter information attached to this site is as follows:
 Razer | Pokémon Gengar wireless mouse and mouse pad are now available, with a set price of 1,549 yuan
Jul 19, 2024 am 04:17 AM
Razer | Pokémon Gengar wireless mouse and mouse pad are now available, with a set price of 1,549 yuan
Jul 19, 2024 am 04:17 AM
According to news from this site on July 12, Razer today announced the launch of the Razer|Pokémon Gengar wireless mouse and mouse pad. The single product prices are 1,299 yuan and 299 yuan respectively, and the package price including the two products is 1,549 yuan. This is not the first time that Razer has launched Gengar co-branded peripheral products. In 2023, Razer launched the Gengar-style Yamata Orochi V2 gaming mouse. The two new products launched this time all use a dark purple background similar to the appearance of the Ghost, Ghost, and Gengar families. They are printed with the outlines of these three Pokémon and Poké Balls, with the character Gengar in the middle. A large, colorful image of a classic ghost-type Pokémon. This site found that the Razer|Pokémon Gengar wireless mouse is based on the previously released Viper V3 Professional Edition. Its overall weight is 55g and equipped with Razer’s second-generation FOC
 VGN co-branded 'Elden's Circle' keyboard and mouse series products are now on the shelves: Lani / Faded One custom theme, starting from 99 yuan
Aug 12, 2024 pm 10:45 PM
VGN co-branded 'Elden's Circle' keyboard and mouse series products are now on the shelves: Lani / Faded One custom theme, starting from 99 yuan
Aug 12, 2024 pm 10:45 PM
According to news from this site on August 12, VGN launched the co-branded "Elden Ring" keyboard and mouse series on August 6, including keyboards, mice and mouse pads, designed with a customized theme of Lani/Faded One. The current series of products It has been put on JD.com, priced from 99 yuan. The co-branded new product information attached to this site is as follows: VGN丨Elden Law Ring S99PRO Keyboard This keyboard uses a pure aluminum alloy shell, supplemented by a five-layer silencer structure, uses a GASKET leaf spring structure, has a single-key slotted PCB, and the original height PBT material Keycaps, aluminum alloy personalized backplane; supports three-mode connection and SMARTSPEEDX low-latency technology; connected to VHUB, it can manage multiple devices in one stop, starting at 549 yuan. VGN丨Elden French Ring F1PROMAX wireless mouse the mouse
 Microsoft Word cannot select or highlight text using mouse
Feb 20, 2024 am 09:54 AM
Microsoft Word cannot select or highlight text using mouse
Feb 20, 2024 am 09:54 AM
This article explores issues that can arise when the mouse is unable to select or highlight text in Microsoft Word, and how to resolve them. Why can't I select text in Microsoft Word? The inability to select text in MSWord may be affected by a variety of reasons, such as permission restrictions, document protection, mouse driver issues, or file corruption. Solutions to these problems are provided below. Fix Microsoft Word cannot select or highlight text using mouse If Microsoft Word cannot select or highlight text using mouse, follow the solutions mentioned below: Make sure your left mouse button is working Check if you are eligible to change the file Update the driver of your mouse
 In which folder is the Razer mouse driver located?
Mar 02, 2024 pm 01:28 PM
In which folder is the Razer mouse driver located?
Mar 02, 2024 pm 01:28 PM
Many users don't know where the files installed by their Razer drivers go. These driver files are usually installed on the system disk, which is the C drive of the computer. The specific location is in the RAZE folder under programfiles. In which folder is the Razer mouse driver located? A: In the RAZE folder under programfiles on the system C drive. Generally, the driver will be installed on the C drive, just find it according to the location. Introduction to Razer mouse driver installation method 1. After downloading the file from the official website, double-click to run the downloaded EXE file. 2. Wait for the software to load. 3. Here you can choose which driver you want to install. 4. After selecting, click "Install" in the lower right corner.
 What does mouse cpi mean?
Feb 12, 2024 pm 09:40 PM
What does mouse cpi mean?
Feb 12, 2024 pm 09:40 PM
CPI is also called countperinch. The CPI in the mouse is the sensitivity of the mouse. When using it, the higher the CPI number, the more sensitive the mouse is. Now in this article, the editor brings you an introduction to the function of the mouse CPI button. What does cpi mean? The meaning of x and y axis. The left button becomes the right button. The scroll wheel fails up and down. How to adjust the mouse and restore the mouse? What does cpi mean? Answer: The number of coordinate points fed back per inch during dynamic movement is the sensitivity of the mouse. Button function introduction: 1. Adjust the mouse movement speed button; 2. Adjust the mouse sensitivity by pressing the cpi key; 3. Dynamic indicators to measure mouse sensitivity; 4. The CPI can be freely adjusted between 500/1000CPI;
 Windows 10 only shows black screen and mouse after logging in
Dec 28, 2023 pm 04:10 PM
Windows 10 only shows black screen and mouse after logging in
Dec 28, 2023 pm 04:10 PM
The win10 system is the most common system used in computers today. In the process of using the win10 system, some system shortcomings have gradually become apparent. Many friends have recently reported that the desktop of win10 does not work after booting. There is no normal display but a black screen with only a mouse cursor. This problem is actually very easy to solve! Today, the editor has brought you a solution for Win10 desktop with black screen and only mouse. If you are in need, please come and take a look. Tutorial to solve the problem of black screen with only mouse graphics and text after win10 login: Operation method: 1. Right-click on the start menu and select 2. Click "Other Power Settings" 3. Click 4 on the left. In "Define Power Buttons and Enable Password Protection" ” interface click “Change the current