

On Windows 11 or 10, use Powershell or CMD to install the Azure CLI

Prerequisites
To complete this tutorial, the user must have the following:
- Windows OS 10 or 11 with administrative rights.
- PowerShell access to use the Azure CLI
- Internet connection to download the files required to install the Azure CLI
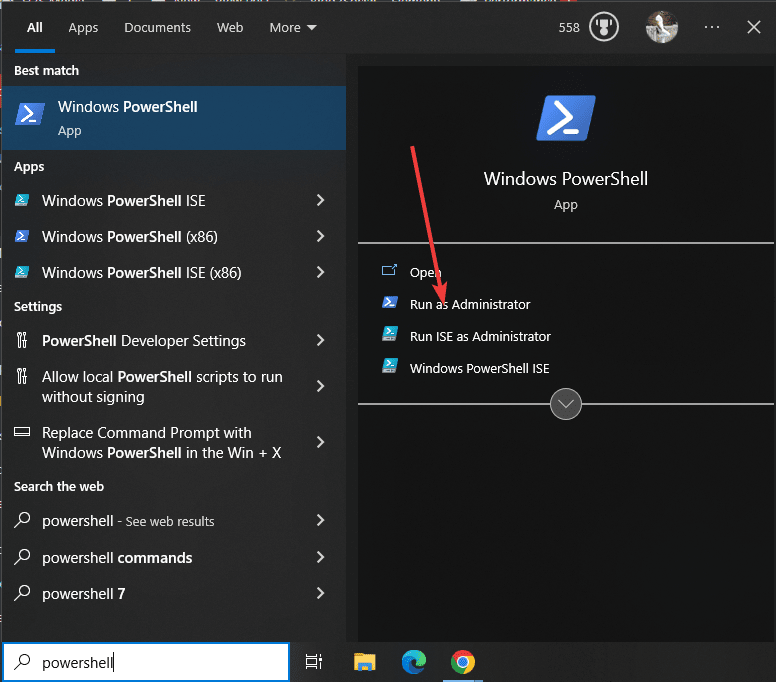
Step 1: Open PowerShell
Here, we are using PowerShell to install the Azure CLI tool, however, the steps for the command prompt will be the same as well. So, first, open any of them you want to use with admin permissions.
To do this, click the WindowsStart button and search for PowerShell, then hover over it and select "Run as administrator " option.
Step 2: Check Winget Availability
The main motivation for this tutorial is to install Azure on Windows using only the command line. Therefore, we will not visit any website to obtain the executable file of this CLI tool. So, like Linux, we also have a package manager in Windows 10 and 11 systems, also known as "Winget". To check if it is available, run the given command and you will see its version number in the output.
1 |
|
Step 3: Install Azure CLI on Windows 10 or 11
In this step, we will execute the "winget" command which will not only download the latest available Azure CLI tool settings , the same setup can even be installed without user intervention.
1 |
|
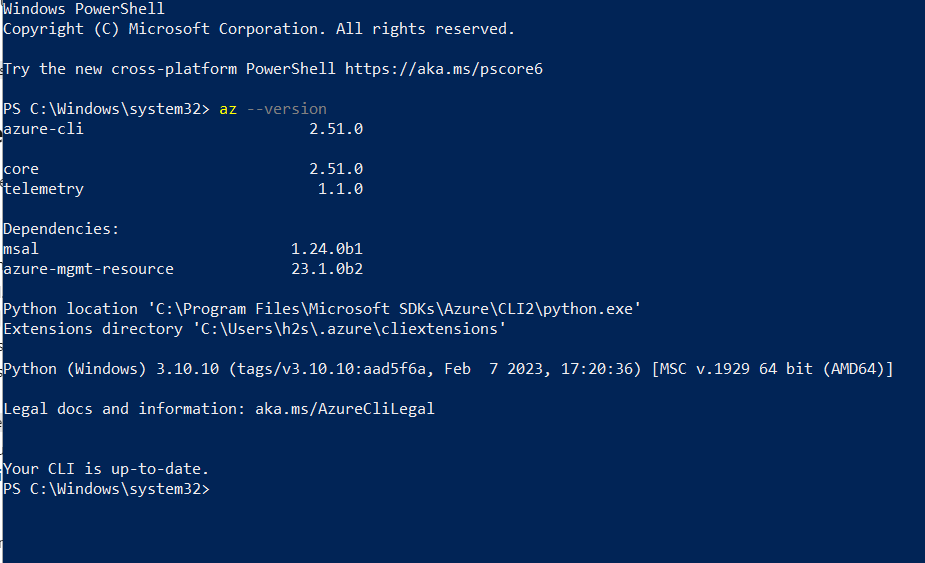
Step 4: Azure CLI Version
After completing the installation, first close the PowerShell or Command Prompt that you used to install it. Then open it again so that we can identify the path to the installed Azure CLI tool on our system. Once done, type the given command on CMD or Powershell and it will not only provide the only current version of the tool but also the extension directory of Azure CLI.
1 |
|
Uninstall (optional)
It is also very easy to remove Azure CLI from Windows if you do not need to use the command terminal. Use the same Winget package manager, but this time use the "uninstall" parameter.
1 |
|

Now we have the Azure CLI installed on Windows, but using only the CLI. You can further check out the official documentation available on the Microsoft website for this tool to manage Azure resources, automate tasks, and streamline cloud management workflows.
The above is the detailed content of On Windows 11 or 10, use Powershell or CMD to install the Azure CLI. For more information, please follow other related articles on the PHP Chinese website!

Hot AI Tools

Undresser.AI Undress
AI-powered app for creating realistic nude photos

AI Clothes Remover
Online AI tool for removing clothes from photos.

Undress AI Tool
Undress images for free

Clothoff.io
AI clothes remover

Video Face Swap
Swap faces in any video effortlessly with our completely free AI face swap tool!
Hot Article
Hot Tools

Notepad++7.3.1
Easy-to-use and free code editor

SublimeText3 Chinese version
Chinese version, very easy to use

Zend Studio 13.0.1
Powerful PHP integrated development environment

Dreamweaver CS6
Visual web development tools

SublimeText3 Mac version
God-level code editing software (SublimeText3)
Hot Topics
 1387
1387
 52
52

 How to run SUDO commands in Windows 11/10
Mar 09, 2024 am 09:50 AM
How to run SUDO commands in Windows 11/10
Mar 09, 2024 am 09:50 AM
The sudo command allows users to run commands in elevated privilege mode without switching to superuser mode. This article will introduce how to simulate functions similar to sudo commands in Windows systems. What is the Shudao Command? Sudo (short for "superuser do") is a command-line tool that allows users of Unix-based operating systems such as Linux and MacOS to execute commands with elevated privileges typically held by administrators. Running SUDO commands in Windows 11/10 However, with the launch of the latest Windows 11 Insider preview version, Windows users can now experience this feature. This new feature enables users to
 How to check the MAC address of the network card in Win11? How to use the command to obtain the MAC address of the network card in Win11
Feb 29, 2024 pm 04:34 PM
How to check the MAC address of the network card in Win11? How to use the command to obtain the MAC address of the network card in Win11
Feb 29, 2024 pm 04:34 PM
This article will introduce readers to how to use the command prompt (CommandPrompt) to find the physical address (MAC address) of the network adapter in Win11 system. A MAC address is a unique identifier for a network interface card (NIC), which plays an important role in network communications. Through the command prompt, users can easily obtain the MAC address information of all network adapters on the current computer, which is very helpful for network troubleshooting, configuring network settings and other tasks. Method 1: Use "Command Prompt" 1. Press the [Win+X] key combination, or [right-click] click the [Windows logo] on the taskbar, and in the menu item that opens, select [Run]; 2. Run the window , enter the [cmd] command, and then
 cmdtelnet command is not recognized as an internal or external command
Jan 03, 2024 am 08:05 AM
cmdtelnet command is not recognized as an internal or external command
Jan 03, 2024 am 08:05 AM
The cmd window prompts that telnet is not an internal or external command. This problem must have deeply troubled you. This problem does not appear because there is anything wrong with the user's operation. Users do not need to worry too much. All it takes is a few small steps. Operation settings can solve the problem of cmd window prompting telnet is not an internal or external command. Let’s take a look at the solution to the cmd window prompting telnet is not an internal or external command brought by the editor today. The cmd window prompts that telnet is not an internal or external command. Solution: 1. Open the computer's control panel. 2. Find programs and functions. 3. Find Turn Windows features on or off on the left. 4. Find “telnet client
 Where is hyperv enhanced session mode? Tips for enabling or disabling Hyper-V enhanced session mode using commands in Win11
Feb 29, 2024 pm 05:52 PM
Where is hyperv enhanced session mode? Tips for enabling or disabling Hyper-V enhanced session mode using commands in Win11
Feb 29, 2024 pm 05:52 PM
In Win11 system, you can enable or disable Hyper-V enhanced session mode through commands. This article will introduce how to use commands to operate and help users better manage and control Hyper-V functions in the system. Hyper-V is a virtualization technology provided by Microsoft. It is built into Windows Server and Windows 10 and 11 (except Home Edition), allowing users to run virtual operating systems in Windows systems. Although virtual machines are isolated from the host operating system, they can still use the host's resources, such as sound cards and storage devices, through settings. One of the key settings is to enable Enhanced Session Mode. Enhanced session mode is Hyper
 Super practical! Sar commands that will make you a Linux master
Mar 01, 2024 am 08:01 AM
Super practical! Sar commands that will make you a Linux master
Mar 01, 2024 am 08:01 AM
1. Overview The sar command displays system usage reports through data collected from system activities. These reports are made up of different sections, each containing the type of data and when the data was collected. The default mode of the sar command displays the CPU usage at different time increments for various resources accessing the CPU (such as users, systems, I/O schedulers, etc.). Additionally, it displays the percentage of idle CPU for a given time period. The average value for each data point is listed at the bottom of the report. sar reports collected data every 10 minutes by default, but you can use various options to filter and adjust these reports. Similar to the uptime command, the sar command can also help you monitor the CPU load. Through sar, you can understand the occurrence of excessive load
 Artifact in Linux: Principles and Applications of eventfd
Feb 13, 2024 pm 08:30 PM
Artifact in Linux: Principles and Applications of eventfd
Feb 13, 2024 pm 08:30 PM
Linux is a powerful operating system that provides many efficient inter-process communication mechanisms, such as pipes, signals, message queues, shared memory, etc. But is there a simpler, more flexible, and more efficient way to communicate? The answer is yes, that is eventfd. eventfd is a system call introduced in Linux version 2.6. It can be used to implement event notification, that is, to deliver events through a file descriptor. eventfd contains a 64-bit unsigned integer counter maintained by the kernel. The process can read/change the counter value by reading/writing this file descriptor to achieve inter-process communication. What are the advantages of eventfd? It has the following features
 How to delete win11 widgets? One command to uninstall Windows 11 widgets function tips
Apr 11, 2024 pm 05:19 PM
How to delete win11 widgets? One command to uninstall Windows 11 widgets function tips
Apr 11, 2024 pm 05:19 PM
Widgets are a new feature of the Win11 system. They are turned on by default. However, it is inevitable that some users do not use widgets very much and want to disable them because they take up space. So how should they do this? The editor below will teach you how to operate it, and you can try it out. What are widgets? Widgets are small cards that display dynamic content from your favorite apps and services on your Windows desktop. They appear on the widget board, where you can discover, pin, unpin, arrange, resize, and customize widgets to reflect your interests. The widget board is optimized to display relevant widgets and personalized content based on usage. Open the widget panel from the left corner of the taskbar, where you can see live weather
 What is the correct way to restart a service in Linux?
Mar 15, 2024 am 09:09 AM
What is the correct way to restart a service in Linux?
Mar 15, 2024 am 09:09 AM
What is the correct way to restart a service in Linux? When using a Linux system, we often encounter situations where we need to restart a certain service, but sometimes we may encounter some problems when restarting the service, such as the service not actually stopping or starting. Therefore, it is very important to master the correct way to restart services. In Linux, you can usually use the systemctl command to manage system services. The systemctl command is part of the systemd system manager