

How to change the height of br tag?


The tag is a commonly used HTML element used to add line breaks in web content. Sometimes, however, the pre-existing height of line discontinuity may be deemed insufficient and the gaps between consecutive lines of written material need to be increased. In this discussion, we'll explore various ways to modify the height of the
tag, including using the CSS line-height property and adding auxiliary wrapping elements. Whether you are a beginner or an experienced web developer, this manual will give you a comprehensive understanding of how to adjust the height of the
tag in your web design.
method
We will see two different ways to visibly change the height of the br tag. They are as follows -
Use CSS line-height property
Add extra newlines
Method 1: Use CSS line-height property
The standard technique for modifying the height of line breaks is to utilize a CSS property called line-height. This attribute is used to adjust the height of text lines, and can also be used on the parent element of the
mark to expand the gap between lines.
This code block renders an HTML document that contains a header describing the task to be accomplished and a paragraph component containing several lines of written language, separated by the "br" tag. The CSS style applied to this paragraph element specifies a "line-height" of 3, which causes vertical spacing between lines of text to be three times the regular line height.
Example
Here is the final code we will use in this example -
<!DOCTYPE html>
<html>
<head>
   <title>How to change the height of br tag?</title>
   <style>
      p {
         line-height: 3;
      }
   </style>
</head>
<body>
   <h4 id="How-to-change-the-height-of-br-tag">How to change the height of br tag?</h4>
   <p>
      This is some text in line 1.
      <br>
      This is some text in line 2.
   </p>
</body>
</html>
Method 2: Add extra newlines
Another way to change the newline height is to add additional
markers. This will create more space between lines of text, which is especially useful when the line-height property is not enough.
Example
The code below is an effortless sequence of instructions. As can be seen, a large number of
tags are used to enhance the perceptibility of the vertical span between two consecutive lines of writing or printing.
<!DOCTYPE html>
<html>
<head>
   <title>How to change the height of br tag?</title>
</head>
<body>
   <h4 id="How-to-change-the-height-of-br-tag">How to change the height of br tag?</h4>
   <p>
      This is some text in line 1.
      <br><br><br>
      This is some text in line 2.
   </p>
</body>
</html>
In summary, the vertical size of the
tag can be modified by using the CSS line-height property and supplementing it with a line break element. Mastering the technique of adjusting the height of the
tag is an important aspect of web development and a highly beneficial ability to create visually appealing web content with exceptional line spacing.
tag is important to optimizing the user experience on your website. By following the methods outlined in this article, you can easily modify the height of the
mark to suit the requirements of your specific task.
The above is the detailed content of How to change the height of br tag?. For more information, please follow other related articles on the PHP Chinese website!

Hot AI Tools

Undresser.AI Undress
AI-powered app for creating realistic nude photos

AI Clothes Remover
Online AI tool for removing clothes from photos.

Undress AI Tool
Undress images for free

Clothoff.io
AI clothes remover

AI Hentai Generator
Generate AI Hentai for free.

Hot Article
Hot Tools

Notepad++7.3.1
Easy-to-use and free code editor

SublimeText3 Chinese version
Chinese version, very easy to use

Zend Studio 13.0.1
Powerful PHP integrated development environment

Dreamweaver CS6
Visual web development tools

SublimeText3 Mac version
God-level code editing software (SublimeText3)
Hot Topics


 How to change the storage location of wallpaper engine? How to set the save path in wallpaper engine
Mar 13, 2024 pm 12:40 PM
How to change the storage location of wallpaper engine? How to set the save path in wallpaper engine
Mar 13, 2024 pm 12:40 PM
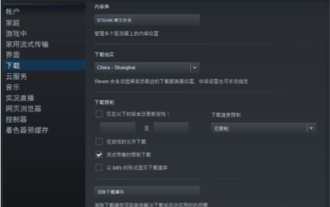
Many users like to download various wallpapers and videos on WallpaperEngine. Over time, they will find that more and more wallpapers are downloaded, resulting in insufficient hard disk space. At this time, the storage location of WallpaperEngine can be changed to reduce the space occupied. So let’s take a look at how to change the save path for wallpaperengine. Step 1: Click Settings under steam in the upper left corner to open the following interface. Step 2: Click Download to find the "Steam Library Folder" under the content library, and click Open above. Step 3: Click Add Library Folder, select the path you want to change to, and after adding it, right-click on the default column.
 4 steps to change user folder names on Windows 11
Jul 07, 2023 pm 02:33 PM
4 steps to change user folder names on Windows 11
Jul 07, 2023 pm 02:33 PM
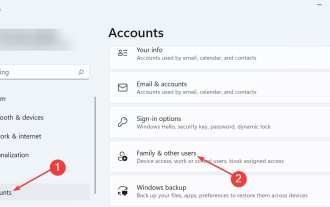
User folder names and account names are set during user account setup. However, sometimes for some reason, you need to change your user folder name on Windows 11. Unlike renaming a standard folder, this process is not that simple. But with the right information, the process can be effortless, and that's what we've got you covered in this guide. Is it safe to rename my user folder name? As mentioned before, changing user folder names on Windows 11 is not as simple as renaming a normal folder. Even if you change the user account name, the user folder name will remain the same. Microsoft recommends not changing your user folder name as this may cause some applications to
 How to change the font color of win7 desktop icons
Jan 02, 2024 pm 11:17 PM
How to change the font color of win7 desktop icons
Jan 02, 2024 pm 11:17 PM
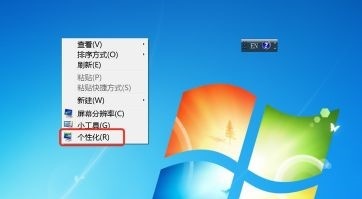
The default desktop icon font of win7 is generally white. If we use a white desktop background, the desktop icon text may not be visible. At this time, we can customize the desktop font color through the advanced appearance settings in the personalization settings. The following is Let’s take a look together. Tutorial on changing the font color of win7 desktop icons 1. Right-click a blank space on the desktop and open the "Personalization" settings. 2. Under Theme, we can directly select the desired theme to change the font color of desktop icons. 3. If you are not satisfied with these themes, you can also turn on the "Window Color" as shown in the picture. 4. Click "Advanced Appearance Settings" below 5. Change the "Project" at the icon location to "Desktop" 6. Then you can change various attributes such as font color and size in the red box
 How to adjust the font, style, and size of Notepad in Windows 11
Sep 23, 2023 pm 11:25 PM
How to adjust the font, style, and size of Notepad in Windows 11
Sep 23, 2023 pm 11:25 PM
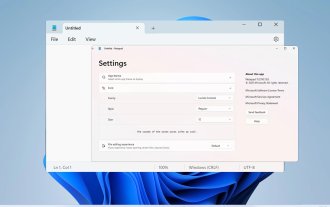
Many users want to change the font in Notepad on Windows 11 because the default font is too small or difficult to read for them. Changing fonts is quick and easy, and in this guide, we'll show you how to customize Notepad and change the font to suit your needs. What font does Windows 11 Notepad use by default? As for the default font options, Notepad uses the Consolas font and the default font size is set to 11 pixels. How to change Notepad font size and style in Windows 11? Use the Edit menu in Notepad to click the search button and type notepad. Select Notepad from the list of results. In Notepad, click the Edit menu and select Fonts. You should now see the settings in the left pane
 How to change region settings on xbox store
Dec 24, 2023 pm 08:53 PM
How to change region settings on xbox store
Dec 24, 2023 pm 08:53 PM
When the game you want to buy is not available, you can purchase it by changing the region. Do any players know how to change the region settings in the Xbox store? So let’s take a look at the introduction to changing the region settings in the Xbox store! Xbox store region settings: 1. Open windows settings - select time and language. 2. Select the region - the default should be China - select other countries and regions. 3. Select other countries and regions - enter the store - the store prompts you to refresh the content.
 Step-by-step guide to changing background color with Eclipse
Jan 28, 2024 am 08:28 AM
Step-by-step guide to changing background color with Eclipse
Jan 28, 2024 am 08:28 AM
Teach you step by step how to change the background color in Eclipse, specific code examples are required Eclipse is a very popular integrated development environment (IDE) that is often used to write and debug Java projects. By default, the background color of Eclipse is white, but some users may wish to change the background color to suit their preference or to reduce eye strain. This article will teach you step by step how to change the background color in Eclipse and provide specific code examples. Step 1: Open Eclipse First
 Teach you how to modify the temporary file location of Win7
Jan 04, 2024 pm 11:25 PM
Teach you how to modify the temporary file location of Win7
Jan 04, 2024 pm 11:25 PM
The temp folder is our temporary file storage location. The system will save temporary files to this folder. If there are too many temporary files, especially when the temp folder is on the system disk, it is likely to affect the system running speed. We can solve the problem by changing the temp location. Let’s take a look below. Tutorial on changing the location of win7temp 1. First, right-click "Computer" and open "Properties" 2. Click "Advanced System Settings" on the left 3. Click "Environment Variables" below 4. Select "temp" and click "Edit" 5. Then change Just change the "Variable Value" to the path that needs to be changed.
 Teach you how to modify the startup sequence of win7
Jan 04, 2024 pm 09:06 PM
Teach you how to modify the startup sequence of win7
Jan 04, 2024 pm 09:06 PM
Properly setting the startup sequence of win7 can make our computer boot faster, but many friends don’t know how to change the startup sequence. In fact, we can change it in the registry editor. Let’s take a look at it with the editor. A specific method. Tutorial on changing the win7 startup sequence 1. Search for "Run" in the lower left corner. 2. Open the "Run" program. 3. Enter “regedit” and press Enter to confirm. 4. Find the following path "HKEY_LOCAL_MACHINE\SYSTEM\CurrentControlSet\Control\ServiceGroupOrder" and right-click to modify the icon "list" file. 5. The position shown in the picture is from top to bottom.
