

Implementing OpenAI CLIP on custom datasets

In January 2021, OpenAI announced two new models: DALL-E and CLIP. Both models are multimodal models that connect text and images in some way. The full name of CLIP is Contrastive Language-Image Pre-training, which is a pre-training method based on contrasting text-image pairs. Why introduce CLIP? Because the currently popular Stable Diffusion is not a single model, but consists of multiple models. One of the key components is the text encoder, which is used to encode the user's text input, and this text encoder is the text encoder in the CLIP model
CLIP model during training , you can give it an input sentence and extract the most relevant images to match it. CLIP learns the relationship between a complete sentence and the image it describes. That is to say, it is trained on complete sentences, rather than discrete categories like "car", "dog", etc. This is crucial for the application. When trained on complete phrases, the model can learn more and recognize patterns between photos and text. They also demonstrated that the model works as a classifier when trained on a sizable dataset of photos and corresponding sentences. When CLIP was released, its classification performance on the ImageNet data set exceeded that of ResNets-50 after fine-tuning without any fine-tuning (zero-shot), which means that it is very useful.

So in this article, we will implement the CLIP model from scratch using PyTorch so that we can have a better understanding of CLIP
You need to use two libraries here: timm and transformers. We first import the code
import os import cv2 import gc import numpy as np import pandas as pd import itertools from tqdm.autonotebook import tqdm import albumentations as A import matplotlib.pyplot as plt import torch from torch import nn import torch.nn.functional as F import timm from transformers import DistilBertModel, DistilBertConfig, DistilBertTokenizer
The next step is to preprocess the data and general configuration config. config is an ordinary python file in which we put all the hyperparameters. If using Jupyter Notebook, it is a class defined at the beginning of Notebook.
class CFG:debug = Falseimage_path = "../input/flickr-image-dataset/flickr30k_images/flickr30k_images"captions_path = "."batch_size = 32num_workers = 4head_lr = 1e-3image_encoder_lr = 1e-4text_encoder_lr = 1e-5weight_decay = 1e-3patience = 1factor = 0.8epochs = 2device = torch.device("cuda" if torch.cuda.is_available() else "cpu") model_name = 'resnet50'image_embedding = 2048text_encoder_model = "distilbert-base-uncased"text_embedding = 768text_tokenizer = "distilbert-base-uncased"max_length = 200 pretrained = True # for both image encoder and text encodertrainable = True # for both image encoder and text encodertemperature = 1.0 # image sizesize = 224 # for projection head; used for both image and text encodersnum_projection_layers = 1projection_dim = 256 dropout = 0.1There are also some helper classes for our custom indicators
class AvgMeter:def __init__(self, name="Metric"):self.name = nameself.reset() def reset(self):self.avg, self.sum, self.count = [0] * 3 def update(self, val, count=1):self.count += countself.sum += val * countself.avg = self.sum / self.count def __repr__(self):text = f"{self.name}: {self.avg:.4f}"return text def get_lr(optimizer):for param_group in optimizer.param_groups:return param_group["lr"]Our goal is to describe images and sentences. So the dataset must return both sentences and images. So you need to use the DistilBERT tagger to tag the sentence (title), and then provide the tag id (input_ids) and attention mask to DistilBERT. DistilBERT is smaller than the BERT model, but the results of the models are similar, so we choose to use it.
The next step is to tokenize using HuggingFace tokenizer. The tokenizer object obtained in __init__ will be loaded when the model is run. The title is padded and truncated to a predetermined maximum length. Before loading the related image, we will load an encoded title in __getitem__, which is a dictionary with keys input_ids and attention_mask, and Perform conversions and expansions (if any). Then turn it into a tensor and store it in a dictionary with "image" as the key. Finally we enter the original text of the title into the dictionary together with the keyword "title".
class CLIPDataset(torch.utils.data.Dataset):def __init__(self, image_filenames, captions, tokenizer, transforms):"""image_filenames and cpations must have the same length; so, if there aremultiple captions for each image, the image_filenames must have repetitivefile names """ self.image_filenames = image_filenamesself.captions = list(captions)self.encoded_captions = tokenizer(list(captions), padding=True, truncatinotallow=True, max_length=CFG.max_length)self.transforms = transforms def __getitem__(self, idx):item = {key: torch.tensor(values[idx])for key, values in self.encoded_captions.items()} image = cv2.imread(f"{CFG.image_path}/{self.image_filenames[idx]}")image = cv2.cvtColor(image, cv2.COLOR_BGR2RGB)image = self.transforms(image=image)['image']item['image'] = torch.tensor(image).permute(2, 0, 1).float()item['caption'] = self.captions[idx] return item def __len__(self):return len(self.captions) def get_transforms(mode="train"):if mode == "train":return A.Compose([A.Resize(CFG.size, CFG.size, always_apply=True),A.Normalize(max_pixel_value=255.0, always_apply=True),])else:return A.Compose([A.Resize(CFG.size, CFG.size, always_apply=True),A.Normalize(max_pixel_value=255.0, always_apply=True),])Image and text encoder: We will use ResNet50 as the image encoder.
class ImageEncoder(nn.Module):"""Encode images to a fixed size vector""" def __init__(self, model_name=CFG.model_name, pretrained=CFG.pretrained, trainable=CFG.trainable):super().__init__()self.model = timm.create_model(model_name, pretrained, num_classes=0, global_pool="avg")for p in self.model.parameters():p.requires_grad = trainable def forward(self, x):return self.model(x)
Use DistilBERT as text encoder. Use the final representation of CLS tokens to obtain the entire representation of the sentence.
class TextEncoder(nn.Module):def __init__(self, model_name=CFG.text_encoder_model, pretrained=CFG.pretrained, trainable=CFG.trainable):super().__init__()if pretrained:self.model = DistilBertModel.from_pretrained(model_name)else:self.model = DistilBertModel(cnotallow=DistilBertConfig()) for p in self.model.parameters():p.requires_grad = trainable # we are using the CLS token hidden representation as the sentence's embeddingself.target_token_idx = 0 def forward(self, input_ids, attention_mask):output = self.model(input_ids=input_ids, attention_mask=attention_mask)last_hidden_state = output.last_hidden_statereturn last_hidden_state[:, self.target_token_idx, :]
The above code has encoded the image and text into fixed size vectors (image 2048, text 768), we need the image and text to have similar dimensions to be able to compare them, So we project the 2048-dimensional and 768-dimensional vectors to 256 dimensions (projection_dim), and we can compare them only if the dimensions are the same.
class ProjectionHead(nn.Module):def __init__(self,embedding_dim,projection_dim=CFG.projection_dim,dropout=CFG.dropout):super().__init__()self.projection = nn.Linear(embedding_dim, projection_dim)self.gelu = nn.GELU()self.fc = nn.Linear(projection_dim, projection_dim)self.dropout = nn.Dropout(dropout)self.layer_norm = nn.LayerNorm(projection_dim) def forward(self, x):projected = self.projection(x)x = self.gelu(projected)x = self.fc(x)x = self.dropout(x)x = x + projectedx = self.layer_norm(x)return x
So our final CLIP model is like this:
class CLIPModel(nn.Module):def __init__(self,temperature=CFG.temperature,image_embedding=CFG.image_embedding,text_embedding=CFG.text_embedding,):super().__init__()self.image_encoder = ImageEncoder()self.text_encoder = TextEncoder()self.image_projection = ProjectionHead(embedding_dim=image_embedding)self.text_projection = ProjectionHead(embedding_dim=text_embedding)self.temperature = temperature def forward(self, batch):# Getting Image and Text Featuresimage_features = self.image_encoder(batch["image"])text_features = self.text_encoder(input_ids=batch["input_ids"], attention_mask=batch["attention_mask"])# Getting Image and Text Embeddings (with same dimension)image_embeddings = self.image_projection(image_features)text_embeddings = self.text_projection(text_features) # Calculating the Losslogits = (text_embeddings @ image_embeddings.T) / self.temperatureimages_similarity = image_embeddings @ image_embeddings.Ttexts_similarity = text_embeddings @ text_embeddings.Ttargets = F.softmax((images_similarity + texts_similarity) / 2 * self.temperature, dim=-1)texts_loss = cross_entropy(logits, targets, reductinotallow='none')images_loss = cross_entropy(logits.T, targets.T, reductinotallow='none')loss = (images_loss + texts_loss) / 2.0 # shape: (batch_size)return loss.mean() #这里还加了一个交叉熵函数 def cross_entropy(preds, targets, reductinotallow='none'):log_softmax = nn.LogSoftmax(dim=-1)loss = (-targets * log_softmax(preds)).sum(1)if reduction == "none":return losselif reduction == "mean":return loss.mean()
It needs to be explained here that CLIP uses symmetric cross entropy as the loss function, you can To reduce the impact of noise and improve model robustness, we just use cross entropy here for simplicity.
We can test:
# A simple Example batch_size = 4 dim = 256 embeddings = torch.randn(batch_size, dim) out = embeddings @ embeddings.T print(F.softmax(out, dim=-1))
The next step is training. There are some functions that can help us load the training and verification dataloader
def make_train_valid_dfs():dataframe = pd.read_csv(f"{CFG.captions_path}/captions.csv")max_id = dataframe["id"].max() + 1 if not CFG.debug else 100image_ids = np.arange(0, max_id)np.random.seed(42)valid_ids = np.random.choice(image_ids, size=int(0.2 * len(image_ids)), replace=False)train_ids = [id_ for id_ in image_ids if id_ not in valid_ids]train_dataframe = dataframe[dataframe["id"].isin(train_ids)].reset_index(drop=True)valid_dataframe = dataframe[dataframe["id"].isin(valid_ids)].reset_index(drop=True)return train_dataframe, valid_dataframe def build_loaders(dataframe, tokenizer, mode):transforms = get_transforms(mode=mode)dataset = CLIPDataset(dataframe["image"].values,dataframe["caption"].values,tokenizer=tokenizer,transforms=transforms,)dataloader = torch.utils.data.DataLoader(dataset,batch_size=CFG.batch_size,num_workers=CFG.num_workers,shuffle=True if mode == "train" else False,)return dataloaderThen comes training and evaluation
def train_epoch(model, train_loader, optimizer, lr_scheduler, step):loss_meter = AvgMeter()tqdm_object = tqdm(train_loader, total=len(train_loader))for batch in tqdm_object:batch = {k: v.to(CFG.device) for k, v in batch.items() if k != "caption"}loss = model(batch)optimizer.zero_grad()loss.backward()optimizer.step()if step == "batch":lr_scheduler.step() count = batch["image"].size(0)loss_meter.update(loss.item(), count) tqdm_object.set_postfix(train_loss=loss_meter.avg, lr=get_lr(optimizer))return loss_meter def valid_epoch(model, valid_loader):loss_meter = AvgMeter() tqdm_object = tqdm(valid_loader, total=len(valid_loader))for batch in tqdm_object:batch = {k: v.to(CFG.device) for k, v in batch.items() if k != "caption"}loss = model(batch) count = batch["image"].size(0)loss_meter.update(loss.item(), count) tqdm_object.set_postfix(valid_loss=loss_meter.avg)return loss_meterFinally, the whole process is integrated
def main():train_df, valid_df = make_train_valid_dfs()tokenizer = DistilBertTokenizer.from_pretrained(CFG.text_tokenizer)train_loader = build_loaders(train_df, tokenizer, mode="train")valid_loader = build_loaders(valid_df, tokenizer, mode="valid") model = CLIPModel().to(CFG.device)params = [{"params": model.image_encoder.parameters(), "lr": CFG.image_encoder_lr},{"params": model.text_encoder.parameters(), "lr": CFG.text_encoder_lr},{"params": itertools.chain(model.image_projection.parameters(), model.text_projection.parameters()), "lr": CFG.head_lr, "weight_decay": CFG.weight_decay}]optimizer = torch.optim.AdamW(params, weight_decay=0.)lr_scheduler = torch.optim.lr_scheduler.ReduceLROnPlateau(optimizer, mode="min", patience=CFG.patience, factor=CFG.factor)step = "epoch" best_loss = float('inf')for epoch in range(CFG.epochs):print(f"Epoch: {epoch + 1}")model.train()train_loss = train_epoch(model, train_loader, optimizer, lr_scheduler, step)model.eval()with torch.no_grad():valid_loss = valid_epoch(model, valid_loader) if valid_loss.avg <p><span>Application: Get image embeddings and find matches. </span></p><p><span>How do we actually apply it after we complete the training? We need to write a function that loads the trained model, provides it with images from the validation set, and returns the shape (valid_set_size, 256) and the image_embeddings of the model itself. </span></p><pre class="brush:php;toolbar:false">def get_image_embeddings(valid_df, model_path):tokenizer = DistilBertTokenizer.from_pretrained(CFG.text_tokenizer)valid_loader = build_loaders(valid_df, tokenizer, mode="valid") model = CLIPModel().to(CFG.device)model.load_state_dict(torch.load(model_path, map_locatinotallow=CFG.device))model.eval() valid_image_embeddings = []with torch.no_grad():for batch in tqdm(valid_loader):image_features = model.image_encoder(batch["image"].to(CFG.device))image_embeddings = model.image_projection(image_features)valid_image_embeddings.append(image_embeddings)return model, torch.cat(valid_image_embeddings) _, valid_df = make_train_valid_dfs() model, image_embeddings = get_image_embeddings(valid_df, "best.pt") def find_matches(model, image_embeddings, query, image_filenames, n=9):tokenizer = DistilBertTokenizer.from_pretrained(CFG.text_tokenizer)encoded_query = tokenizer([query])batch = {key: torch.tensor(values).to(CFG.device)for key, values in encoded_query.items()}with torch.no_grad():text_features = model.text_encoder(input_ids=batch["input_ids"], attention_mask=batch["attention_mask"])text_embeddings = model.text_projection(text_features) image_embeddings_n = F.normalize(image_embeddings, p=2, dim=-1)text_embeddings_n = F.normalize(text_embeddings, p=2, dim=-1)dot_similarity = text_embeddings_n @ image_embeddings_n.T values, indices = torch.topk(dot_similarity.squeeze(0), n * 5)matches = [image_filenames[idx] for idx in indices[::5]] _, axes = plt.subplots(3, 3, figsize=(10, 10))for match, ax in zip(matches, axes.flatten()):image = cv2.imread(f"{CFG.image_path}/{match}")image = cv2.cvtColor(image, cv2.COLOR_BGR2RGB)ax.imshow(image)ax.axis("off") plt.show()The calling method is as follows:
find_matches(model, image_embeddings,query="one dog sitting on the grass",image_filenames=valid_df['image'].values,n=9)
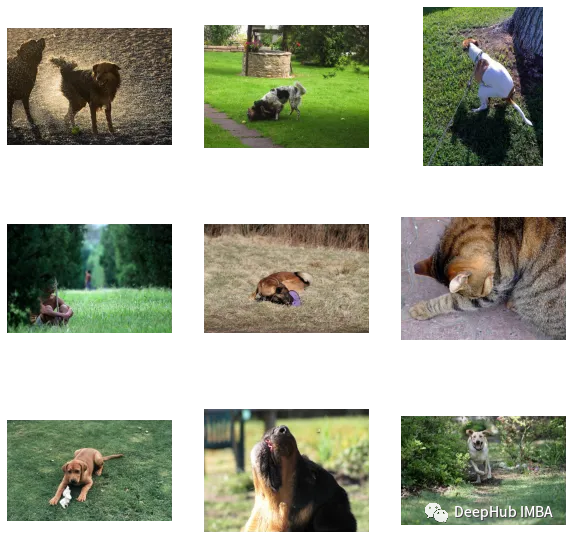
We can see that our customized effect is still Not bad (but there’s a cat in the picture, haha). In other words, the CLIP method is also feasible to customize on small data sets
The following is the code and data set of this article:
https ://www.kaggle.com/code/jyotidabas/simple-openai-clip-implementation
The above is the detailed content of Implementing OpenAI CLIP on custom datasets. For more information, please follow other related articles on the PHP Chinese website!

Hot AI Tools

Undresser.AI Undress
AI-powered app for creating realistic nude photos

AI Clothes Remover
Online AI tool for removing clothes from photos.

Undress AI Tool
Undress images for free

Clothoff.io
AI clothes remover

AI Hentai Generator
Generate AI Hentai for free.

Hot Article
Hot Tools

Notepad++7.3.1
Easy-to-use and free code editor

SublimeText3 Chinese version
Chinese version, very easy to use

Zend Studio 13.0.1
Powerful PHP integrated development environment

Dreamweaver CS6
Visual web development tools

SublimeText3 Mac version
God-level code editing software (SublimeText3)
Hot Topics


 Choosing the embedding model that best fits your data: A comparison test of OpenAI and open source multi-language embeddings
Feb 26, 2024 pm 06:10 PM
Choosing the embedding model that best fits your data: A comparison test of OpenAI and open source multi-language embeddings
Feb 26, 2024 pm 06:10 PM
OpenAI recently announced the launch of their latest generation embedding model embeddingv3, which they claim is the most performant embedding model with higher multi-language performance. This batch of models is divided into two types: the smaller text-embeddings-3-small and the more powerful and larger text-embeddings-3-large. Little information is disclosed about how these models are designed and trained, and the models are only accessible through paid APIs. So there have been many open source embedding models. But how do these open source models compare with the OpenAI closed source model? This article will empirically compare the performance of these new models with open source models. We plan to create a data
 A new programming paradigm, when Spring Boot meets OpenAI
Feb 01, 2024 pm 09:18 PM
A new programming paradigm, when Spring Boot meets OpenAI
Feb 01, 2024 pm 09:18 PM
In 2023, AI technology has become a hot topic and has a huge impact on various industries, especially in the programming field. People are increasingly aware of the importance of AI technology, and the Spring community is no exception. With the continuous advancement of GenAI (General Artificial Intelligence) technology, it has become crucial and urgent to simplify the creation of applications with AI functions. Against this background, "SpringAI" emerged, aiming to simplify the process of developing AI functional applications, making it simple and intuitive and avoiding unnecessary complexity. Through "SpringAI", developers can more easily build applications with AI functions, making them easier to use and operate.
 Rust-based Zed editor has been open sourced, with built-in support for OpenAI and GitHub Copilot
Feb 01, 2024 pm 02:51 PM
Rust-based Zed editor has been open sourced, with built-in support for OpenAI and GitHub Copilot
Feb 01, 2024 pm 02:51 PM
Author丨Compiled by TimAnderson丨Produced by Noah|51CTO Technology Stack (WeChat ID: blog51cto) The Zed editor project is still in the pre-release stage and has been open sourced under AGPL, GPL and Apache licenses. The editor features high performance and multiple AI-assisted options, but is currently only available on the Mac platform. Nathan Sobo explained in a post that in the Zed project's code base on GitHub, the editor part is licensed under the GPL, the server-side components are licensed under the AGPL, and the GPUI (GPU Accelerated User) The interface) part adopts the Apache2.0 license. GPUI is a product developed by the Zed team
 Posthumous work of the OpenAI Super Alignment Team: Two large models play a game, and the output becomes more understandable
Jul 19, 2024 am 01:29 AM
Posthumous work of the OpenAI Super Alignment Team: Two large models play a game, and the output becomes more understandable
Jul 19, 2024 am 01:29 AM
If the answer given by the AI model is incomprehensible at all, would you dare to use it? As machine learning systems are used in more important areas, it becomes increasingly important to demonstrate why we can trust their output, and when not to trust them. One possible way to gain trust in the output of a complex system is to require the system to produce an interpretation of its output that is readable to a human or another trusted system, that is, fully understandable to the point that any possible errors can be found. For example, to build trust in the judicial system, we require courts to provide clear and readable written opinions that explain and support their decisions. For large language models, we can also adopt a similar approach. However, when taking this approach, ensure that the language model generates
 To provide a new scientific and complex question answering benchmark and evaluation system for large models, UNSW, Argonne, University of Chicago and other institutions jointly launched the SciQAG framework
Jul 25, 2024 am 06:42 AM
To provide a new scientific and complex question answering benchmark and evaluation system for large models, UNSW, Argonne, University of Chicago and other institutions jointly launched the SciQAG framework
Jul 25, 2024 am 06:42 AM
Editor |ScienceAI Question Answering (QA) data set plays a vital role in promoting natural language processing (NLP) research. High-quality QA data sets can not only be used to fine-tune models, but also effectively evaluate the capabilities of large language models (LLM), especially the ability to understand and reason about scientific knowledge. Although there are currently many scientific QA data sets covering medicine, chemistry, biology and other fields, these data sets still have some shortcomings. First, the data form is relatively simple, most of which are multiple-choice questions. They are easy to evaluate, but limit the model's answer selection range and cannot fully test the model's ability to answer scientific questions. In contrast, open-ended Q&A
 Don't wait for OpenAI, wait for Open-Sora to be fully open source
Mar 18, 2024 pm 08:40 PM
Don't wait for OpenAI, wait for Open-Sora to be fully open source
Mar 18, 2024 pm 08:40 PM
Not long ago, OpenAISora quickly became popular with its amazing video generation effects. It stood out among the crowd of literary video models and became the focus of global attention. Following the launch of the Sora training inference reproduction process with a 46% cost reduction 2 weeks ago, the Colossal-AI team has fully open sourced the world's first Sora-like architecture video generation model "Open-Sora1.0", covering the entire training process, including data processing, all training details and model weights, and join hands with global AI enthusiasts to promote a new era of video creation. For a sneak peek, let’s take a look at a video of a bustling city generated by the “Open-Sora1.0” model released by the Colossal-AI team. Open-Sora1.0
 The local running performance of the Embedding service exceeds that of OpenAI Text-Embedding-Ada-002, which is so convenient!
Apr 15, 2024 am 09:01 AM
The local running performance of the Embedding service exceeds that of OpenAI Text-Embedding-Ada-002, which is so convenient!
Apr 15, 2024 am 09:01 AM
Ollama is a super practical tool that allows you to easily run open source models such as Llama2, Mistral, and Gemma locally. In this article, I will introduce how to use Ollama to vectorize text. If you have not installed Ollama locally, you can read this article. In this article we will use the nomic-embed-text[2] model. It is a text encoder that outperforms OpenAI text-embedding-ada-002 and text-embedding-3-small on short context and long context tasks. Start the nomic-embed-text service when you have successfully installed o
 Microsoft, OpenAI plan to invest $100 million in humanoid robots! Netizens are calling Musk
Feb 01, 2024 am 11:18 AM
Microsoft, OpenAI plan to invest $100 million in humanoid robots! Netizens are calling Musk
Feb 01, 2024 am 11:18 AM
Microsoft and OpenAI were revealed to be investing large sums of money into a humanoid robot startup at the beginning of the year. Among them, Microsoft plans to invest US$95 million, and OpenAI will invest US$5 million. According to Bloomberg, the company is expected to raise a total of US$500 million in this round, and its pre-money valuation may reach US$1.9 billion. What attracts them? Let’s take a look at this company’s robotics achievements first. This robot is all silver and black, and its appearance resembles the image of a robot in a Hollywood science fiction blockbuster: Now, he is putting a coffee capsule into the coffee machine: If it is not placed correctly, it will adjust itself without any human remote control: However, After a while, a cup of coffee can be taken away and enjoyed: Do you have any family members who have recognized it? Yes, this robot was created some time ago.
