

In KivyMD-Python, a banner is a graphical element that displays a short message or notification to the user. It can be used to notify the user of the status of the application, such as a task completing successfully or an error occurring.
Banner Color, text and position on screen can be customized. They are particularly useful for mobile applications where space is limited and fast feedback to the user is important. Banners can improve the overall user experience by providing timely and relevant information.
In KivyMD-Python, there are two types of banners available -
Snackbar Banner - A Snackbar is a short message that appears at the bottom of the screen and disappears quickly. It is usually used to display notifications or alerts.
BottomAppBar Banner - A BottomAppBar is a persistent banner that appears at the bottom of the screen and can contain navigation options or action buttons. It is often used in mobile applications to replace traditional toolbars.
Both types of banners can be customized with different colors, icons and text.
The syntax for creating a Snackbar banner in KivyMD-Python is as follows -
Snackbar(text="Your message here").show()
In this syntax, we create a new instance of the Snackbar class and pass the required message as the "text" parameter and then call the "show()" method to display the banner. You can further customize the Snackbar banner using other properties and methods of the Snackbar class, such as setting the display time using "duration" or adding a button with a callback function using "button_text" and "button_callback".
This is the algorithm for creating a Snackbar banner in KivyMD-Python -
Step 1 - Import the Snackbar class from the KivyMD library.
Step 2 - Create a new instance of the "Snackbar" class and pass the desired message as the "text" parameter.
Step 3 - Customize the Snackbar banner by setting additional properties such as "duration", "button_text", or "button_callback" (optional).
Step 4 - Call the "show()" method of the Snackbar instance to display the banner.
Step 5 - The Snackbar banner will temporarily appear at the bottom of the screen and contain the specified message and any other custom content.
from kivy.lang import Builder
from kivymd.app import MDApp
KV = '''
#:import Snackbar kivymd.uix.snackbar.Snackbar
MDScreen:
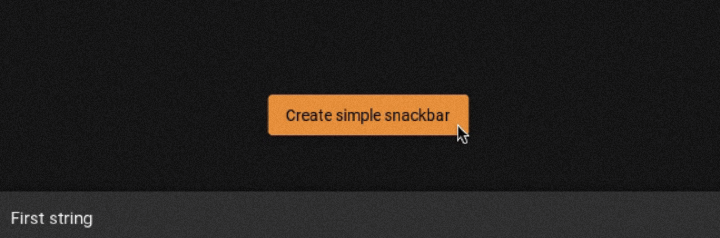
MDRaisedButton:
text: "Create simple snackbar"
on_release: Snackbar(text="This is a snackbar!").open()
pos_hint: {"center_x": .5, "center_y": .5}
'''
class Test(MDApp):
def build(self):
return Builder.load_string(KV)
Test().run()
The syntax for creating a BottomAppBar banner in KivyMD-Python is as follows -
MDBottomAppBar(
   MDToolbar(title="Your title here"),
   ... # Other parameters and widgets here
)
In this syntax, we create a new instance of the "MDBottomAppBar" class and use the MDToolbar instance as the first parameter, which sets the title of the banner. Additional parameters and widgets can be added to customize the appearance and functionality of the BottomAppBar banner.
For example, you can set the "icon" parameter to add a menu icon to the banner, and set the "on_icon_press" parameter to specify a callback function when the icon is pressed. You can also add other widgets, such as buttons or labels, to the BottomAppBar banner by passing them as additional parameters to the constructor.
This is the algorithm for creating BottomAppBar banner in KivyMD-Python -
Step 1 - Import the MDBottomAppBar and MDToolbar classes from the KivyMD library.
Step 2 - Create a new instance of the MDToolbar class with the desired title.
Step 3 - Create a new instance of the MDBottomAppBar class and pass the MDToolbar instance as the first parameter.
Step 4 - Optionally customize the BottomAppBar banner by setting additional properties such as icon, on_icon_press, or md_bg_color.
Step 5 - Add any other widgets (such as buttons or labels) to the BottomAppBar banner by passing them as additional parameters to the MDBottomAppBar constructor.
Step 6 - Return the MDBottomAppBar instance from the KivyMD application's build() method.
Step 7 - The BottomAppBar banner will appear at the bottom of the screen.
To create a banner in KivyMD-Python you can use the "MDBanner" widget. Here is a basic example of how to create a banner -
# import packages
from kivy.lang import Builder
from kivymd.app import MDApp
# writing kv lang
KV = '''
# declaring layout/screen
MDScreen:
   # this will create a space navigation bottom
   MDBottomNavigation:
      # this will create a navigation button on the bottom of screen
      MDBottomNavigationItem:
         name: 'screen 1'
         text: 'Python'
         icon: 'language-python'
         # this will be triggered when screen 1 is selected
         # creates a label
         MDLabel:
            text: 'Python'
            halign: 'center'
      # this will create a navigation button on the bottom of screen
      MDBottomNavigationItem:
         name: 'screen 2'
         text: 'Java'
         icon: 'language-java'
         # this will be triggered when screen 2 is selected
         # creates a label
         MDLabel:
            text: 'Java'
            halign: 'center'
      # this will create a navigation button on the bottom of the screen
      MDBottomNavigationItem:
         name: 'screen 3'
         text: 'CPP'
         icon: 'language-cpp'
         # this will be triggered when screen 3 is selected
         # creates a label
         MDLabel:
            text: 'CPP'
            halign: 'center'
'''
# App class
class Test(MDApp):
   def build(self):
      # this will load kv lang
      screen = Builder.load_string(KV)
      # returning screen
      return screen
# running app
Test().run()

Creating banners in KivyMD using Python is a simple and efficient process. By following the steps outlined in this article, anyone can easily design and implement visually appealing banners for their applications.
With KivyMD’s user-friendly interface and rich library of design elements, developers can create high-quality, functional and beautiful banners. By incorporating these banners into their applications, developers can enhance user experience and create more engaging and immersive environments.
The above is the detailed content of How to create banner in kivymd-Python?. For more information, please follow other related articles on the PHP Chinese website!


![[Web front-end] Node.js quick start](https://img.php.cn/upload/course/000/000/067/662b5d34ba7c0227.png)


