

What to do if the optical drive cannot be ejected?

The optical drive cannot be ejected. Try pressing the eject button on the optical drive panel, using the computer operating system to eject the optical drive, using physical tools to solve the problem, restarting the computer, or seeking professional technical support. Detailed introduction: 1. Press the eject button on the front panel of the optical drive, and the optical drive may become stuck or jammed; 2. Use the computer's operating system to eject the optical drive by right-clicking the optical drive icon and selecting "Eject" option to try to eject the optical drive; 3. Use physical tools to solve the problem, etc.

The operating system for this tutorial: Windows 10 system, DELL G3 computer.
The optical drive not ejecting is a common problem, which may be caused by hardware failure or software problems. When the optical drive fails to eject, we can take some simple methods to try to solve the problem.
1. We can try pressing the eject button on the front panel of the optical drive. Sometimes, the optical drive may get stuck or stuck, and pressing the button may solve the problem. If the optical drive still cannot be ejected after pressing the button, we can try other methods.
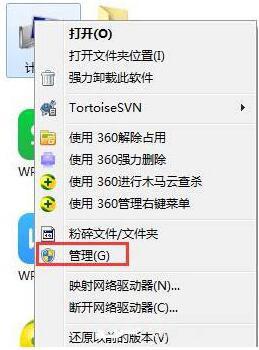
2. We can try to use the computer’s operating system to eject the optical drive. In Windows operating system, we can try to eject the optical drive by right-clicking on the optical drive icon and selecting the "Eject" option. If this doesn't work either, we can try something else.
3. We can try to use physical tools to solve the problem. First, we can find the small hole on the optical drive panel. This small hole is usually located on the front or side of the optical drive. We can use a thin needle or similar object, insert it into the small hole, and give it a gentle push. This action may free the stuck optical drive, allowing it to eject.
4. If none of the above methods can solve the problem, it may be caused by a software problem. We can try restarting the computer and try ejecting the optical drive again. Sometimes, restarting your computer can resolve some software issues.
If all methods fail, it may be due to hardware failure. In this case, we recommend seeking professional technical support. You can contact your computer manufacturer or repair center for help and advice.
To sum up, when the optical drive cannot be ejected, we can try to press the eject button on the optical drive panel, use the computer operating system to eject the optical drive, use physical tools to solve the problem, restart the computer, or seek professional help Technical Support. I hope these methods can help you solve the problem of the optical drive not ejecting .
The above is the detailed content of What to do if the optical drive cannot be ejected?. For more information, please follow other related articles on the PHP Chinese website!

Hot AI Tools

Undresser.AI Undress
AI-powered app for creating realistic nude photos

AI Clothes Remover
Online AI tool for removing clothes from photos.

Undress AI Tool
Undress images for free

Clothoff.io
AI clothes remover

Video Face Swap
Swap faces in any video effortlessly with our completely free AI face swap tool!
Hot Article
Hot Tools

Notepad++7.3.1
Easy-to-use and free code editor

SublimeText3 Chinese version
Chinese version, very easy to use

Zend Studio 13.0.1
Powerful PHP integrated development environment

Dreamweaver CS6
Visual web development tools

SublimeText3 Mac version
God-level code editing software (SublimeText3)
Hot Topics


 How to mount the optical drive in Linux system?
Jan 11, 2024 pm 05:09 PM
How to mount the optical drive in Linux system?
Jan 11, 2024 pm 05:09 PM
How to mount an optical drive in Linux if you want to mount it? Let’s take a look at the detailed tutorial below. 1. First create a normal directory. 2. Next, find the optical drive hardware device. 3. Finally, connect the normal directory with the CD-ROM drive.
 Solution to the automatic ejection of the optical drive in Windows 7 computers
Mar 26, 2024 pm 04:36 PM
Solution to the automatic ejection of the optical drive in Windows 7 computers
Mar 26, 2024 pm 04:36 PM
1. Move the mouse to the computer, and then right-click to select the management item, as shown in the figure: 2. After opening the computer management item, we see the function options on the left, click to select the Services and Applications item, such as As shown in the figure: 3. Next, we need to select the service item on the right and double-click to open it, as shown in the figure: 4. After opening the service item, we need to find the service item ShellHardwareDetection, as shown in the figure: 5. Move the mouse to On the service item, then right-click and select Properties, as shown in the figure: 6. After opening the properties, change the startup type to Disabled, then click Apply - OK, save, and it is OK, as shown in the figure: win7 optical drive automatically The pop-up solution is shared here in detail for users. More
 How to solve the problem of automatic ejection of optical drive in win7 system
Feb 28, 2024 am 08:00 AM
How to solve the problem of automatic ejection of optical drive in win7 system
Feb 28, 2024 am 08:00 AM
How to solve the problem of automatic ejection of optical drive in Win7 system. In Win7 system, the problem of automatic ejection of optical drive sometimes occurs. This problem may cause trouble to users. But, don't worry, this problem can be solved. First, we need to understand the reason why the optical drive automatically ejects. Usually, this problem may be caused by some software or driver conflicts in the system. So, the key to solving this problem is to find out the specific cause. One possible solution is to check the software and drivers installed on your system to see if there are some incompatible or conflicting programs. If so, you can try uninstalling these programs and restarting your computer to see if the problem is resolved. Also, you can try updating the drivers in your system
 Solution to the problem that the optical drive is not available after the win10 system upgrade
Jun 29, 2023 pm 11:37 PM
Solution to the problem that the optical drive is not available after the win10 system upgrade
Jun 29, 2023 pm 11:37 PM
What should I do if the optical drive cannot be used after the win10 system upgrade? As the usage rate of computers is getting higher and higher, we may sometimes encounter the problem that the optical drive cannot be used after the win10 system upgrade. If we encounter the problem that the optical drive cannot be used after the win10 system upgrade Question, how to deal with the problem that the optical drive cannot be used after the win10 system upgrade? Let’s take a look at the detailed solution to the problem that the optical drive cannot be used after the win10 system is upgraded. After the system is upgraded to Windows 10-10586 version, after running for a period of time, the optical drive cannot be used, and the optical drive symbol disappears in the resource manager. Enter the device manager. In the device processor, we cannot see the DVD/CD-ROM drive device. Click [View]-[Show hidden devices]
 How to recover lost Windows 10 system resource manager optical drive
Jun 29, 2023 pm 03:24 PM
How to recover lost Windows 10 system resource manager optical drive
Jun 29, 2023 pm 03:24 PM
How to recover the lost Windows 10 system resource manager optical drive? As the usage of computers is getting higher and higher, we may sometimes encounter the problem of setting up the recovery of the lost optical drive of the Windows 10 system resource manager. What should we do if we need to set up the recovery of the lost optical drive of the win10 system resource manager? How to recover lost Windows 10 system resource manager optical drive? Many friends don’t know how to operate in detail. The editor has compiled the steps to format the C drive in win11 below. If you are interested, follow the editor to read below! Detailed steps to recover the lost optical drive of Windows 10 system resource manager. You can use the method of modifying the registry to solve the problem. However, IT Home reminds you that you must back up the registry before modifying it.
 What to do if the optical drive cannot be ejected?
Sep 15, 2023 pm 03:12 PM
What to do if the optical drive cannot be ejected?
Sep 15, 2023 pm 03:12 PM
If the optical drive cannot be ejected, try pressing the eject button on the optical drive panel, using the computer operating system to eject the optical drive, using physical tools to solve the problem, restarting the computer, or seeking professional technical support. Detailed introduction: 1. Press the eject button on the front panel of the optical drive, and the optical drive may become stuck or jammed; 2. Use the computer's operating system to eject the optical drive by right-clicking the optical drive icon and selecting "Eject" option to try to eject the optical drive; 3. Use physical tools to solve the problem, etc.
 What should I do if the optical drive cannot be ejected?
Jul 06, 2023 pm 02:15 PM
What should I do if the optical drive cannot be ejected?
Jul 06, 2023 pm 02:15 PM
Solution to the problem that the optical drive cannot be ejected: 1. Press the "Eject" button multiple times; 2. Press the Start button, and then select Run. In the run window, enter the eject or eject cd command, and then press the Enter key to trigger the computer command to eject the optical drive; 3. Insert a slender tool into the emergency ejection hole of the optical drive and push it outward with a certain amount of force, so that the optical drive may be ejected; 4. Send it to a professional computer repair center for repair or replace.
 How to reinstall the Win7 system on a computer without a CD-ROM drive How to reinstall the Win7 system on a PC without a CD-ROM drive
Jul 13, 2023 pm 10:53 PM
How to reinstall the Win7 system on a computer without a CD-ROM drive How to reinstall the Win7 system on a PC without a CD-ROM drive
Jul 13, 2023 pm 10:53 PM
How to reinstall Win7 system if the computer does not have a CD-ROM drive? Some netizens have requested to reinstall Win7 on the system, but they are beginners and do not know what to do about reinstalling the Win7 system. They do not know how to install Win7 when reinstalling the system. In fact, there are many methods. Below I will teach you a simple tutorial on how to reinstall win7 on the computer system. Master Shi's method of reinstalling Win7 system 1. After entering the tool, the tool will automatically identify the relevant information of the current system, click Next. 2. After entering the page, customers can follow the prompts to choose to install Windows 732-bit or Windows 764-bit systems. Note: The gray button means that the current hardware configuration or partition format is not