How to install Jupyter Notebook in Windows 11 or 10 using CMD?
Installing Jupyter on Windows 11 or 10 via Command Prompt
The given steps are applicable for Win 11 and 10 operating systems, here we will use Winget package manager.
1. Open CMD or Powershell
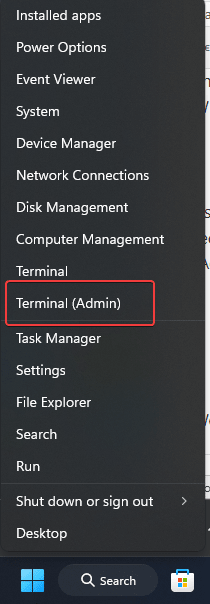
As in this guide, we are only using the command to install all the required packages to meet the requirements required by Jupyter; therefore, right click on the Windows Start button to select PowerShell (Admin) or Terminal (Admin).
Note: Please make sure to only open CMD or Powershell with administrator privileges.
2. Install the latest version of python
Well, we can manually download the executable file of python from its official website. However, we don't need to do this when we have Winget package manager for Windows.
Winget appears by default on all latest versions of Win 10 and 11. However, to confirm, in your terminal or Powershell, just type:
winget
and you will see the options available for your package manager tool. Now, to search for the latest version of Python, type the given command:
You will also see all the available versions as well as the ones using:
winget search python.python
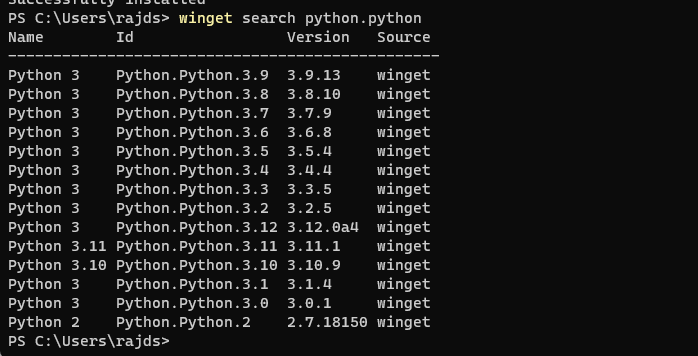
To get the extremely latest version of Python 3, for example in our case it is 3.11, we have to mention:
Syntax:
winget install python.python.version-number
Usage:
winget install python.python.3.11
Close whatever CMD or PowerShell you are using and reopen it again with administrator privileges. This ensures that python is added to our path correctly. It is necessary to use its package manager "PIP".
3. Check the Picture-in-Picture version
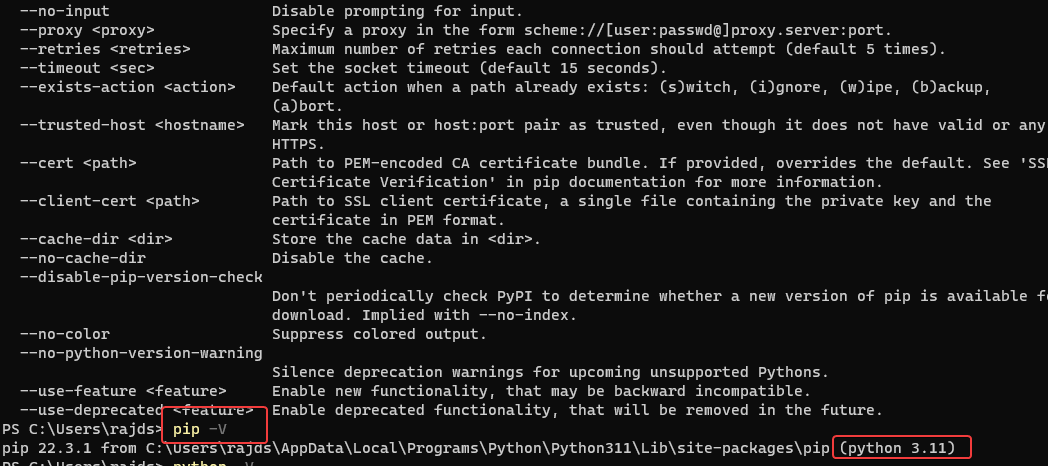
Confirm that the latest version of Python has been added to the path of our system. Let's check the version of PIP installed. Here are the commands to use:
pip -V
3. Install Jupyter notebook using PIP
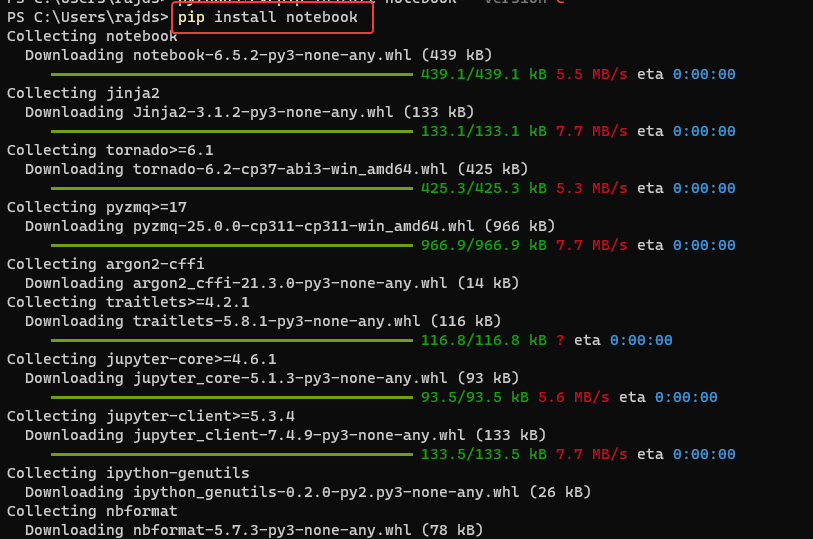
Now, use ## on your command prompt or PowerShell #PIP, Python's package manager installs Jupyter Notebook using a single command.
pip install notebook
jupyter notebook
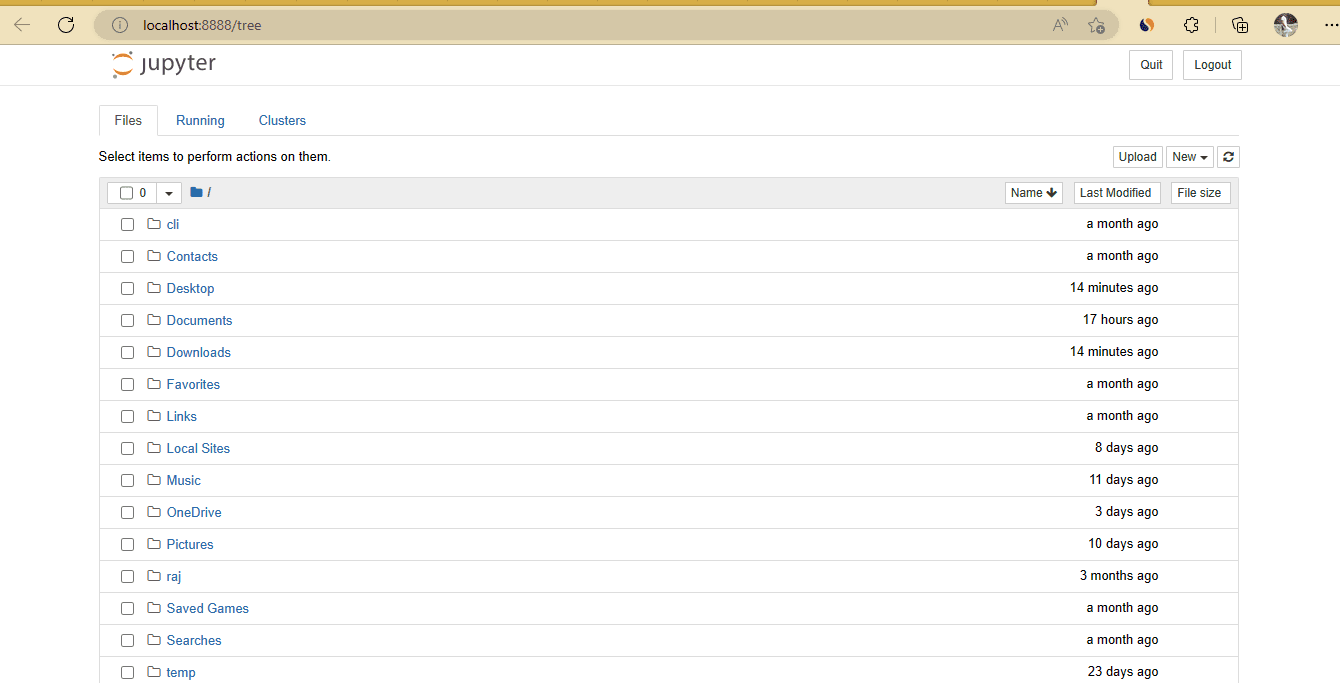
Step 1: Right-click on the Windows desktop and select "New" and then select the "Shortcut" option.
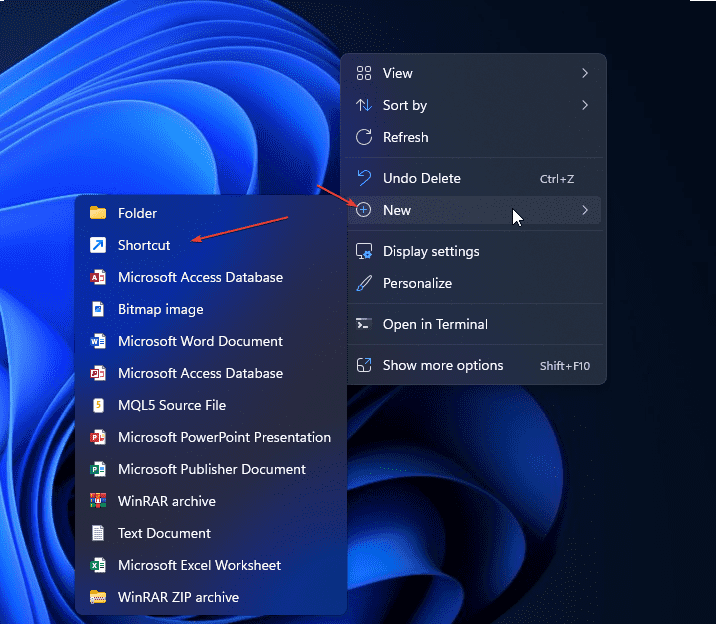
Step 2: The shortcut window will open to create a new window. The path given below is pasted there. This will open Powershell and execute the command in it. jupyter notebook
C:\Windows\System32\WindowsPowerShell\v1.0\powershell.exe jupyter notebook
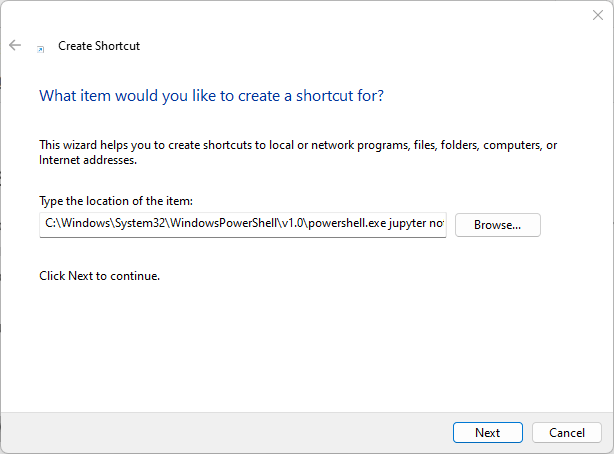
步骤3:为您的快捷方式命名,在这里我们分配 – Jupyter Notebook。你可以给任何你想要的东西。之后点击 结束通话 按钮。
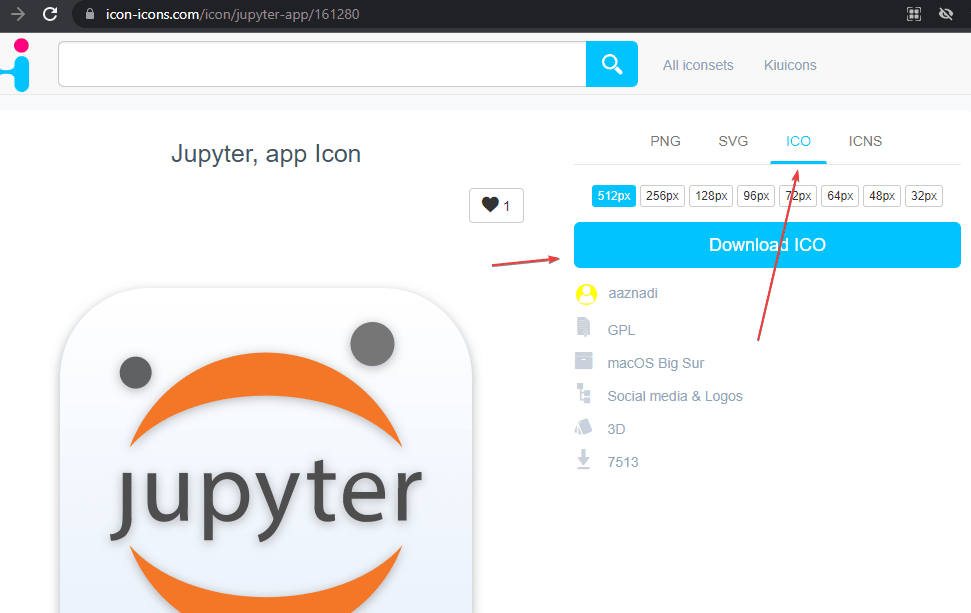
第 4 步:为了轻松识别您的快捷方式,让我们下载 Jupyter 图标。访问 icons.com 并单击ICO选项卡,然后下载图标。将图标保存在某个位置,这样您就不会意外删除它。
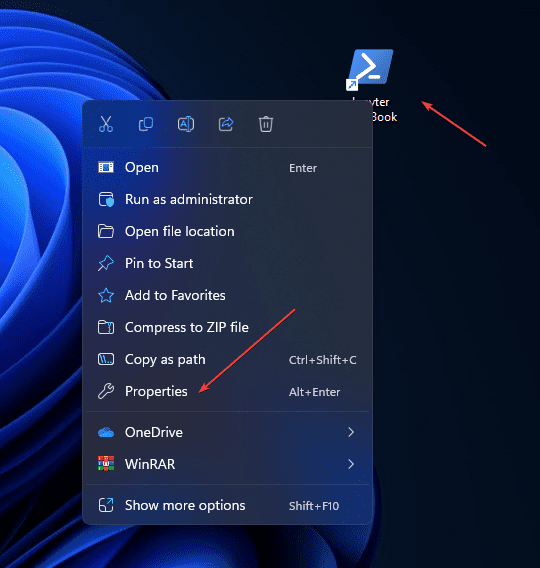
第 5 步:右键单击创建的快捷方式,然后选择“属性”选项。
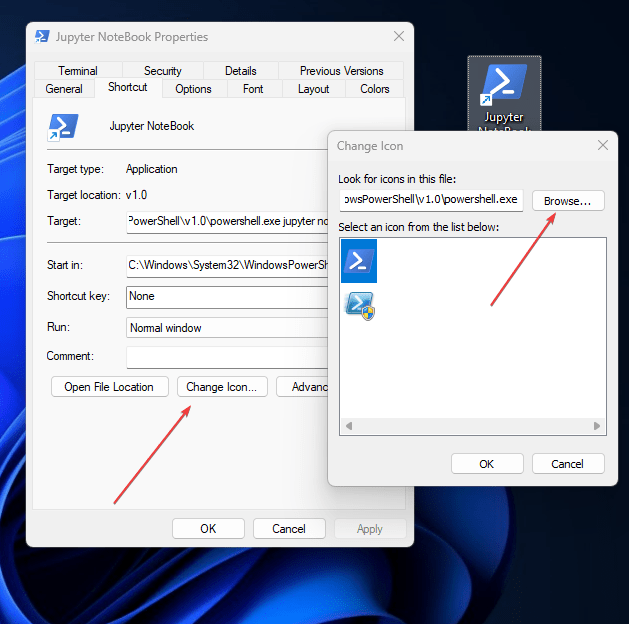
第 6 步:单击更改图标按钮,然后单击浏览以选择已下载的图标。之后,按 Ok 按钮保存更改。
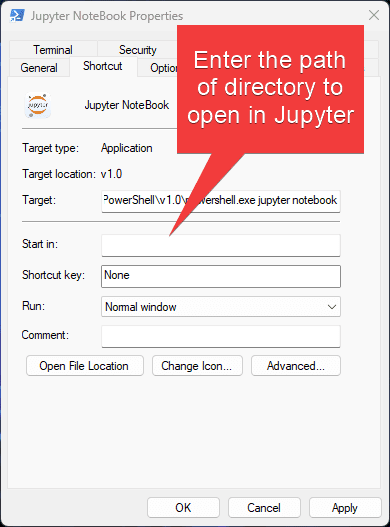
附加信息:默认情况下,Jupyter 将显示创建快捷方式的目录的文件。要改变并告诉它,请打开并列出 Python 项目的文件。再次右键单击快捷方式,选择属性,然后在“启动”列中输入 Python 项目目录的路径。
6. 升级 Jupyter 笔记本
将来,如果要使用命令行在Windows上安装Jupyter的任何可用升级,请再次使用PIP,下面是示例:
pip install -U jupyter
The above is the detailed content of How to install Jupyter Notebook in Windows 11 or 10 using CMD?. For more information, please follow other related articles on the PHP Chinese website!

Hot AI Tools

Undresser.AI Undress
AI-powered app for creating realistic nude photos

AI Clothes Remover
Online AI tool for removing clothes from photos.

Undress AI Tool
Undress images for free

Clothoff.io
AI clothes remover

AI Hentai Generator
Generate AI Hentai for free.

Hot Article

Hot Tools

Notepad++7.3.1
Easy-to-use and free code editor

SublimeText3 Chinese version
Chinese version, very easy to use

Zend Studio 13.0.1
Powerful PHP integrated development environment

Dreamweaver CS6
Visual web development tools

SublimeText3 Mac version
God-level code editing software (SublimeText3)

Hot Topics
 1379
1379
 52
52
 How to enable or disable DLNA on Windows 11
Sep 28, 2023 pm 11:05 PM
DLNA streaming has been around for a long time and is considered one of the more user-friendly options. Given its compatibility with a variety of devices and systems, you shouldn’t have problems connecting to one. So, let us understand how to enable DLNA in Windows 11. There are two methods, use the built-in Windows DLNA (Digital Living Network Alliance) feature or install a third-party application. While the former works well and provides the best experience, you can try the app with its enhanced feature set. We will list both options. What are the benefits of using DLNA? DLNA allows media streaming across devices on the network, provided the streaming device is compatible with the standard. Once set up on a smart TV or other system, you can
 Windows 11 Guide: How to adjust the display resolution in Hyper-V
Sep 23, 2023 pm 08:25 PM
If you are using Hyper-V to run virtual machines on a Windows 11 machine, you may need to change the display resolution of one or both VMs. In this guide, we will introduce simple methods and step-by-step instructions to adjust and optimize display resolution in Hyper-V environment. How to adjust screen resolution in Hyper-V? Before moving on to the detailed steps to change Hyper-V screen resolution on Windows 11, be sure to complete the following checks for smoother operation: Make sure you are logged in with an administrator account. Make sure graphics drivers are updated. Back up important data in the VM. Make sure Hyper-V is enabled. 1. Setting up using Hyper-V First, we will enable enhanced session mode; for this
 Solution: Your organization requires you to change your PIN
Oct 04, 2023 pm 05:45 PM
The message "Your organization has asked you to change your PIN" will appear on the login screen. This happens when the PIN expiration limit is reached on a computer using organization-based account settings, where they have control over personal devices. However, if you set up Windows using a personal account, the error message should ideally not appear. Although this is not always the case. Most users who encounter errors report using their personal accounts. Why does my organization ask me to change my PIN on Windows 11? It's possible that your account is associated with an organization, and your primary approach should be to verify this. Contacting your domain administrator can help! Additionally, misconfigured local policy settings or incorrect registry keys can cause errors. Right now
 How to properly calibrate your Xbox One controller on Windows 11
Sep 21, 2023 pm 09:09 PM
Since Windows has become the gaming platform of choice, it's even more important to identify its gaming-oriented features. One of them is the ability to calibrate an Xbox One controller on Windows 11. With built-in manual calibration, you can get rid of drift, random movement, or performance issues and effectively align the X, Y, and Z axes. If the available options don't work, you can always use a third-party Xbox One controller calibration tool. Let’s find out! How do I calibrate my Xbox controller on Windows 11? Before proceeding, make sure you connect your controller to your computer and update your Xbox One controller's drivers. While you're at it, also install any available firmware updates. 1. Use Wind
 How to show folder size on Windows 11?
Sep 23, 2023 pm 06:13 PM
By default, Windows 11 does not display folder sizes in File Explorer, however, you can make certain changes in Explorer settings to make them visible. In this guide, we will discuss some of the easiest ways to display folder sizes so that you can effectively manage disk space on your PC. How to check the size of a folder on Windows 11? 1. Use the folder's Properties window to open a Windows Explorer window by pressing +. WindowsE Go to the folder whose size you want to check, right-click on it and select "Properties" from the context menu. In the folder properties window, go to the "General" tab and find the "Size" section to find out how much space the folder takes up. 2. Enable "
 Fix: Taskbar thumbnail preview disappears too quickly on Windows 11
Sep 14, 2023 pm 03:33 PM
While taskbar thumbnail preview is a very useful feature, some users have reported issues with it. In most cases, it is impossible to click on the application icon because the thumbnail preview disappears too quickly. In this guide, we’ll discuss the expert-recommended methods to fix taskbar preview issues right after explaining the causes. Why do taskbar thumbnail previews disappear so quickly? Corrupted system files or other system file errors Outdated Windows versions Third-party security software conflicts Corrupted user profiles How to stop taskbar thumbnail previews from disappearing quickly on Windows 11? Before proceeding with any steps to fix taskbar thumbnail preview not working on Windows 11, do the following preliminary checks: Right-click on the desktop &
 How to Completely Remove Unwanted Display Languages on Windows 11
Sep 24, 2023 pm 04:25 PM
Work on the same setup for too long or share your PC with others. You may have some language packs installed, which often create conflicts. So, it’s time to remove unwanted display languages in Windows 11. Speaking of conflicts, when there are multiple language packs, inadvertently pressing Ctrl+Shift changes the keyboard layout. If not taken care of, this can be a hindrance to the task at hand. So, let’s jump right into the method! How to remove display language from Windows 11? 1. From Settings press + to open the Settings app, go to Time & Language from the navigation pane and click on Language & Region. WindowsI click the ellipsis next to the display language you want to remove and select Remove from the pop-up menu. Click "
 How to fix device disabled (error code 22) in Windows 10/11
Aug 04, 2023 pm 03:17 PM
Is the "This device is disabled" code 22 error in Device Manager preventing you from using a new or old device on your PC? Don’t worry because we are here to help you solve this problem. A code 22 error means the device has been manually disabled and sometimes re-enabling it does not help. Whatever the cause, here are 10 ways to fix the “This device is disabled” code 10 error on Windows 22/PC and make that hardware work again. 1. Unplug and replug new hardware New hardware you plug into your PC may start working again after a quick removal and reinstallation. So if it's a device plugged in via USB, go ahead and unplug it. Then, wait a few seconds and plug it back in. Now, check if the device is showing up in device manager


