

Create a contact form in WordPress using a free plugin

Today, we will discuss the Formidable Forms plugin for WordPress, which allows you to easily create different types of forms. Specifically, we’ll look at how to use this plugin to build a contact form for your website. We will first explore the basic settings provided by this plugin, and then we will go through a practical example of building a contact form using this plugin.
As a website owner, you may want to get feedback from your users and customers about your services, which will help you serve them better. Therefore, a contact form on your website is one of the must-have features to collect user feedback.
If you are a WordPress developer or building websites with WordPress as a hobby, you already know that WordPress offers a ton of plugins for just about every feature you can think of, and it can be hard to choose which one to use. For this article, I have chosen one of the best forms in this category: Powerful Forms, and I will show you how to use it throughout this tutorial.
In this article, I am using WordPress 5.1 and the Formidable Forms plugin version is 3.06. If you want to follow this article, I recommend you install it. To install the Formidable Forms plugin, you just need to follow the standard installation process.
In the next few sections, we will explore the basics of the Formidable Forms plugin and the setup process. We will then build a real-life example to demonstrate the use of the plugin. At the same time, we will also cover several important aspects of the plugin, which allows you to create different types of forms that can collect data, not just contact forms.
What is a powerful form?
Formidable Forms plugin is a powerful form builder plugin that allows you to create different types of forms to collect user information. It provides a drag-and-drop interface on the backend, making the entire process a breeze. In fact, you can use this plugin to create any type of form you can think of, not just contact forms.
Let’s take a quick look at the features it offers:
- Drag and Drop Contact Form Maker and Form Builder
- Supports email notifications and automatic replies
- Customize the look and feel of your contact form using built-in stylers
- Integrate with MailChimp, Constant Contact, Salesforce, and more
- Mobile friendly and responsive
- Spam Protection
- there are more
As you can see, this plugin offers many exciting features that you can use to build awesome forms on your website. And it's also extensible, which is an important feature as it gives developers the opportunity to change certain aspects and core behavior of the plugin.
In the next section, we will discuss several core elements of the plugin that are important to understand if you want to use the plugin effectively.
Explore Settings
After you install the Formidable Forms plugin, it will add a link in the left sidebar. Let's take a brief look at each section.
sheet
In this section you can create new forms, edit existing forms, and view a list of created forms.
It provides three different ways to create new forms. You can build a form from scratch using a drag-and-drop interface. Or you can choose from built-in form templates to start creating a new form. Finally, you can also import forms from XML files. Regardless, you will end up creating a form that will be displayed on the frontend using shortcodes.
entry
This is an entry list page that lists all records submitted by the front end. There is a filter that allows you to filter records by form type. In addition to the list, you can view entries in detail in the form details view. Finally, there is a delete option that you can use if you wish to clear out old records.
style
In this section, you can manage different form styles that can be used to style the form when it is displayed on the front end.
Form styles allow you to configure and customize how different elements of a form, such as form titles, field labels, or buttons, appear. There is already a default style available that you can use and customize as per your requirements. Alternatively, if you don't want to use any form styles, you can disable styles and use custom CSS.
Import and Export
This section allows you to import and export forms created by this plugin. This is a very useful feature if you want to move forms between different WordPress installations.
For example, if you created several forms in a local setup and wanted to move those forms to the live site, would you create it again on the live site? In fact, you can just export these forms in XML or CSV format and then use this feature to import them into a live installation. I'd say this is a must-have feature!
Global Settings
In this section you can configure settings that apply globally to all forms. You can configure different aspects of this plugin, for example:
- User rights
- reCAPTCHA settings
- Default front-end message
- IP Storage
In the next section, we will build a practical example as a demonstration.
Build contact forms with powerful forms
In this section, we will build a real-life example that demonstrates how to use the Formidable Forms plugin to create a contact form on your website.
Before we continue, if you want to proceed, make sure you have the Formidable Forms plugin installed in your WordPress site.
You can use the built-in contact form that comes with this plugin, but we’ll create a new form from scratch to walk you through the process. Continue to the Powerful> Forms link in the left sidebar of the backend. This should list all existing forms in the system. Click the Add New button to create a new form and you will be asked to choose one of the following three options.
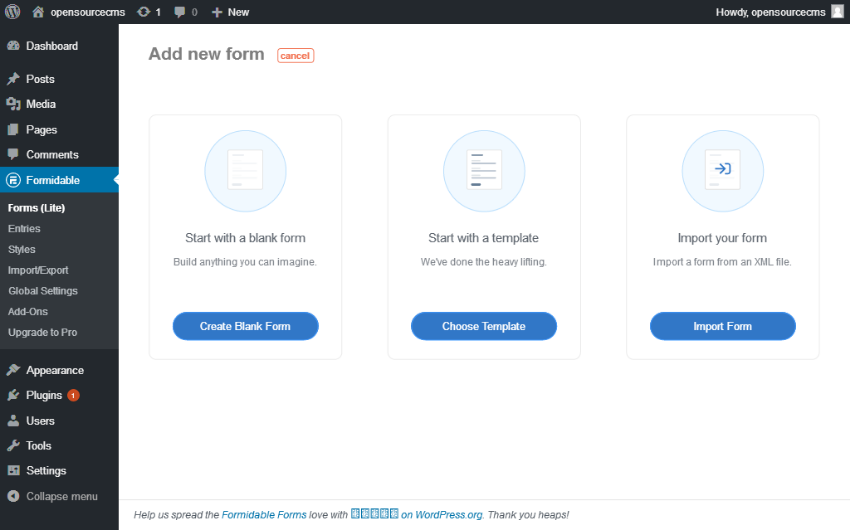
You should be familiar with these three options - we just discussed them in the previous section. Go ahead and click Create Blank Form to create the form from scratch, which will show you the following interface.
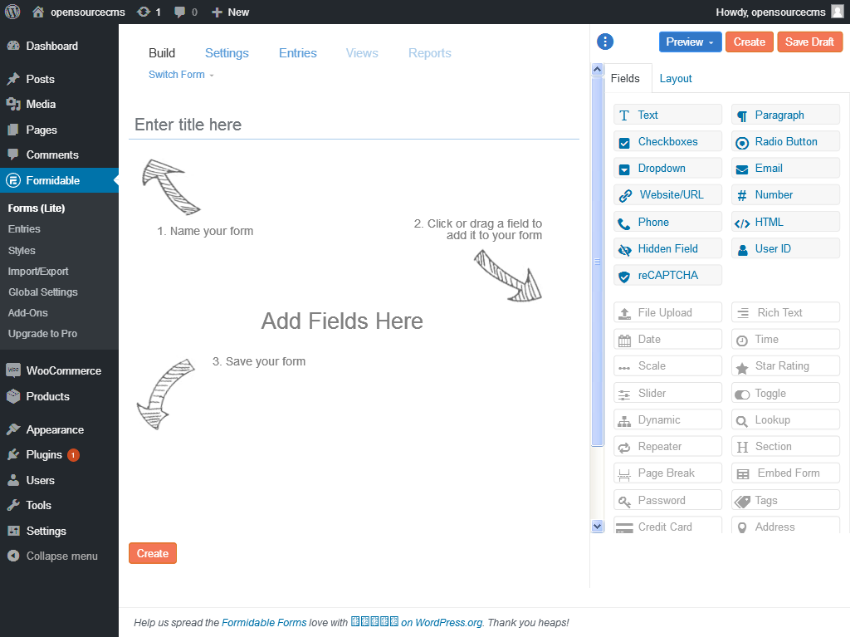
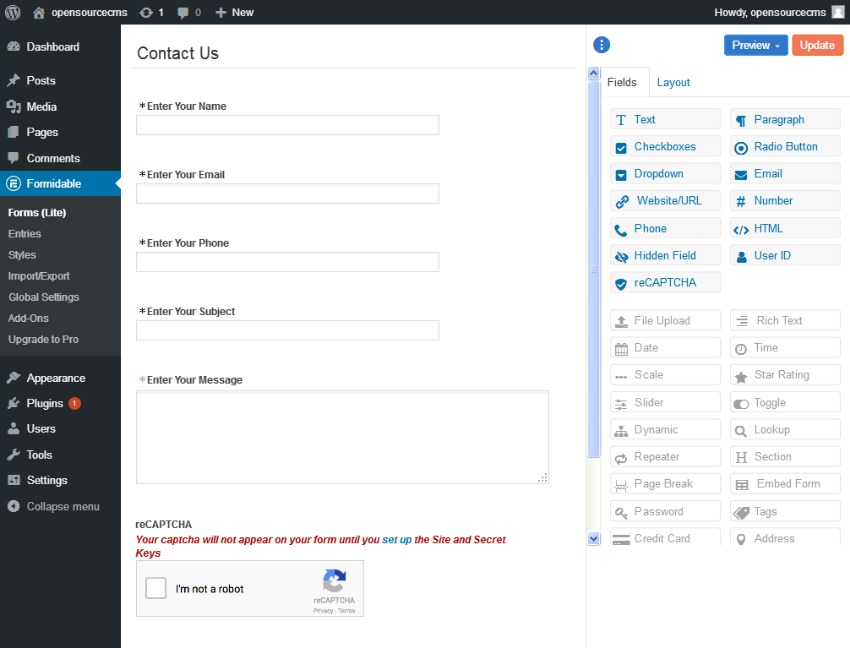
As you can see, the form builder interface is very intuitive. You can add any number of fields to your form from the list in the right sidebar.
First, let’s enter a name for the form. Enter Contact Us in the Enter title here field.
In our example we will add fields for the following data:
- Name
- Telephone
- theme
- information
- Verification code
Drag the Text field from the field list in the right sidebar and drop it into the content area titled Add Field Here. It will add a new field to your form.
After adding any field, you need to configure certain settings for that field. Since we just added a new text field, let's see how to configure it so that it becomes a Name field.
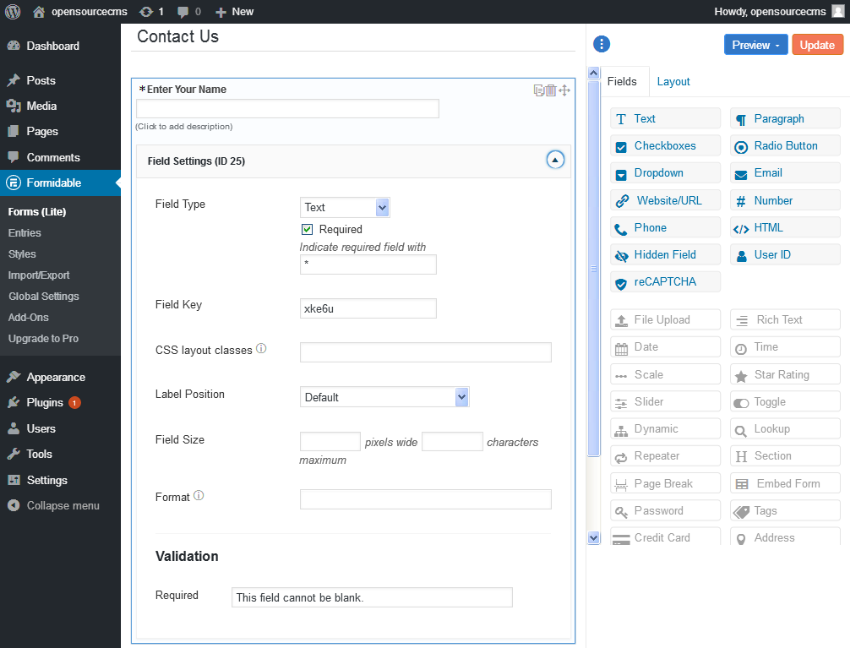
As you can see, the Field Settings section allows us to configure the field, such as whether it is required, label position, or field size. Continue configuring the name field.
Next, use the same drag-and-drop interface to add the Email, Phone, and Subject fields. So far, the fields we have added are text fields.
Next, add the Paragraph field that will serve as the message field in the form. This will be paragraph type.
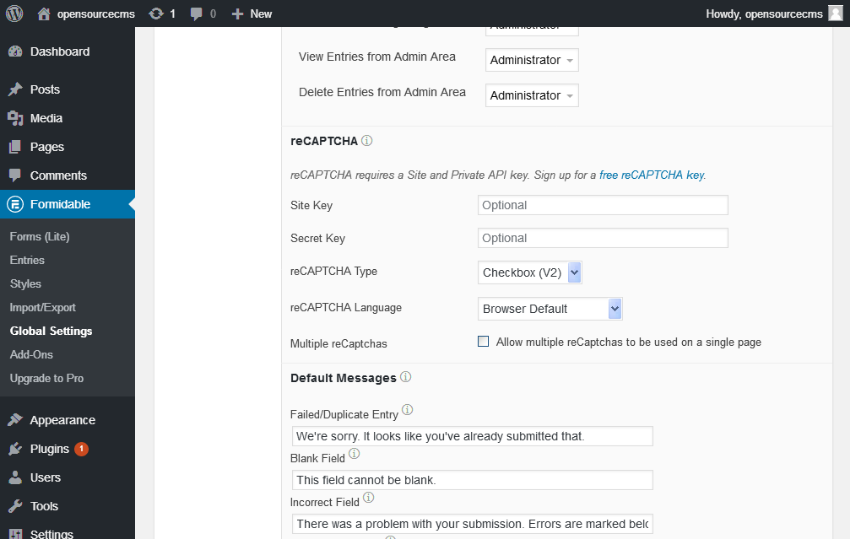
Finally, add a reCAPTCHA field to prevent spam. To enable reCAPTCHA spam protection, you need to configure the site key and secret key under the Powerful >Global Settings> reCAPTCHA section as follows Shown below screenshot.
After adding all the fields, the form should look like the following screenshot:
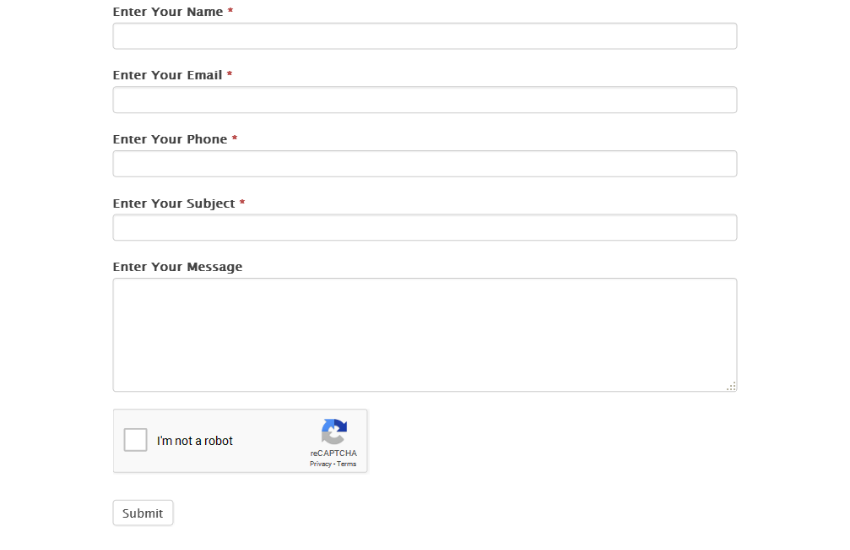
Of course, this is just a backend preview. You need to use shortcodes to display the form on the front-end. You can copy the form's shortcode from the form list page.
Get the shortcode for the form you just created. You can use this shortcode in a post or in your sidebar - wherever you want to display this form.
It looks like this:
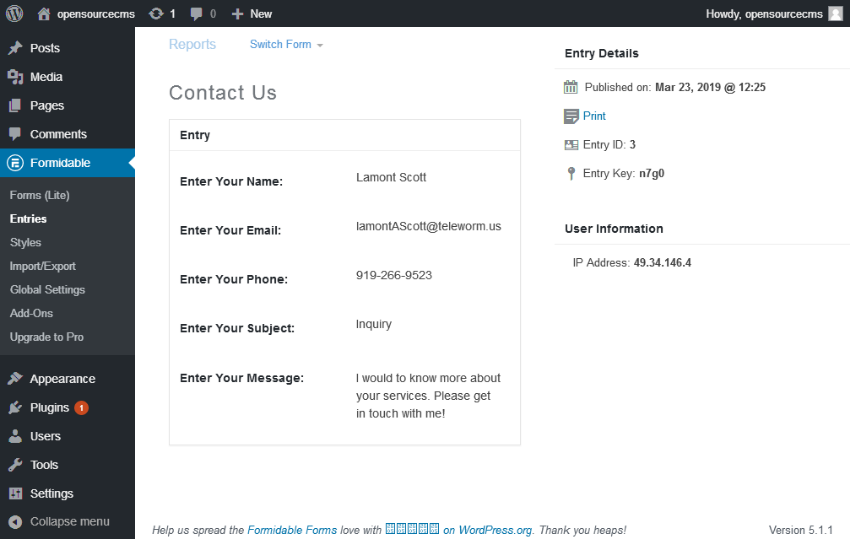
Continue submitting the form for testing. You can verify submitted entries in the Powerful>Entries section.
So you can create a form, add fields, and finally display it on the frontend: using shortcodes. In fact, you can do more because Formidable Forms offers more functionality. I encourage you to explore the other settings this plugin offers - it should be fun!
Advanced form plugin
As I showed above, Formidable Forms is an excellent free software package for building WordPress forms. If your website needs more advanced features, check out some of the professional-grade form builders provided by CodeCanyon. For a small cost, these plugins can save you a lot of work and take your WordPress website to the next level.
 Ashraf Hatibelagar地址>
WordPress
Ashraf Hatibelagar地址>
WordPress-
Nona Blackman地址>
WordPress
-


Choosing a Form Builder: Comparing the 7 Best WordPress Form Builders


 Ashraf Hatibelagar地址>
WordPress
Ashraf Hatibelagar地址>
WordPress

 Nona Blackman地址>
WordPress
Nona Blackman地址>
WordPressin conclusion
Today, we discussed how to create a contact form using the Formidable Forms plugin in WordPress. We also provide an in-depth overview of this plugin and discuss its different aspects.
Please feel free to share your thoughts and feedback using the feed below! If you’d like to share your experiences with other contact form plugins you’ve used on your website, I’d love to hear from you.
The above is the detailed content of Create a contact form in WordPress using a free plugin. For more information, please follow other related articles on the PHP Chinese website!

Hot AI Tools

Undresser.AI Undress
AI-powered app for creating realistic nude photos

AI Clothes Remover
Online AI tool for removing clothes from photos.

Undress AI Tool
Undress images for free

Clothoff.io
AI clothes remover

AI Hentai Generator
Generate AI Hentai for free.

Hot Article
Hot Tools

Notepad++7.3.1
Easy-to-use and free code editor

SublimeText3 Chinese version
Chinese version, very easy to use

Zend Studio 13.0.1
Powerful PHP integrated development environment

Dreamweaver CS6
Visual web development tools

SublimeText3 Mac version
God-level code editing software (SublimeText3)
Hot Topics


 PHP vs. Flutter: The best choice for mobile development
May 06, 2024 pm 10:45 PM
PHP vs. Flutter: The best choice for mobile development
May 06, 2024 pm 10:45 PM
PHP and Flutter are popular technologies for mobile development. Flutter excels in cross-platform capabilities, performance and user interface, and is suitable for applications that require high performance, cross-platform and customized UI. PHP is suitable for server-side applications with lower performance and not cross-platform.
 How to change page width in wordpress
Apr 16, 2024 am 01:03 AM
How to change page width in wordpress
Apr 16, 2024 am 01:03 AM
You can easily modify your WordPress page width by editing your style.css file: Edit your style.css file and add .site-content { max-width: [your preferred width]; }. Edit [your preferred width] to set the page width. Save changes and clear cache (optional).
 How to create a product page in wordpress
Apr 16, 2024 am 12:39 AM
How to create a product page in wordpress
Apr 16, 2024 am 12:39 AM
Create a product page in WordPress: 1. Create the product (name, description, pictures); 2. Customize the page template (add title, description, pictures, buttons); 3. Enter product information (stock, size, weight); 4 . Create variations (different colors, sizes); 5. Set visibility (public or hidden); 6. Enable/disable comments; 7. Preview and publish the page.
 In which folder are wordpress articles located?
Apr 16, 2024 am 10:29 AM
In which folder are wordpress articles located?
Apr 16, 2024 am 10:29 AM
WordPress posts are stored in the /wp-content/uploads folder. This folder uses subfolders to categorize different types of uploads, including articles organized by year, month, and article ID. Article files are stored in plain text format (.txt), and the filename usually includes its ID and title.
 Where is the wordpress template file?
Apr 16, 2024 am 11:00 AM
Where is the wordpress template file?
Apr 16, 2024 am 11:00 AM
WordPress template files are located in the /wp-content/themes/[theme name]/ directory. They are used to determine the appearance and functionality of the website, including header (header.php), footer (footer.php), main template (index.php), single article (single.php), page (page.php), Archive (archive.php), category (category.php), tag (tag.php), search (search.php) and 404 error page (404.php). By editing and modifying these files, you can customize the appearance of your WordPress website
 How to search for authors in WordPress
Apr 16, 2024 am 01:18 AM
How to search for authors in WordPress
Apr 16, 2024 am 01:18 AM
Search for authors in WordPress: 1. Once logged in to your admin panel, navigate to Posts or Pages, enter the author name using the search bar, and select Author in Filters. 2. Other tips: Use wildcards to broaden your search, use operators to combine criteria, or enter author IDs to search for articles.
 Which version of wordpress is stable?
Apr 16, 2024 am 10:54 AM
Which version of wordpress is stable?
Apr 16, 2024 am 10:54 AM
The most stable WordPress version is the latest version because it contains the latest security patches, performance enhancements, and introduces new features and improvements. In order to update to the latest version, log into your WordPress dashboard, go to the Updates page and click Update Now.
 What language is used to develop WordPress?
Apr 16, 2024 am 12:03 AM
What language is used to develop WordPress?
Apr 16, 2024 am 12:03 AM
WordPress is developed using PHP language as its core programming language for handling database interactions, form processing, dynamic content generation, and user requests. PHP was chosen for reasons including cross-platform compatibility, ease of learning, active community, and rich library and frameworks. Apart from PHP, WordPress also uses languages like HTML, CSS, JavaScript, SQL, etc. to enhance its functionality.
