Like an overzealous vacuum cleaner, your Windows 11 system eats up tons of data seemingly for no reason. You realize you can't suffer it in silence. Of course, the operating system comes with new features, so it cannot consume the same amount of data as its predecessors.
However, you should not constantly become a slave to data purchases. To help you, we've come up with a few ways to expand your data to serve you longer.
Why does Windows 11 system use so much data? It’s no secret that operating systems are data hogs. From automatic app updates to background programs, if you're on a limited plan, you'll be lucky to leave any data behind.
Another reason is the various Windows 11 customizations you've made. Of course, themes and wallpapers make for a beautiful UI, but they come at a price.
How to stop Windows 11 from consuming so much data?
1. Enforce data restrictions
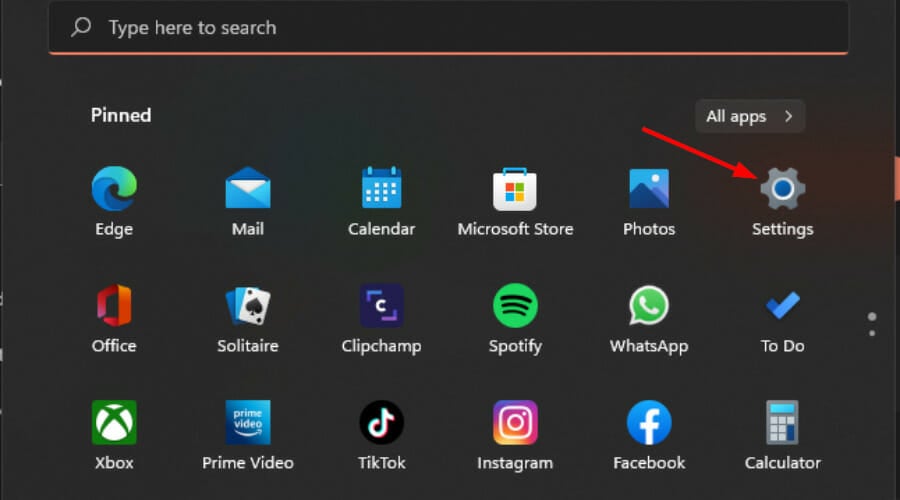
- Press and select Settings. Windows

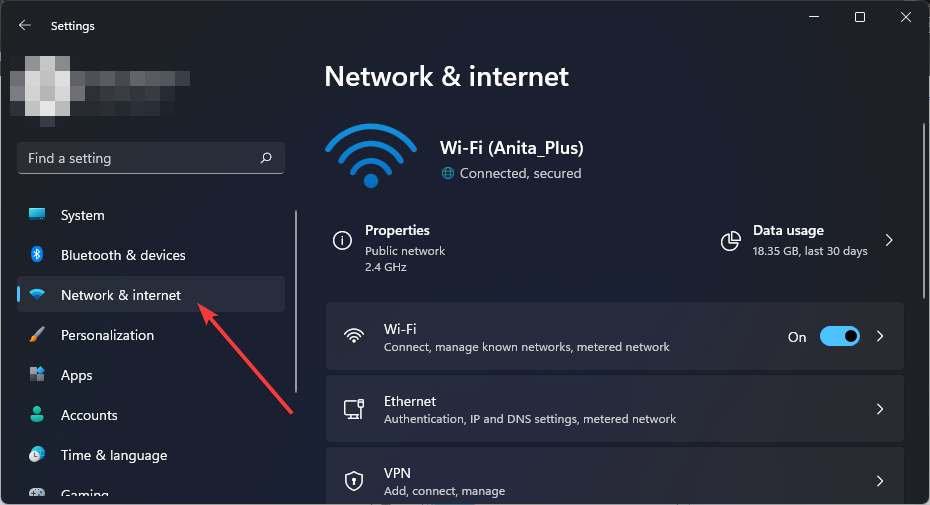
- Click Network & Internet in the left pane.

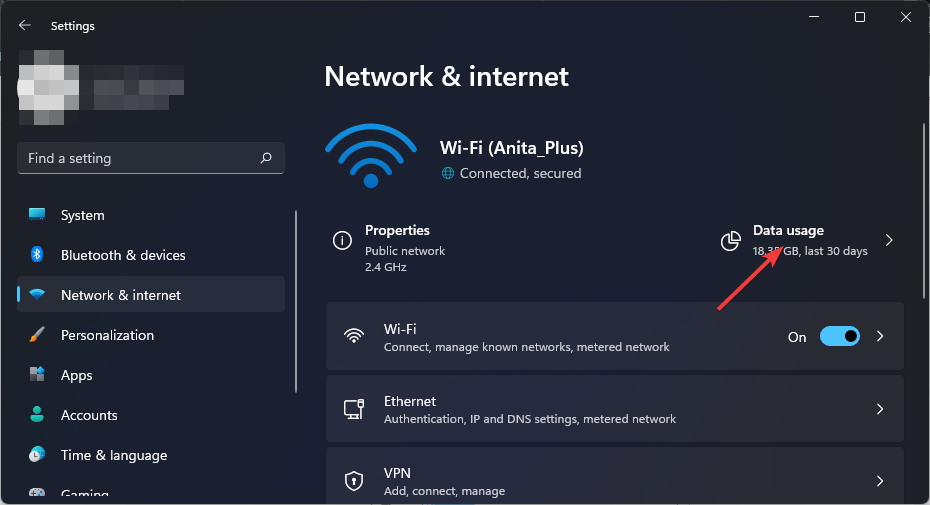
- On your current Wi-Fi connection, click Data Usage.

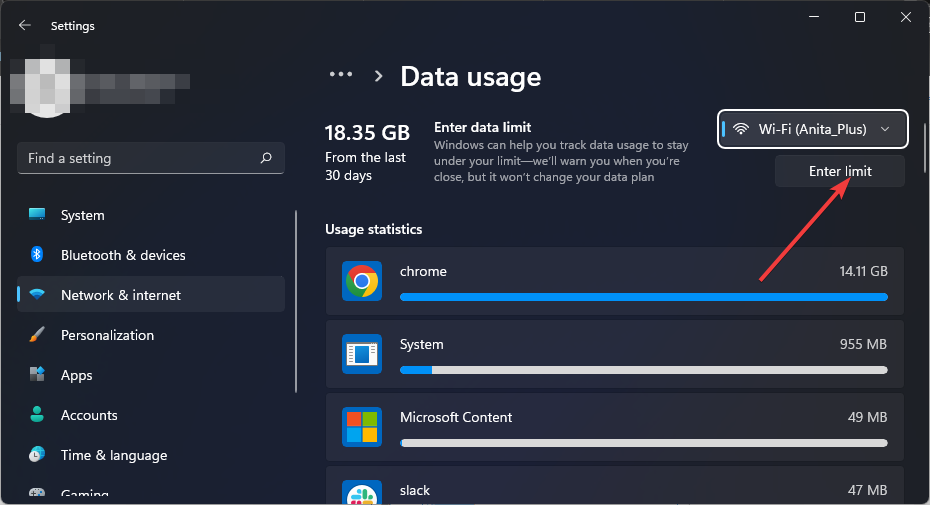
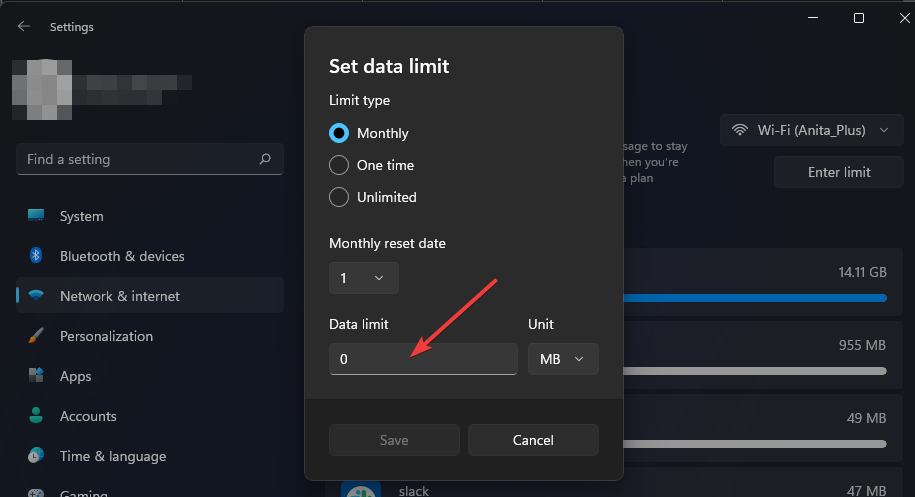
- Select "Input restrictions".

- Set restriction type, ranging from monthly to unlimited options.
- Select the day you want your data to be reset monthly from the drop-down menu under Monthly Reset Date.
- Now enter the data limit and choose whether to limit in MB or GB and finally, click Save.

Please be careful not to set this limit too low as this may interfere with the way some apps work. For example, a user who sets a data usage limit on their Teams app has incoming video disabled.
For more ways to limit bandwidth in Windows 11, check out our comprehensive article.
2. Set up a metered connection
- button and select Settings. Windows

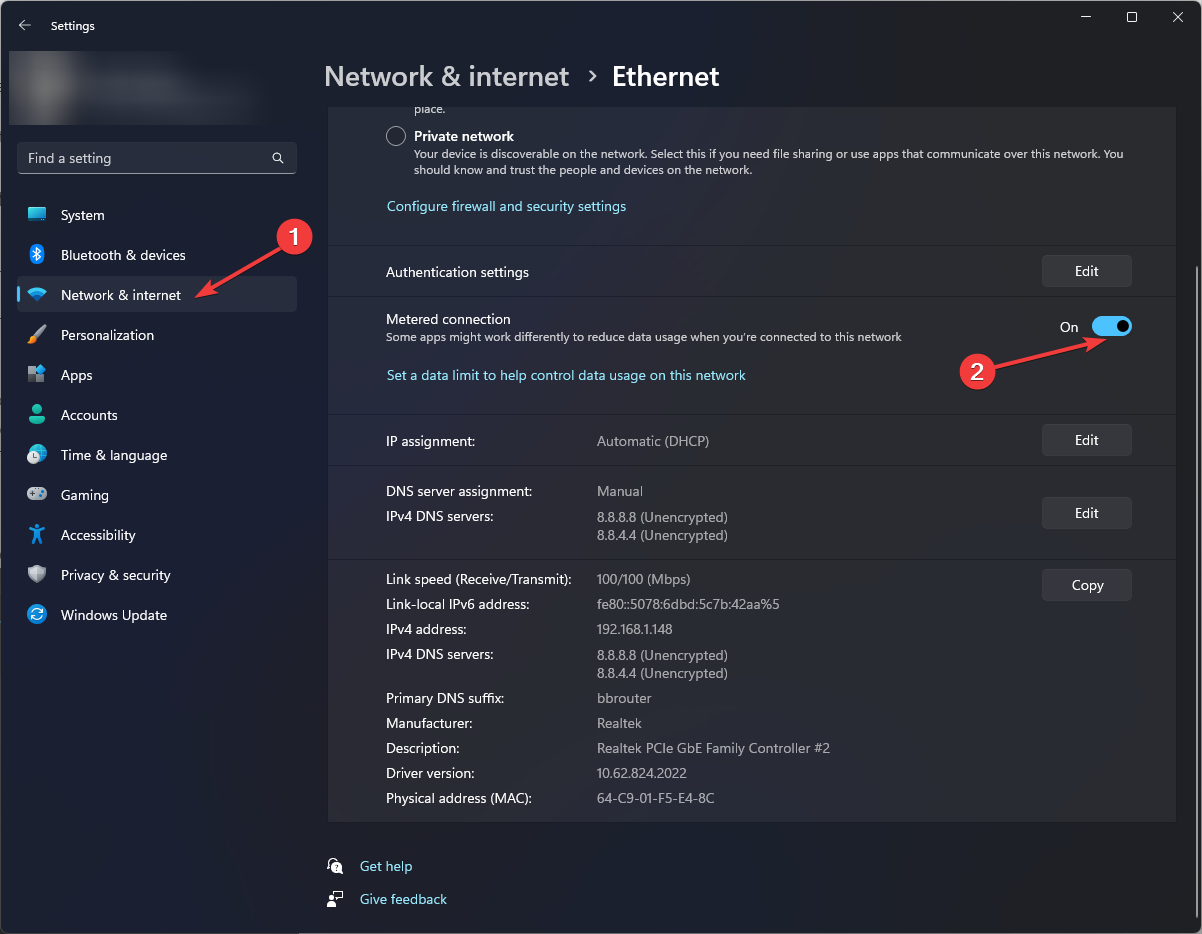
- Go to Network & Internet.

- Select WiFi or Ethernet, depending on the connection you want to set up as metered.
- Click on the network and turn on the switch for billed connections by traffic.

3. Pause window updates
- button and selectSettings. Windows

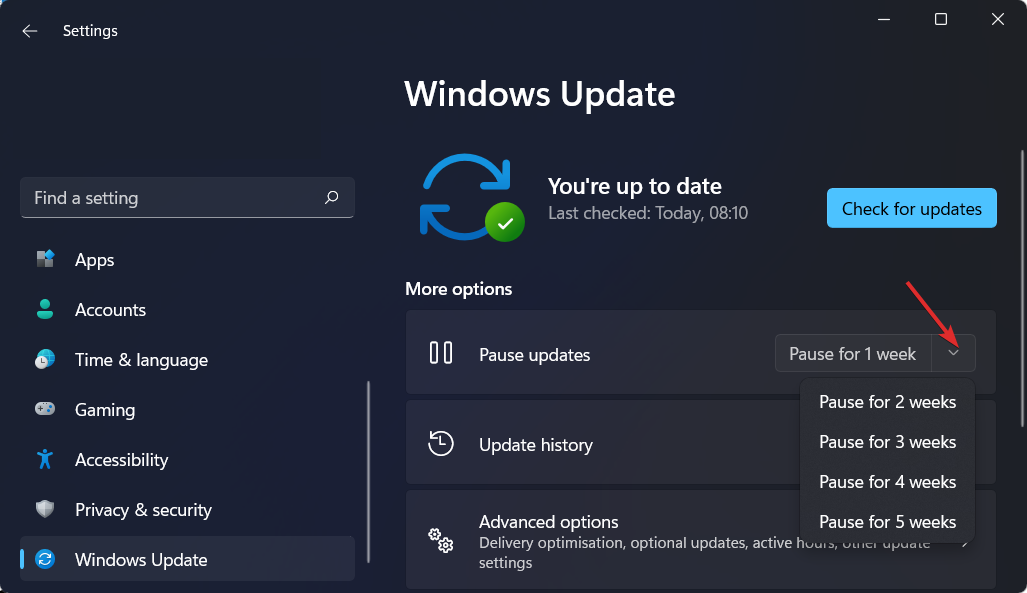
- Navigate to Windows Update.

- Click the drop-down arrow next to Pause updates and select the desired period of time during which the operating system will not update itself.

Keep in mind that there are risks in not updating your operating system regularly, so be sure to manually check for updates to keep your system secure.
4. Disable startup applications
- Tap the key and click Settings. Windows

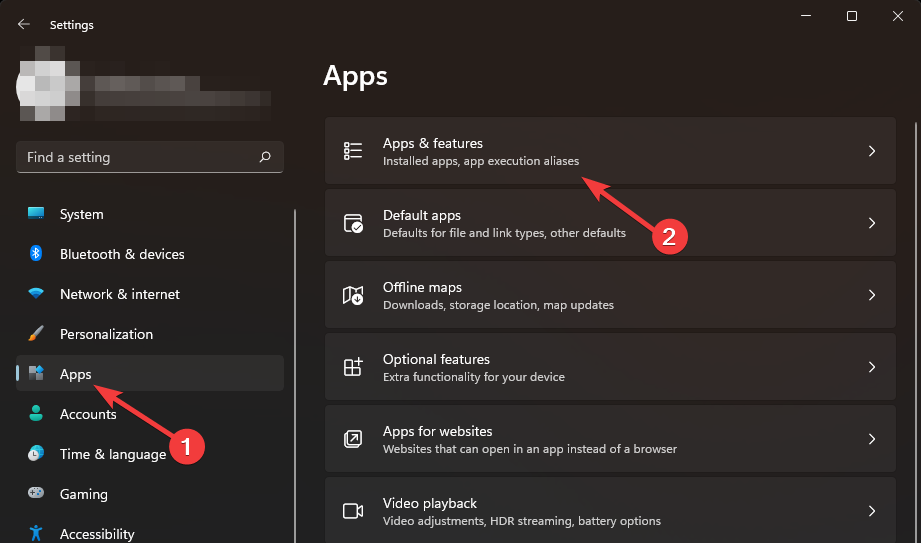
- Click Apps in the left pane and select Apps & Features.

- Check the list and find the application you want to disable at startup.
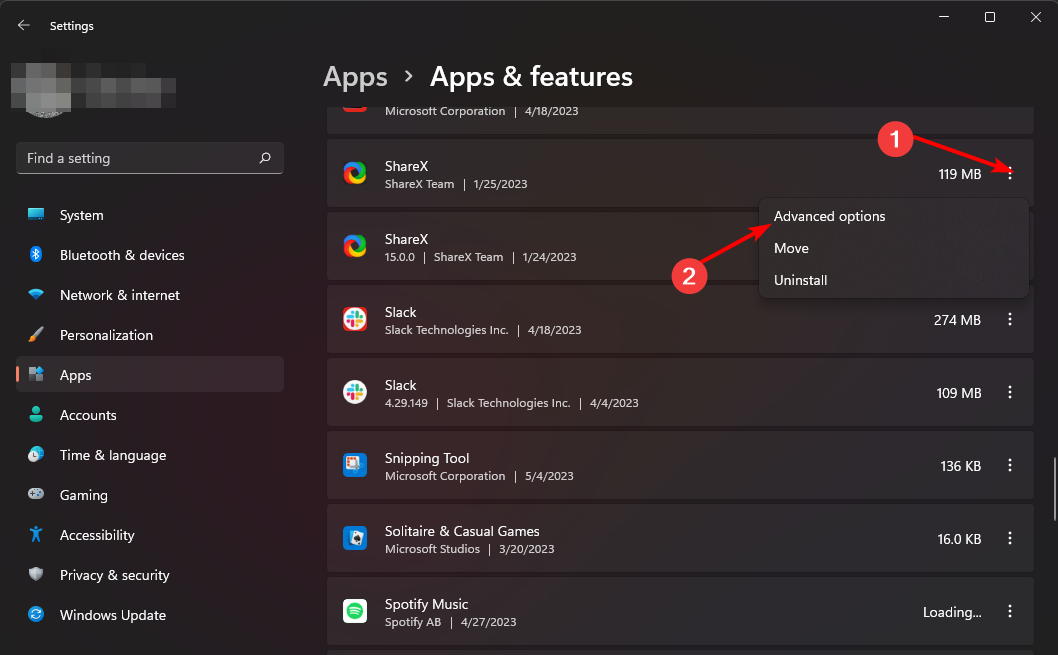
- Click the three ellipses to select the application, then click Advanced Options.

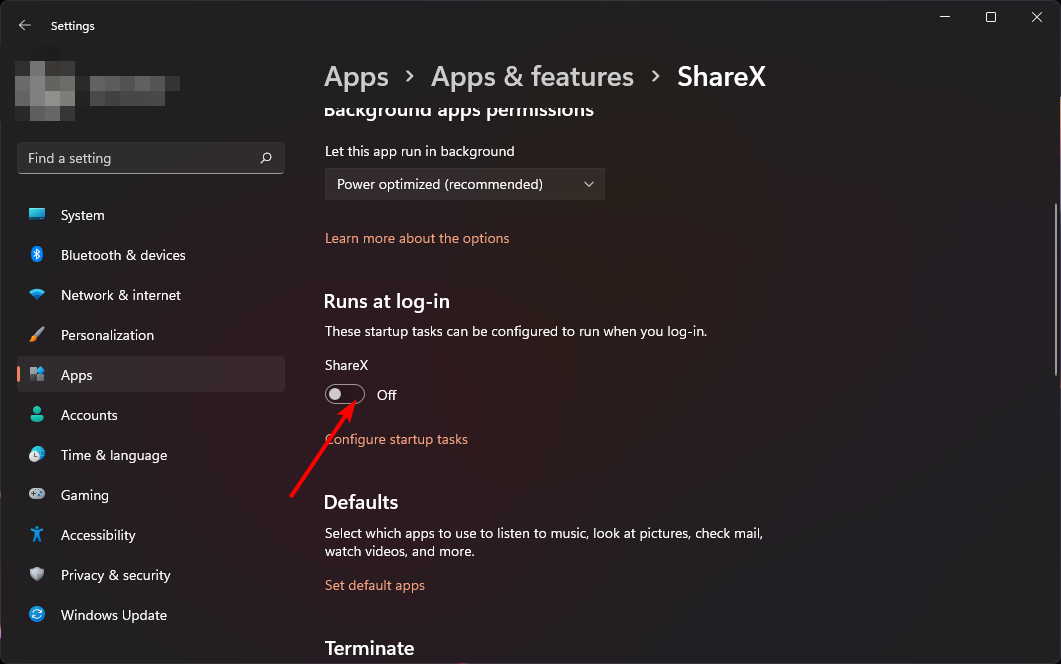
- Under the Run at Login option, toggle the Off button to Disabled and then back to Enabled.

5. Close background applications
- Tap the key and click Settings. Windows

- Click Apps in the left pane and select Apps & Features.

- Search for the app you want to disable, click the three ellipses next to the app, and select "Advanced options".

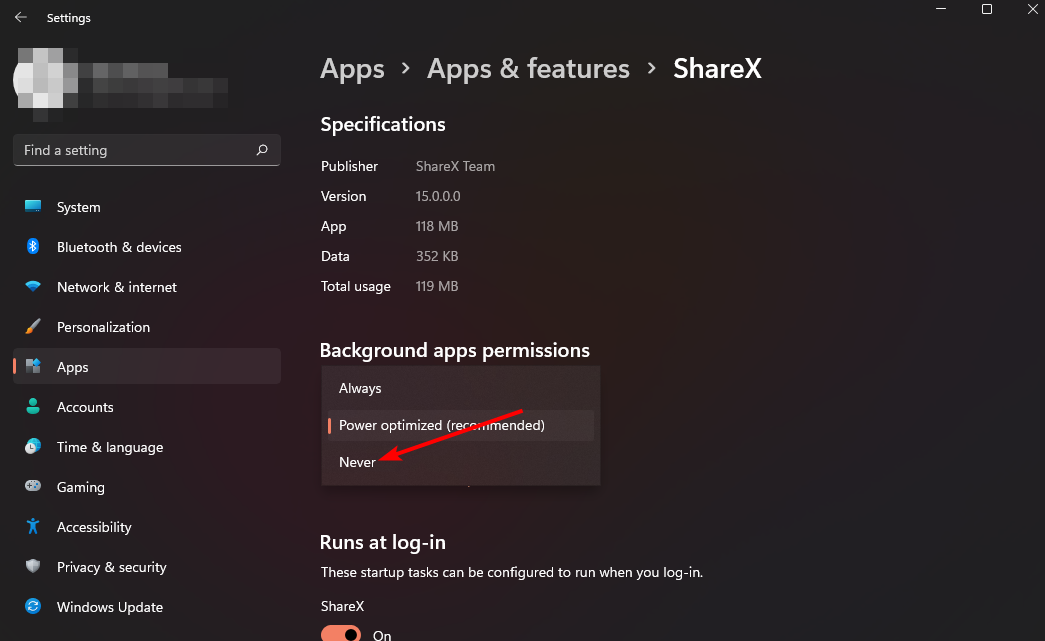
- Navigate to the "Background App Permissions" section.
- Under "Allow this app to run in the background", select the "Never" option.

- Repeat the same steps for each background app that needs to be disabled.
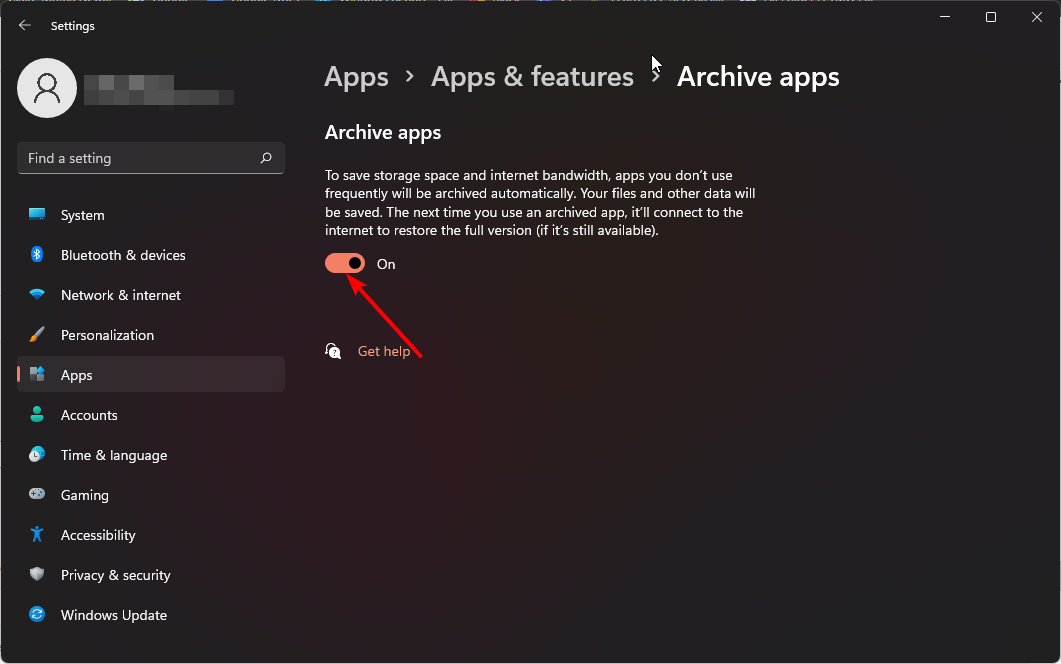
6. Archive non-essential programs
- Click the key and click Settings. Windows

- Click Apps in the left pane and select Apps & Features.

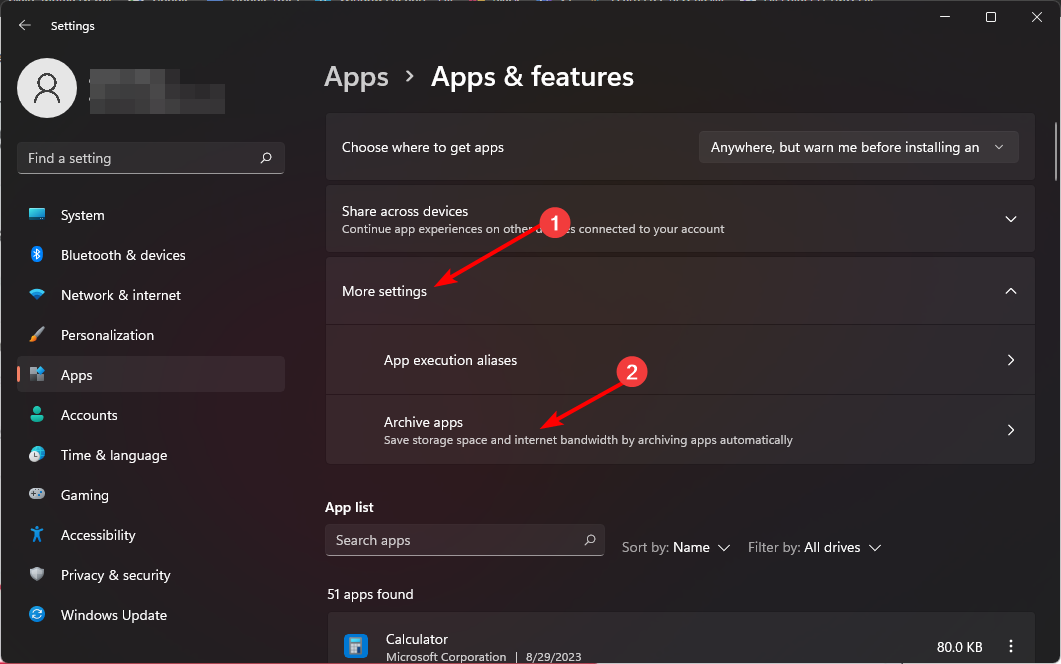
- Select More Settings and click Archive App.

- Open archiveApplication button.

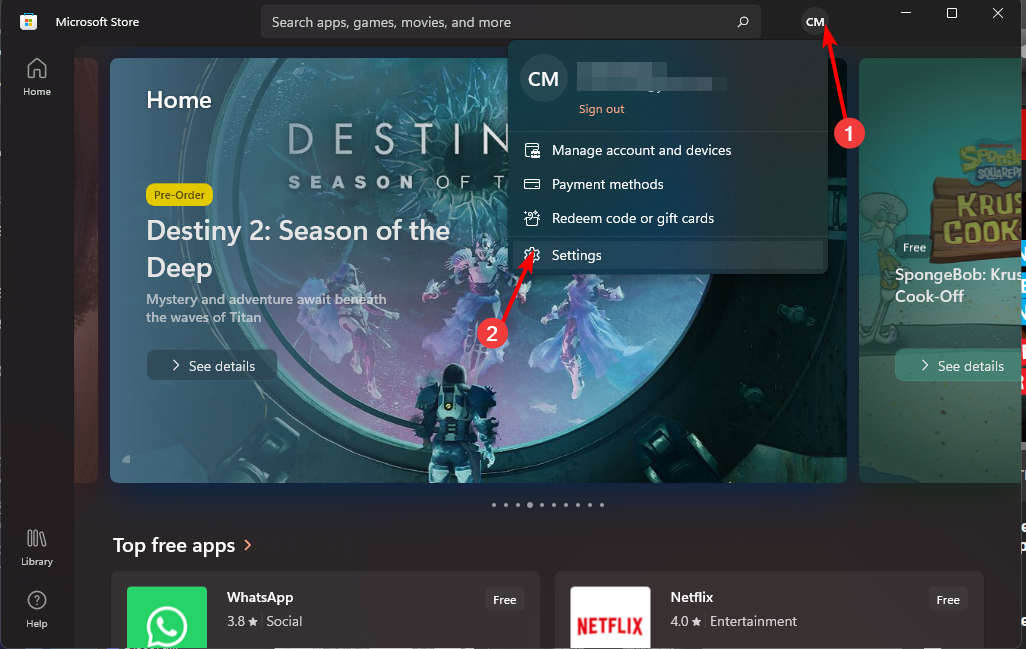
7. Turn off automatic app updates
- Launch the Microsoft Store from the taskbar or search.
- Click on your profile picture and select Settings.

- Turn off automatic app updates.

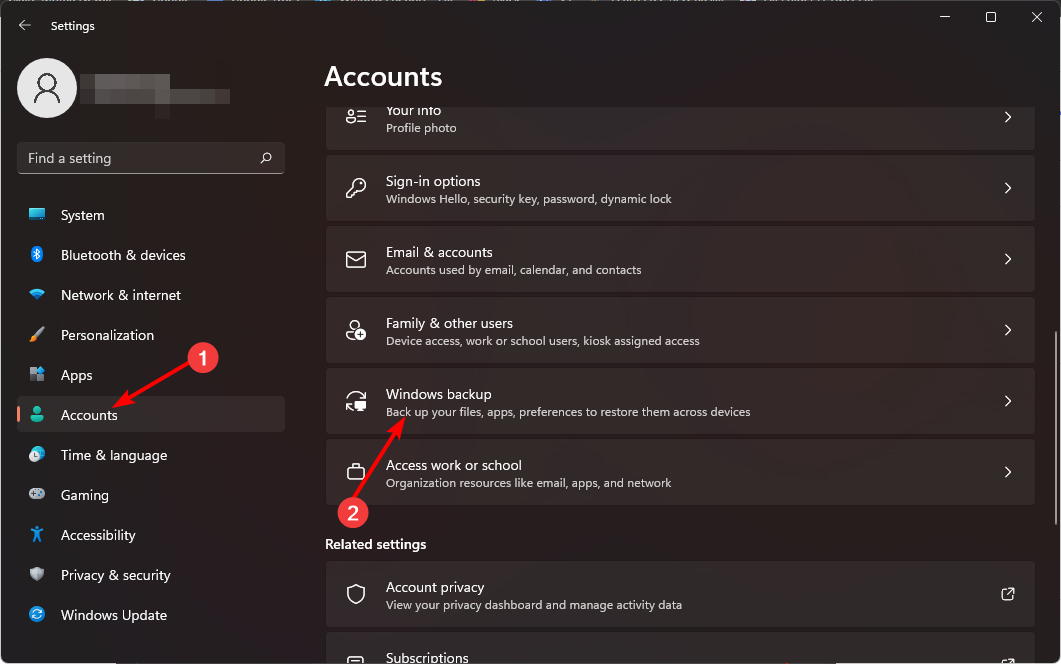
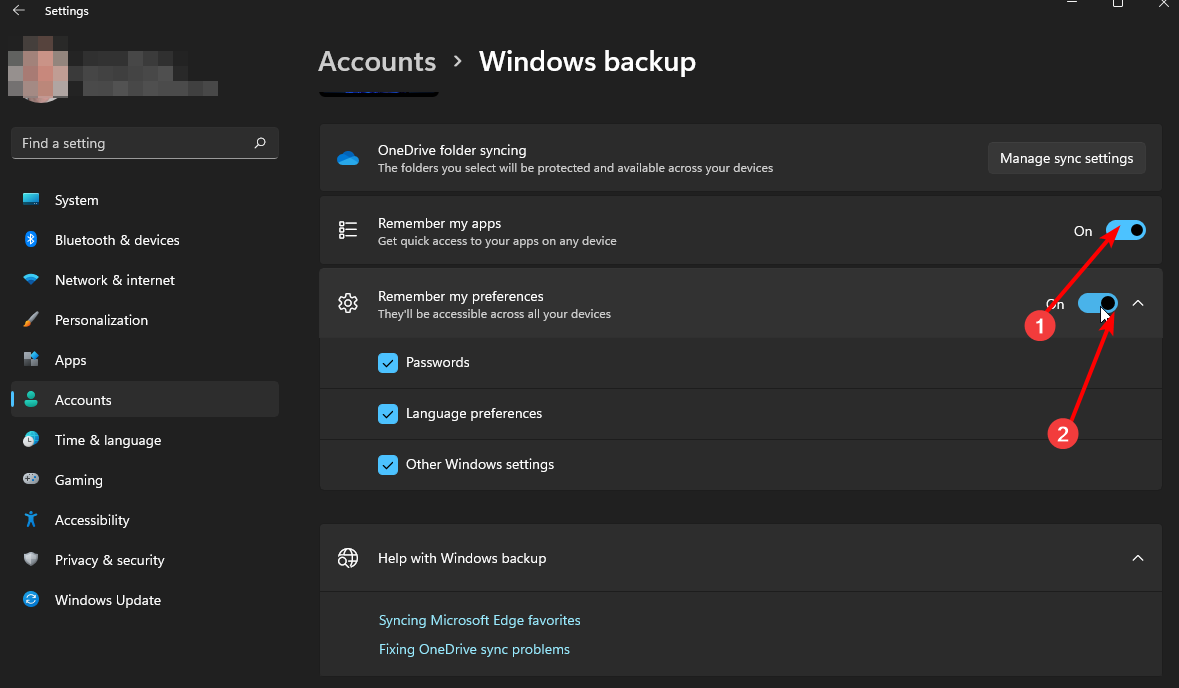
8. Disable automatic synchronization
- Tap the key and click Settings. Windows

- Click "Account" and select "Windows Backup".

- Turn off the Remember my apps and Remember my preferences options to disable automatic syncing.

9. Disable delivery optimization service
- Press the key to open the "Settings" application. WindowsI
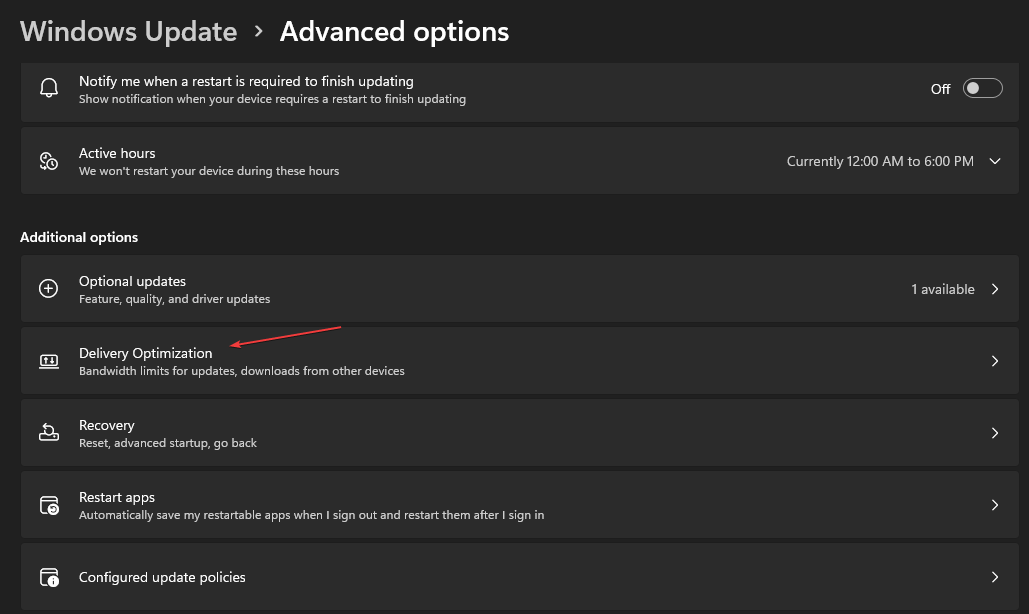
- Select Windows Update Options from the left pane of the screen and click the Advanced Options button.

- Scroll down to the Add Options section and click the Delivery Optimization button.

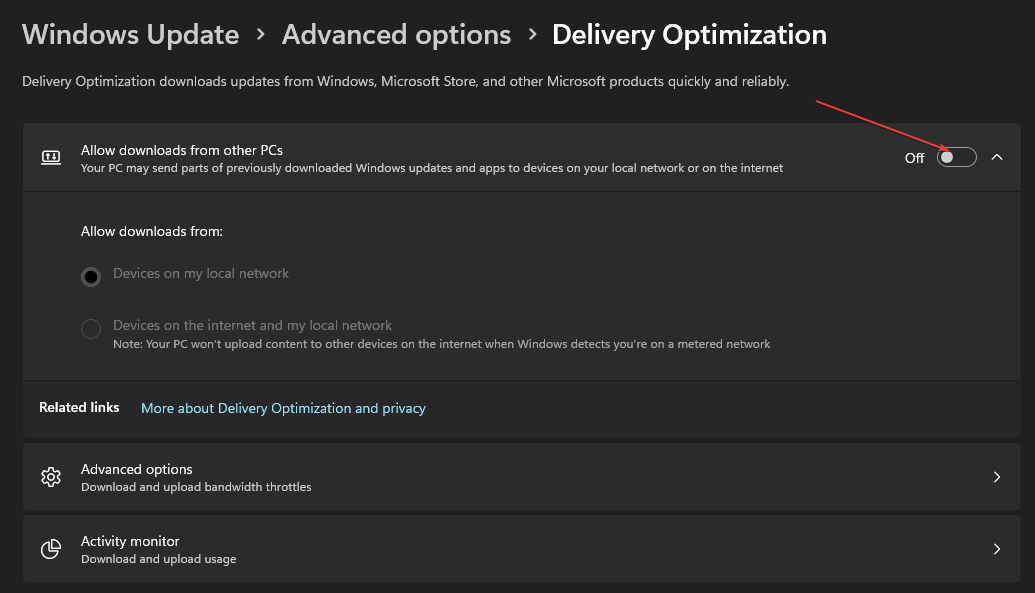
- Go to the Allow downloads from other PCs option and turn off the switch.

What tips can optimize data usage on Windows 11?
- Limit background processes to a minimum. See how many processes there should be at any given time.
- Switch to a data-efficient browser and only download updates when connected to Wi-Fi.
- Uninstall applications you no longer use.
- Turn off auto-playing videos on streaming sites.
- Download the Bandwidth Limiter tool to enforce usage limits, monitor network traffic, and automatically throttle network traffic when set limits are exceeded.
Issues with the system using too much data may harm your overall browsing experience. You may experience a slow internet connection because too many applications and services are competing for limited bandwidth.
As you can see, with some quick configuration changes on your Windows machine and frequent data usage monitoring, you should be able to handle any potential bandwidth issues that may arise.
If you've been worried about significantly higher data usage after upgrading to Windows 11, with these tweaks, things should get back to normal.
The above is the detailed content of How to control or stop system using too much data on Windows 11?. For more information, please follow other related articles on the PHP Chinese website!


