

How to protect your eyes on iOS 17 with the screen distance measurement tool

In iOS 17 and iPadOS 17, Apple is introducing new tools for improving eye health when looking at screens. These tools, called Screen Distance, are aimed primarily at children, but can be used by anyone who wants to reduce eye strain. Read on to learn how it works.

While it's impossible for children to completely stop using screens in this day and age, Apple has added some new tools that parents can use to help protect their children's eyes while they're using an iPhone or iPad healthy.
Of course, no one is too old to keep their eyes in good condition, which is why adults can use the new screen distance tool, too. To reduce eye strain and the risk of myopia in children, Screen Distance helps you keep your iPhone at the recommended distance.
Apple recommends an eye viewing distance of 12 inches and will provide positioning guides to help you know where to hold your device for optimal viewing without causing eye strain. Here's how to enable new features.
- Open the Settings app on your iPhone or iPad.
- ClickScreen Time.
- Under "Restricted Usage," click Screen Distance.
- Read the information screen, then continue.
- Toggle the Screen Distance switch so that it is in the green "on" position.

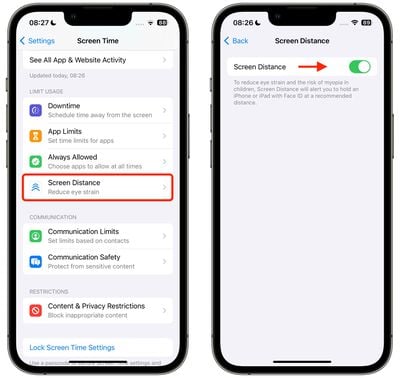
If an iPhone or iPad is too close, Apple’s “Shield” now lets you (or your kids) know the monitor needs to be farther away. Once the device has moved to the recommended distance, the shield will display a "Continue" button for you to continue what you are doing.
The above is the detailed content of How to protect your eyes on iOS 17 with the screen distance measurement tool. For more information, please follow other related articles on the PHP Chinese website!
Hot AI Tools

Undresser.AI Undress
AI-powered app for creating realistic nude photos

AI Clothes Remover
Online AI tool for removing clothes from photos.

Undress AI Tool
Undress images for free

Clothoff.io
AI clothes remover

AI Hentai Generator
Generate AI Hentai for free.
Hot Article
Hot Tools

Notepad++7.3.1
Easy-to-use and free code editor

SublimeText3 Chinese version
Chinese version, very easy to use

Zend Studio 13.0.1
Powerful PHP integrated development environment

Dreamweaver CS6
Visual web development tools

SublimeText3 Mac version
God-level code editing software (SublimeText3)
Hot Topics
 1377
1377
 52
52

 How to interpret the output results of Debian Sniffer
Apr 12, 2025 pm 11:00 PM
How to interpret the output results of Debian Sniffer
Apr 12, 2025 pm 11:00 PM
DebianSniffer is a network sniffer tool used to capture and analyze network packet timestamps: displays the time for packet capture, usually in seconds. Source IP address (SourceIP): The network address of the device that sent the packet. Destination IP address (DestinationIP): The network address of the device receiving the data packet. SourcePort: The port number used by the device sending the packet. Destinatio
 How to check Debian OpenSSL configuration
Apr 12, 2025 pm 11:57 PM
How to check Debian OpenSSL configuration
Apr 12, 2025 pm 11:57 PM
This article introduces several methods to check the OpenSSL configuration of the Debian system to help you quickly grasp the security status of the system. 1. Confirm the OpenSSL version First, verify whether OpenSSL has been installed and version information. Enter the following command in the terminal: If opensslversion is not installed, the system will prompt an error. 2. View the configuration file. The main configuration file of OpenSSL is usually located in /etc/ssl/openssl.cnf. You can use a text editor (such as nano) to view: sudonano/etc/ssl/openssl.cnf This file contains important configuration information such as key, certificate path, and encryption algorithm. 3. Utilize OPE
 Comparison between Debian Sniffer and Wireshark
Apr 12, 2025 pm 10:48 PM
Comparison between Debian Sniffer and Wireshark
Apr 12, 2025 pm 10:48 PM
This article discusses the network analysis tool Wireshark and its alternatives in Debian systems. It should be clear that there is no standard network analysis tool called "DebianSniffer". Wireshark is the industry's leading network protocol analyzer, while Debian systems offer other tools with similar functionality. Functional Feature Comparison Wireshark: This is a powerful network protocol analyzer that supports real-time network data capture and in-depth viewing of data packet content, and provides rich protocol support, filtering and search functions to facilitate the diagnosis of network problems. Alternative tools in the Debian system: The Debian system includes networks such as tcpdump and tshark
 How to configure Debian Apache log format
Apr 12, 2025 pm 11:30 PM
How to configure Debian Apache log format
Apr 12, 2025 pm 11:30 PM
This article describes how to customize Apache's log format on Debian systems. The following steps will guide you through the configuration process: Step 1: Access the Apache configuration file The main Apache configuration file of the Debian system is usually located in /etc/apache2/apache2.conf or /etc/apache2/httpd.conf. Open the configuration file with root permissions using the following command: sudonano/etc/apache2/apache2.conf or sudonano/etc/apache2/httpd.conf Step 2: Define custom log formats to find or
 What are the security settings for Debian Tomcat logs?
Apr 12, 2025 pm 11:48 PM
What are the security settings for Debian Tomcat logs?
Apr 12, 2025 pm 11:48 PM
To improve the security of DebianTomcat logs, we need to pay attention to the following key policies: 1. Permission control and file management: Log file permissions: The default log file permissions (640) restricts access. It is recommended to modify the UMASK value in the catalina.sh script (for example, changing from 0027 to 0022), or directly set filePermissions in the log4j2 configuration file to ensure appropriate read and write permissions. Log file location: Tomcat logs are usually located in /opt/tomcat/logs (or similar path), and the permission settings of this directory need to be checked regularly. 2. Log rotation and format: Log rotation: Configure server.xml
 How to use Debian Apache logs to improve website performance
Apr 12, 2025 pm 11:36 PM
How to use Debian Apache logs to improve website performance
Apr 12, 2025 pm 11:36 PM
This article will explain how to improve website performance by analyzing Apache logs under the Debian system. 1. Log Analysis Basics Apache log records the detailed information of all HTTP requests, including IP address, timestamp, request URL, HTTP method and response code. In Debian systems, these logs are usually located in the /var/log/apache2/access.log and /var/log/apache2/error.log directories. Understanding the log structure is the first step in effective analysis. 2. Log analysis tool You can use a variety of tools to analyze Apache logs: Command line tools: grep, awk, sed and other command line tools.
 How to monitor Nginx SSL performance on Debian
Apr 12, 2025 pm 10:18 PM
How to monitor Nginx SSL performance on Debian
Apr 12, 2025 pm 10:18 PM
This article describes how to effectively monitor the SSL performance of Nginx servers on Debian systems. We will use NginxExporter to export Nginx status data to Prometheus and then visually display it through Grafana. Step 1: Configuring Nginx First, we need to enable the stub_status module in the Nginx configuration file to obtain the status information of Nginx. Add the following snippet in your Nginx configuration file (usually located in /etc/nginx/nginx.conf or its include file): location/nginx_status{stub_status
 How Tomcat logs help troubleshoot memory leaks
Apr 12, 2025 pm 11:42 PM
How Tomcat logs help troubleshoot memory leaks
Apr 12, 2025 pm 11:42 PM
Tomcat logs are the key to diagnosing memory leak problems. By analyzing Tomcat logs, you can gain insight into memory usage and garbage collection (GC) behavior, effectively locate and resolve memory leaks. Here is how to troubleshoot memory leaks using Tomcat logs: 1. GC log analysis First, enable detailed GC logging. Add the following JVM options to the Tomcat startup parameters: -XX: PrintGCDetails-XX: PrintGCDateStamps-Xloggc:gc.log These parameters will generate a detailed GC log (gc.log), including information such as GC type, recycling object size and time. Analysis gc.log