

How to get your iPad ready for iPadOS 17


Make sure your iPad is compatible
iPadOS 17 is compatible with the following iPad models:
- Except iPad Pro All models except the first-generation 12.9-inch iPad Pro
- iPad Air 6th generation and above
- iPad 6th generation and above
- iPad Mini 5th generation and above Above
If your iPad is not on this list, you will not be able to install iPadOS 17.
Back up your iPad
Before proceeding to install any new software on your device, it is highly recommended that you create a backup of all important data and settings. By doing this, you are essentially creating a safety net for yourself. If a software installation doesn't go as planned or causes unexpected problems, you have the option to restore your device to its previous state, minimizing any disruption or data loss.
When it comes to backing up your iPad, you have two main options: use iCloud or use a personal computer for the backup process. Each method has its own set of steps, here's how to do it:
Backup to iCloud
- Open the Settings app on your iPad.
- Click on your name at the top, this will lead you to the Apple ID menu.
- From there, navigate to "iCloud."
- Scroll down until you find the 'iCloud Backup' option.
- Toggle the switch next to 'Back up this iPad' to the 'On' position.
Pass By following the steps below, you will enable automatic backup to iCloud, ensuring your data is safely stored in the cloud.
Backup to your computer
- First, use a compatible USB Cable connects iPad to computer.
- Open iTunes if you have a Windows computer or an older Mac; open Finder if you have a Mac running macOS Catalina or later.
- Find your iPad in the sidebar; it should appear under "Devices" in iTunes or under "Locations" in Finder.
- Click on the iPad's name to open its summary page.
- Finally, click the "Backup Now" button to start the backup process.
After completing these steps, you will have created a local backup of your iPad on your computer, giving you Providing another layer of data security.
Free up storage
The release of iPadOS 17 is a major update with many new features and improvements. Given its substantial nature, it is recommended to proceed with the installation Prepare your iPad before by freeing up some storage space. This ensures that the update process runs smoothly and that you have enough space for the new software and any other data it may need.
You can optimize storage in a number of ways , such as deleting apps you no longer use, deleting redundant photos and videos, or transferring files to a cloud storage solution. Popular cloud storage services like iCloud or Google Drive offer a convenient way to offload data from your device , while still being accessible for future use.
Check available storage
- Open the Settings app on your iPad.
- Scroll down and tap General" to access the general settings menu.
- From there, navigate to "iPad Storage."
This will display a detailed breakdown of how storage is utilized, including how much free space you currently have Amount. Knowing this information will help you make informed decisions about what to delete or move to create the necessary space for the iPadOS 17 update.
Delete Unused Apps
- In the iPad Storage menu, you will see a list of apps and their respective storage usage.
- Click on any app you want to delete.
- Select Delete App ” to uninstall it and free up storage space.
Manage Photos and Videos
- Open the Photos app.
- Select photos you no longer need or Videos.
- Click the trash icon to delete them, or move them to an album you designated for cloud storage.
Transfer files to cloud storage
- Open the cloud storage app of your choice, such as iCloud Drive or Google Drive.
- Select the "Upload" option.
- Navigate to the file you want to move and confirm the upload.
By following these steps, you can not only prepare your device for the new update, but also optimize its performance by freeing up valuable storage space.
Update your apps
Many app developers will release updates to their apps to support iPadOS 17. It's a good idea to update apps to the latest versions before installing iPadOS 17.
Update all apps simultaneously
- Open the "App Store" app on your iPad.
- Find and click the Updates tab, usually located at the bottom of the screen.
- Once you enter the Updates section, you will see a list of apps with available updates.
- Click the "Update All" button, usually located in the upper right corner of the screen.
By selecting "Update All" you will start the process of updating all your applications at once, saving the time and effort of updating individually.
Update apps individually
If you prefer a more selective approach, you can also update apps one at a time:
- Still in the App Store Updates tab, scroll through the list of apps with available updates.
- Next to each app's name, you'll see an Update button.
- Click the Update button for each app you want to update.
This allows you to select which apps to update, giving you more control over the process.
By taking the time to update your apps before installing iPadOS 17, you can take proactive steps to ensure a smoother transition to the new operating system while also benefiting from the latest features and functionality that come with app updates. Security enhancements.
Installing iPadOS 17
After completing all the above steps, you can now proceed to install iPadOS 17. The steps you take to back up your data, free up storage space, and update your applications set the stage for a smooth and successful update process.
Start iPadOS 17 Installation
- Open the Settings app on your iPad.
- Scroll down and tap on the "General" option to access the general settings menu.
- In the "General" menu, find and click "Software Update".
Here, your iPad will automatically check for available updates. If iPadOS 17 is available for your device, you'll see it listed.
- Click "Download and Install" to start the download process.
The operating system will be downloaded to your device, and the installation will automatically begin once the download is complete.
Post-Installation Steps
After the installation is complete, your iPad will automatically restart. After restarting, you will see the new interface and features of iPadOS 17. You may need to complete some initial setup steps, but after that, you'll be fully operational on your new operating system.
The above is the detailed content of How to get your iPad ready for iPadOS 17. For more information, please follow other related articles on the PHP Chinese website!

Hot AI Tools

Undresser.AI Undress
AI-powered app for creating realistic nude photos

AI Clothes Remover
Online AI tool for removing clothes from photos.

Undress AI Tool
Undress images for free

Clothoff.io
AI clothes remover

AI Hentai Generator
Generate AI Hentai for free.

Hot Article
Hot Tools

Notepad++7.3.1
Easy-to-use and free code editor

SublimeText3 Chinese version
Chinese version, very easy to use

Zend Studio 13.0.1
Powerful PHP integrated development environment

Dreamweaver CS6
Visual web development tools

SublimeText3 Mac version
God-level code editing software (SublimeText3)
Hot Topics
 1377
1377
 52
52

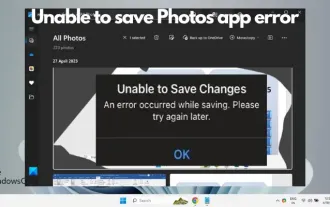 Unable to save changes to Photos app error in Windows 11
Mar 04, 2024 am 09:34 AM
Unable to save changes to Photos app error in Windows 11
Mar 04, 2024 am 09:34 AM
If you encounter the Unable to save changes error while using the Photos app for image editing in Windows 11, this article will provide you with solutions. Unable to save changes. An error occurred while saving. Please try again later. This problem usually occurs due to incorrect permission settings, file corruption, or system failure. So, we’ve done some deep research and compiled some of the most effective troubleshooting steps to help you resolve this issue and ensure you can continue to use the Microsoft Photos app seamlessly on your Windows 11 device. Fix Unable to Save Changes to Photos App Error in Windows 11 Many users have been talking about Microsoft Photos app error on different forums
 How to fix Blizzard Battle.net update stuck at 45%?
Mar 16, 2024 pm 06:52 PM
How to fix Blizzard Battle.net update stuck at 45%?
Mar 16, 2024 pm 06:52 PM
Blizzard Battle.net update keeps stuck at 45%, how to solve it? Recently, many people have been stuck at the 45% progress bar when updating software. They will still get stuck after restarting multiple times. So how to solve this situation? We can reinstall the client, switch regions, and delete files. To deal with it, this software tutorial will share the operation steps, hoping to help more people. Blizzard Battle.net update keeps stuck at 45%, how to solve it? 1. Client 1. First, you need to confirm that your client is the official version downloaded from the official website. 2. If not, users can enter the Asian server website to download. 3. After entering, click Download in the upper right corner. Note: Be sure not to select Simplified Chinese when installing.
 How to connect Apple Vision Pro to PC
Apr 08, 2024 pm 09:01 PM
How to connect Apple Vision Pro to PC
Apr 08, 2024 pm 09:01 PM
The Apple Vision Pro headset is not natively compatible with computers, so you must configure it to connect to a Windows computer. Since its launch, Apple Vision Pro has been a hit, and with its cutting-edge features and extensive operability, it's easy to see why. Although you can make some adjustments to it to suit your PC, and its functionality depends heavily on AppleOS, so its functionality will be limited. How do I connect AppleVisionPro to my computer? 1. Verify system requirements You need the latest version of Windows 11 (Custom PCs and Surface devices are not supported) Support 64-bit 2GHZ or faster fast processor High-performance GPU, most
 MS Paint not working properly in Windows 11
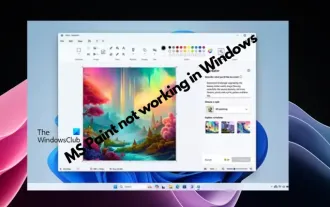
Mar 09, 2024 am 09:52 AM
MS Paint not working properly in Windows 11
Mar 09, 2024 am 09:52 AM
Microsoft Paint not working in Windows 11/10? Well, this seems to be a common problem and we have some great solutions to fix it. Users have been complaining that when trying to use MSPaint, it doesn't work or open. Scrollbars in the app don't work, paste icons don't show up, crashes, etc. Luckily, we've collected some of the most effective troubleshooting methods to help you resolve issues with Microsoft Paint app. Why doesn't Microsoft Paint work? Some possible reasons why MSPaint is not working on Windows 11/10 PC are as follows: The security identifier is corrupted. hung system
 Shazam app not working in iPhone: Fix
Jun 08, 2024 pm 12:36 PM
Shazam app not working in iPhone: Fix
Jun 08, 2024 pm 12:36 PM
Having issues with the Shazam app on iPhone? Shazam helps you find songs by listening to them. However, if Shazam isn't working properly or doesn't recognize the song, you'll have to troubleshoot it manually. Repairing the Shazam app won't take long. So, without wasting any more time, follow the steps below to resolve issues with Shazam app. Fix 1 – Disable Bold Text Feature Bold text on iPhone may be the reason why Shazam is not working properly. Step 1 – You can only do this from your iPhone settings. So, open it. Step 2 – Next, open the “Display & Brightness” settings there. Step 3 – If you find that “Bold Text” is enabled
 How to install Angular on Ubuntu 24.04
Mar 23, 2024 pm 12:20 PM
How to install Angular on Ubuntu 24.04
Mar 23, 2024 pm 12:20 PM
Angular.js is a freely accessible JavaScript platform for creating dynamic applications. It allows you to express various aspects of your application quickly and clearly by extending the syntax of HTML as a template language. Angular.js provides a range of tools to help you write, update and test your code. Additionally, it provides many features such as routing and form management. This guide will discuss how to install Angular on Ubuntu24. First, you need to install Node.js. Node.js is a JavaScript running environment based on the ChromeV8 engine that allows you to run JavaScript code on the server side. To be in Ub
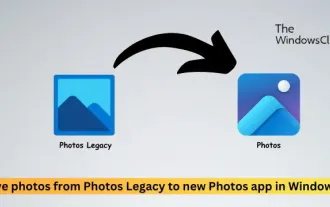 Move photos from old Photos to the new Photos app in Windows 11
Mar 10, 2024 am 09:37 AM
Move photos from old Photos to the new Photos app in Windows 11
Mar 10, 2024 am 09:37 AM
This article will guide you on how to migrate photos from Photos Legacy to the new Photos app in Windows 11. Microsoft has introduced a revamped Photos app in Windows 11, giving users a simpler and more feature-rich experience. The new Photos app sorts photos differently than the past PhotosLegacy app. It organizes photos into folders like other Windows files instead of creating albums. However, users still using the Photos Legacy app can easily migrate their photos to the new version of Microsoft Photos. What is Phot
 How to use MySQL backup and restore in PHP?
Jun 03, 2024 pm 12:19 PM
How to use MySQL backup and restore in PHP?
Jun 03, 2024 pm 12:19 PM
Backing up and restoring a MySQL database in PHP can be achieved by following these steps: Back up the database: Use the mysqldump command to dump the database into a SQL file. Restore database: Use the mysql command to restore the database from SQL files.