
 Java
javaTutorial
How to use Java to develop a front-end development application based on JHipster
Java
javaTutorial
How to use Java to develop a front-end development application based on JHipster
How to use Java to develop a front-end development application based on JHipster


How to use Java to develop a front-end development application based on JHipster
Foreword:
In the field of front-end development, JHipster is a very popular open source tool. Help developers quickly build modern web applications. JHipster integrates many commonly used front-end and back-end technologies, including Java, Spring Boot, Angular, React, etc., allowing developers to quickly build a full-featured web application. This article will introduce how to use Java to develop a front-end development application based on JHipster and provide specific code examples.
- Installing JHipster
First, we need to install JHipster. JHipster is a Yeoman-based code generator, we can install it through npm:
npm install -g generator-jhipster
After the installation is completed, you can check whether the installation is successful:
jhipster --version
- Create a new The JHipster project
Go to the directory where you wish to create the project on the command line and run the following command:
jhipster
JHipster will prompt you to select some options to configure the project, such as selecting the front-end technology (Angular Or React), database type, etc. Choose based on your needs.
- Developing front-end applications
JHipster provides a separate directory for front-end applications, which contains all front-end code and resource files. Here, we will use Angular as the front-end framework, but you can also choose to use other frameworks such as React.
Enter the front-end directory:
cd src/main/webapp
In this directory, we can see an app folder, which contains all Angular code and resource files.
Open the app directory and you will find a subdirectory named home. This is a sample page that you can start developing your app from.
- Writing front-end code
Open the file in the home directory, and you will find a file named home.component.ts. This is the Angular component definition file, which contains the component's logic and views.
We can open the file using any text editor and start writing our code. Here is a simple example:
import { Component, OnInit } from '@angular/core';

@Component({
  selector: 'app-home',
  templateUrl: './home.component.html',
  styleUrls: ['./home.component.scss']
})
export class HomeComponent implements OnInit {
  title = 'Hello, JHipster!';

  constructor() { }

  ngOnInit(): void {
  }
}The above code defines an Angular component named HomeComponent, which has a property named title. We can use this attribute in HTML templates to display titles.
- Writing front-end template
In the home directory, you will also find a file named home.component.html. This is the component's HTML template file that defines the component's view.
Open home.component.html and write the following content:
<h1 id="title">{{ title }}</h1>The above code simply displays the title of the component.
- Run the application
Go back to the root directory of the project and run the following command to start the application:
./mvnw
After successful startup, open the browser and visit http:// /localhost:8080/, you will see a page that says "Hello, JHipster!"
- Advanced functions and advanced development
In addition to the above basic functions, JHipster also provides many other advanced functions and advanced development options, including routing configuration, authentication and authorization, and API calling. etc. You can learn more through JHipster's documentation and community resources.
Conclusion:
This article introduces how to use Java to develop a front-end development application based on JHipster. We used JHipster to quickly build a full-featured web application, demonstrated the basic front-end development process, and provided specific code examples. I hope this article can provide you with some help so that you can better use JHipster to develop front-end applications.
The above is the detailed content of How to use Java to develop a front-end development application based on JHipster. For more information, please follow other related articles on the PHP Chinese website!

Hot AI Tools

Undresser.AI Undress
AI-powered app for creating realistic nude photos

AI Clothes Remover
Online AI tool for removing clothes from photos.

Undress AI Tool
Undress images for free

Clothoff.io
AI clothes remover

AI Hentai Generator
Generate AI Hentai for free.

Hot Article
Hot Tools

Notepad++7.3.1
Easy-to-use and free code editor

SublimeText3 Chinese version
Chinese version, very easy to use

Zend Studio 13.0.1
Powerful PHP integrated development environment

Dreamweaver CS6
Visual web development tools

SublimeText3 Mac version
God-level code editing software (SublimeText3)
Hot Topics
 1378
1378
 52
52

 Perfect Number in Java
Aug 30, 2024 pm 04:28 PM
Perfect Number in Java
Aug 30, 2024 pm 04:28 PM
Guide to Perfect Number in Java. Here we discuss the Definition, How to check Perfect number in Java?, examples with code implementation.
 Weka in Java
Aug 30, 2024 pm 04:28 PM
Weka in Java
Aug 30, 2024 pm 04:28 PM
Guide to Weka in Java. Here we discuss the Introduction, how to use weka java, the type of platform, and advantages with examples.
 Smith Number in Java
Aug 30, 2024 pm 04:28 PM
Smith Number in Java
Aug 30, 2024 pm 04:28 PM
Guide to Smith Number in Java. Here we discuss the Definition, How to check smith number in Java? example with code implementation.
 Java Spring Interview Questions
Aug 30, 2024 pm 04:29 PM
Java Spring Interview Questions
Aug 30, 2024 pm 04:29 PM
In this article, we have kept the most asked Java Spring Interview Questions with their detailed answers. So that you can crack the interview.
 Break or return from Java 8 stream forEach?
Feb 07, 2025 pm 12:09 PM
Break or return from Java 8 stream forEach?
Feb 07, 2025 pm 12:09 PM
Java 8 introduces the Stream API, providing a powerful and expressive way to process data collections. However, a common question when using Stream is: How to break or return from a forEach operation? Traditional loops allow for early interruption or return, but Stream's forEach method does not directly support this method. This article will explain the reasons and explore alternative methods for implementing premature termination in Stream processing systems. Further reading: Java Stream API improvements Understand Stream forEach The forEach method is a terminal operation that performs one operation on each element in the Stream. Its design intention is
 TimeStamp to Date in Java
Aug 30, 2024 pm 04:28 PM
TimeStamp to Date in Java
Aug 30, 2024 pm 04:28 PM
Guide to TimeStamp to Date in Java. Here we also discuss the introduction and how to convert timestamp to date in java along with examples.
 Java Program to Find the Volume of Capsule
Feb 07, 2025 am 11:37 AM
Java Program to Find the Volume of Capsule
Feb 07, 2025 am 11:37 AM
Capsules are three-dimensional geometric figures, composed of a cylinder and a hemisphere at both ends. The volume of the capsule can be calculated by adding the volume of the cylinder and the volume of the hemisphere at both ends. This tutorial will discuss how to calculate the volume of a given capsule in Java using different methods. Capsule volume formula The formula for capsule volume is as follows: Capsule volume = Cylindrical volume Volume Two hemisphere volume in, r: The radius of the hemisphere. h: The height of the cylinder (excluding the hemisphere). Example 1 enter Radius = 5 units Height = 10 units Output Volume = 1570.8 cubic units explain Calculate volume using formula: Volume = π × r2 × h (4
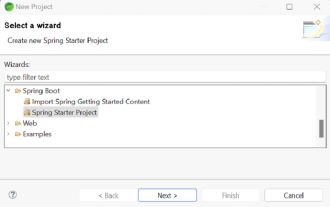 How to Run Your First Spring Boot Application in Spring Tool Suite?
Feb 07, 2025 pm 12:11 PM
How to Run Your First Spring Boot Application in Spring Tool Suite?
Feb 07, 2025 pm 12:11 PM
Spring Boot simplifies the creation of robust, scalable, and production-ready Java applications, revolutionizing Java development. Its "convention over configuration" approach, inherent to the Spring ecosystem, minimizes manual setup, allo
