

Steps to configure RAID 1 on Windows 11

Windows 11 has strict requirements and it would be a shame to lose your hard drive and data after working hard to obtain that storage. Well, we have good news that can help you buffer against hard drive failure.
Using built-in Windows tools, you can copy all your data from one drive to another. This way, if one drive fails, you can mirror and rebuild the original data on the replacement drive.
Can Windows 11 do RAID? You can perform RAID on Windows 11 with the Windows Storage Spaces feature. This feature allows you to create multiple virtual disks using a hard drive connected directly to your computer without degrading performance.
Benefits of Raid:
- Reduce the risk of data loss due to disk failure
- Improve performance by spreading the load across multiple disks
- Expand storage capacity by adding additional drives
- Acts as an alternative backup solution
How to configure RAID in Windows 11?
Hardware requirements for RAID setup:
- All disks must use the same file system, preferably NTFS.
- Make sure there is enough RAM available so that your PC does not have to constantly write data back and forth between its hard drive and RAM.
- Download RAID controller driver.
- Your CPU should be able to perform supported RAID levels. If it's multi-core, even better.
- The hard drive disks required will depend on the RAID configuration you choose, but as a general rule of thumb, RAID 0 should have two disks, which is the minimum array configuration.
- Compatible motherboards and chipsets. Most modern motherboards support RAID, but older motherboards may not, so check to see if yours has a SATA connector.
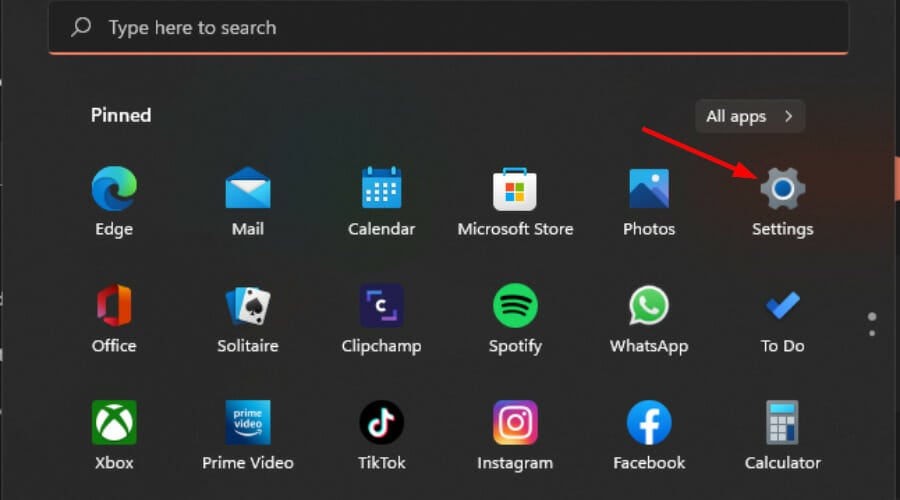
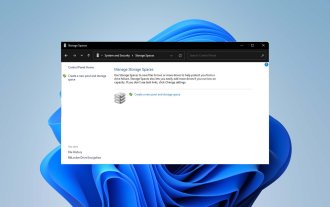
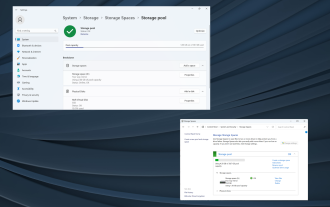
1. Using the Settings app
- tap the key and click Settings. Windows

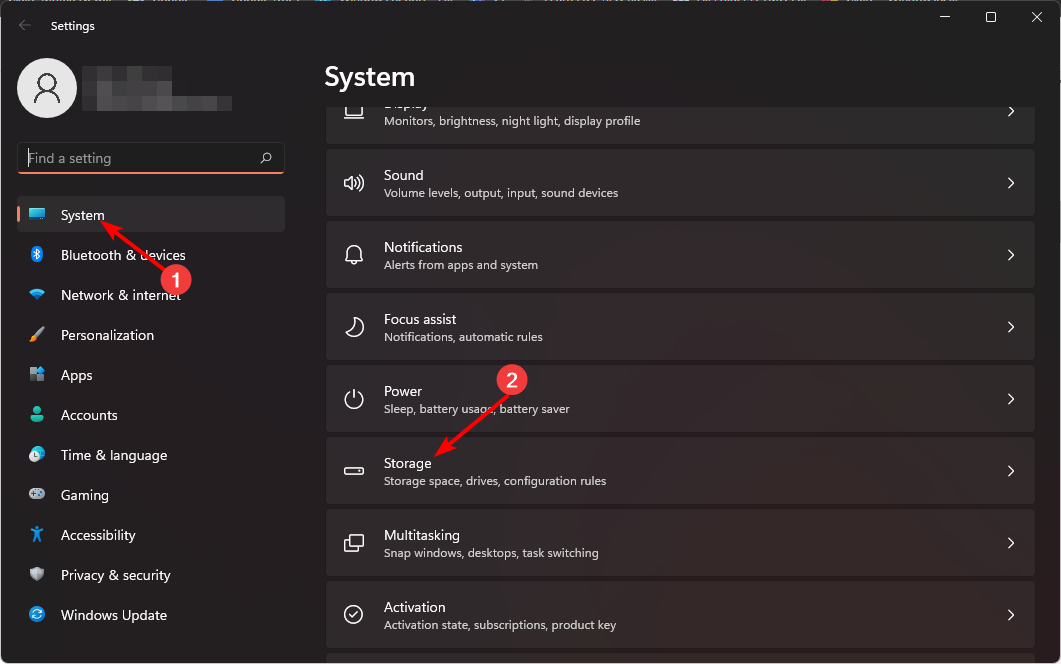
- Click "System" and then select "Storage".
- Select "Advanced Storage Settings" and then select "Storage Space".
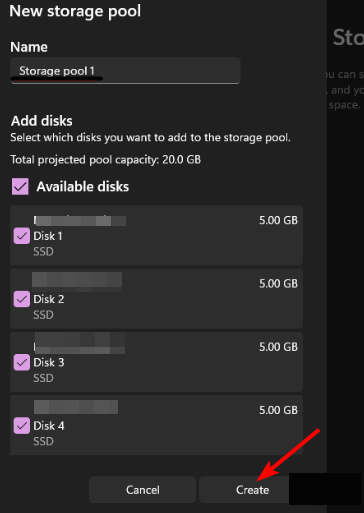
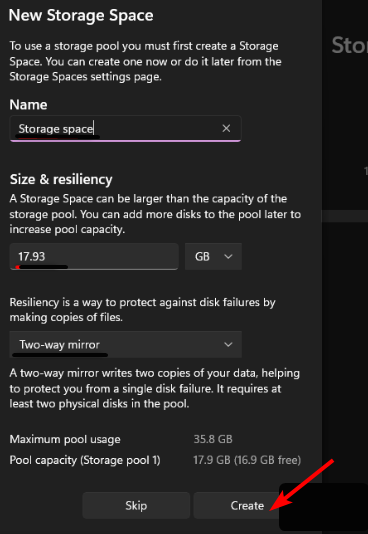
- Click to create a new pool and storage space.
- Select and check the disks you want to RAID, then click Create.
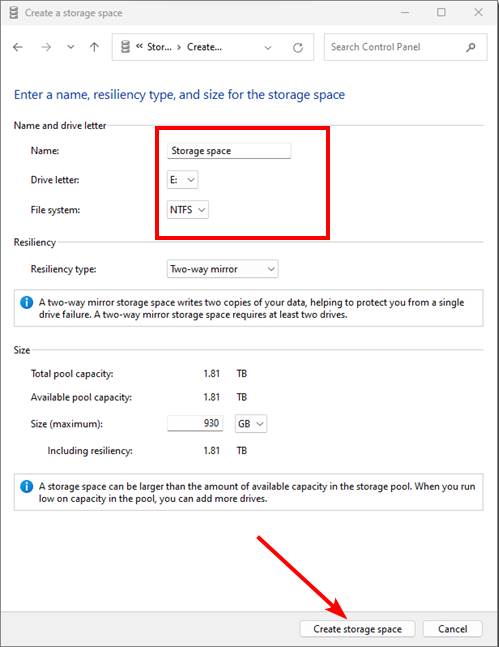
- Enter a new name for the storage space as well as the size and elasticity.
- Under "Resilience", select one of the options "Simple (no resilience), Two-way Mirror", "Three-way Mirror" and "Parity", respectively representing RAID 0, RAID 1, RAID 1 and RAID 5, then click "Create".
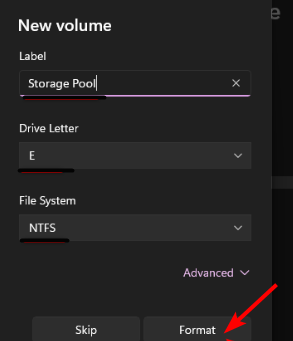
- Next, select a name, drive letter, file system as NTFS, and finally, click Format.


Remember Back up all files before starting this exercise.
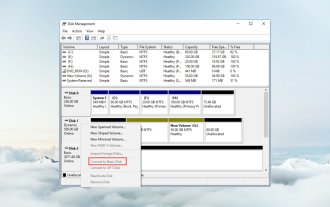
2. Using Disk Management Settings
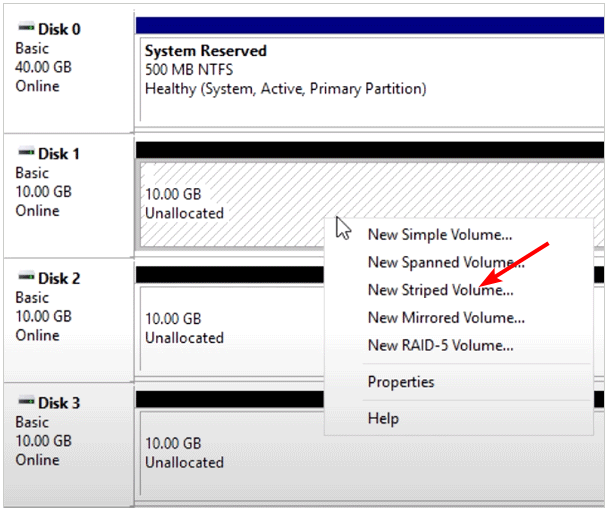
- Right-click the Start menu icon and select "Disk Management".
- Locate the drive you want to RAID, right-click it, and select New Striped Volume or New Mirrored Volume, depending on the RAID array you want to create. RAID 0 will be the default, RAID 1 is the latter.
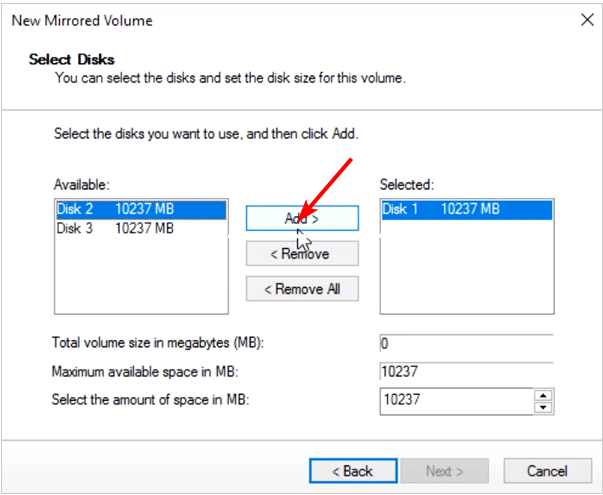
- Click Next.
- Add the disks you want to the RAID and click Next.
- Assign a letter to the drive and click Next.
- Select NFTS as the file system and click Next.
- Click "Done" and select "is" on the next confirmation prompt.


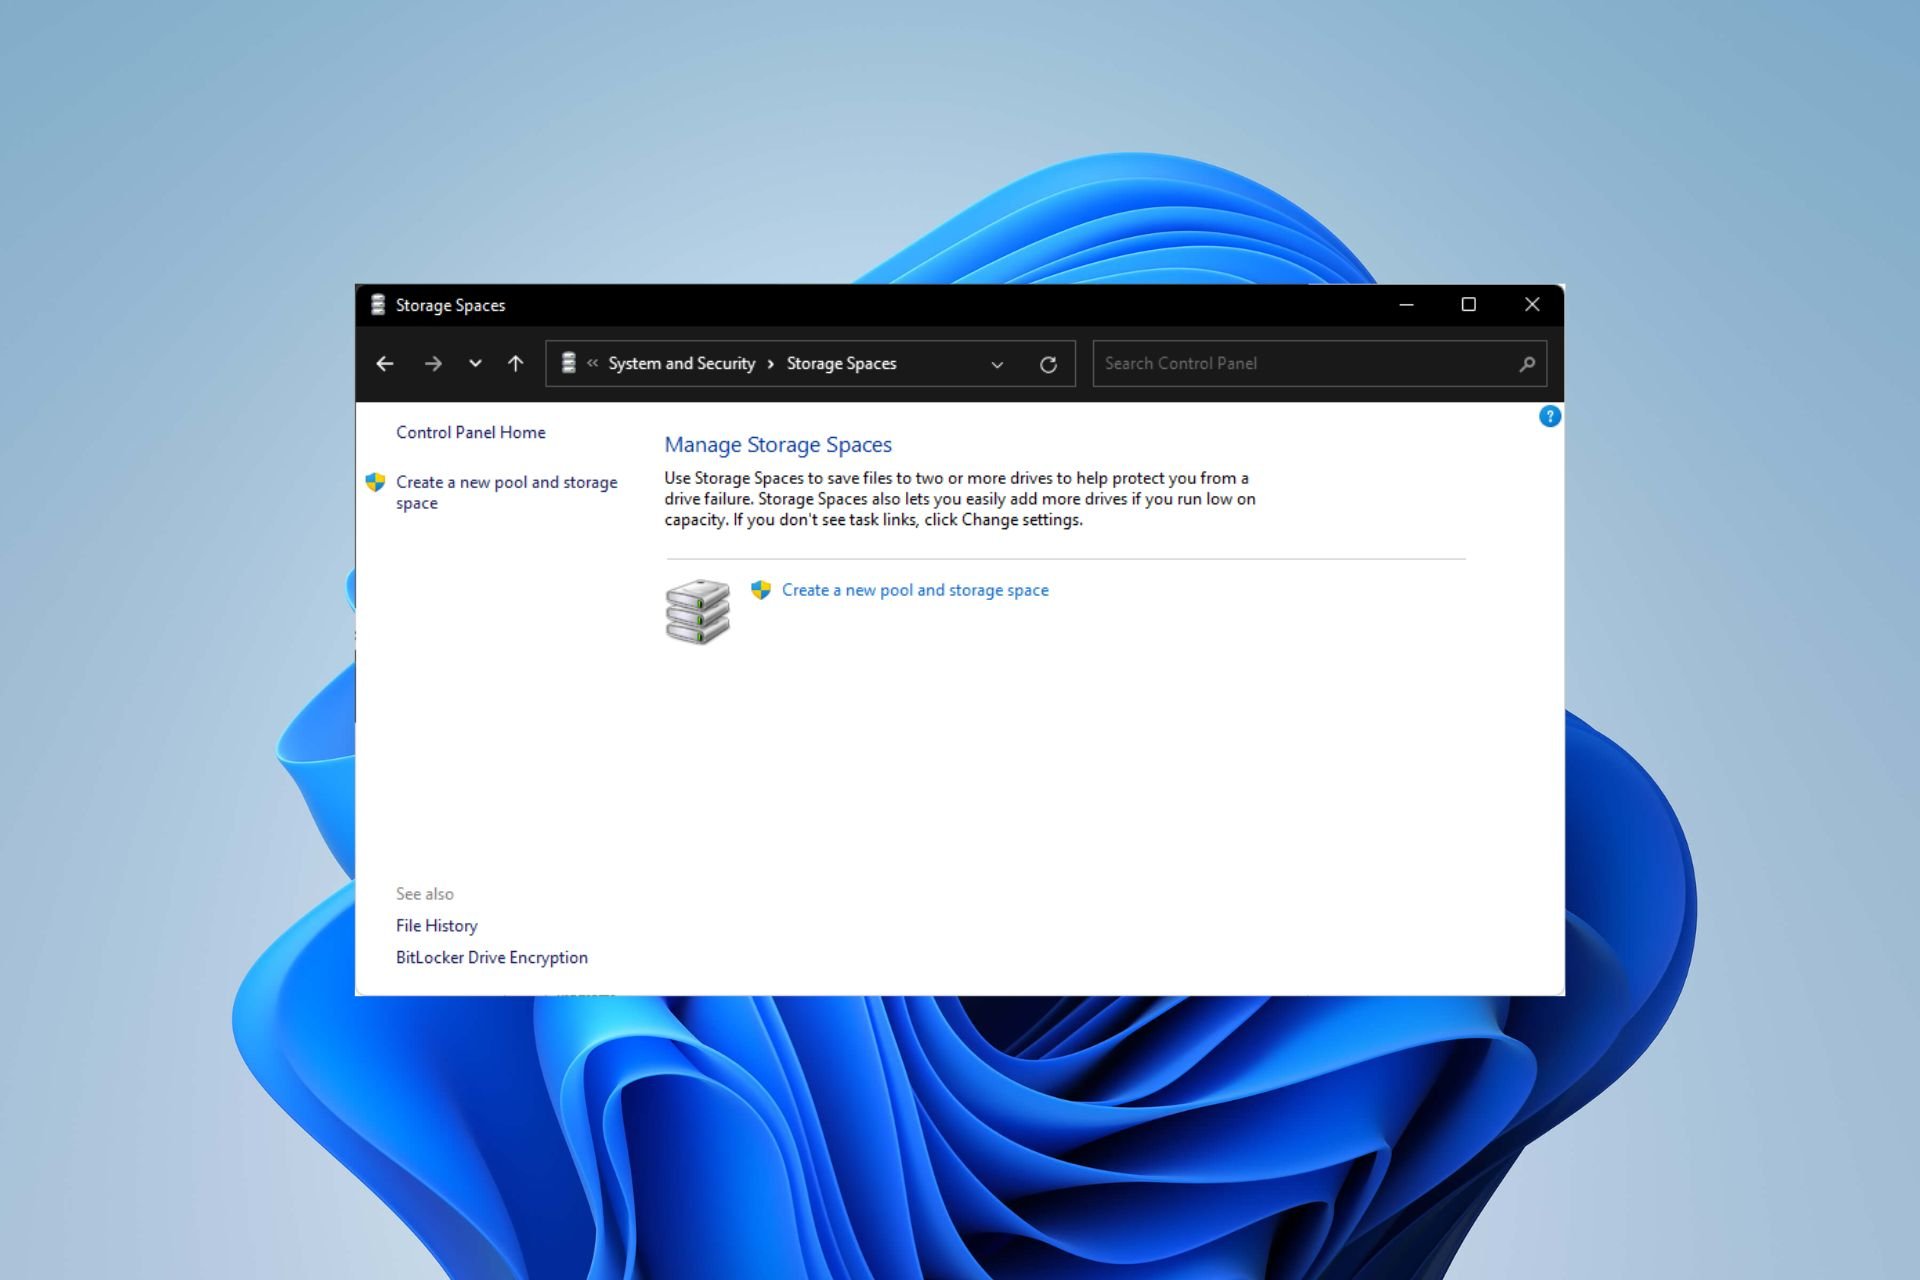
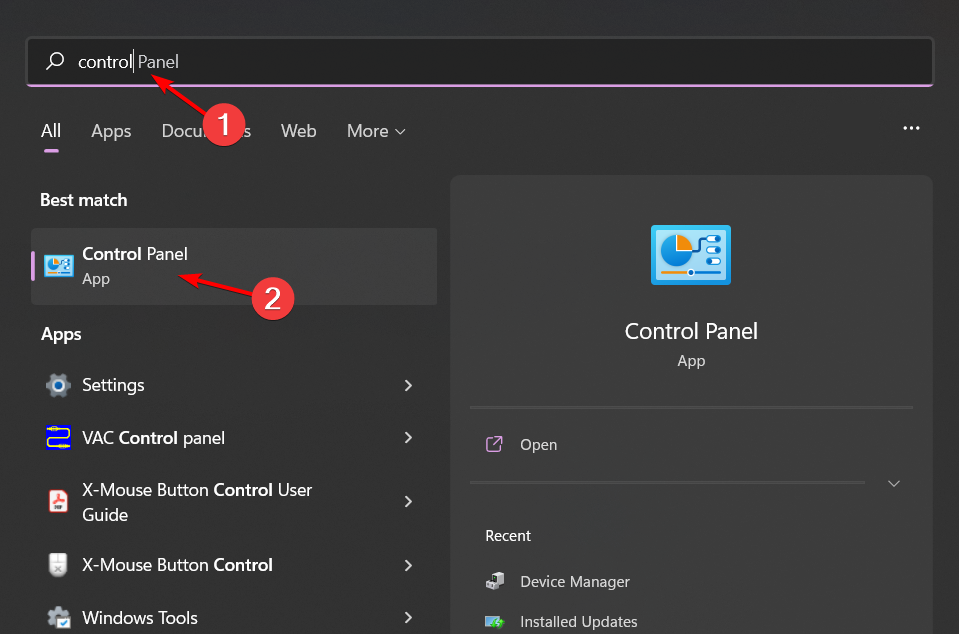
3. Use the Control Panel
- key, type Control Panel, and then click Open. Windows
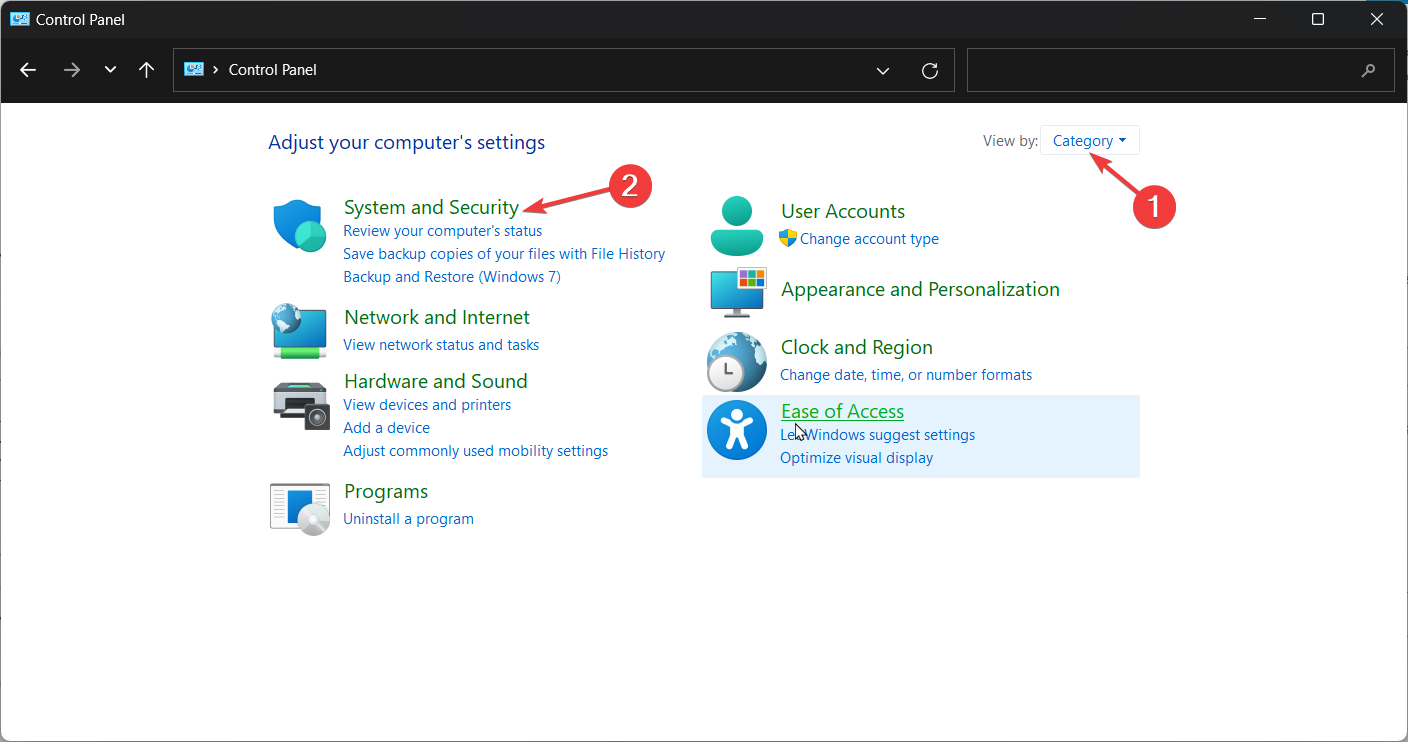
- Click "System and Security".
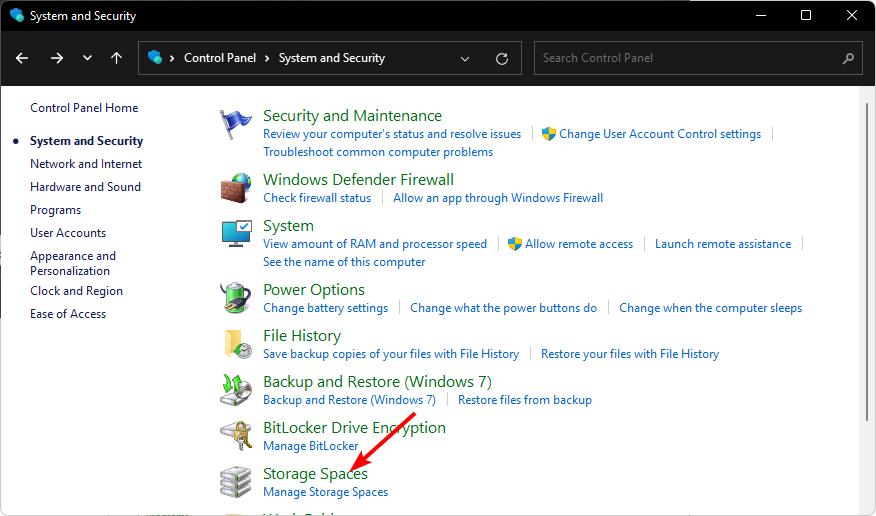
- Select "Storage Space".
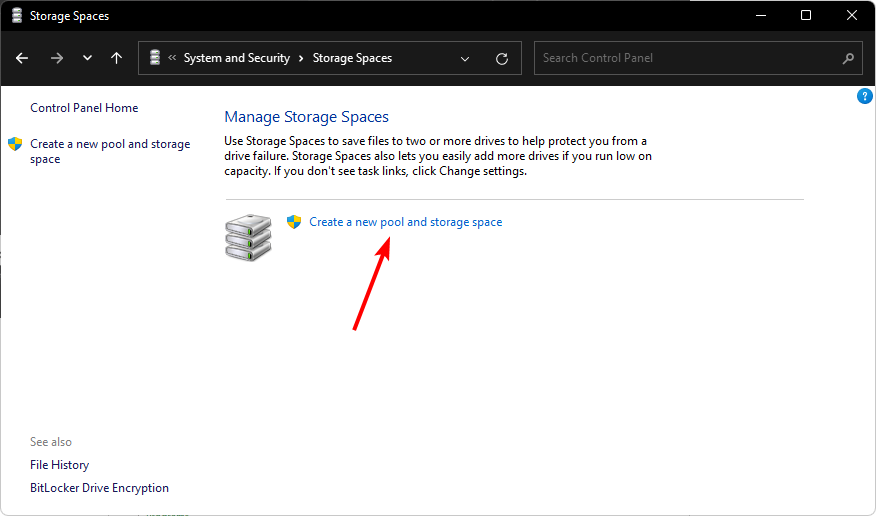
- Click to create a new Pool and Storage.
- Select the drives to add to the RAID array.
- Enter a name and select a drive letter for the storage space, and set the file system to NTFS.
- Under "Include resiliency", select one of the options "Simple (no resiliency), Two-way mirror", "Three-way mirror" and "Parity" respectively. RAID 0, RAID 1, RAID 1 and RAID 5.
- Now press to create storage space.
4. By using the Command Prompt
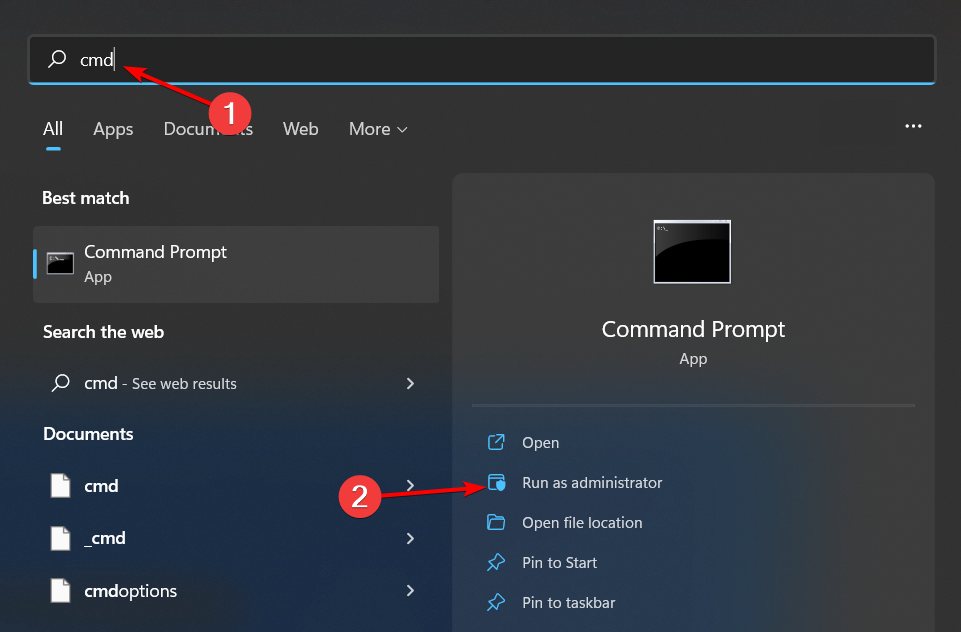
- keys, type cmd in the search bar and click on As Administrator run. Windows
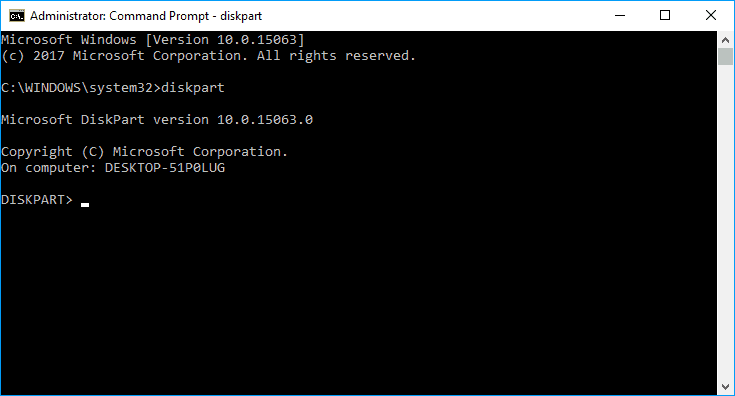
- Type the following command:
<strong>diskpart</strong>
- Next, enter the following command to list Exit Drives and select a drive. Remember to replace X with the appropriate drive letter:
<strong>listdisk</strong><strong>Select disk X</strong> - Now enter:
<strong>convert dynamic</strong> - Create RAID by entering the following command:
<strong>Create Volume RAID Disk 1, 2, 3</strong> - Using the newly created RAID volume, type the following commands and press after each command to format. Remember to replace C with the desired drive letter: Enter
<strong>select volume 2</strong><strong>Format FS=NTFS Label= MyNewVolume</strong><strong>Assign Letter=C</strong>
What’s the difference What does RAID level mean?
- RAID 0 – Data from multiple drives is combined into a single drive, providing higher performance than any single drive in the array. However, if one drive fails, all data will be lost since there is no redundancy.
- RAID 1 – If one drive fails, data is still available on the other drive. However, performance is severely degraded because only half of the total storage capacity is available.
- RAID 2 – RAID 2 is a variant of RAID1, but with faster storage capacity. The result is still the same, if one disk fails, both copies will be lost.
- RAID 3 – This type can tolerate one drive failure at any time without data loss or performance degradation. It uses disk striping with parity, where parity information is stored in separate stripes on different disks.
- RAID 4 – RAID 4 is a combined striping and parity scheme where data is striped across all drives, like RAID 0. However, there is an additional set of parity information that can be used to recover from drive failure.
- RAID 5 – Data is striped across all drives in the array. If one drive fails, the data on it is not lost because it is distributed across all other drives. However, since each drive must store more information than usual, there is a capacity bottleneck.
- RAID 6 – This RAID type is the most balanced of all RAID levels. It provides excellent read/write performance, good capacity and fault tolerance.
- RAID 10 – RAID 10 is a special type that provides the advantages of RAID 1 and RAID 0. It requires a minimum of two physical drives and provides two-way mirroring that combines the benefits of striping and mirroring.
When RAID is used correctly, you create a virtual drive that can handle the failure of a disk drive or group of disks without interrupting the operation of the system. The beauty of it all is that it's not limited to your hard drive, you can also RAID external drives.
The above is the detailed content of Steps to configure RAID 1 on Windows 11. For more information, please follow other related articles on the PHP Chinese website!

Hot AI Tools

Undresser.AI Undress
AI-powered app for creating realistic nude photos

AI Clothes Remover
Online AI tool for removing clothes from photos.

Undress AI Tool
Undress images for free

Clothoff.io
AI clothes remover

Video Face Swap
Swap faces in any video effortlessly with our completely free AI face swap tool!

Hot Article
Hot Tools

Notepad++7.3.1
Easy-to-use and free code editor

SublimeText3 Chinese version
Chinese version, very easy to use

Zend Studio 13.0.1
Powerful PHP integrated development environment

Dreamweaver CS6
Visual web development tools

SublimeText3 Mac version
God-level code editing software (SublimeText3)
Hot Topics
 1387
1387
 52
52

 How to fix missing ReadyBoost tabs in Windows 11
Jul 13, 2023 pm 11:21 PM
How to fix missing ReadyBoost tabs in Windows 11
Jul 13, 2023 pm 11:21 PM
Is the "Ready to Accelerate" tab not showing up on any drives on your system? Don't worry. ReadyBoost is technology that uses available space on your drive to make your system faster. However, if you cannot find a specific ReadyBoost tab in File Explorer, you need to follow these resolutions to quickly resolve this issue. Fix 1 – Compatible USB Drives There are some specific USB drives that support ReadyBoost natively. Like NTFS, drives formatted with FAT16 or FAT32 support ReadyBoost technology. Step 1 – You have to check the drive type. So, open File Explorer. Step 2 – Go to “This PC”. You will see all drives. Now
 Steps to configure RAID 1 on Windows 11
Sep 22, 2023 pm 03:05 PM
Steps to configure RAID 1 on Windows 11
Sep 22, 2023 pm 03:05 PM
Windows 11 has strict requirements, and after struggling to obtain that storage, losing your hard drive and data would be a shame. Well, we have good news that can help you buffer against hard drive failure. Using built-in Windows tools, you can copy all your data from one drive to another. This way, if one drive fails, you can mirror and rebuild the original data on the replacement drive. Can Windows 11 do RAID? With Windows Storage Spaces feature, you can perform RAID on Windows 11. This feature allows you to create multiple virtual disks using a hard drive connected directly to your computer without degrading performance. Benefits of Raid: Reduce the cost of disk
 Fix: WD My Cloud doesn't show up on the network in Windows 11
Oct 02, 2023 pm 11:21 PM
Fix: WD My Cloud doesn't show up on the network in Windows 11
Oct 02, 2023 pm 11:21 PM
If WDMyCloud is not showing up on the network in Windows 11, this can be a big problem, especially if you store backups or other important files in it. This can be a big problem for users who frequently need to access network storage, so in today's guide, we'll show you how to fix this problem permanently. Why doesn't WDMyCloud show up on Windows 11 network? Your MyCloud device, network adapter, or internet connection is not configured correctly. The SMB function is not installed on the computer. A temporary glitch in Winsock can sometimes cause this problem. What should I do if my cloud doesn't show up on the network? Before we start fixing the problem, you can perform some preliminary checks:
 Convert VirtualBox fixed disk to dynamic disk and vice versa
Mar 25, 2024 am 09:36 AM
Convert VirtualBox fixed disk to dynamic disk and vice versa
Mar 25, 2024 am 09:36 AM
When creating a virtual machine, you will be asked to select a disk type, you can select fixed disk or dynamic disk. What if you choose fixed disks and later realize you need dynamic disks, or vice versa? Good! You can convert one to the other. In this post, we will see how to convert VirtualBox fixed disk to dynamic disk and vice versa. A dynamic disk is a virtual hard disk that initially has a small size and grows in size as you store data in the virtual machine. Dynamic disks are very efficient at saving storage space because they only take up as much host storage space as needed. However, as disk capacity expands, your computer's performance may be slightly affected. Fixed disks and dynamic disks are commonly used in virtual machines
 How to update network drive login credentials in Windows 11
Feb 19, 2024 pm 12:18 PM
How to update network drive login credentials in Windows 11
Feb 19, 2024 pm 12:18 PM
To enhance network drive security, Microsoft supports password-protecting shared folders or network drives. However, to ensure continued protection, we need to change the password for the network drive regularly. This article will introduce how to update the login credentials of a network drive in Windows 11/10. How to Update Network Drive Login Credentials in Windows In order to update the network driver’s login credentials, we need to use Credential Manager. This is a pre-installed feature on Windows computers and can be accessed through the Control Panel. So, follow the steps below to perform the same. Click Win+S, search for "Control Panel" and click "Open". Change the screen view proportionally to large icons.
 How to RAID an external hard drive on Windows 11
Sep 16, 2023 pm 10:05 PM
How to RAID an external hard drive on Windows 11
Sep 16, 2023 pm 10:05 PM
RAID or Redundant Array of Independent Disks is a data storage technology in which multiple external drives are combined into one. It was widely used when large hard drives were expensive, but many people still prefer the RAID external drive method. There are several levels of RAID, each serving a specific purpose. Keep in mind that the average user doesn't have to delve into the complexity, a simple setup of RAID0 or RAID1 should work fine. Reasons to consider raiding an external drive: Improved PC performance Easy to configure, cheaper than existing alternatives Faster data reading and writing Efficient backup solution through mirroring How to RAID an external drive on Windows 11? Before RAID external hard drives, you need to pay attention to the following first things
 How to convert dynamic disk to basic disk on Windows 11
Sep 23, 2023 pm 11:33 PM
How to convert dynamic disk to basic disk on Windows 11
Sep 23, 2023 pm 11:33 PM
If you want to convert a dynamic disk to a basic disk in Windows 11, you should create a backup first as the process will erase all data in it. Why should you convert dynamic disk to basic disk in Windows 11? According to Microsoft, dynamic disks have been deprecated from Windows and their use is no longer recommended. Additionally, Windows Home Edition does not support dynamic disks, so you will not be able to access these logical drives. If you want to combine more disks into a larger volume, it is recommended to use Basic Disks or Storage Spaces. In this article, we will show you how to convert dynamic disk to basic disk on Windows 11 How to convert dynamic disk to basic disk in Windows 11? In the beginning
 4 Ways to Check SSD Health on Windows 11
Sep 27, 2023 pm 09:49 PM
4 Ways to Check SSD Health on Windows 11
Sep 27, 2023 pm 09:49 PM
SSDs are quickly replacing HDDs due to their fast read, write, and access speeds, but even though they are more reliable, you still need to check the health of your SSDs in Windows 11. Can I check the health of my SSD? Of course you can, and should, since they have limited read/write cycles. SLCNAND flash SSDs are currently the most popular and can handle approximately 50,000 to 100,000 write cycles. Nonetheless, in this article, you will learn how to check the health of your SSD and extend its lifecycle on Windows 11. How to check SSD health on Windows 11? First, here’s how to identify an SSD that’s about to fail: You start