

用户口令检查_PHP

<font color="#000000">
<font color="#0000BB"></font><font color="#007700"> <br></font><font color="#FF8000">/* <br>* etc.passwd.inc v1.0 <br>* <br>* Syntax: <br>* verifypasswd(string USERNAME, string PASSWORD) <br>* <br>* The function will return one of three values: <br>* -2 if there was a file reading error <br>* -1 if the password is incorrect <br>* 0 if the username doesn't exist <br>* 1 if the password is correct <br>* <br>* Written by WarMage ( michael@irc.net ) <br>* <br>*/ <br><br></font><font color="#007700">function </font><font color="#0000BB">verifypasswd </font><font color="#007700">(</font><font color="#0000BB">$USERNAME</font><font color="#007700">, </font><font color="#0000BB">$PASSWORD</font><font color="#007700">) { <br><br></font><font color="#0000BB">$fd </font><font color="#007700">= </font><font color="#0000BB">fopen</font><font color="#007700">( </font><font color="#DD0000">"/etc/passwd"</font><font color="#007700">, </font><font color="#DD0000">"r"</font><font color="#007700">); <br></font><font color="#0000BB">$contents </font><font color="#007700">= </font><font color="#0000BB">fread</font><font color="#007700">(</font><font color="#0000BB">$fd</font><font color="#007700">, </font><font color="#0000BB">filesize</font><font color="#007700">( </font><font color="#DD0000">"/etc/passwd"</font><font color="#007700">)); <br></font><font color="#0000BB">fclose</font><font color="#007700">(</font><font color="#0000BB">$fd</font><font color="#007700">); <br>if (!</font><font color="#0000BB">$contents</font><font color="#007700">) return -</font><font color="#0000BB">2</font><font color="#007700">; <br><br><br><br></font><font color="#0000BB">$lines </font><font color="#007700">= </font><font color="#0000BB">split</font><font color="#007700">( </font><font color="#DD0000">"\n"</font><font color="#007700">, </font><font color="#0000BB">$contents</font><font color="#007700">); <br></font><font color="#0000BB">$passwd </font><font color="#007700">= array(); <br><br>for(</font><font color="#0000BB">$count</font><font color="#007700">=</font><font color="#0000BB">0</font><font color="#007700">;</font><font color="#0000BB">$count</font><font color="#007700"><font color="#0000BB">count</font><font color="#007700">(</font><font color="#0000BB">$lines</font><font color="#007700">);</font><font color="#0000BB">$count </font><font color="#007700">) { <br>list (</font><font color="#0000BB">$user</font><font color="#007700">,</font><font color="#0000BB">$pass</font><font color="#007700">) = </font><font color="#0000BB">split</font><font color="#007700">( </font><font color="#DD0000">":"</font><font color="#007700">,</font><font color="#0000BB">$lines</font><font color="#007700">[</font><font color="#0000BB">$count</font><font color="#007700">]); <br>if (</font><font color="#0000BB">$user </font><font color="#007700">== </font><font color="#0000BB">$USERNAME</font><font color="#007700">) { <br>break; <br>} <br>} <br><br>if (!</font><font color="#0000BB">$user</font><font color="#007700">) return </font><font color="#0000BB">0</font><font color="#007700">; <br><br></font><font color="#0000BB">$cryptedpass </font><font color="#007700">= </font><font color="#0000BB">$pass</font><font color="#007700">; <br></font><font color="#0000BB">$salt </font><font color="#007700">= </font><font color="#0000BB">substr</font><font color="#007700">(</font><font color="#0000BB">$cryptedpass</font><font color="#007700">,</font><font color="#0000BB">0</font><font color="#007700">,</font><font color="#0000BB">2</font><font color="#007700">); <br></font><font color="#0000BB">$Pass </font><font color="#007700">= </font><font color="#0000BB">crypt</font><font color="#007700">(</font><font color="#0000BB">$PASSWORD</font><font color="#007700">,</font><font color="#0000BB">$salt</font><font color="#007700">); <br><br>if (</font><font color="#0000BB">$Pass </font><font color="#007700">== </font><font color="#0000BB">$cryptedpass</font><font color="#007700">) { <br>return </font><font color="#0000BB">1</font><font color="#007700">; <br>} else { <br>return -</font><font color="#0000BB">1</font><font color="#007700">; <br>} <br>} <br></font><font color="#0000BB">?></font></font>
</font>

Hot AI Tools

Undresser.AI Undress
AI-powered app for creating realistic nude photos

AI Clothes Remover
Online AI tool for removing clothes from photos.

Undress AI Tool
Undress images for free

Clothoff.io
AI clothes remover

AI Hentai Generator
Generate AI Hentai for free.

Hot Article
Hot Tools

Notepad++7.3.1
Easy-to-use and free code editor

SublimeText3 Chinese version
Chinese version, very easy to use

Zend Studio 13.0.1
Powerful PHP integrated development environment

Dreamweaver CS6
Visual web development tools

SublimeText3 Mac version
God-level code editing software (SublimeText3)
Hot Topics
 1376
1376
 52
52

 How to use Xiaohongshu account to find users? Can I find my mobile phone number?
Mar 22, 2024 am 08:40 AM
How to use Xiaohongshu account to find users? Can I find my mobile phone number?
Mar 22, 2024 am 08:40 AM
With the rapid development of social media, Xiaohongshu has become one of the most popular social platforms. Users can create a Xiaohongshu account to show their personal identity and communicate and interact with other users. If you need to find a user’s Xiaohongshu number, you can follow these simple steps. 1. How to use Xiaohongshu account to find users? 1. Open the Xiaohongshu APP, click the "Discover" button in the lower right corner, and then select the "Notes" option. 2. In the note list, find the note posted by the user you want to find. Click to enter the note details page. 3. On the note details page, click the "Follow" button below the user's avatar to enter the user's personal homepage. 4. In the upper right corner of the user's personal homepage, click the three-dot button and select "Personal Information"
 Log in to Ubuntu as superuser
Mar 20, 2024 am 10:55 AM
Log in to Ubuntu as superuser
Mar 20, 2024 am 10:55 AM
In Ubuntu systems, the root user is usually disabled. To activate the root user, you can use the passwd command to set a password and then use the su- command to log in as root. The root user is a user with unrestricted system administrative rights. He has permissions to access and modify files, user management, software installation and removal, and system configuration changes. There are obvious differences between the root user and ordinary users. The root user has the highest authority and broader control rights in the system. The root user can execute important system commands and edit system files, which ordinary users cannot do. In this guide, I'll explore the Ubuntu root user, how to log in as root, and how it differs from a normal user. Notice
 How to write if in c language to judge multiple conditions
Mar 25, 2024 pm 03:24 PM
How to write if in c language to judge multiple conditions
Mar 25, 2024 pm 03:24 PM
In C language, if statement is usually used to execute a specific block of code based on a single condition. However, multiple conditions can be combined to make a determination using logical operators such as &&, ||, and !. Including using logical AND (&&) to judge multiple conditions, using logical OR (||) to judge at least one condition, using logical NOT (!) to judge the negation of a single condition, as well as nesting if statements and using parentheses to clarify priority.
 How to use UC Browser access password
Jan 30, 2024 pm 12:39 PM
How to use UC Browser access password
Jan 30, 2024 pm 12:39 PM
How to use uc browser password? In the uc browser, there is the uc network disk function that many friends like to use. It can help us obtain and store high-quality data resources on the Internet, allowing us to enjoy excellent network disk services. When you use UC Browser to store data, you can quickly obtain the data files shared by others by entering a password. If you don’t know how to use it, follow the editor to take a look at the UC Browser password usage tutorial. . How to use the uc browser password 1. First copy the uc password to be opened 2. After copying it to the pasteboard, open the uc browser and the shared resources will pop up. Click View Now to view the corresponding resources 3. After viewing the page, you can click Save and save to your own uc network disk
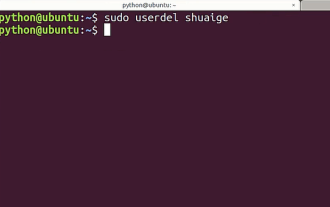 Tutorial: How to delete a normal user account in Ubuntu system?
Jan 02, 2024 pm 12:34 PM
Tutorial: How to delete a normal user account in Ubuntu system?
Jan 02, 2024 pm 12:34 PM
Many users have been added to the Ubuntu system. I want to delete the users that are no longer in use. How to delete them? Let’s take a look at the detailed tutorial below. 1. Open the terminal command line and use the userdel command to delete the specified user. Be sure to add the sudo permission command, as shown in the figure below. 2. When deleting, be sure to be in the administrator directory. Ordinary users do not have this permission. , as shown in the figure below 3. After the delete command is executed, how to judge whether it has been truly deleted? Next we use the cat command to open the passwd file, as shown in the figure below 4. We see that the deleted user information is no longer in the passwd file, which proves that the user has been deleted, as shown in the figure below 5. Then we enter the home file
 What is sudo and why is it important?
Feb 21, 2024 pm 07:01 PM
What is sudo and why is it important?
Feb 21, 2024 pm 07:01 PM
sudo (superuser execution) is a key command in Linux and Unix systems that allows ordinary users to run specific commands with root privileges. The function of sudo is mainly reflected in the following aspects: Providing permission control: sudo achieves strict control over system resources and sensitive operations by authorizing users to temporarily obtain superuser permissions. Ordinary users can only obtain temporary privileges through sudo when needed, and do not need to log in as superuser all the time. Improved security: By using sudo, you can avoid using the root account during routine operations. Using the root account for all operations may lead to unexpected system damage, as any mistaken or careless operation will have full permissions. and
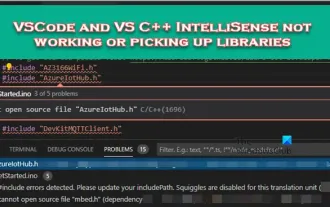 VSCode and VS C++ IntelliSense not working or picking up libraries
Feb 29, 2024 pm 01:28 PM
VSCode and VS C++ IntelliSense not working or picking up libraries
Feb 29, 2024 pm 01:28 PM
VS Code and Visual Studio C++ IntelliSense may not be able to pick up libraries, especially when working on large projects. When we hover over #Include<wx/wx.h>, we see the error message "CannotOpen source file 'string.h'" (depends on "wx/wx.h") and sometimes, autocomplete Function is unresponsive. In this article we will see what you can do if VSCode and VSC++ IntelliSense are not working or extracting libraries. Why doesn't my Intellisense work in C++? When working with large files, IntelliSense sometimes
![Spellcheck not working in Teams [Fixed]](https://img.php.cn/upload/article/000/887/227/170968741326618.jpg?x-oss-process=image/resize,m_fill,h_207,w_330) Spellcheck not working in Teams [Fixed]
Mar 06, 2024 am 09:10 AM
Spellcheck not working in Teams [Fixed]
Mar 06, 2024 am 09:10 AM
We've started noticing that sometimes spellcheck stops working for Teams. Spell check is an essential tool for effective communication, and any attack on it can cause considerable disruption to workflow. In this article, we'll explore common reasons why spell check might not be working as expected, and how to restore it to its previous state. So, if spell check is not working in Teams, follow the solutions mentioned in this article. Why doesn't Microsoft spell check work? There may be several reasons why Microsoft spell check is not working properly. These reasons include incompatible language settings, disabled spell check function, damaged MSTeam or MSOffice installation, etc. Also, outdated MSTeams and MSOf
