
 Common Problem
Fix: Network connection issue that prevents access to the Internet in Windows 11 Safe Mode
Common Problem
Fix: Network connection issue that prevents access to the Internet in Windows 11 Safe Mode
Fix: Network connection issue that prevents access to the Internet in Windows 11 Safe Mode

Having no internet connection on your Windows 11 computer can be frustrating, especially when diagnosing and troubleshooting system issues.
In this guide, we will discuss the potential causes of the problem and list effective solutions to ensure that you can access the Internet in Safe Mode.
Why is there no internet in safe mode with networking?
- The network adapter is incompatible or not loading correctly.
- Third-party firewalls, security software, or antivirus software may interfere with network connections in safe mode.
- Network service is not running.
- Malware Infection
What should I do if the Internet won’t work in Safe Mode on Windows 11?
Before performing advanced troubleshooting steps, you should consider performing the following checks:
- Please make sure you are logged in with an account with administrator privileges.
- Restart your computer and make sure there are no pending Windows updates.
- Disable third-party security software.
- Ensure that network hardware, Ethernet cables, and other connections are not loosely connected.
- Verify that the internet is working properly in normal mode without any issues.
1. Use advanced startup to enter safe mode
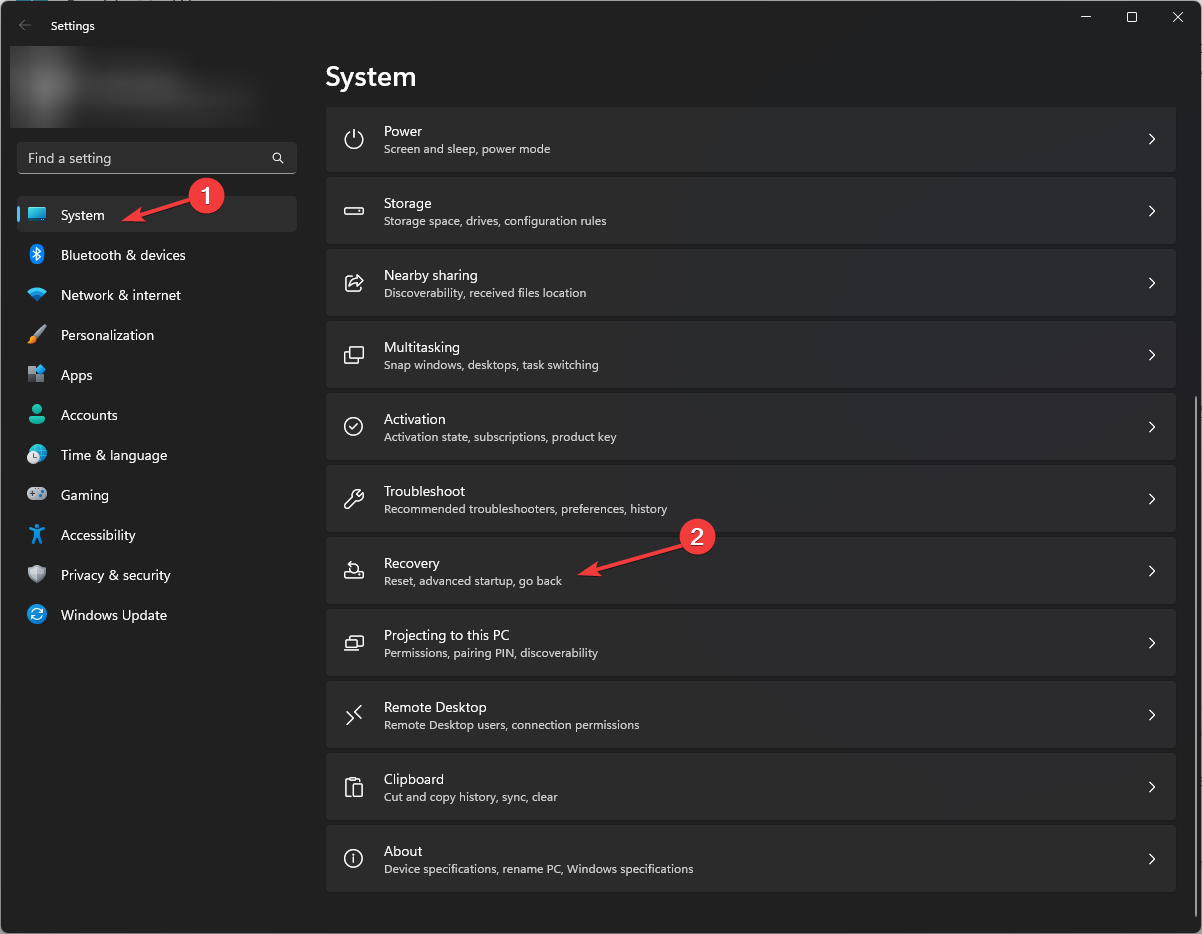
- Press to open the "Settings" application. WindowsI
- Go to System and click Recovery.

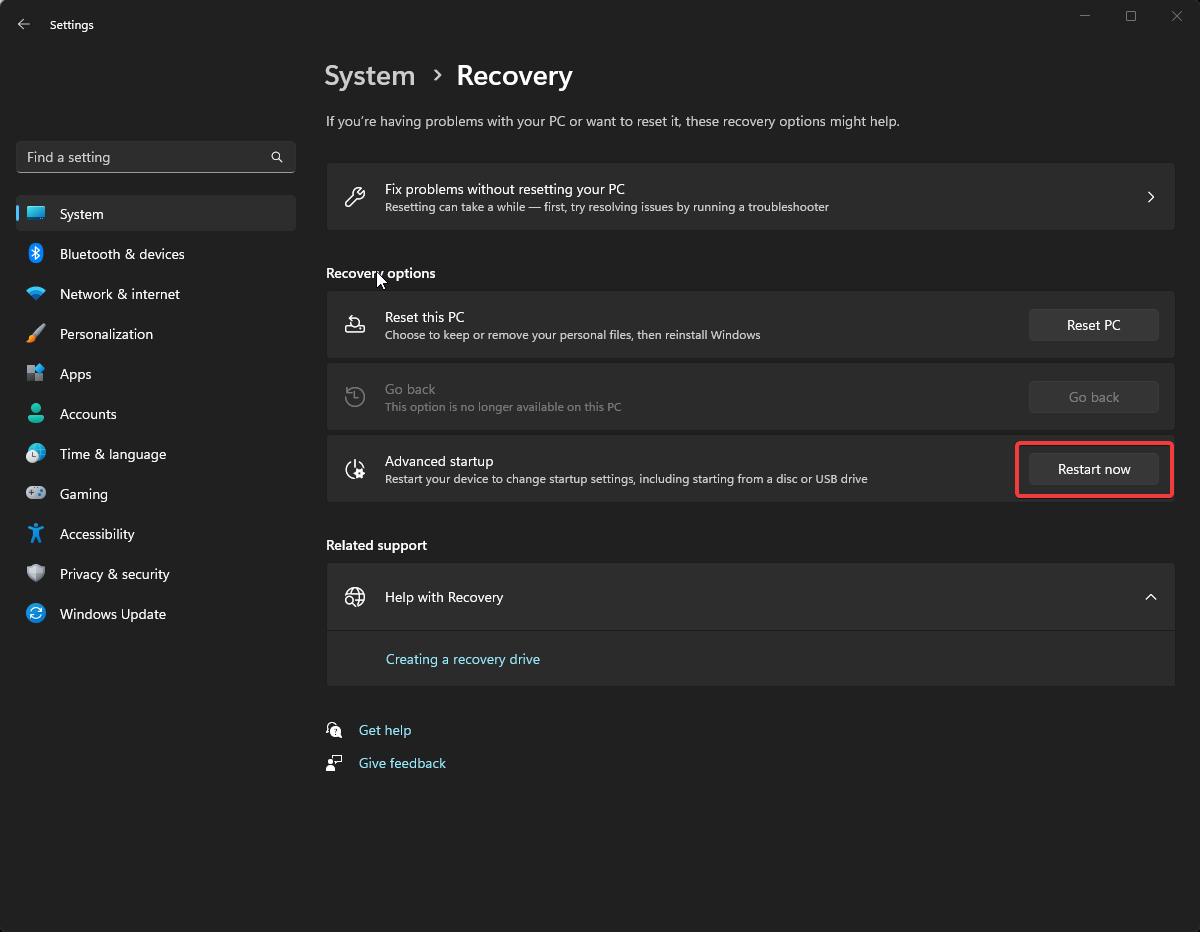
- Next, find Advanced startup, and click Restart.
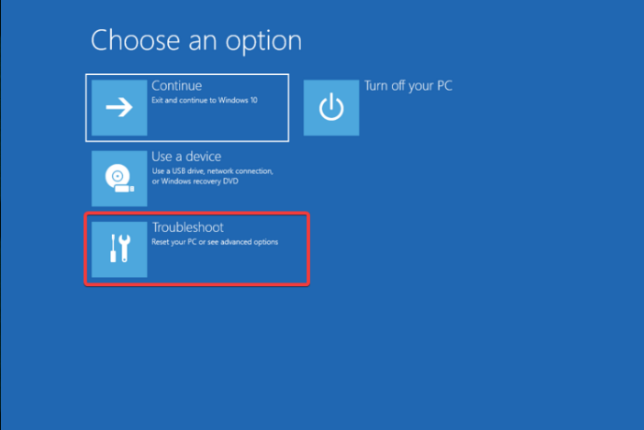
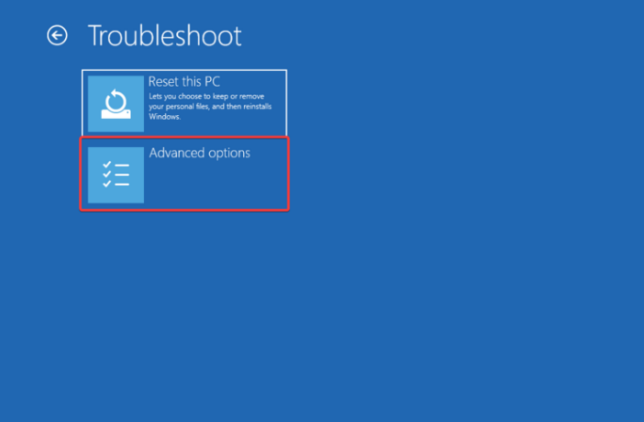
- Your computer will restart and you will see the Select an option screen and select Troubleshoot.
- Next, select Advanced Options from the Troubleshooting page.
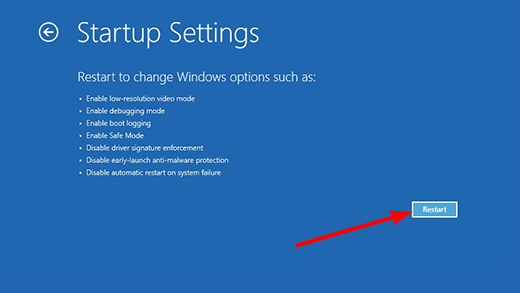
- On the Advanced Options screen, click Start Settings.
- On the next page, select Restart.
- Your computer will restart and display the Startup Settings options list and then press the mentioned number or Safe Mode with Networking feature.


If you cannot get your Internet connection to work in Safe Mode, use the System Configuration window to restart your computer in Normal Mode and follow the steps below.
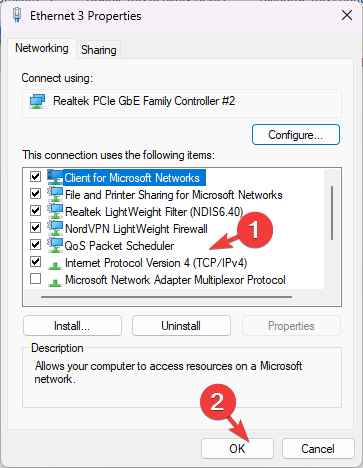
2. Verify that the Internet Protocol Version 4 (TCP/IPv4) option
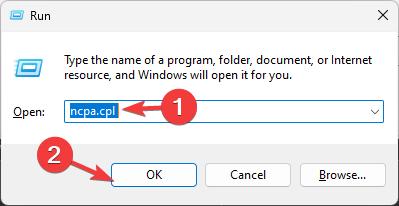
- Press to open the "Run" window. WindowsR
- Type ncpa.cpl and click OK to open Network Connection.
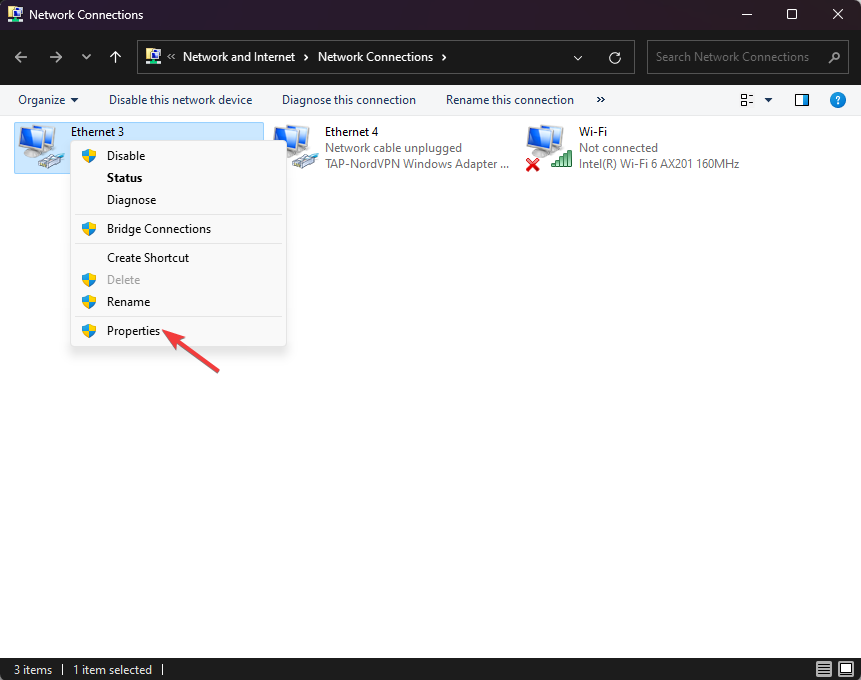
- Right-click the Ethernet connection and select Properties.
- Under the "Connect using" heading, scroll and check that the "Internet Protocol Version 4 (TCP/IPv4)" option is selected.
- If not, select it and click OK.
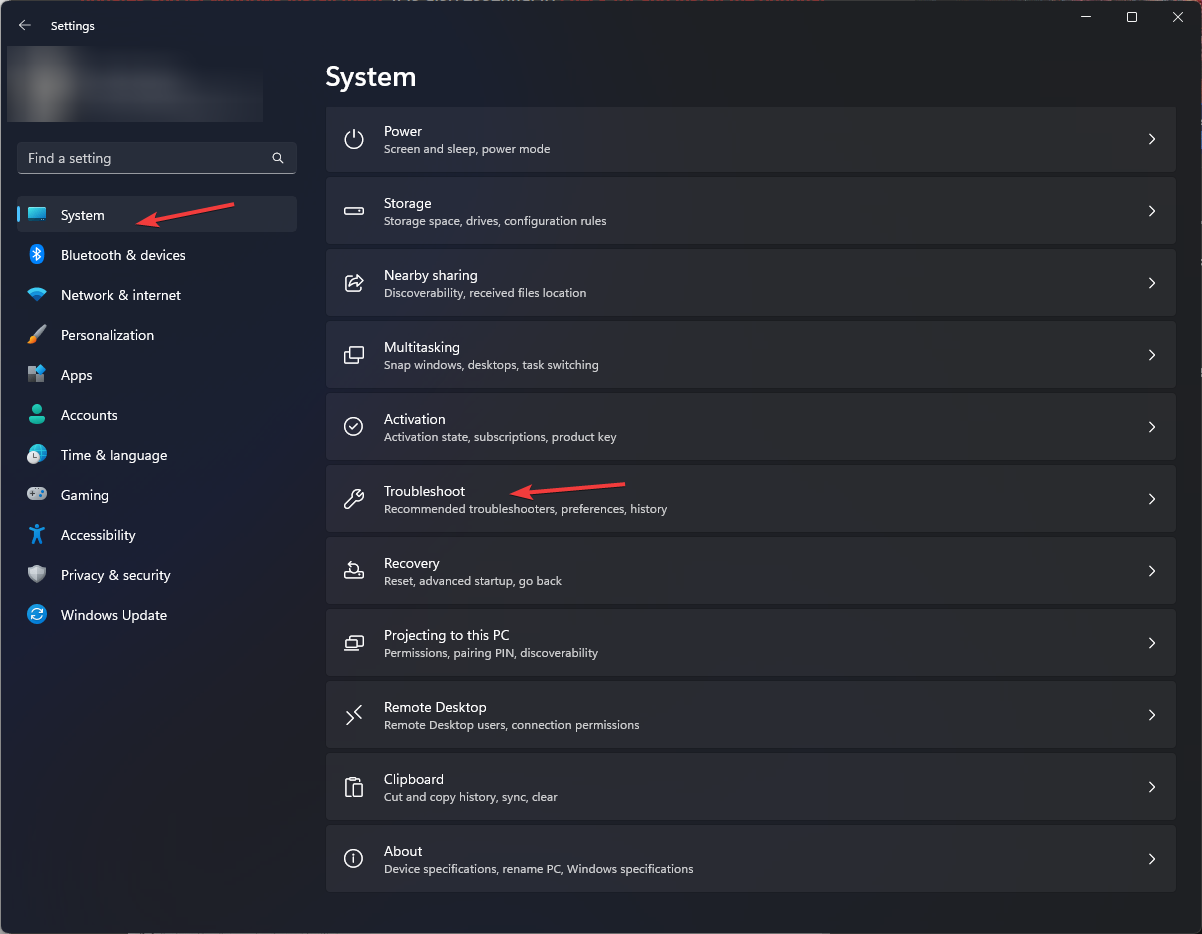
3. Run the network troubleshooter
- Press to open the "Settings" app. WindowsI
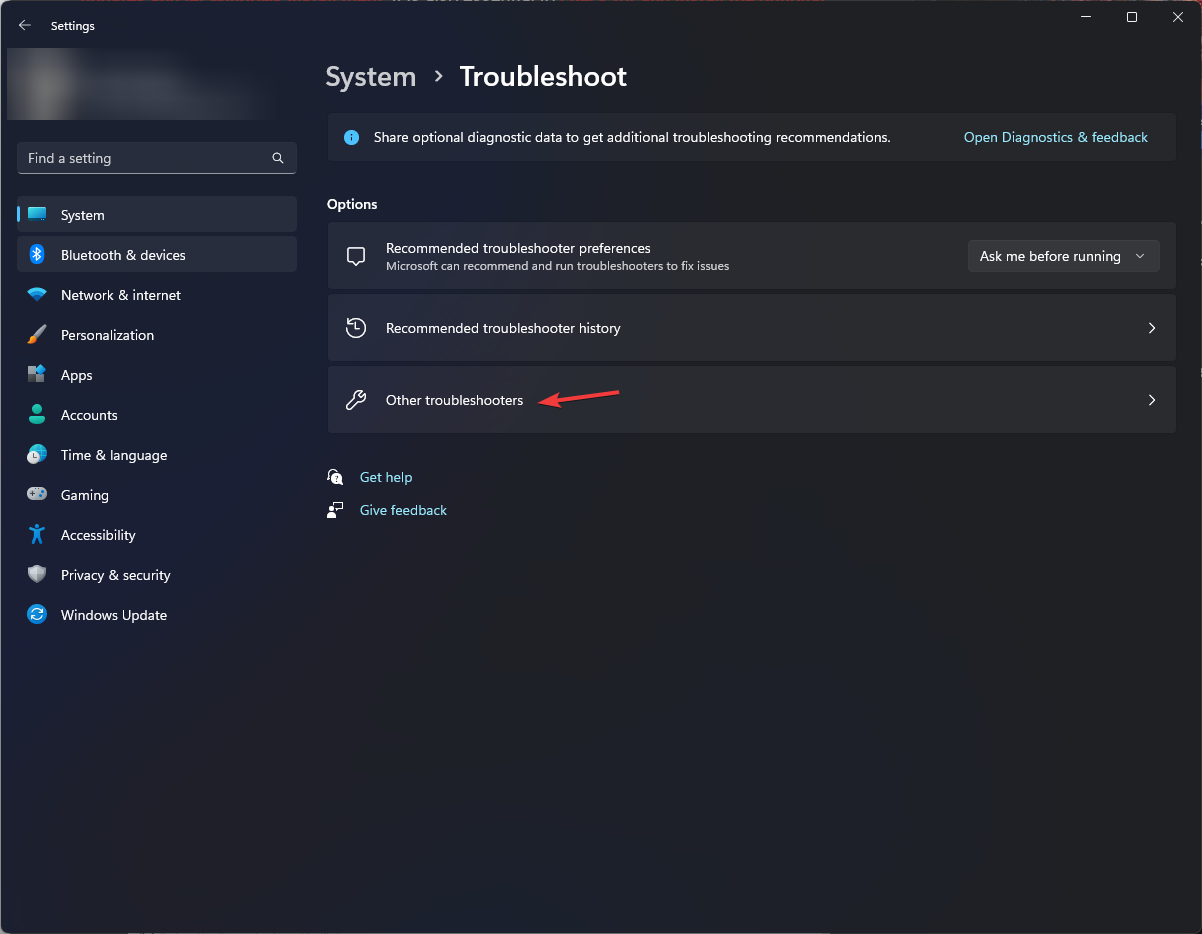
- Go to System and select Troubleshoot.
- Click on Other Troubleshooting.
- Find the "Network Adapters" option and click "Run" to start the troubleshooter. Follow the on-screen prompts to complete the process.
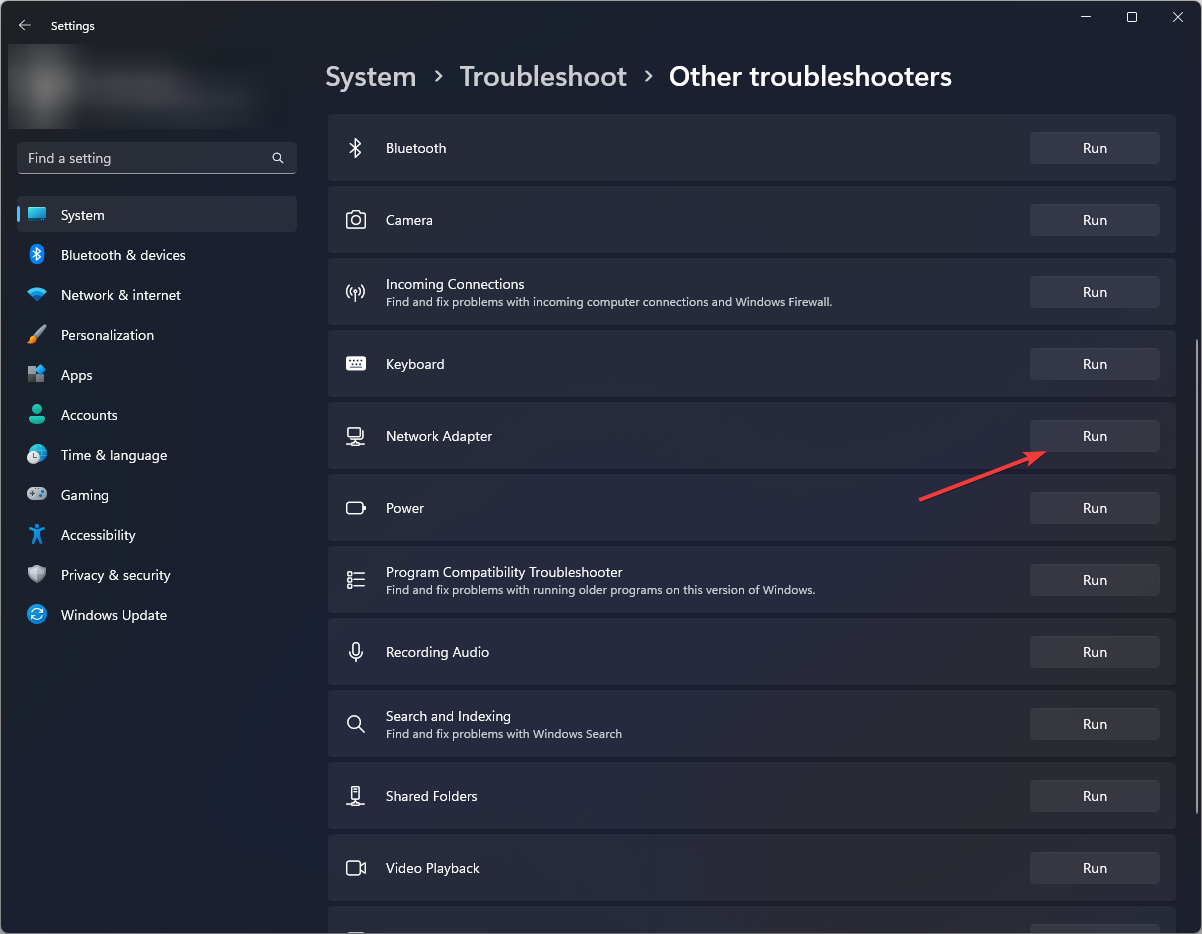
The Network Troubleshooter can be very helpful in fixing connection issues, especially after a Windows update.
4. Start the wireless LAN automatic configuration service
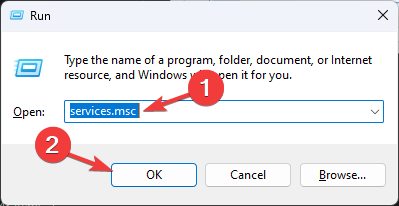
- Press to open the "Run" dialog box. WindowsR
- Type services.msc and click OK to open Services.
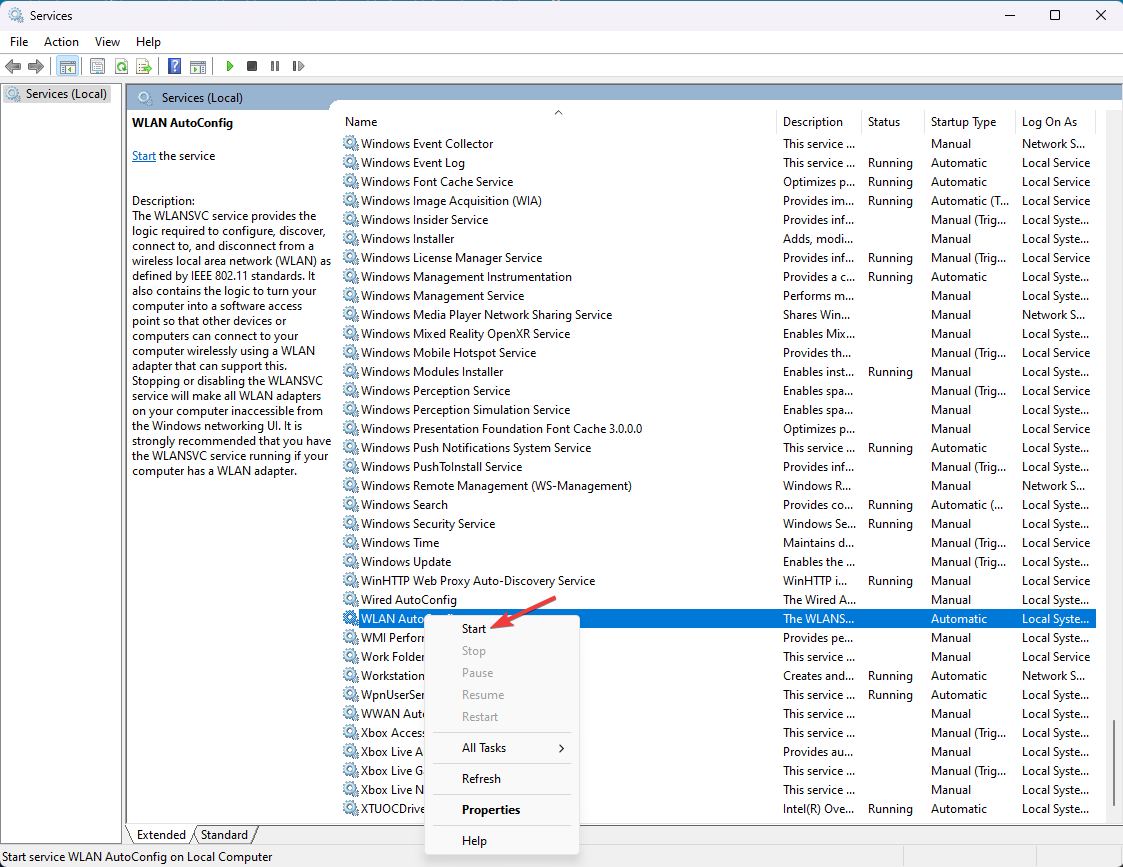
- Find and right-click WLAN Automatic Configuration and select Start.
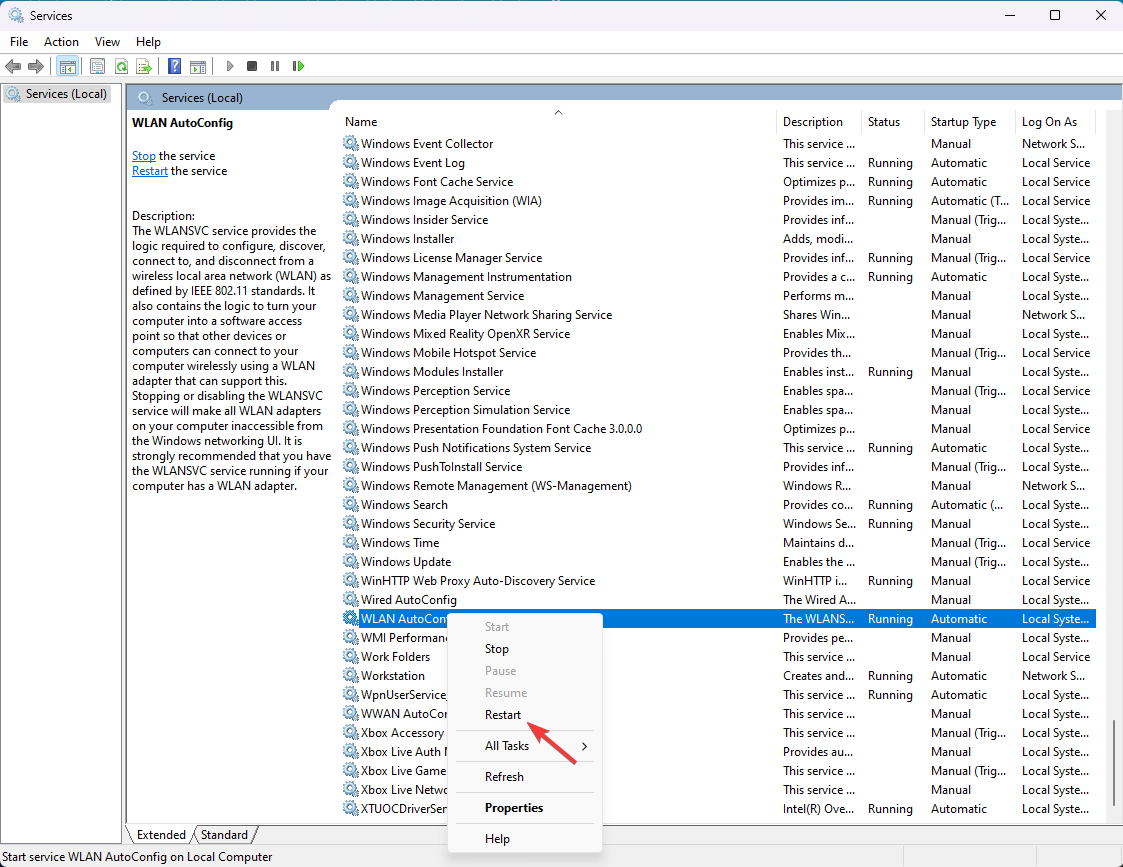
- If the Start option is grayed out, click Restart.
- Wait for the service to start again, then close the Services window.
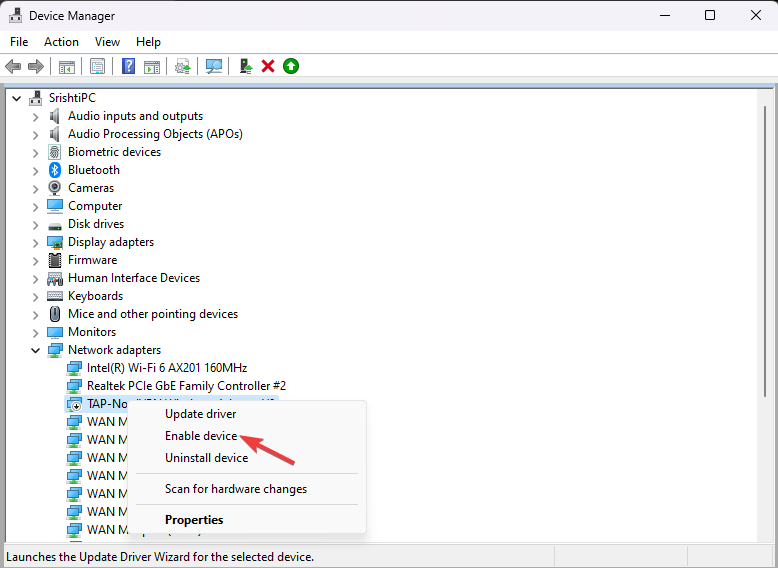
5. Re-enable the network adapter
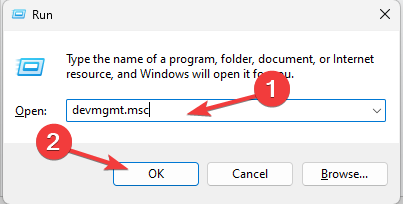
- Press to open the "Run" window. WindowsR
- Type devmgmt.msc and click OK to open Device Manager"window.
- Find Network Adapters and click to expand it. Right-click on the network driver and select Enable Device. You will get the "Enable device" option only if the network adapter is disabled.
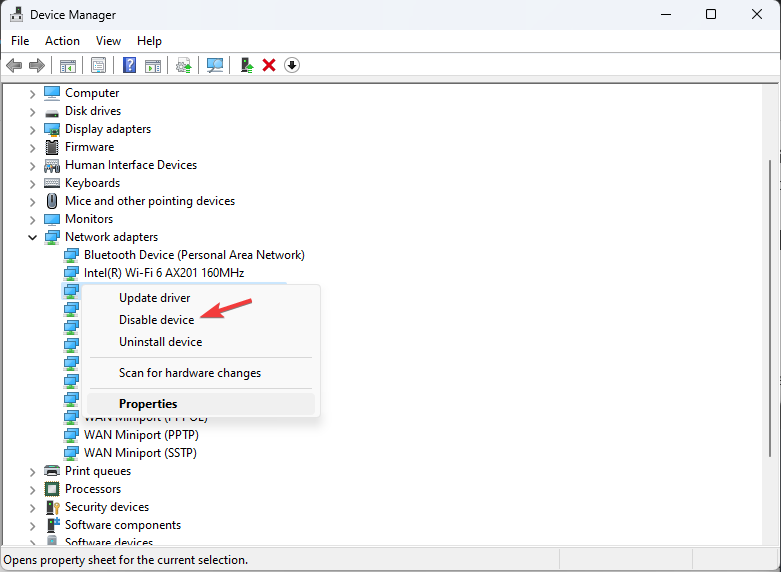
- If you see the "Disable device" option, click it and select "Yes" at the following prompt to confirm the change.
- Now, right-click on the driver and select Enable Device to enable it again.
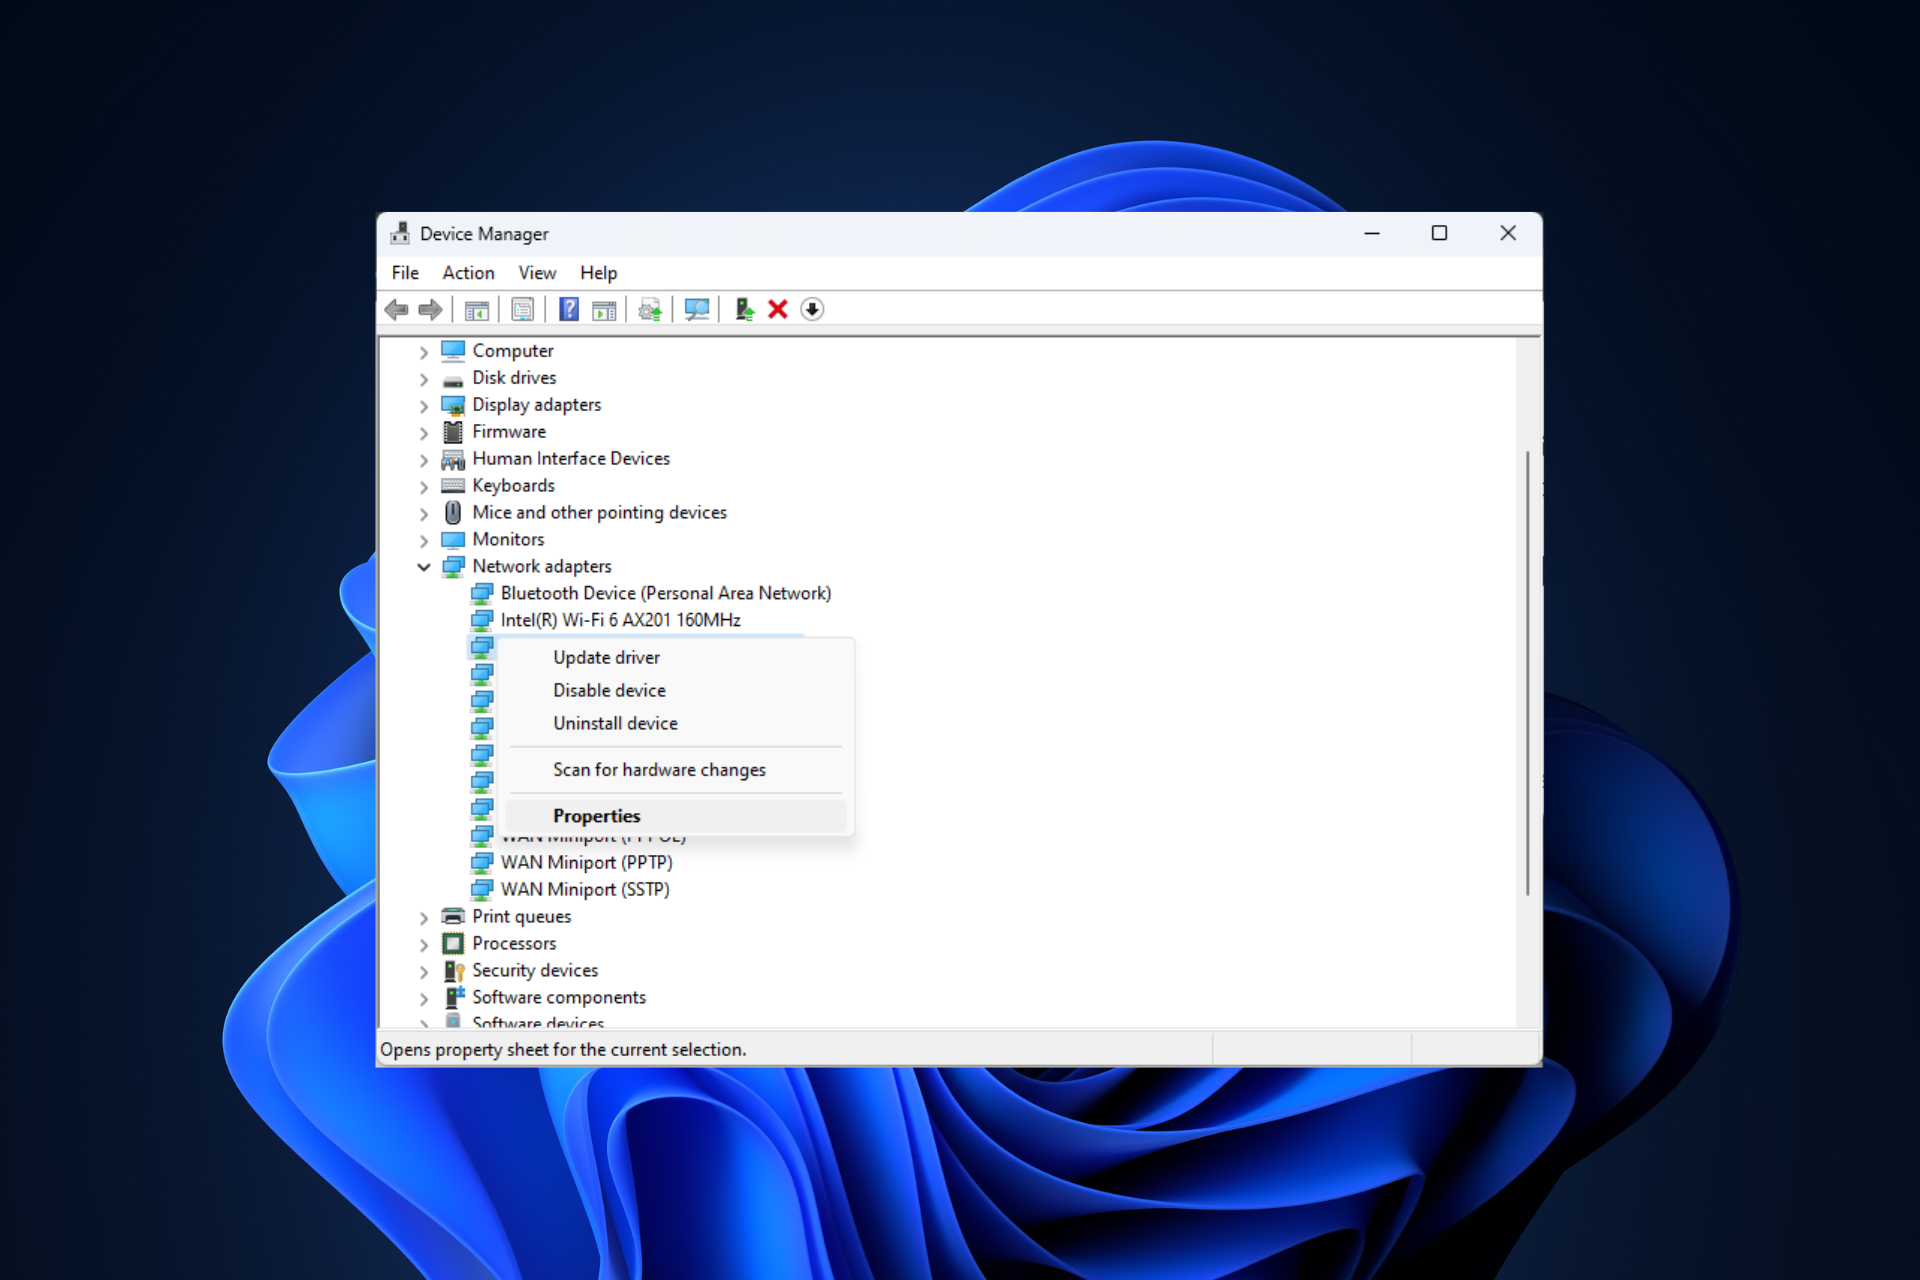
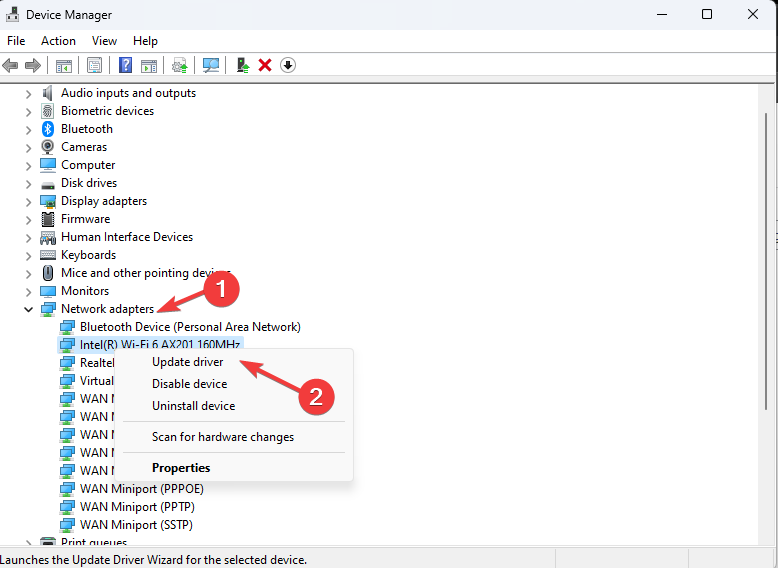
6. Update/reinstall the network driver
- Press to open the "Run" window. WindowsR
- Type devmgmt.msc and click OK to open Device Manager"window.
- Find Network Adapters and click to expand it. Right-click on the network driver and select "Update Driver".
- Click Search for drivers automatically and follow the on-screen instructions.
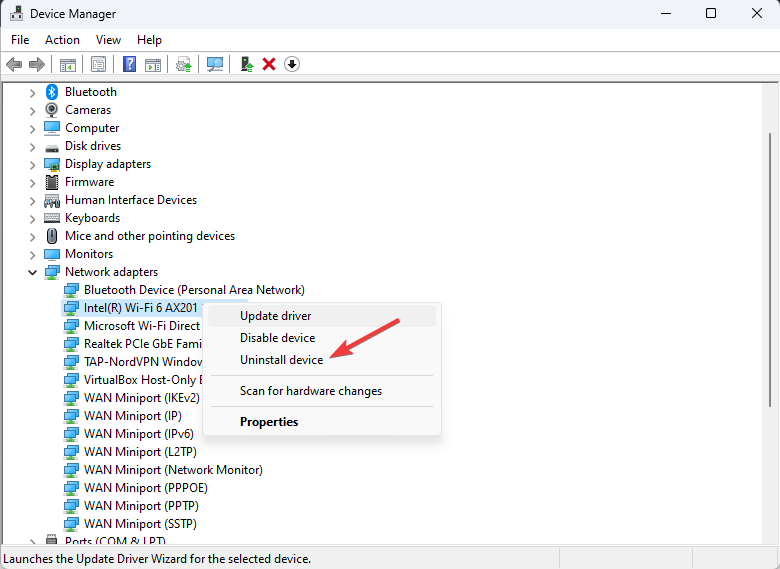
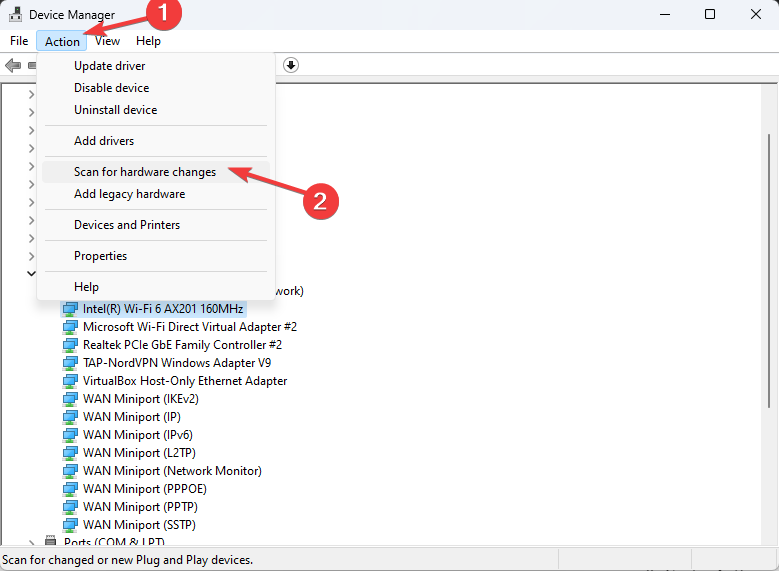
- If the update is not found, right-click the driver again and select Uninstall Driver.
- Next, go to "Actions" and select "Scan for hardware changes" to reinstall the driver.
Keeping your network drivers up to date can help you prevent other network connection issues, such as Windows not finding a Wi-Fi network.
7. Reset TCP/IP Stack
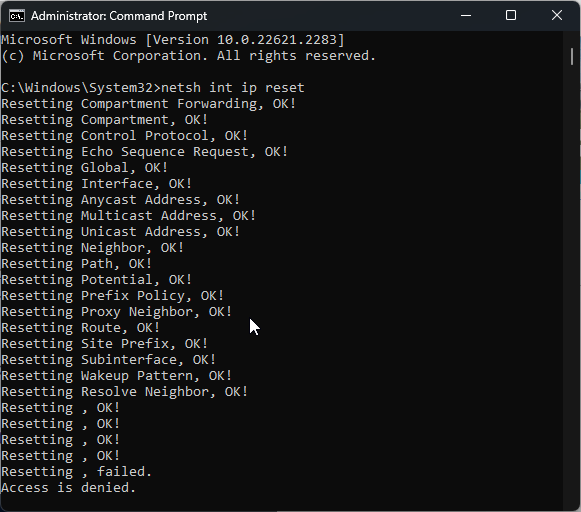
- key, type cmd, and click Run as administrator. Windows
- Copy and paste the following command to reset your network connection and click: Enter
<strong>netsh int ip reset</strong>
- After execution, restart the computer.

To successfully use the Internet in Safe Mode, you must ensure you have a stable Internet connection in Normal Mode via an Ethernet cable.
After the task is completed, don’t forget to return to normal mode to enjoy the full functionality of the operating system.
If you are experiencing other internet connection issues on your Windows computer, read this guide to find a quick solution.
The above is the detailed content of Fix: Network connection issue that prevents access to the Internet in Windows 11 Safe Mode. For more information, please follow other related articles on the PHP Chinese website!

Hot AI Tools

Undresser.AI Undress
AI-powered app for creating realistic nude photos

AI Clothes Remover
Online AI tool for removing clothes from photos.

Undress AI Tool
Undress images for free

Clothoff.io
AI clothes remover

AI Hentai Generator
Generate AI Hentai for free.

Hot Article
Hot Tools

Notepad++7.3.1
Easy-to-use and free code editor

SublimeText3 Chinese version
Chinese version, very easy to use

Zend Studio 13.0.1
Powerful PHP integrated development environment

Dreamweaver CS6
Visual web development tools

SublimeText3 Mac version
God-level code editing software (SublimeText3)
Hot Topics
 1377
1377
 52
52

 Detailed introduction to the difference between NVIDIA graphics card driver Game ready and Studio
Mar 14, 2024 am 10:00 AM
Detailed introduction to the difference between NVIDIA graphics card driver Game ready and Studio
Mar 14, 2024 am 10:00 AM
NVIDIA is a graphics card brand used by many users, that is, N card. However, some users found that there are Gameready and Studio when downloading the graphics card driver. Is there any difference? Let’s take a look at the detailed introduction of the difference between NVIDIA graphics card driver Gameready and Studio. Gameready is a product of NVIDIA graphics cards optimized for the gaming field, while the Studio series is aimed at professional users and optimizes the experience of using productivity software. These two series of graphics cards provide the best performance and stability for different application fields to meet users' needs for games and professional software. 2. The frequency of updates is different: gameready is updated frequently and will be released
![WLAN expansion module has stopped [fix]](https://img.php.cn/upload/article/000/465/014/170832352052603.gif?x-oss-process=image/resize,m_fill,h_207,w_330) WLAN expansion module has stopped [fix]
Feb 19, 2024 pm 02:18 PM
WLAN expansion module has stopped [fix]
Feb 19, 2024 pm 02:18 PM
If there is a problem with the WLAN expansion module on your Windows computer, it may cause you to be disconnected from the Internet. This situation is often frustrating, but fortunately, this article provides some simple suggestions that can help you solve this problem and get your wireless connection working properly again. Fix WLAN Extensibility Module Has Stopped If the WLAN Extensibility Module has stopped working on your Windows computer, follow these suggestions to fix it: Run the Network and Internet Troubleshooter to disable and re-enable wireless network connections Restart the WLAN Autoconfiguration Service Modify Power Options Modify Advanced Power Settings Reinstall Network Adapter Driver Run Some Network Commands Now, let’s look at it in detail
 How to solve win11 DNS server error
Jan 10, 2024 pm 09:02 PM
How to solve win11 DNS server error
Jan 10, 2024 pm 09:02 PM
We need to use the correct DNS when connecting to the Internet to access the Internet. In the same way, if we use the wrong dns settings, it will prompt a dns server error. At this time, we can try to solve the problem by selecting to automatically obtain dns in the network settings. Let’s take a look at the specific solutions. How to solve win11 network dns server error. Method 1: Reset DNS 1. First, click Start in the taskbar to enter, find and click the "Settings" icon button. 2. Then click the "Network & Internet" option command in the left column. 3. Then find the "Ethernet" option on the right and click to enter. 4. After that, click "Edit" in the DNS server assignment, and finally set DNS to "Automatic (D
 UCM in Windows 11/10 - UCSI VPI device driver error
Mar 24, 2024 am 09:50 AM
UCM in Windows 11/10 - UCSI VPI device driver error
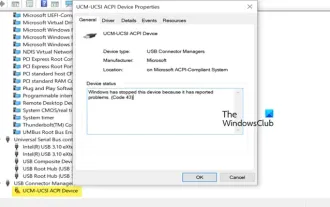
Mar 24, 2024 am 09:50 AM
UCM-UCSIVPI is crucial to your computer because it is responsible for managing the USB Type-C port. When you encounter error messages for this driver in Device Manager, it will affect the normal working of your USB Type-C port. Therefore, it is crucial to resolve this issue promptly and this article will guide you on how to resolve the issues caused by this error message. UCM-UCSIACPI, Windows has stopped this device because it reported a problem (code 43). What is UCM—UCSIVPI device driver? Microsoft provides a driver that complies with the USB Type-C Connector System Software Interface (UCSI) specification for TPI transmission. If your system is configured
 What should I do if Win11 fails to load the driver? What to do if the driver cannot be loaded on this device?
Apr 11, 2024 pm 05:01 PM
What should I do if Win11 fails to load the driver? What to do if the driver cannot be loaded on this device?
Apr 11, 2024 pm 05:01 PM
This article aims to solve the "The driver cannot be loaded on this device" error message that Win11 users encounter when trying to install or update drivers. By reading this article, Win11 users will be able to solve the "The driver cannot be loaded on this device" problem, thereby ensuring the stability of the system and the normal operation of the hardware device. Program Compatibility Assistant prompts: The driver cannot be loaded on this device. Method 1: 1. Press the [Win+X] key combination, or [right-click] click [Windows Start Logo] on the taskbar, and open the hidden menu item , select [Terminal Administrator]; 2. User Account Control window, do you want to allow this application to make changes to your device? Click【
![What should I do if my Bluetooth peripheral device does not have a driver? [solved]](https://img.php.cn/upload/article/000/465/014/171033721377290.jpg?x-oss-process=image/resize,m_fill,h_207,w_330) What should I do if my Bluetooth peripheral device does not have a driver? [solved]
Mar 13, 2024 pm 09:40 PM
What should I do if my Bluetooth peripheral device does not have a driver? [solved]
Mar 13, 2024 pm 09:40 PM
When many users use the Bluetooth function, an error message box pops up: The driver for the bluetooth peripheral device cannot be found, and an exclamation mark is displayed when opening the device manager. What is going on? In response to this problem, today I will share with you how to deal with the problem that the driver for the bluetooth peripheral device cannot be found. How to solve the problem that the driver cannot be found for bluetooth peripheral devices? Right-click the Bluetooth icon in the lower right corner to display Bluetooth devices. Right-click the paired Bluetooth device and click Delete Device, and the Bluetooth peripheral device will disappear. There is an uninstalled "Bluetooth Peripheral Device" in "Device Manager"
 What should I do if the earth is displayed in the lower right corner of Windows 10 when I cannot access the Internet? Various solutions to the problem that the Earth cannot access the Internet in Win10
Feb 29, 2024 am 09:52 AM
What should I do if the earth is displayed in the lower right corner of Windows 10 when I cannot access the Internet? Various solutions to the problem that the Earth cannot access the Internet in Win10
Feb 29, 2024 am 09:52 AM
This article will introduce the solution to the problem that the globe symbol is displayed on the Win10 system network but cannot access the Internet. The article will provide detailed steps to help readers solve the problem of Win10 network showing that the earth cannot access the Internet. Method 1: Restart directly. First check whether the network cable is not plugged in properly and whether the broadband is in arrears. The router or optical modem may be stuck. In this case, you need to restart the router or optical modem. If there are no important things being done on the computer, you can restart the computer directly. Most minor problems can be quickly solved by restarting the computer. If it is determined that the broadband is not in arrears and the network is normal, that is another matter. Method 2: 1. Press the [Win] key, or click [Start Menu] in the lower left corner. In the menu item that opens, click the gear icon above the power button. This is [Settings].
 USB to HDMI adapter not working properly on Windows 11/10
Feb 19, 2024 pm 12:00 PM
USB to HDMI adapter not working properly on Windows 11/10
Feb 19, 2024 pm 12:00 PM
If you're having issues with your USB to HDMI adapter not working properly on Windows, it could be because of an outdated graphics card driver or a problem with the adapter itself. The following content will help you resolve this dilemma. Fix USB to HDMI adapter not working on Windows 11/10 Use the following solutions to fix USB to HDMI adapter not working on Windows 10/11: Update Display Adapter Driver Rollback Graphics Driver Unplug and Plug USB to HDMI Adapter Updated BIOS Let's get started. 1] Update Display Adapter Driver Issues may be caused by outdated or corrupted display adapter drivers. You can try downloading from the official website of the manufacturer