

php写的发送附件的程序实例_PHP

error_reporting(63);
include('class.html_mime_mail.inc');
/***************************************
** Example of usage.
***************************************/
/***************************************
** Read the file background.gif into
** $backgrnd.
***************************************/
$filename = 'background.gif';
$backgrnd = fread($fp = fopen($filename, 'r'), filesize($filename));
fclose($fp);
/***************************************
** Read the file test.zip into $attachment.
***************************************/
$filename = 'example.zip';
$attachment = fread($fp = fopen($filename, 'r'), filesize($filename));
fclose($fp);
/***************************************
** Create the mail object. Optional headers
** argument. Do not put From: here, this
** will be added when $mail->send
***************************************/
$mail = new html_mime_mail("X-Mailer: Html Mime Mail Class\r\n");
/***************************************
** If sending an html email, then these
** two variables specify the text and
** html versions of the mail. Don't
** have to be named as these are. Just
** make sure the names tie in to the
** $mail->add_html() command further down.
***************************************/
$text = 'This is a test.';
$html = '
';
/***************************************
** Add the text, html and embedded images.
** Each embedded image has to be added
** using $mail->add_html_image() BEFORE
** calling $mail->add_html(). The name
** of the image should match exactly
** (case-sensitive) to the name in the html.
***************************************/
$mail->add_html_image($backgrnd, 'background.gif', 'image/gif');
$mail->add_html($html, $text);
/***************************************
** If not sending an html email, then
** this is used to set the plain text
** body of the email.
***************************************/
// $mail->body = 'fsss';
/***************************************
** This is used to add an attachment to
** the email.
***************************************/
$mail->add_attachment($attachment, 'example.zip', 'application/octet-stream');
/***************************************
** Builds the message.
***************************************/
$mail->build_message();
/***************************************
** Sends the message. $mail->build_message()
** is seperate to $mail->send so that the
** same email can be sent many times to
** differing recipients simply by putting
** $mail->send() in a loop.
***************************************/
$mail->send('','szw@phpexe.com', 'From Name', 'szw@phpexe.com', 'Subject','');
/***************************************
** Debug stuff. Entirely unnecessary.
***************************************/
echo '
'; <br>echo $mail->mime; <br>echo '
?>
class html_mime_mail{
var $headers;
var $body;
var $multipart;
var $mime;
var $html;
var $html_text;
var $html_images = array();
var $cids = array();
var $do_html;
var $parts = array();
/***************************************
** Constructor function. Sets the headers
** if supplied.
***************************************/
function html_mime_mail($headers = ''){
$this->headers = $headers;
}
/***************************************
** Adds a html part to the mail.
** Also replaces image names with
** content-id's.
***************************************/
function add_html($html, $text){
$this->do_html = 1;
$this->html = $html;
$this->html_text = $text;
if(is_array($this->html_images) AND count($this->html_images) > 0){
for($i=0; $i
$this->html = ereg_replace($this->html_images[$i]['name'], 'cid:'.$this->html_images[$i]['cid'], $this->html);
}
}
}
/***************************************
** Builds html part of email.
***************************************/
function build_html($orig_boundary){
$sec_boundary = '=_'.md5(uniqid(time()));
$thr_boundary = '=_'.md5(uniqid(time()));
if(!is_array($this->html_images)){
$this->multipart.= '--'.$orig_boundary."\r\n";
$this->multipart.= 'Content-Type: multipart/alternative; boundary="'.$sec_boundary."\"\r\n\r\n\r\n";
$this->multipart.= '--'.$sec_boundary."\r\n";
$this->multipart.= 'Content-Type: text/plain'."\r\n";
$this->multipart.= 'Content-Transfer-Encoding: 7bit'."\r\n\r\n";
$this->multipart.= $this->html_text."\r\n\r\n";
$this->multipart.= '--'.$sec_boundary."\r\n";
$this->multipart.= 'Content-Type: text/html'."\r\n";
$this->multipart.= 'Content-Transfer-Encoding: 7bit'."\r\n\r\n";
$this->multipart.= $this->html."\r\n\r\n";
$this->multipart.= '--'.$sec_boundary."--\r\n\r\n";
}else{
$this->multipart.= '--'.$orig_boundary."\r\n";
$this->multipart.= 'Content-Type: multipart/related; boundary="'.$sec_boundary."\"\r\n\r\n\r\n";
$this->multipart.= '--'.$sec_boundary."\r\n";
$this->multipart.= 'Content-Type: multipart/alternative; boundary="'.$thr_boundary."\"\r\n\r\n\r\n";
$this->multipart.= '--'.$thr_boundary."\r\n";
$this->multipart.= 'Content-Type: text/plain'."\r\n";
$this->multipart.= 'Content-Transfer-Encoding: 7bit'."\r\n\r\n";
$this->multipart.= $this->html_text."\r\n\r\n";
$this->multipart.= '--'.$thr_boundary."\r\n";
$this->multipart.= 'Content-Type: text/html'."\r\n";
$this->multipart.= 'Content-Transfer-Encoding: 7bit'."\r\n\r\n";
$this->multipart.= $this->html."\r\n\r\n";
$this->multipart.= '--'.$thr_boundary."--\r\n\r\n";
for($i=0; $i
$this->multipart.= '--'.$sec_boundary."\r\n";
$this->build_html_image($i);
}
$this->multipart.= "--".$sec_boundary."--\r\n\r\n";
}
}
/***************************************
** Adds an image to the list of embedded
** images.
***************************************/
function add_html_image($file, $name = '', $c_type='application/octet-stream'){
$this->html_images[] = array( 'body' => $file,
'name' => $name,
'c_type' => $c_type,
'cid' => md5(uniqid(time())) );
}
/***************************************
** Adds a file to the list of attachments.
***************************************/
function add_attachment($file, $name = '', $c_type='application/octet-stream'){
$this->parts[] = array( 'body' => $file,
'name' => $name,
'c_type' => $c_type );
}
/***************************************
** Builds an embedded image part of an
** html mail.
***************************************/
function build_html_image($i){
$this->multipart.= 'Content-Type: '.$this->html_images[$i]['c_type'];
if($this->html_images[$i]['name'] != '') $this->multipart .= '; name="'.$this->html_images[$i]['name']."\"\r\n";
else $this->multipart .= "\r\n";
$this->multipart.= 'Content-ID: html_images[$i]['cid'].">\r\n";
$this->multipart.= 'Content-Transfer-Encoding: base64'."\r\n\r\n";
$this->multipart.= chunk_split(base64_encode($this->html_images[$i]['body']))."\r\n";
}
/***************************************
** Builds a single part of a multipart
** message.
***************************************/
function build_part($i){
$message_part = '';
$message_part.= 'Content-Type: '.$this->parts[$i]['c_type'];
if($this->parts[$i]['name'] != '')
$message_part .= '; name="'.$this->parts[$i]['name']."\"\r\n";
else
$message_part .= "\r\n";
// Determine content encoding.
if($this->parts[$i]['c_type'] == 'text/plain'){
$message_part.= 'Content-Transfer-Encoding: 7bit'."\r\n\r\n";
$message_part.= $this->parts[$i]['body']."\r\n";
}else{
$message_part.= 'Content-Transfer-Encoding: base64'."\r\n";
$message_part.= 'Content-Disposition: attachment; filename="'.$this->parts[$i]['name']."\"\r\n\r\n";
$message_part.= chunk_split(base64_encode($this->parts[$i]['body']))."\r\n";
}
return $message_part;
}
/***************************************
** Builds the multipart message from the
** list ($this->parts).
***************************************/
function build_message(){
$boundary = '=_'.md5(uniqid(time()));
$this->headers.= "MIME-Version: 1.0\r\n";
$this->headers.= "Content-Type: multipart/mixed; boundary=\"".$boundary."\"\r\n";
$this->multipart = '';
$this->multipart.= "This is a MIME encoded message.\r\nCreated by html_mime_mail.class.\r\nSee http://www.heyes-computing.net/scripts/ for a copy.\r\n\r\n";
if(isset($this->do_html) AND $this->do_html == 1) $this->build_html($boundary);
if(isset($this->body) AND $this->body != '') $this->parts[] = array('body' => $this->body, 'name' => '', 'c_type' => 'text/plain');
for($i=(count($this->parts)-1); $i>=0; $i--){
$this->multipart.= '--'.$boundary."\r\n".$this->build_part($i);
}
$this->mime = $this->multipart."--".$boundary."--\r\n";
}
/***************************************
** Sends the mail.
***************************************/
function send($to_name, $to_addr, $from_name, $from_addr, $subject = '', $headers = ''){
if($to_name != '') $to = '"'.$to_name.'" ';
else $to = $to_addr;
if($from_name != '') $from = '"'.$from_name.'" ';
else $from = $from_addr;
$this->headers.= 'From: '.$from."\r\n";
//$this->headers.= $headers;
mail($to, $subject, $this->mime, $this->headers);
}
/***************************************
** Use this method to deliver using direct
** smtp connection. Relies upon Manuel Lemos'
** smtp mail delivery class available at:
** http://phpclasses.upperdesign.com
**
** void smtp_send( string *Name* of smtp object,
** string From address,
** array To addresses,
** array Headers,
** string The body)
***************************************/
function smtp_send($smtp_obj, $from_addr, $to_addr){
global $$smtp_obj;
$smtp_obj = $$smtp_obj;
if(substr($this->headers, -2) == "\r\n") $this->headers = substr($this->headers,0,-2);
$this->headers = explode("\r\n", $this->headers);
$smtp_obj->sendmessage($from_addr, $to_addr, $this->headers, $this->mime);
}
} // End of class.
?>

Hot AI Tools

Undresser.AI Undress
AI-powered app for creating realistic nude photos

AI Clothes Remover
Online AI tool for removing clothes from photos.

Undress AI Tool
Undress images for free

Clothoff.io
AI clothes remover

AI Hentai Generator
Generate AI Hentai for free.

Hot Article
Hot Tools

Notepad++7.3.1
Easy-to-use and free code editor

SublimeText3 Chinese version
Chinese version, very easy to use

Zend Studio 13.0.1
Powerful PHP integrated development environment

Dreamweaver CS6
Visual web development tools

SublimeText3 Mac version
God-level code editing software (SublimeText3)
Hot Topics
 1359
1359
 52
52

 How to make Google Maps the default map in iPhone
Apr 17, 2024 pm 07:34 PM
How to make Google Maps the default map in iPhone
Apr 17, 2024 pm 07:34 PM
The default map on the iPhone is Maps, Apple's proprietary geolocation provider. Although the map is getting better, it doesn't work well outside the United States. It has nothing to offer compared to Google Maps. In this article, we discuss the feasible steps to use Google Maps to become the default map on your iPhone. How to Make Google Maps the Default Map in iPhone Setting Google Maps as the default map app on your phone is easier than you think. Follow the steps below – Prerequisite steps – You must have Gmail installed on your phone. Step 1 – Open the AppStore. Step 2 – Search for “Gmail”. Step 3 – Click next to Gmail app
 Clock app missing in iPhone: How to fix it
May 03, 2024 pm 09:19 PM
Clock app missing in iPhone: How to fix it
May 03, 2024 pm 09:19 PM
Is the clock app missing from your phone? The date and time will still appear on your iPhone's status bar. However, without the Clock app, you won’t be able to use world clock, stopwatch, alarm clock, and many other features. Therefore, fixing missing clock app should be at the top of your to-do list. These solutions can help you resolve this issue. Fix 1 – Place the Clock App If you mistakenly removed the Clock app from your home screen, you can put the Clock app back in its place. Step 1 – Unlock your iPhone and start swiping to the left until you reach the App Library page. Step 2 – Next, search for “clock” in the search box. Step 3 – When you see “Clock” below in the search results, press and hold it and
 How to write a simple countdown program in C++?
Nov 03, 2023 pm 01:39 PM
How to write a simple countdown program in C++?
Nov 03, 2023 pm 01:39 PM
C++ is a widely used programming language that is very convenient and practical in writing countdown programs. Countdown program is a common application that can provide us with very precise time calculation and countdown functions. This article will introduce how to use C++ to write a simple countdown program. The key to implementing a countdown program is to use a timer to calculate the passage of time. In C++, we can use the functions in the time.h header file to implement the timer function. The following is the code for a simple countdown program
 WhatsApp Tips: How to Send HD Photos and Videos
Sep 10, 2023 am 10:13 AM
WhatsApp Tips: How to Send HD Photos and Videos
Sep 10, 2023 am 10:13 AM
WhatsApp has launched a new option that allows users to send photos and videos in high resolution through the messaging platform. Read on to find out how it's done. WhatsApp has released an update that allows iPhone and Android users to send photos and videos in high resolution, finally addressing the service's low-quality media sharing limitations. The option is called "HD Quality" and means users can send clearer photos and videos with minimal compression. For example, images captured on the iPhone can now be sent at 3024x4032 resolution instead of the previous maximum of 920x1280, while videos can be sent at 1280×718 resolution instead of 848×476.
 How to send files to others on TikTok? How to delete files sent to others?
Mar 22, 2024 am 08:30 AM
How to send files to others on TikTok? How to delete files sent to others?
Mar 22, 2024 am 08:30 AM
On Douyin, users can not only share their life details and talents, but also interact with other users. In this process, sometimes we need to send files to other users, such as pictures, videos, etc. So, how to send files to others on Douyin? 1. How to send files to others on Douyin? 1. Open Douyin and enter the chat interface where you want to send files. 2. Click the "+" sign in the chat interface and select "File". 3. In the file options, you can choose to send pictures, videos, audio and other files. After selecting the file you want to send, click "Send". 4. Wait for the other party to accept your file. Once the other party accepts it, the file will be transferred successfully. 2. How to delete files sent to others on Douyin? 1. Open Douyin and enter the text you sent.
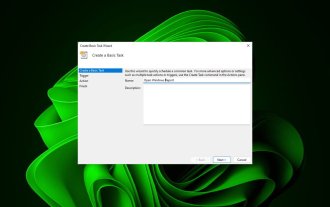 How to open a website using Task Scheduler
Oct 02, 2023 pm 11:13 PM
How to open a website using Task Scheduler
Oct 02, 2023 pm 11:13 PM
Do you frequently visit the same website at about the same time every day? This can lead to spending a lot of time with multiple browser tabs open and cluttering the browser while performing daily tasks. Well, how about opening it without having to launch the browser manually? It's very simple and doesn't require you to download any third-party apps, as shown below. How do I set up Task Scheduler to open a website? Press the key, type Task Scheduler in the search box, and then click Open. Windows On the right sidebar, click on the Create Basic Task option. In the Name field, enter the name of the website you want to open and click Next. Next, under Triggers, click Time Frequency and click Next. Select how long you want the event to repeat and click Next. Select enable
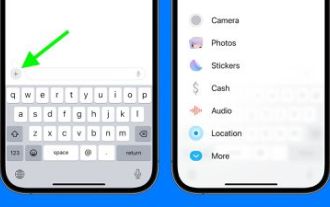 iOS 17: How to organize iMessage apps in Messages
Sep 18, 2023 pm 05:25 PM
iOS 17: How to organize iMessage apps in Messages
Sep 18, 2023 pm 05:25 PM
In iOS 17, Apple not only added several new messaging features, but also tweaked the design of the Messages app to give it a cleaner look. All iMessage apps and tools, such as the camera and photo options, can now be accessed by tapping the "+" button above the keyboard and to the left of the text input field. Clicking the "+" button brings up a menu column with a default order of options. Starting from the top, there's camera, photos, stickers, cash (if available), audio, and location. At the very bottom is a "More" button, which when tapped will reveal any other installed messaging apps (you can also swipe up to reveal this hidden list). How to reorganize your iMessage app You can do this below
 Can't allow access to camera and microphone in iPhone
Apr 23, 2024 am 11:13 AM
Can't allow access to camera and microphone in iPhone
Apr 23, 2024 am 11:13 AM
Are you getting "Unable to allow access to camera and microphone" when trying to use the app? Typically, you grant camera and microphone permissions to specific people on a need-to-provide basis. However, if you deny permission, the camera and microphone will not work and will display this error message instead. Solving this problem is very basic and you can do it in a minute or two. Fix 1 – Provide Camera, Microphone Permissions You can provide the necessary camera and microphone permissions directly in settings. Step 1 – Go to the Settings tab. Step 2 – Open the Privacy & Security panel. Step 3 – Turn on the “Camera” permission there. Step 4 – Inside, you will find a list of apps that have requested permission for your phone’s camera. Step 5 – Open the “Camera” of the specified app
