

在网页上制作360度全景图_PHP

轻松制作360度全景网页图片
——使用PixMaker软件制作网页上的360度旋转全景图
一、 软件简介
PixMaker是一个简单方便的360度全景图片制作软件,它可以将描写一个环型场景的多个连续图片无缝地接合在一起,形成一个360度“场景”图片。可以在网页上播放,使你的页面更加生动活泼。PixMaker软件在网页上显示全景图片是靠程序本身提供的一个“Java applet”小程序组件,只要网页编辑者将这个组件放到与全景图页面相同的目录下,就可以用常用的浏览器在网页上播放全景图片。这与目前流行的“Ulead Cool 360全景制作软件”不同,“Ulead Cool 360”制作的网页全景图片,需要浏览者首先下载一个“全景图观察器”插件到的浏览器上才可以播放全景图片,相比之下,PixMaker使用起来感觉更方便自然。PixMaker可以很好地自动处理图片边界的连接,看不出任何接缝的痕迹。在你准备好一组连续场景图片的前题下,PixMaker只需几个简单的操作步骤,就可自动完成全景图片从制作到发行的全过程。如果读者想先看看全景网页的效果,请访问这个演示页面:http://rubber-ts.51.net/pm360/test.html 。下面我们简单介绍它的使用方法。
二、 软件的使用
1. 制作一组全景图片的步骤和注意的问题。
(1)使照像机平行于地面并最好固定在三角架上。
(2)拍摄每一幅照片时要保持照像机在同一个高度。
(3)以一个固定点为圆心,顺时针方向旋转拍摄每一幅照片。
(4)每一幅照片的边界要有30%左右的重叠区域。
(5)要注意将移动的物体拍摄在照片的中间,不要让移动物体出现的照片相交错的边界上,以免对以后照片的边界处理带来不便。
(6)根据你使用的照像设备的不同,使用扫描仪等设备将照片处理成JPG格式的图片文件,图片的尺寸可根据你自己的需要决定,文件名最好按字母顺序排列。
2.将多张连续的场景图片输入到PXIMAKER处理窗口。
(1)启动PixMaker程序,可以看到程序窗口上方有三个大图标,分别标记有“1—Snap”(抓取图片)、“2-Stitch”(缝合图片)、“3-Publish”(发行一个“场景”),下面是“Stitch”(缝合图片)标签板窗口。(见图1)
(2)用鼠标点击“1—Snap”(抓取图片)图标,在出现的一个指定图片获取位置的对话框中选择“My computer”并按“OK”按钮,在打开的文件输入对话框中找到保存文件的目录。本文为方便起见,就以PIXMAKER程序的SAMPLE目录下自带的图片文件为例,它是一组展览大厅的场景图片,文件名为“Sample01—Sample12”。按下“SHIFT”键不放,用鼠标选择这一组文件,或按下ALT键不放,用鼠标选择所需的图片文件,然后按“OPEN”(打开)按钮,所选择的图片文件就排列在“Stitch”标签板上方的窗口内(见图1上面的窗口),并出现一个工具条,上边有插入、删除、移动图片、图片类型(Type)、镜头选择(Lens)等操作命令图标,在此就不多加叙述了,读者可自行熟悉使用。其中图片类型选360度,镜头选Auto即可,这也是软件启动时给出的默认值。
3.缝合图片
这一步骤是将前面所抓取的多幅图片无缝地连接在一起,形成一个360度全景的“场景”图。操作非常简单,只需你点击第二个“Stitch”大图标,PixMaker程序会自动地处理图片的边界对齐和连接,在一个弹出的处理窗口中可以动态地看到自动处理图片的全过程。完成后的场景图片会显示在下面的窗口内(见图1下面窗口)。此时你就可以用鼠标指针操纵图片,欣赏刚刚生成的360度旋转的全景影像了。横向拖动鼠标可以左右移动图片,按住“Shift”键并上下移多鼠标指针可以放大和缩小“场景”的影像。使用场景窗口左下方的工具条也可以操纵场景图片的放大、缩小和使场景自动旋转,用鼠标指针点击场景图片内任一位置,可停止场景的移动,操作方式非常灵活方便。如果你对自动生成场景图片的边界连接效果不满意,也可以选择手动方式人为调整图片的边界连接。
4.在场景内增加热点链接
在场景图片制作完成后,点击“HotSpot”标签,这时会出现一个提示对话框,要求你首先要保存所生成的场景图片,对话框内要求你选择图像的质量和图片的尺寸,我们在这里选择图像质量为:“good”(较好)一项,图片尺寸选择:“Optimize for web”(按网页使用优化)一项,按“NEXT”按钮,在出现的文件保存对话框中将场景图片保存到指定目录下。接着出现的提示框要求你将目前编辑的工程文件保存到指定的目录下,以方便你以后的修改和编辑。完成以上的操作后就出现了热点编辑窗口,和一个工具条,我们点击第二个命令图标,它是在场景图片上增加一个指向网页的链接,在出现的对话框内填入链接的页面地址和热点提示的内容,按“OK”按钮完成一个热点链接,可以在场景上增加多个链接热点,每一个热点在场景上显示为一个小图框,以提示你点击的位置。
5.将场景发行到网页上
我们这里讨论的最终目的就是将360度的场景图片显示在网页上。首先点击窗口上方的“Publish”(发行)大图标,在对话框中选择“web page (.html)”一项,按“NEXT”按钮,任选一种网页模板,按“NEXT”按钮,在对话框中填入标题和有关的说明文字,并在对话框的下面选择网页上显示场景图片的长、宽尺寸,按“NEXT”按钮并给文件取名为:mypage.html保存生成的网页文件到指定的目录下,接着又出现一个对话框,它提示你在保存页面文件的目录下,程序同时将一些必需的文件也拷贝到此目录,因为PixMaker程序在网页上显示图片是靠“Java applet”小程序支持的,注意!你要认真地记下这些文件名,并在以后将页面上传到你的服务器上时,一同将这些文件上传到与包含全景图片页面相同的目录下,这样才能正常播放“场景”图片。如果你想将“场景”图片插入到你现有的网页中去,用一个文本文件编辑工具打开由程序生成的页面文件,直接将“applet >……./applet>”标记内所包含的内容粘贴到你自己的页面内适当位置就可以正常使用了。而且这部分语句中有关“applet”小程序的参数如:显示宽度-width、显示高度-height、自动滚动速度-autoPanSpeed 等对应的数值都可以直接手工修改。
到此为止,我们就完成了在网页上制作一幅全景图片的全过程,其中大部分操作都是由“PixMaker”程序自动完成的,是不是很简单!
它还可以将全景图片生成到一个可执行的“EXE”文件中,可单独地播放全景图像,将它用E-MAIL发送给你的朋友,使他们可以在远方欣赏到你制作的全景图像,很酷吧!
有关的程序使用的其它细节,如:手工编辑图片的边界连接;多种热点链接形式的设置;多种镜头焦距的选择等操作,本文就不再赘述了。读者可自行熟悉掌握操作方法。

Hot AI Tools

Undresser.AI Undress
AI-powered app for creating realistic nude photos

AI Clothes Remover
Online AI tool for removing clothes from photos.

Undress AI Tool
Undress images for free

Clothoff.io
AI clothes remover

AI Hentai Generator
Generate AI Hentai for free.

Hot Article
Hot Tools

Notepad++7.3.1
Easy-to-use and free code editor

SublimeText3 Chinese version
Chinese version, very easy to use

Zend Studio 13.0.1
Powerful PHP integrated development environment

Dreamweaver CS6
Visual web development tools

SublimeText3 Mac version
God-level code editing software (SublimeText3)
Hot Topics


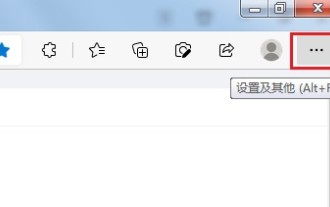 How to send web pages to desktop as shortcut in Edge browser?
Mar 14, 2024 pm 05:22 PM
How to send web pages to desktop as shortcut in Edge browser?
Mar 14, 2024 pm 05:22 PM
How to send web pages to the desktop as a shortcut in Edge browser? Many of our users want to display frequently used web pages on the desktop as shortcuts for the convenience of directly opening access pages, but they don’t know how to do it. In response to this problem, the editor of this issue will share the solution with the majority of users. , let’s take a look at the content shared in today’s software tutorial. The shortcut method of sending web pages to the desktop in Edge browser: 1. Open the software and click the "..." button on the page. 2. Select "Install this site as an application" in "Application" from the drop-down menu option. 3. Finally, click it in the pop-up window
 How to solve the problem of automatically saving pictures when publishing on Xiaohongshu? Where is the automatically saved image when posting?
Mar 22, 2024 am 08:06 AM
How to solve the problem of automatically saving pictures when publishing on Xiaohongshu? Where is the automatically saved image when posting?
Mar 22, 2024 am 08:06 AM
With the continuous development of social media, Xiaohongshu has become a platform for more and more young people to share their lives and discover beautiful things. Many users are troubled by auto-save issues when posting images. So, how to solve this problem? 1. How to solve the problem of automatically saving pictures when publishing on Xiaohongshu? 1. Clear the cache First, we can try to clear the cache data of Xiaohongshu. The steps are as follows: (1) Open Xiaohongshu and click the "My" button in the lower right corner; (2) On the personal center page, find "Settings" and click it; (3) Scroll down and find the "Clear Cache" option. Click OK. After clearing the cache, re-enter Xiaohongshu and try to post pictures to see if the automatic saving problem is solved. 2. Update the Xiaohongshu version to ensure that your Xiaohongshu
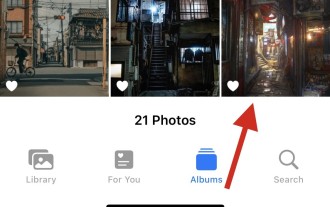
 How to post pictures in TikTok comments? Where is the entrance to the pictures in the comment area?
Mar 21, 2024 pm 09:12 PM
How to post pictures in TikTok comments? Where is the entrance to the pictures in the comment area?
Mar 21, 2024 pm 09:12 PM
With the popularity of Douyin short videos, user interactions in the comment area have become more colorful. Some users wish to share images in comments to better express their opinions or emotions. So, how to post pictures in TikTok comments? This article will answer this question in detail and provide you with some related tips and precautions. 1. How to post pictures in Douyin comments? 1. Open Douyin: First, you need to open Douyin APP and log in to your account. 2. Find the comment area: When browsing or posting a short video, find the place where you want to comment and click the "Comment" button. 3. Enter your comment content: Enter your comment content in the comment area. 4. Choose to send a picture: In the interface for entering comment content, you will see a "picture" button or a "+" button, click
 6 Ways to Make Pictures Sharper on iPhone
Mar 04, 2024 pm 06:25 PM
6 Ways to Make Pictures Sharper on iPhone
Mar 04, 2024 pm 06:25 PM
Apple's recent iPhones capture memories with crisp detail, saturation and brightness. But sometimes, you may encounter some issues that may cause the image to look less clear. While autofocus on iPhone cameras has come a long way, allowing you to take photos quickly, the camera can mistakenly focus on the wrong subject in certain situations, making the photo blurry in unwanted areas. If your photos on your iPhone look out of focus or lack sharpness overall, the following post should help you make them sharper. How to Make Pictures Clearer on iPhone [6 Methods] You can try using the native Photos app to clean up your photos. If you want more features and options
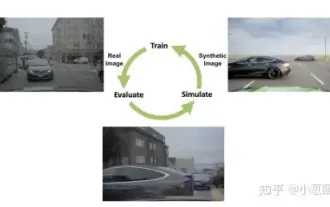 How to solve the long tail problem in autonomous driving scenarios?
Jun 02, 2024 pm 02:44 PM
How to solve the long tail problem in autonomous driving scenarios?
Jun 02, 2024 pm 02:44 PM
Yesterday during the interview, I was asked whether I had done any long-tail related questions, so I thought I would give a brief summary. The long-tail problem of autonomous driving refers to edge cases in autonomous vehicles, that is, possible scenarios with a low probability of occurrence. The perceived long-tail problem is one of the main reasons currently limiting the operational design domain of single-vehicle intelligent autonomous vehicles. The underlying architecture and most technical issues of autonomous driving have been solved, and the remaining 5% of long-tail problems have gradually become the key to restricting the development of autonomous driving. These problems include a variety of fragmented scenarios, extreme situations, and unpredictable human behavior. The "long tail" of edge scenarios in autonomous driving refers to edge cases in autonomous vehicles (AVs). Edge cases are possible scenarios with a low probability of occurrence. these rare events
 How to make ppt pictures appear one by one
Mar 25, 2024 pm 04:00 PM
How to make ppt pictures appear one by one
Mar 25, 2024 pm 04:00 PM
In PowerPoint, it is a common technique to display pictures one by one, which can be achieved by setting animation effects. This guide details the steps to implement this technique, including basic setup, image insertion, adding animation, and adjusting animation order and timing. Additionally, advanced settings and adjustments are provided, such as using triggers, adjusting animation speed and order, and previewing animation effects. By following these steps and tips, users can easily set up pictures to appear one after another in PowerPoint, thereby enhancing the visual impact of the presentation and grabbing the attention of the audience.
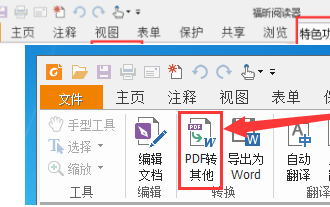 How to convert pdf documents into jpg images with Foxit PDF Reader - How to convert pdf documents into jpg images with Foxit PDF Reader
Mar 04, 2024 pm 05:49 PM
How to convert pdf documents into jpg images with Foxit PDF Reader - How to convert pdf documents into jpg images with Foxit PDF Reader
Mar 04, 2024 pm 05:49 PM
Are you also using Foxit PDF Reader software? So do you know how Foxit PDF Reader converts pdf documents into jpg images? The following article brings you how Foxit PDF Reader converts pdf documents into jpg images. For those who are interested in the method of converting jpg images, please come and take a look below. First start Foxit PDF Reader, then find "Features" on the top toolbar, and then select the "PDF to Others" function. Next, open a web page called "Foxit PDF Online Conversion". Click the "Login" button on the upper right side of the page to log in, and then turn on the "PDF to Image" function. Then click the upload button and add the pdf file you want to convert into an image. After adding it, click "Start Conversion"
 How to arrange two pictures side by side in wps document
Mar 20, 2024 pm 04:00 PM
How to arrange two pictures side by side in wps document
Mar 20, 2024 pm 04:00 PM
When using WPS office software, we found that not only one form is used, tables and pictures can be added to the text, pictures can also be added to the table, etc. These are all used together to make the content of the entire document look richer. , if you need to insert two pictures into the document and they need to be arranged side by side. Our next course can solve this problem: how to place two pictures side by side in a wps document. 1. First, you need to open the WPS software and find the picture you want to adjust. Left-click the picture and a menu bar will pop up, select "Page Layout". 2. Select "Tight wrapping" in text wrapping. 3. After all the pictures you need are confirmed to be set to "Tight text wrapping", you can drag the pictures to the appropriate position and click on the first picture.
