Follow the steps below to install Red Hat Podman on a Windows machine using Command Prompt or Powershell:
Step 1: Check System Requirements
First, you must ensure that your Windows system is running with the latest updates so that it meets the requirements for running Podman. You should be using Windows 11 or Windows 10 version 1709 (Build 16299) or later, and the Windows Subsystem for Linux 2 (WSL 2) and VM features must be enabled, well, if they are not already activated, then You can do this using the second step command.
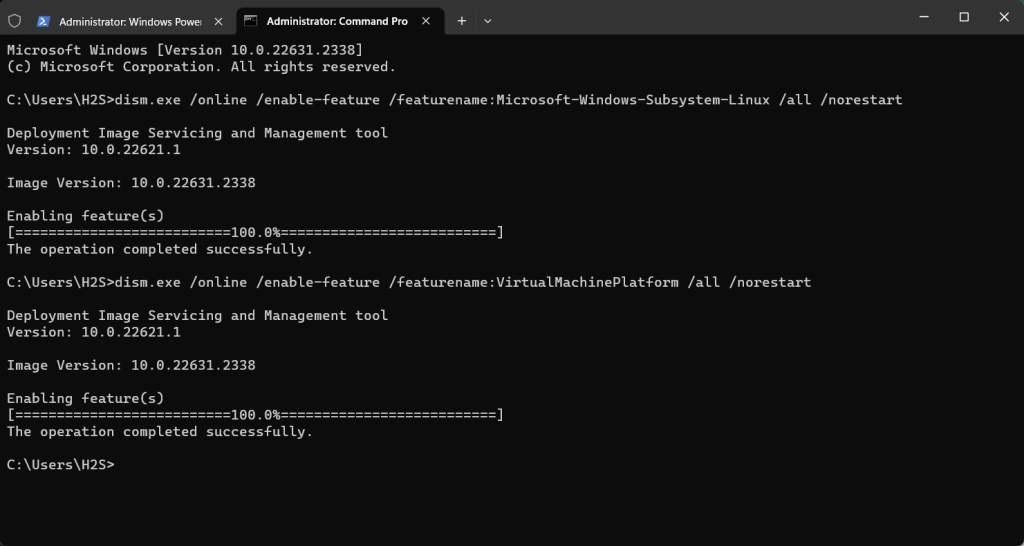
Step 2: Install WSL 2 and Virtual Machine Platform
Let’s open Windows PowerShell or Command Prompt to start running the required commands.
To do this, right-click the Windows 10 or 11 Start button and select PowerShell (Admin) or Terminal ( Administrator), any content available.
After that, first run the following command to enable the
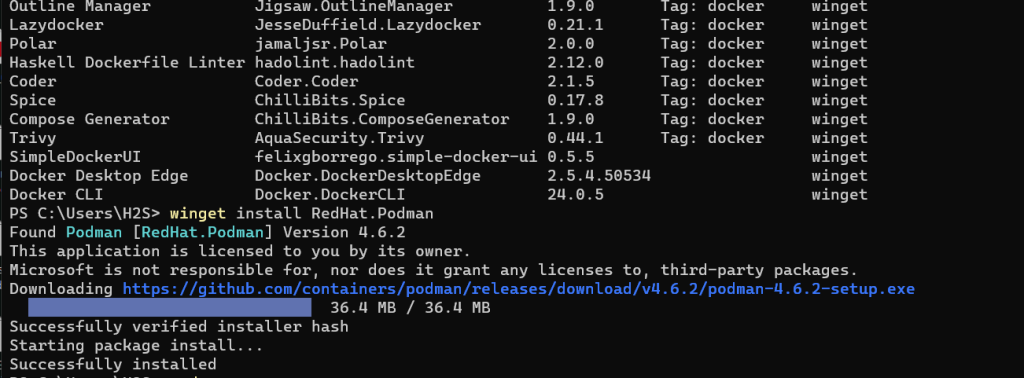
Step 3: Install Podman on Windows 10 or 11After restarting the system again, open PowerShell as administrator and use the given The
Winget command downloads and installs RedHat Podman on Windows.
winget install RedHat.Podman
Copy after login
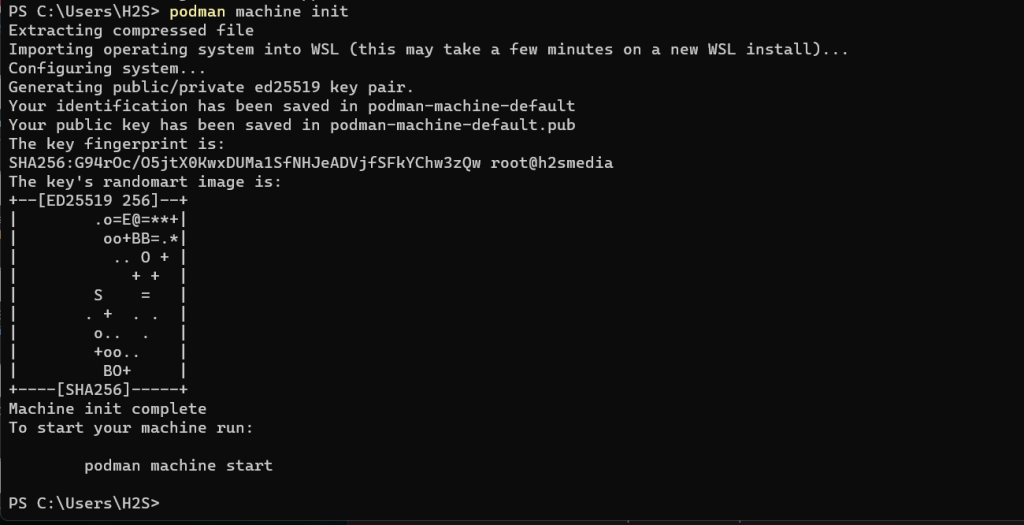
Step 4: Initialize the Podman machineOnce the installation of Podman is complete, the next step is to initialize the Podman machine, which will download the necessary files to create the container. end. In short, it will import a Linux operating system to set up WSL so that Podman can run the container natively as on any Linux machine.
podman machine init
Copy after login
Step 5: Start the Podman MachineWhen you set up the initial setup configuration of Podman on Windows, the next step is to start the initialized machine. To do this, just type in your Windows command terminal:
podman machine start
Copy after login
Step 6: Verify installationTo verify that Podman has been installed correctly, you can run the following command on PowerShell or CMD .
podman --version
Copy after login
You should see the Podman version shown in the output. Creating ContainersPodman's command line works exactly like Docker, however, it is daemonless, which makes it different from Docker. We can use Podman commands to manage containers, images, and pods just like on Linux systems. If you're interested, you can also check out our other tutorial on installing Docker Desktop on Windows 11 or 10 via PowerShell.
So to download some container image, say Ubuntu, here is the command:
podman pull ubuntu
Copy after login
To check the downloaded image:
podman images
Copy after login
Copy after login
To quickly create a container, use:
podman run -it ubuntu /bin/bash
Copy after login
Commands Podman commandsThe following are some common Podman commands, whose explanations are similar to those of Docker:1. Pull the image:Use Podman pull downloads container images from registries (such as Docker Hub).
podman pull ubuntu:latest
Copy after login
2. List running containers: Displays the list of currently running containers.
podman ps
Copy after login
3. List all containers: Displays a list of all containers, including stopped containers.
podman ps -a
Copy after login
4. Run the container: Create and start the container from the image. The -it flag allocates a terminal and makes the container interactive.
podman run -it --rm ubuntu:latest /bin/bash
Copy after login
5. Stop the container: Stop a running container by specifying the container ID or name.
podman stop container_name_or_id
Copy after login
6. Remove a container: Delete a stopped container by specifying the container ID or name.
podman rm container_name_or_id
Copy after login
7. List image: Displays the list of locally available container images.
podman images
Copy after login
Copy after login
8. Delete image: Delete the container image from the local repository.
podman rmi image_name
Copy after login
9. Container logs: View the logs of running or stopped containers.
podman logs container_name_or_id
Copy after login
10. 在正在运行的容器中执行命令:
在正在运行的容器中运行命令,而无需启动新的 shell。
podman exec -it container_name_or_id /bin/bash
Copy after login
11. 端口映射:
将容器的端口映射到主机端口。例如,这会将容器中的端口 80 映射到主机上的端口 8080。
podman run -d -p 8080:80 nginx:latest
Copy after login
12. 列出窗格:
显示 Pod 列表(Podman 用于管理容器组的概念)。
podman pod list
Copy after login
13. 创建一个新容器:
创建一个新容器并向其添加容器。
podman pod create --name mypod
Copy after login
14. 将容器添加到容器:
将现有容器添加到容器。
podman pod container add mypod container_name_or_id
Copy after login
15. 从 Pod 中移除容器:
podman pod container remove mypod container_name_or_id
The above is the detailed content of How to install Redhat Podman on Windows 10 or 11 via CMD. For more information, please follow other related articles on the PHP Chinese website!
Statement of this Website
The content of this article is voluntarily contributed by netizens, and the copyright belongs to the original author. This site does not assume corresponding legal responsibility. If you find any content suspected of plagiarism or infringement, please contact admin@php.cn
If you have used Docker, you must understand daemons, containers, and their functions. A daemon is a service that runs in the background when a container is already in use in any system. Podman is a free management tool for managing and creating containers without relying on any daemon such as Docker. Therefore, it has advantages in managing containers without the need for long-term backend services. Additionally, Podman does not require root-level permissions to be used. This guide discusses in detail how to install Podman on Ubuntu24. To update the system, we first need to update the system and open the Terminal shell of Ubuntu24. During both installation and upgrade processes, we need to use the command line. a simple
As a lightweight virtualization platform based on container technology, Docker has been widely used in various scenarios. In a production environment, high availability and automatic failure recovery of containers are crucial. This article will introduce how to use Docker for container failure recovery and automatic restart, including specific code examples. 1. Configuration of automatic container restart In Docker, the automatic restart function of the container can be enabled by using the --restart option when running the container. Common options are: no: do not automatically restart. silent
According to Huawei’s official news, the Open Atomic Developer Conference, with the theme of “Everything for Developers”, was held in Wuxi for two days, from December 16 to 17. The conference was led by the Open Atomic Open Source Foundation, Huawei, and Inspur. , DaoCloud, Xieyun, Qingyun, Hurricane Engine, as well as the OpenSDV Open Source Alliance, openEuler community, OpenCloudOS community and other member units jointly initiated the construction of the AtomHub Trusted Mirror Center, which is officially open for public testing. AtomHub adheres to the concepts of co-construction, co-governance, and sharing, and aims to provide open source organizations and developers with a neutral, open and co-constructed trusted open source container mirror center. In view of the instability and uncontrollability of image warehouses such as DockerHub, and some
Install RedHatPodman on Windows 11 or 10 Follow the steps below to install RedHatPodman on your Windows machine using Command Prompt or Powershell: Step 1: Check System Requirements First, you have to make sure that your Windows system is running with the latest updates so that it can meet the requirements to run Podman requirements. You should be using Windows 11 or Windows 10 version 1709 (Build 16299) or higher and you have to enable Windows Subsystem for Linux 2 (WSL2) and VM features, well if they are not activated yet then you can use The two-step command executes this
How to sort STL containers in C++: Use the sort() function to sort containers in place, such as std::vector. Using the ordered containers std::set and std::map, elements are automatically sorted on insertion. For a custom sort order, you can use a custom comparator class, such as sorting a vector of strings alphabetically.
The most common container types in C++STL are Vector, List, Deque, Set, Map, Stack and Queue. These containers provide solutions for different data storage needs, such as dynamic arrays, doubly linked lists, and key- and value-based associative containers. In practice, we can use STL containers to organize and access data efficiently, such as storing student grades.
Hello, I am Brother Zheng. WeChat's mini program is a very good experience, simple and quick to use. I have been learning to use mini programs these days. I have summarized three ways to use Python as the backend of mini programs for your reference. Method 1. WeChat cloud hosting [1]. Advantages: No need to purchase a server, no domain name registration required, billing based on usage, DevOps automation, security authentication, suitable for people with no operation and maintenance experience. Disadvantages: The cost is definitely slightly higher than the cost of building a self-built server. Just like the same model, automatic transmission cars are more expensive than manual transmission cars. The so-called cloud hosting is a Docker container. You only need to get a warehouse, which can be any of github, gitlab, and gitee.
This article brings you relevant knowledge about podman and docker. It mainly introduces to you what podman and docker are, and what are the differences between them. Friends who are interested can take a look at it. I hope Helpful to everyone.

 Oct 02, 2023 pm 09:33 PM
podman
container
Oct 02, 2023 pm 09:33 PM
podman
container


 1377
1377
 52
52


 How to install Podman on Ubuntu 24.04
Mar 22, 2024 am 11:26 AM
How to install Podman on Ubuntu 24.04
Mar 22, 2024 am 11:26 AM
 How to use Docker for container failure recovery and automatic restart
Nov 07, 2023 pm 04:28 PM
How to use Docker for container failure recovery and automatic restart
Nov 07, 2023 pm 04:28 PM
 AtomHub, an open source container mirroring center jointly created by Huawei, Inspur and other units, announced that it is officially open for public testing and can stably download domestic services.
Jan 02, 2024 pm 03:54 PM
AtomHub, an open source container mirroring center jointly created by Huawei, Inspur and other units, announced that it is officially open for public testing and can stably download domestic services.
Jan 02, 2024 pm 03:54 PM
 How to install Redhat Podman on Windows 10 or 11 via CMD
Oct 02, 2023 pm 09:33 PM
How to install Redhat Podman on Windows 10 or 11 via CMD
Oct 02, 2023 pm 09:33 PM
 How to sort C++ STL containers?
Jun 02, 2024 pm 08:22 PM
How to sort C++ STL containers?
Jun 02, 2024 pm 08:22 PM
 What are the common types in C++ STL containers?
Jun 02, 2024 pm 02:11 PM
What are the common types in C++ STL containers?
Jun 02, 2024 pm 02:11 PM
 Three ways to use Python as a backend for small programs
Apr 12, 2023 pm 09:10 PM
Three ways to use Python as a backend for small programs
Apr 12, 2023 pm 09:10 PM
 In-depth analysis of the differences between podman and docker
Jan 06, 2023 pm 04:33 PM
In-depth analysis of the differences between podman and docker
Jan 06, 2023 pm 04:33 PM