
 Web Front-end
Vue.js
How to handle sorting and filtering of table data in Vue technology development
Web Front-end
Vue.js
How to handle sorting and filtering of table data in Vue technology development
How to handle sorting and filtering of table data in Vue technology development


How to handle the sorting and filtering of table data in Vue technology development
In front-end development, tables are often used to display data. Sorting and filtering table data is a very common requirement. As a popular front-end framework, Vue provides rich solutions to handle sorting and filtering of tabular data.
This article will introduce how to use Vue to handle sorting and filtering of table data, and provide corresponding code examples.
- Sort of table data
In Vue, you can sort table data by using the computed attribute. First, we need to define an array in Vue's data to store table data. Suppose our table data is as follows:
data() {
  return {
    tableData: [
      { name: '张三', age: 20, gender: '男' },
      { name: '李四', age: 25, gender: '女' },
      { name: '王五', age: 22, gender: '男' },
      // ...
    ],
    sortKey: '',  // 用来记录排序的列名
    sortOrder: 1  // 用来记录排序的顺序,1表示升序,-1表示降序
  }
}Next, we can use the computed attribute to sort the table data. Suppose we want to sort by age, we can do it like this:
computed: {
  sortedTableData() {
    return this.tableData.sort((a, b) => {
      return (a.age - b.age) * this.sortOrder;
    });
  }
}When using sorted data in the table, just use sortedTableData instead of tableData:
<table>
  <tr>
    <th @click="sort('name')">姓名</th>
    <th @click="sort('age')">年龄</th>
    <th @click="sort('gender')">性别</th>
  </tr>
  <tr v-for="item in sortedTableData" :key="item.name">
    <td>{{ item.name }}</td>
    <td>{{ item.age }}</td>
    <td>{{ item.gender }}</td>
  </tr>
</table>In the above code, We trigger the sort method by clicking on the th tag, realizing the function of sorting according to different columns. The implementation of the sort method is as follows:
methods: {
  sort(key) {
    if (key === this.sortKey) {  // 如果点击的是同一列
      this.sortOrder *= -1;  // 切换排序顺序
    } else {
      this.sortKey = key;  // 记录当前排序的列
      this.sortOrder = 1;  // 默认升序排序
    }
  }
}- Filtering of table data
In Vue, you can filter table data by using the computed attribute and the v-model directive. Assume that our form has a text box for entering filter conditions, which can be implemented like this:
First, define a variable in Vue's data to save the filter conditions:
data() {
  return {
    tableData: [
      // 表格数据
    ],
    filterValue: ''  // 过滤条件
  }
}Next , define a filteredTableData method in the computed attribute to filter the table data according to the filter conditions:
computed: {
  filteredTableData() {
    return this.tableData.filter(item => {
      return item.name.includes(this.filterValue) ||
             item.age.toString().includes(this.filterValue) ||
             item.gender.includes(this.filterValue);
    });
  }
}Then, use filteredTableData instead of tableData in the table to display the filtered data:
<input v-model="filterValue" placeholder="请输入过滤条件">
<table>
  <tr>
    <th>姓名</th>
    <th>年龄</th>
    <th>性别</th>
  </tr>
  <tr v-for="item in filteredTableData" :key="item.name">
    <td>{{ item.name }}</td>
    <td>{{ item.age }}</td>
    <td>{{ item.gender }}</td>
  </tr>
</table>In the above code, we use the v-model instruction to bind the value of the input box to the filterValue variable to achieve the effect of real-time filtering.
To sum up, by using Vue’s computed attribute and v-model directive, we can easily implement the sorting and filtering functions of table data. The above is a detailed introduction to sorting and filtering table data, and provides corresponding code examples. I hope it will be helpful to you in processing table data in Vue technology development.
The above is the detailed content of How to handle sorting and filtering of table data in Vue technology development. For more information, please follow other related articles on the PHP Chinese website!

Hot AI Tools

Undresser.AI Undress
AI-powered app for creating realistic nude photos

AI Clothes Remover
Online AI tool for removing clothes from photos.

Undress AI Tool
Undress images for free

Clothoff.io
AI clothes remover

Video Face Swap
Swap faces in any video effortlessly with our completely free AI face swap tool!

Hot Article
Hot Tools

Notepad++7.3.1
Easy-to-use and free code editor

SublimeText3 Chinese version
Chinese version, very easy to use

Zend Studio 13.0.1
Powerful PHP integrated development environment

Dreamweaver CS6
Visual web development tools

SublimeText3 Mac version
God-level code editing software (SublimeText3)
Hot Topics
 1386
1386
 52
52

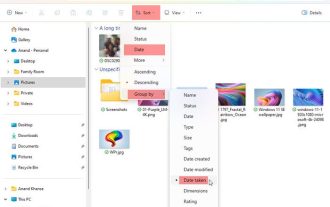 How to sort photos by date taken in Windows 11/10
Feb 19, 2024 pm 08:45 PM
How to sort photos by date taken in Windows 11/10
Feb 19, 2024 pm 08:45 PM
This article will introduce how to sort pictures according to shooting date in Windows 11/10, and also discuss what to do if Windows does not sort pictures by date. In Windows systems, organizing photos properly is crucial to making it easy to find image files. Users can manage folders containing photos based on different sorting methods such as date, size, and name. In addition, you can set ascending or descending order as needed to organize files more flexibly. How to Sort Photos by Date Taken in Windows 11/10 To sort photos by date taken in Windows, follow these steps: Open Pictures, Desktop, or any folder where you place photos In the Ribbon menu, click
 Steps to adjust the format of pictures inserted in PPT tables
Mar 26, 2024 pm 04:16 PM
Steps to adjust the format of pictures inserted in PPT tables
Mar 26, 2024 pm 04:16 PM
1. Create a new PPT file and name it [PPT Tips] as an example. 2. Double-click [PPT Tips] to open the PPT file. 3. Insert a table with two rows and two columns as an example. 4. Double-click on the border of the table, and the [Design] option will appear on the upper toolbar. 5. Click the [Shading] option and click [Picture]. 6. Click [Picture] to pop up the fill options dialog box with the picture as the background. 7. Find the tray you want to insert in the directory and click OK to insert the picture. 8. Right-click on the table box to bring up the settings dialog box. 9. Click [Format Cells] and check [Tile images as shading]. 10. Set [Center], [Mirror] and other functions you need, and click OK. Note: The default is for pictures to be filled in the table
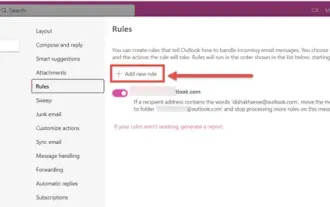 How to sort emails by sender, subject, date, category, size in Outlook
Feb 19, 2024 am 10:48 AM
How to sort emails by sender, subject, date, category, size in Outlook
Feb 19, 2024 am 10:48 AM
Outlook offers many settings and features to help you manage your work more efficiently. One of them is the sorting option that allows you to categorize your emails according to your needs. In this tutorial, we will learn how to use Outlook's sorting feature to organize emails based on criteria such as sender, subject, date, category, or size. This will make it easier for you to process and find important information, making you more productive. Microsoft Outlook is a powerful application that makes it easy to centrally manage your email and calendar schedules. You can easily send, receive, and organize email, while built-in calendar functionality makes it easy to keep track of your upcoming events and appointments. How to be in Outloo
 How to make a table for sales forecast
Mar 20, 2024 pm 03:06 PM
How to make a table for sales forecast
Mar 20, 2024 pm 03:06 PM
Being able to skillfully make forms is not only a necessary skill for accounting, human resources, and finance. For many sales staff, learning to make forms is also very important. Because the data related to sales is very large and complex, and it cannot be simply recorded in a document to explain the problem. In order to enable more sales staff to be proficient in using Excel to make tables, the editor will introduce the table making issues about sales forecasting. Friends in need should not miss it! 1. Open [Sales Forecast and Target Setting], xlsm, to analyze the data stored in each table. 2. Create a new [Blank Worksheet], select [Cell], and enter [Label Information]. [Drag] downward and [Fill] the month. Enter [Other] data and click [
 How to set WPS value to automatically change color according to conditions_Steps to set WPS table value to automatically change color according to condition
Mar 27, 2024 pm 07:30 PM
How to set WPS value to automatically change color according to conditions_Steps to set WPS table value to automatically change color according to condition
Mar 27, 2024 pm 07:30 PM
1. Open the worksheet and find the [Start]-[Conditional Formatting] button. 2. Click Column Selection and select the column to which conditional formatting will be added. 3. Click the [Conditional Formatting] button to bring up the option menu. 4. Select [Highlight conditional rules]-[Between]. 5. Fill in the rules: 20, 24, dark green text with dark fill color. 6. After confirmation, the data in the selected column will be colored with corresponding numbers, text, and cell boxes according to the settings. 7. Conditional rules without conflicts can be added repeatedly, but for conflicting rules WPS will replace the previously established conditional rules with the last added rule. 8. Repeatedly add the cell columns after [Between] rules 20-24 and [Less than] 20. 9. If you need to change the rules, you can just clear the rules and then reset the rules.
 Do you know how to sum a Word table?
Mar 21, 2024 pm 01:10 PM
Do you know how to sum a Word table?
Mar 21, 2024 pm 01:10 PM
Sometimes, we often encounter counting problems in Word tables. Generally, when encountering such problems, most students will copy the Word table to Excel for calculation; some students will silently pick up the calculator. Calculate. Is there a quick way to calculate it? Of course there is, in fact the sum can also be calculated in Word. So, do you know how to do it? Today, let’s take a look together! Without further ado, friends in need should quickly collect it! Step details: 1. First, we open the Word software on the computer and open the document that needs to be processed. (As shown in the picture) 2. Next, we position the cursor on the cell where the summed value is located (as shown in the picture); then, we click [Menu Bar
 How to open filtered duplicate files in Quark
Mar 01, 2024 am 11:25 AM
How to open filtered duplicate files in Quark
Mar 01, 2024 am 11:25 AM
When using Quark Browser, there is a function to filter duplicate files. Some friends are not very familiar with this. Here I will introduce how to turn on this function. If you are interested, come and take a look with me. 1. First, click "Quark Browser" on your mobile phone to enter the interface, then click and select "Quark Network Disk" in the options in the middle of the page to open and enter. 2. Find "Backup Settings" in the lower part of the Quark network disk interface, and click to open it, as shown in the figure below: 3. Next, on the page you enter, there is a "Filter Duplicate Files", which is displayed behind it There is a switch button. Click the circular slider on it and set it to color to turn on this function. When you continue to back up files, duplicate files will be skipped to save network disk capacity.
 How does Arrays.sort() method in Java sort arrays by custom comparator?
Nov 18, 2023 am 11:36 AM
How does Arrays.sort() method in Java sort arrays by custom comparator?
Nov 18, 2023 am 11:36 AM
How does Arrays.sort() method in Java sort arrays by custom comparator? In Java, the Arrays.sort() method is a very useful method for sorting arrays. By default, this method sorts in ascending order. But sometimes, we need to sort the array according to our own defined rules. At this time, you need to use a custom comparator (Comparator). A custom comparator is a class that implements the Comparator interface.
