A guide to using Windows 11 and 10 environment variables for profiling
Environment variables are the location paths (or environments) where applications and programs are run. They can be created, edited, managed or deleted by the user and come in handy when managing the behavior of certain processes.
Here's how to create a configuration file to manage multiple variables simultaneously without having to edit them individually on Windows.
How to use profiles in environment variables Windows 11 and 10
On Windows, there are two sets of environment variables – user variables (apply to the current user) and system variables (apply globally). However, using a tool like PowerToys, you can create a separate configuration file to add new and existing variables and manage them all at once. Here's how:
Step 1: Install PowerToys
PowerToys has an environment variable tool that can be used to create configuration files to manage environment variables. To use it, you first need to install PowerToys. To do this, open the Microsoft Store.
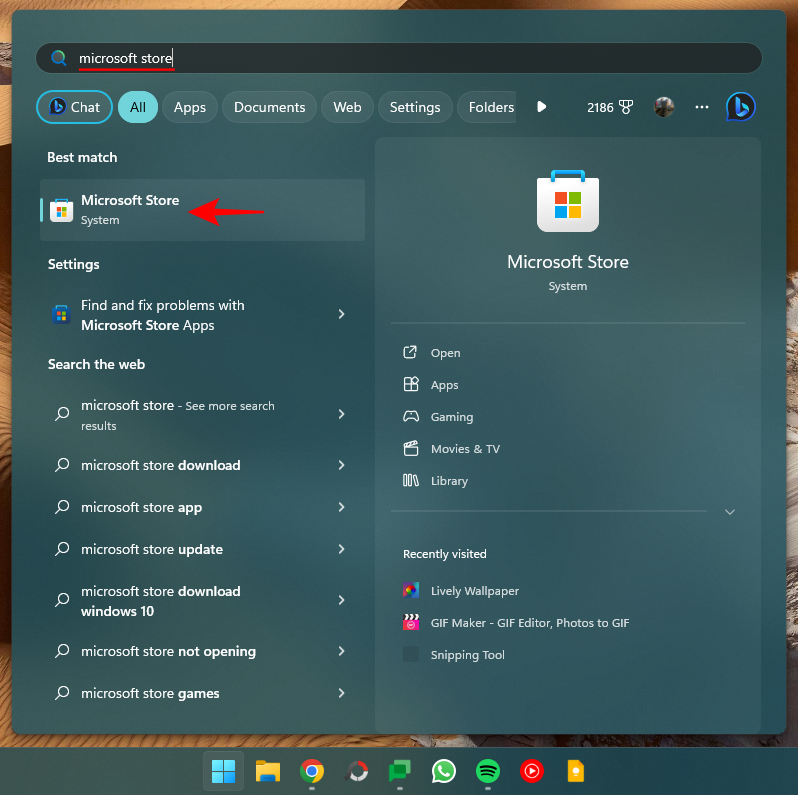
Search for PowerToys.
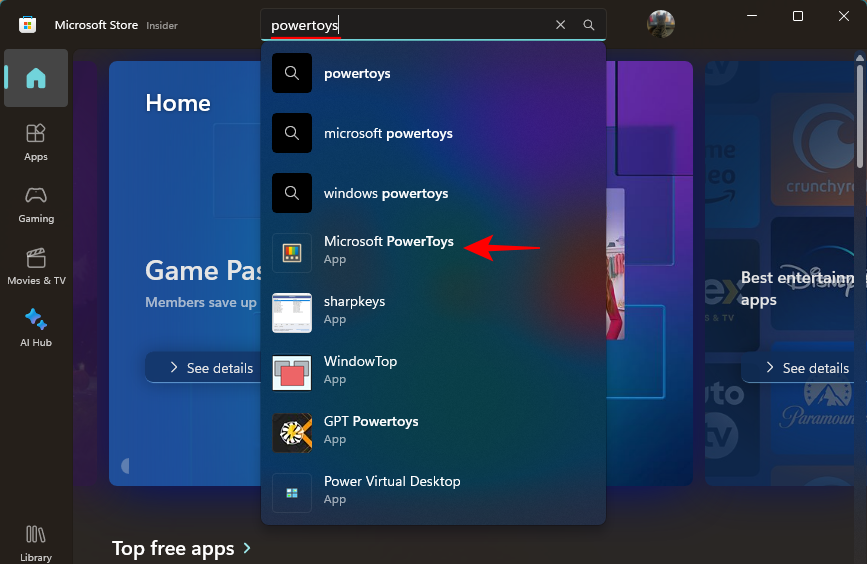
Click "Install".
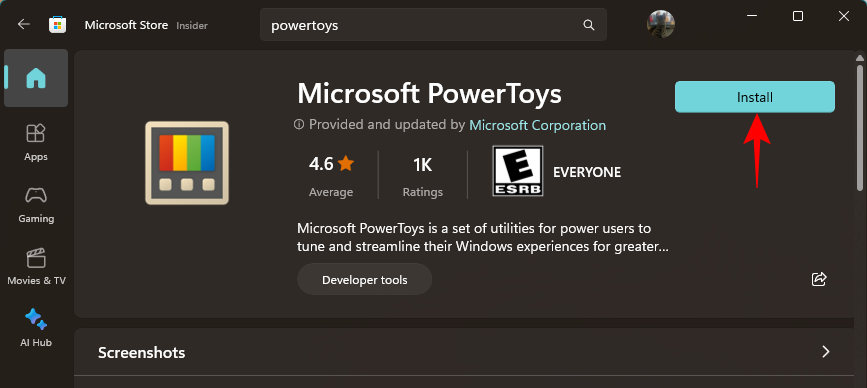
You can also install PowerToys from its GitHub page as follows:
Click the download link on the GitHub page.
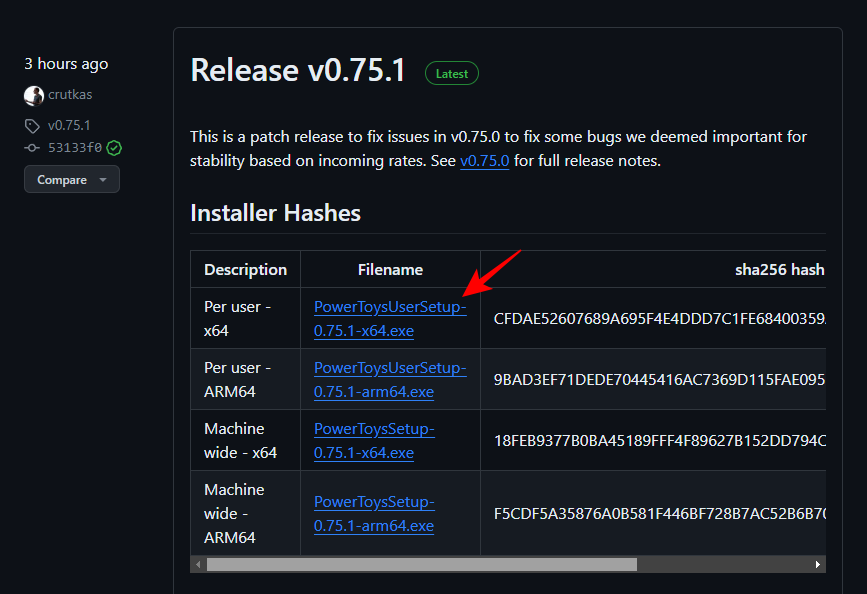
After downloading, run the PowerToys installer.
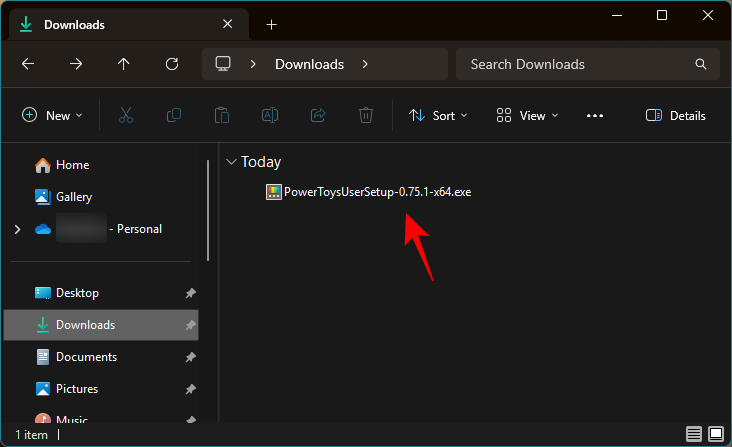
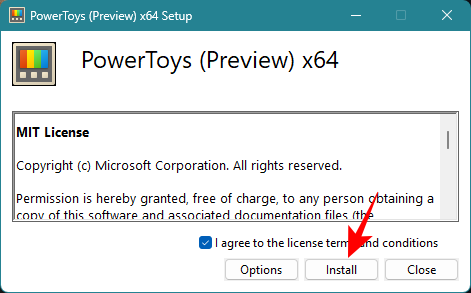
Agree to the terms and conditions and click Install.
Step 2: Enable environment variables in PowerToys
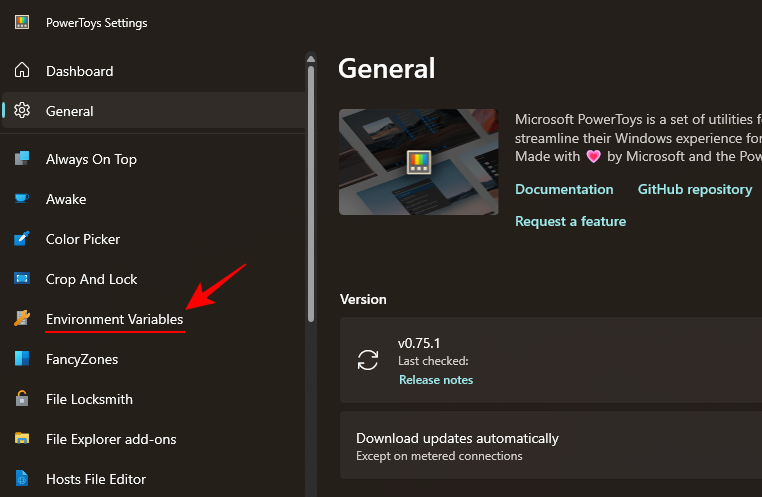
Launch PowerToys and click "Environment Variables" on the left .
On the right, open Enable environment variables.
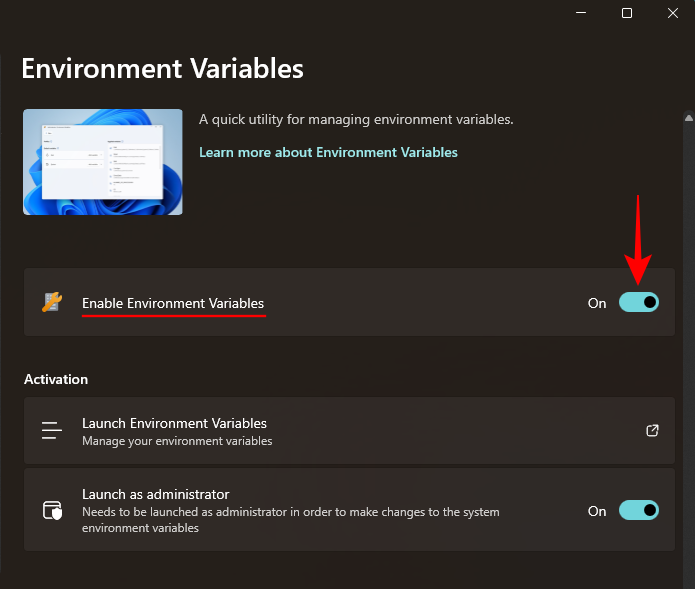
Also, make sure to turn on "Start as Administrator" so you can make changes to the System variables if needed.
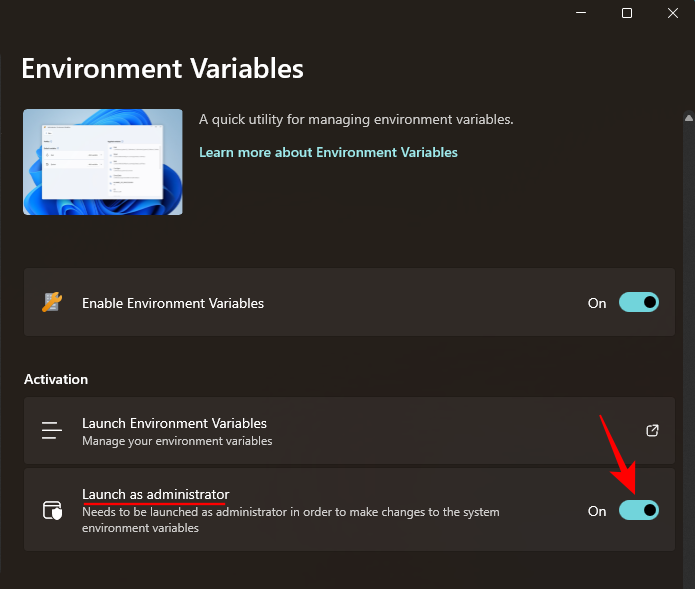
Step 3: Set up a new configuration file
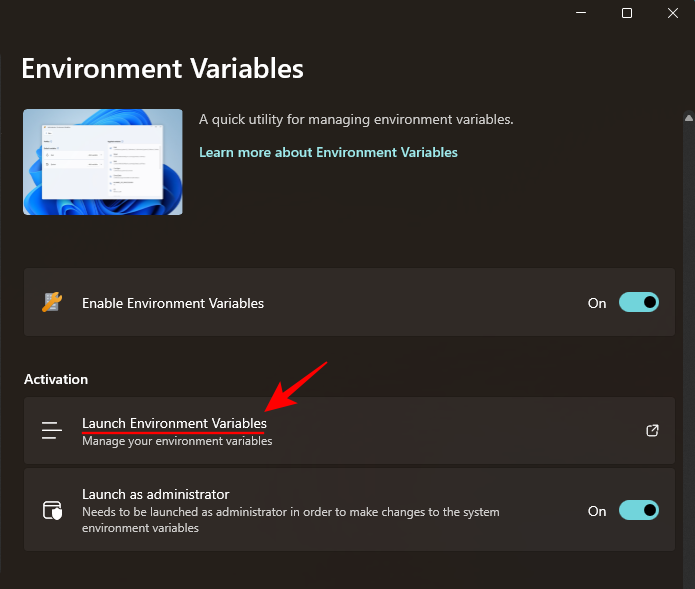
Click"Start Environment Variables" to open it.
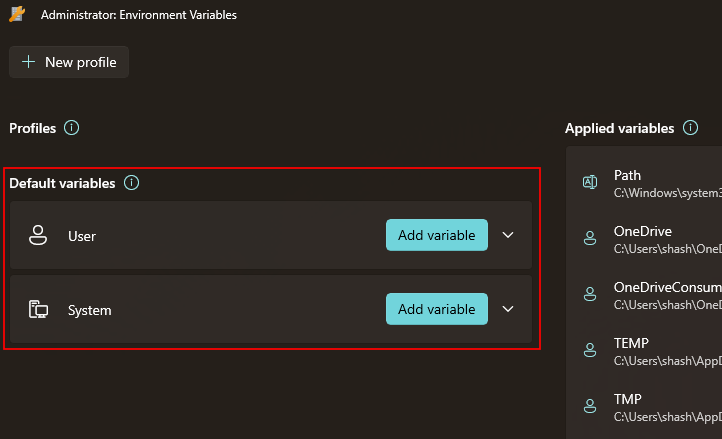
In the Environment Variables window you will find two default variable profiles on the left - User and System.
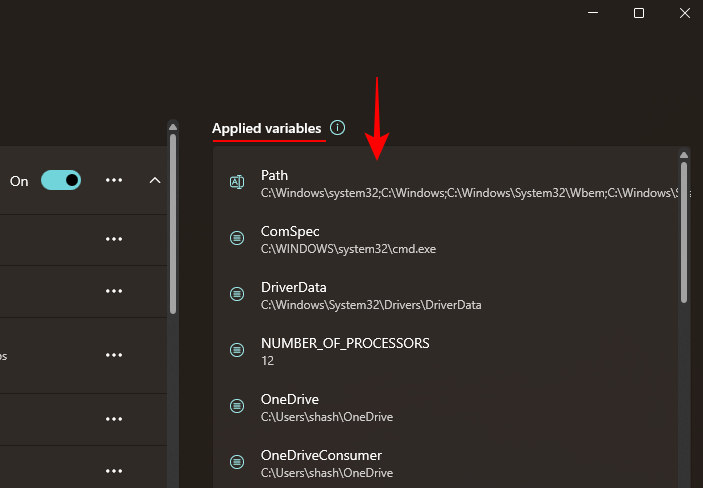
The applied variables will be on the right.
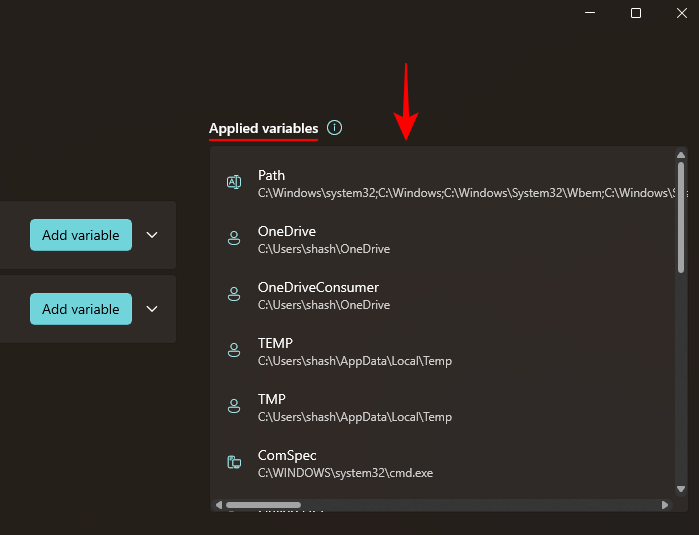
To add a new profile, click the New Profile option in the upper left corner.
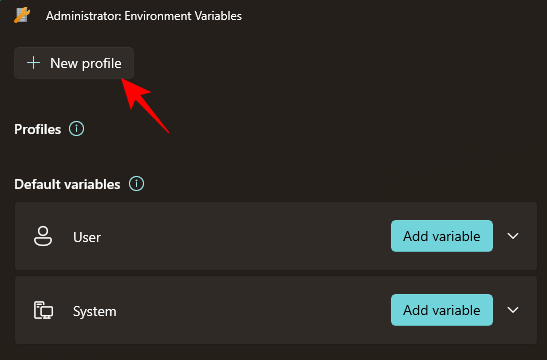
and give your profile a name.
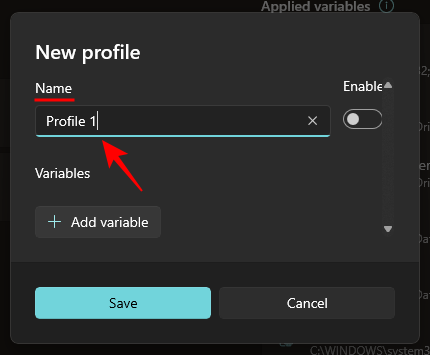
Step 4: Add Variables – New and Existing Variables
Click "Add Variable" to do this .
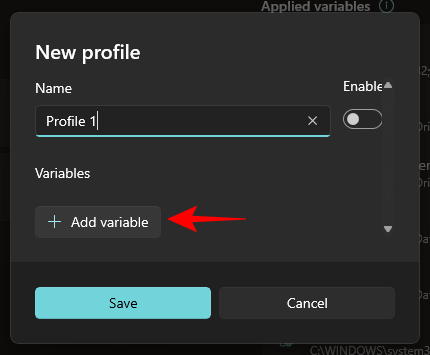
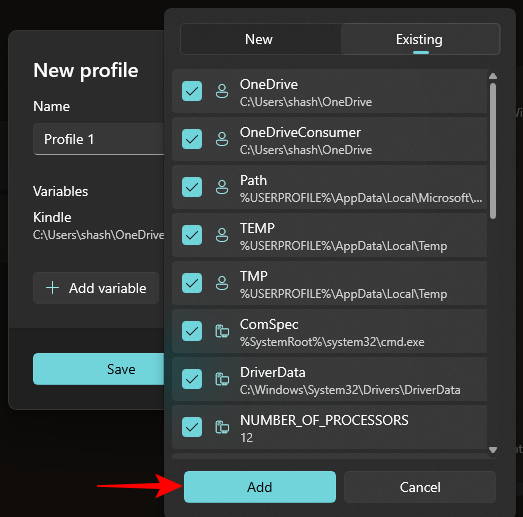
Here you can add new and existing variables in the configuration file. To add a new configuration file, enter the name and value of the environment variable under New.
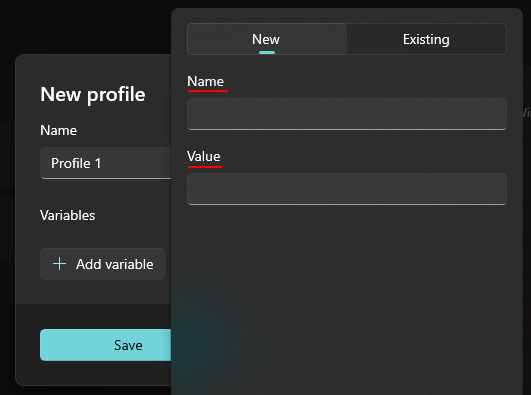
Then click Add at the bottom.
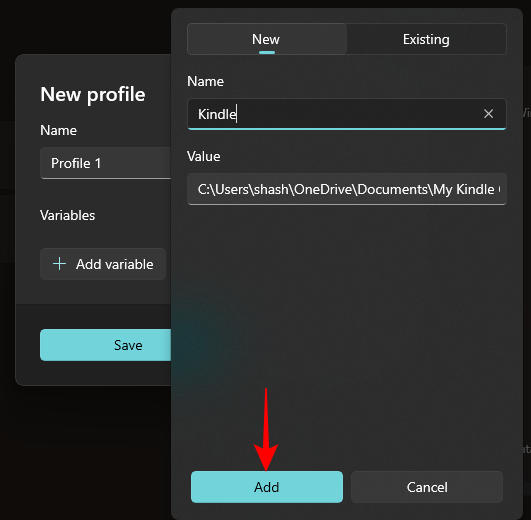
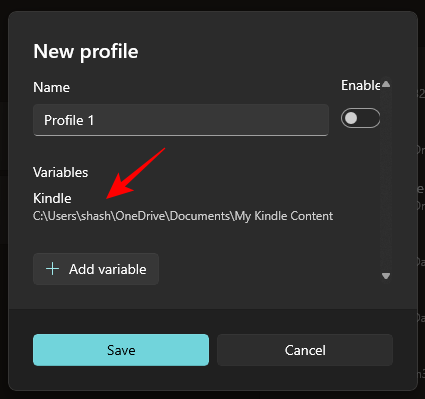
Your new environment variables will be added to your configuration file.
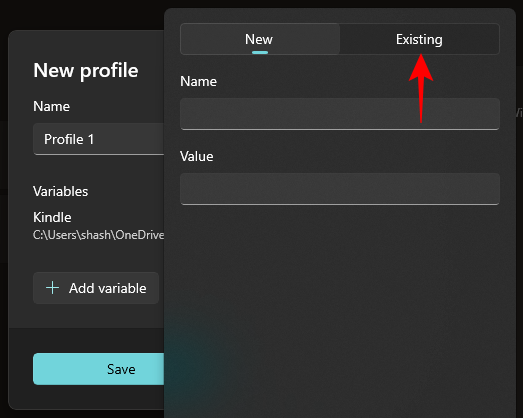
To add an existing variable, click the Existing tab.
Then select the variable you want to add.
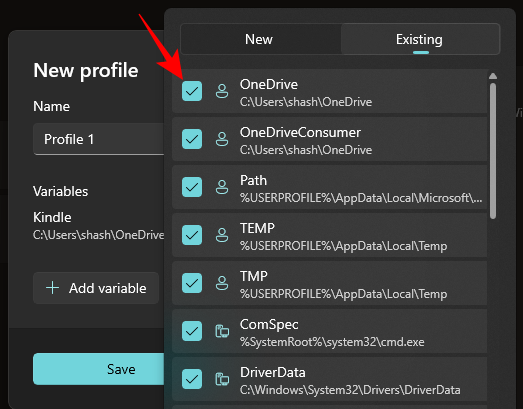
Then click Add at the bottom.
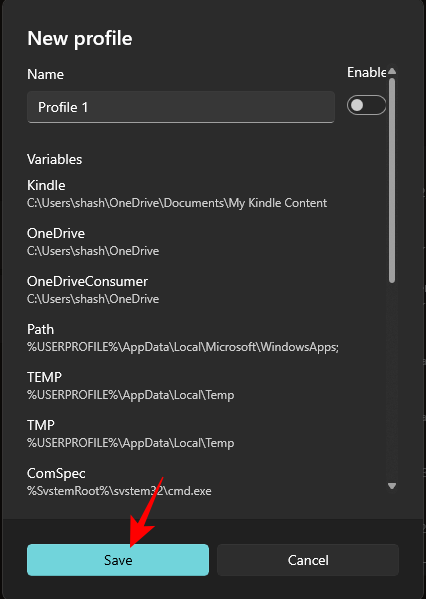
Finally, click Save.
Step 5: Edit or Delete Variables
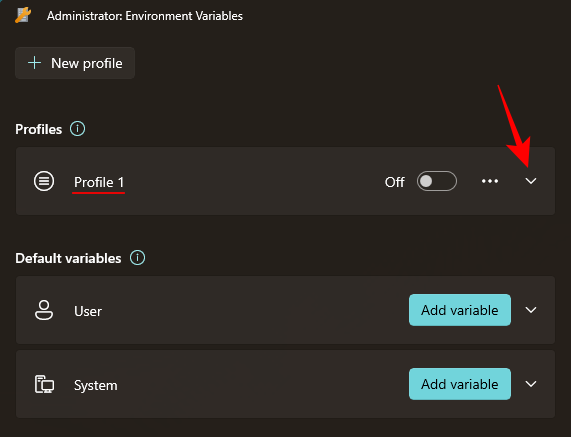
Your custom environment variable profile will be listed under the Profiles section. Click the down arrow next to it to view the variables that belong to the profile.
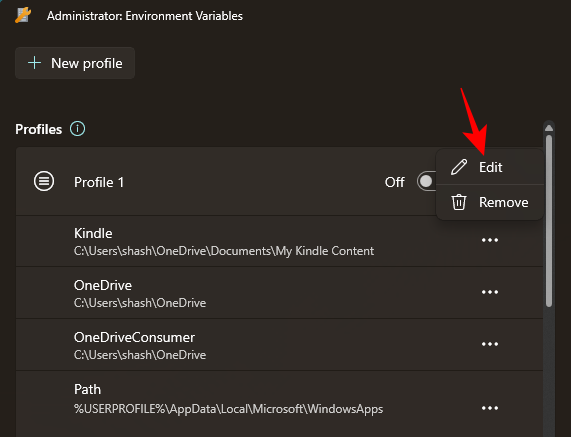
#To edit or delete a variable in the configuration file, click the three-dot icon next to the variable.
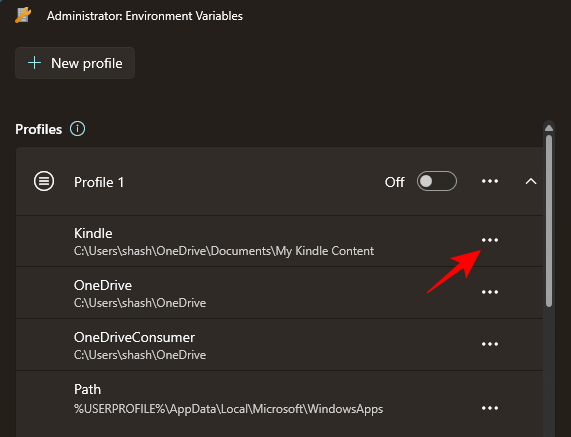
Select "Edit" to modify its name or value.
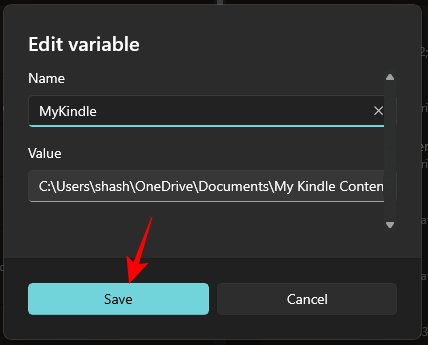
Make the necessary changes and click Save.
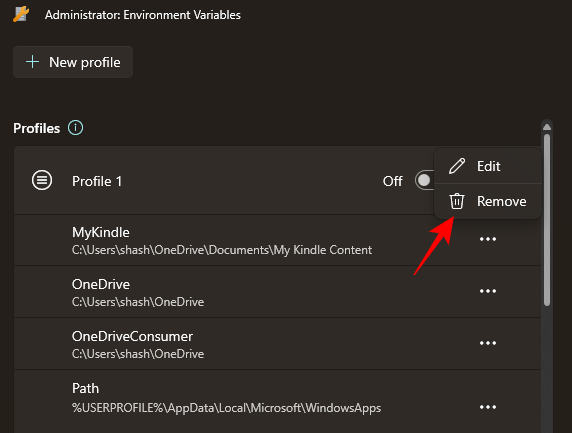
Select "Remove" to remove the variable from the configuration file.
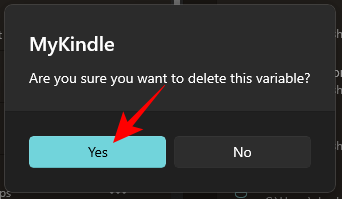
Click "is" to confirm.
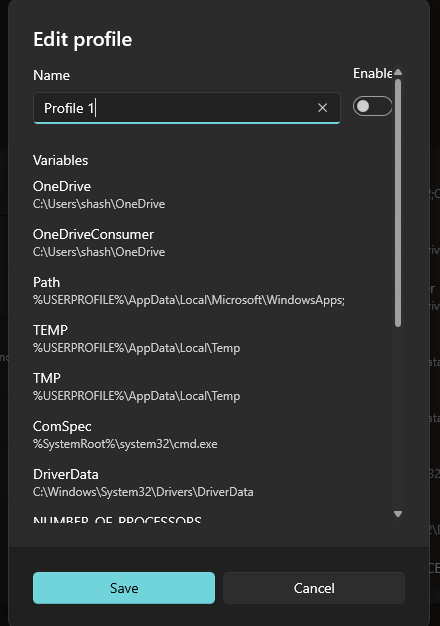
To edit the profile itself, click the three-dot icon next to the profile and select Edit.
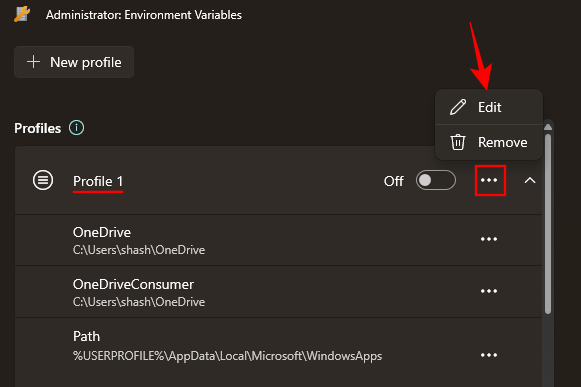
This will take you to the same window as before, where you can add (and edit) new and existing variables.
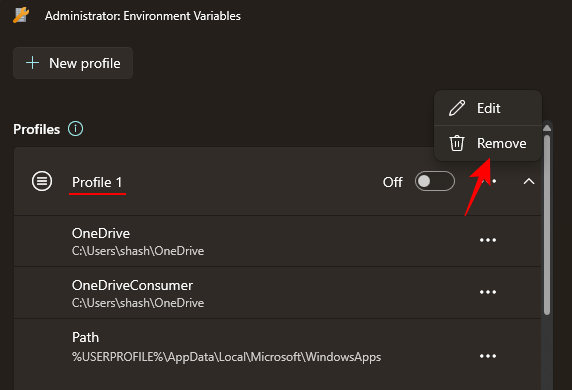
To delete the profile, select "Delete".
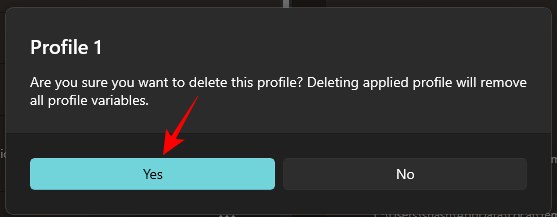
Select "is" to confirm.
Step 6: Enable or disable the configuration file
Finally, don’t forget to open the configuration file to apply the variable set that has been added to it.
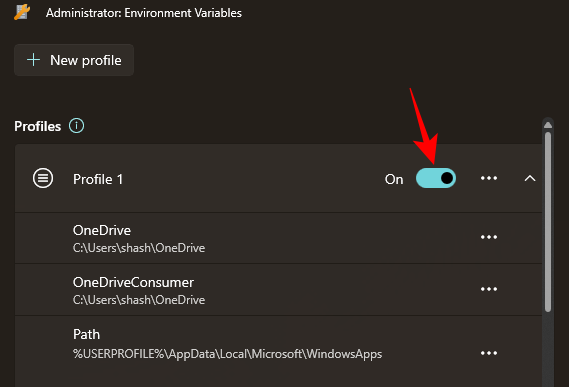
The applied variables will appear on the right side of the Environment Variables window.
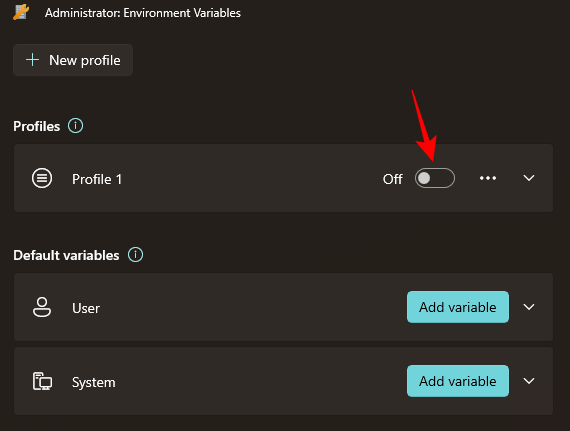
Please note that you can only apply one profile at a time, regardless of the number of profiles you create.
To disable a profile, simply close it.
What happens when creating a configuration file in environment variables?
Then, the variables you add to that configuration file will take over user and system variables when they are common. You will be able to easily turn variables on and off by opening or closing the configuration file respectively. It won't change what's in the user and system environment variables, but if those three variables were common, the order of precedence would be like this: Profile > User > System.
Why use configuration files in environment variables
By using a separate configuration file for environment variables, you can do the following:
- Easily add what you need new variables without changing user and system variables.
- Manage a group of variables at a time.
- Highlight variables with the same name as user variables.
PowerToys' Environment Variables tool also allows you to manage existing user and system variables from the Default Variables section. Just make sure you run the tool as an administrator to allow changes to system variables.
FAQ
Let's look at some frequently asked questions about using profiles with environment variables on Windows.
How to use PowerToys to modify default system variables?
To modify the default system variables, run the Environment Variables tool in PowerToys as an administrator. Then click the System tab under Default Variables, click the three-dot icon next to the variable you want to modify, and select Edit or Delete.
Which variable has priority between configuration files and user variables with the same name?
If two variables have the same name, the variable belonging to the configuration file will get priority. The order of precedence of public variables is as follows: Profile>User>System.
Can you use two configuration files? What happens when I create multiple profiles?
Well, you can only use one profile at a time. You can create multiple profiles, but only one can remain active at a time.
The above is the detailed content of A guide to using Windows 11 and 10 environment variables for profiling. For more information, please follow other related articles on the PHP Chinese website!

Hot AI Tools

Undresser.AI Undress
AI-powered app for creating realistic nude photos

AI Clothes Remover
Online AI tool for removing clothes from photos.

Undress AI Tool
Undress images for free

Clothoff.io
AI clothes remover

AI Hentai Generator
Generate AI Hentai for free.

Hot Article

Hot Tools

Notepad++7.3.1
Easy-to-use and free code editor

SublimeText3 Chinese version
Chinese version, very easy to use

Zend Studio 13.0.1
Powerful PHP integrated development environment

Dreamweaver CS6
Visual web development tools

SublimeText3 Mac version
God-level code editing software (SublimeText3)

Hot Topics
 How to transfer files from Quark Cloud Disk to Baidu Cloud Disk?
Mar 14, 2024 pm 02:07 PM
Quark Netdisk and Baidu Netdisk are currently the most commonly used Netdisk software for storing files. If you want to save the files in Quark Netdisk to Baidu Netdisk, how do you do it? In this issue, the editor has compiled the tutorial steps for transferring files from Quark Network Disk computer to Baidu Network Disk. Let’s take a look at how to operate it. How to save Quark network disk files to Baidu network disk? To transfer files from Quark Network Disk to Baidu Network Disk, you first need to download the required files from Quark Network Disk, then select the target folder in the Baidu Network Disk client and open it. Then, drag and drop the files downloaded from Quark Cloud Disk into the folder opened by the Baidu Cloud Disk client, or use the upload function to add the files to Baidu Cloud Disk. Make sure to check whether the file was successfully transferred in Baidu Cloud Disk after the upload is completed. That's it
 What to do if the 0x80004005 error code appears. The editor will teach you how to solve the 0x80004005 error code.
Mar 21, 2024 pm 09:17 PM
When deleting or decompressing a folder on your computer, sometimes a prompt dialog box "Error 0x80004005: Unspecified Error" will pop up. How should you solve this situation? There are actually many reasons why the error code 0x80004005 is prompted, but most of them are caused by viruses. We can re-register the dll to solve the problem. Below, the editor will explain to you the experience of handling the 0x80004005 error code. Some users are prompted with error code 0X80004005 when using their computers. The 0x80004005 error is mainly caused by the computer not correctly registering certain dynamic link library files, or by a firewall that does not allow HTTPS connections between the computer and the Internet. So how about
 The working principle and configuration method of GDM in Linux system
Mar 01, 2024 pm 06:36 PM
Title: The working principle and configuration method of GDM in Linux systems In Linux operating systems, GDM (GNOMEDisplayManager) is a common display manager used to control graphical user interface (GUI) login and user session management. This article will introduce the working principle and configuration method of GDM, as well as provide specific code examples. 1. Working principle of GDM GDM is the display manager in the GNOME desktop environment. It is responsible for starting the X server and providing the login interface. The user enters
 What is hiberfil.sys file? Can hiberfil.sys be deleted?
Mar 15, 2024 am 09:49 AM
Recently, many netizens have asked the editor, what is the file hiberfil.sys? Can hiberfil.sys take up a lot of C drive space and be deleted? The editor can tell you that the hiberfil.sys file can be deleted. Let’s take a look at the details below. hiberfil.sys is a hidden file in the Windows system and also a system hibernation file. It is usually stored in the root directory of the C drive, and its size is equivalent to the size of the system's installed memory. This file is used when the computer is hibernated and contains the memory data of the current system so that it can be quickly restored to the previous state during recovery. Since its size is equal to the memory capacity, it may take up a larger amount of hard drive space. hiber
 Understand Linux Bashrc: functions, configuration and usage
Mar 20, 2024 pm 03:30 PM
Understanding Linux Bashrc: Function, Configuration and Usage In Linux systems, Bashrc (BourneAgainShellruncommands) is a very important configuration file, which contains various commands and settings that are automatically run when the system starts. The Bashrc file is usually located in the user's home directory and is a hidden file. Its function is to customize the Bashshell environment for the user. 1. Bashrc function setting environment
 Detailed explanation of log viewing command in Linux system!
Mar 06, 2024 pm 03:55 PM
In Linux systems, you can use the following command to view the contents of the log file: tail command: The tail command is used to display the content at the end of the log file. It is a common command to view the latest log information. tail [option] [file name] Commonly used options include: -n: Specify the number of lines to be displayed, the default is 10 lines. -f: Monitor the file content in real time and automatically display the new content when the file is updated. Example: tail-n20logfile.txt#Display the last 20 lines of the logfile.txt file tail-flogfile.txt#Monitor the updated content of the logfile.txt file in real time head command: The head command is used to display the beginning of the log file
 Detailed explanation of the role of .ibd files in MySQL and related precautions
Mar 15, 2024 am 08:00 AM
Detailed explanation of the role of .ibd files in MySQL and related precautions MySQL is a popular relational database management system, and the data in the database is stored in different files. Among them, the .ibd file is a data file in the InnoDB storage engine, used to store data and indexes in tables. This article will provide a detailed analysis of the role of the .ibd file in MySQL and provide relevant code examples to help readers better understand. 1. The role of .ibd files: storing data: .ibd files are InnoDB storage
 How to get variables from PHP method using Ajax?
Mar 09, 2024 pm 05:36 PM
Using Ajax to obtain variables from PHP methods is a common scenario in web development. Through Ajax, the page can be dynamically obtained without refreshing the data. In this article, we will introduce how to use Ajax to get variables from PHP methods, and provide specific code examples. First, we need to write a PHP file to handle the Ajax request and return the required variables. Here is sample code for a simple PHP file getData.php:


