

Six Ways to Force Quit on Mac

1. Force Quit on Mac Using Apple Menu
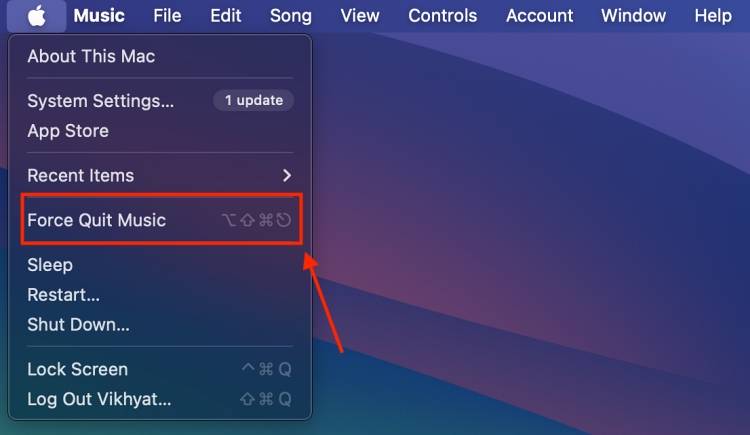
Force Quit Applications on Mac Using Apple Menu provides an easy way to deal with unresponsive or frozen applications without having to remember Additional keyboard shortcuts. Here's how to force quit an app in macOS Sonoma:
- Click the Apple logo in the upper left corner of the Mac screen.
- Here, find and click the "Force Quit" option in the drop-down menu that appears.
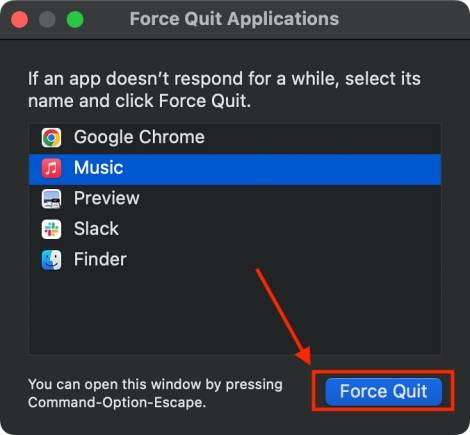
- Once completed, a pop-up window will appear with all the applications currently running on your Mac.
- Select the App you want to quit, and then click the "Force Quit" button in the lower right corner of the window.
2. Use keyboard shortcuts to force quit apps on Mac
When you encounter unresponsive apps on Mac , using the keyboard shortcut Command Option Escape can quickly become your go-to solution. This method works as follows:
- Press Command (⌘) Option (⌥) Escape (⎋) on your Mac PC or MacBook keyboard to open the Force Quit Application window .

- A pop-up window will appear with all the applications currently running on your Mac.
- Now, select the misbehaving application and click the Force Quit button in the lower right corner of the window.
3. Force Quit on Mac using the Applications Dock
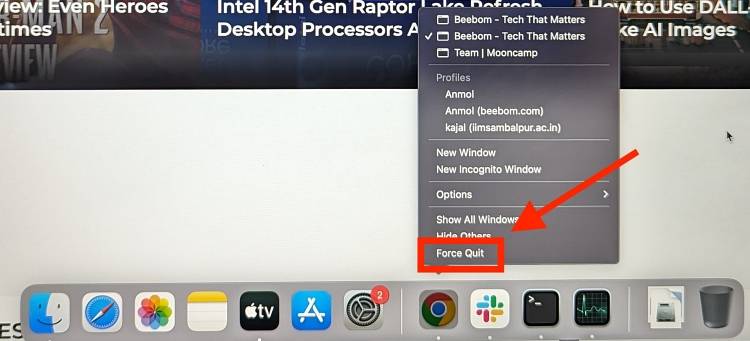
Most Mac users believe that force quitting an application from the Dock is impossible. Because there isn't any Force Quit option available in the Dock menu; instead, the "Quit" option is available. But you can access the hidden force quit option by simply holding down a key. Here's how:
- Right-click the app icon that you want to force quit in the Dock to access the Dock menu.
- A pop-up menu will appear, with a "Quiet" tab at the bottom.
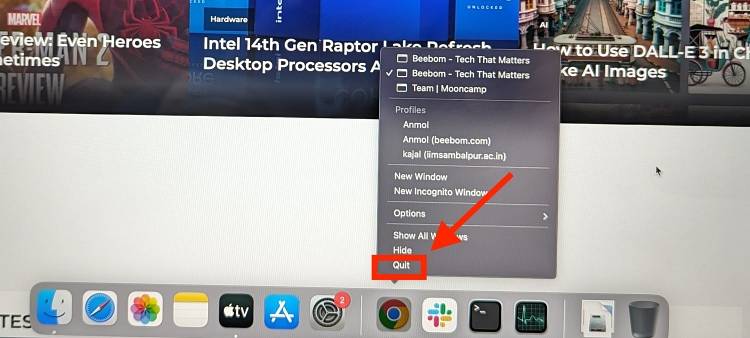
- Hold the Option key and you will see the "Exit" tab will change to "Force Quit" ".
- While still holding down the Option key, Click on the Force Quit tab to successfully force quit troublesome apps on your Mac.
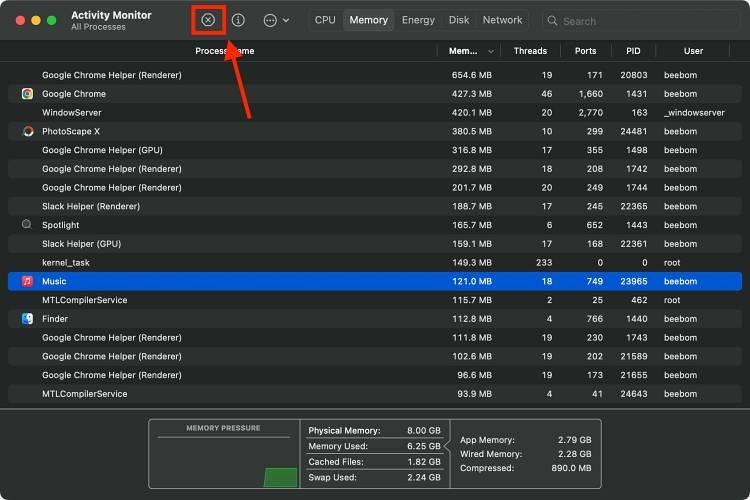
4. Use Activity Monitor to Force Quit on Mac
Activity Monitor is a built-in macOS utility where you can Learn more about your Mac's processes, including applications and system tasks. All of this makes it easier for you to pinpoint resource-intensive or unresponsive applications. This method is most useful when you need to determine which application is causing performance issues and then force-quit it. Methods as below:
- Open Activity Monitor on your Mac PC or MacBook by searching in Spotlight Now, in the Activity Monitor window, find and select the one that is behaving strangely application and click the
- "X" button in the upper left corner.
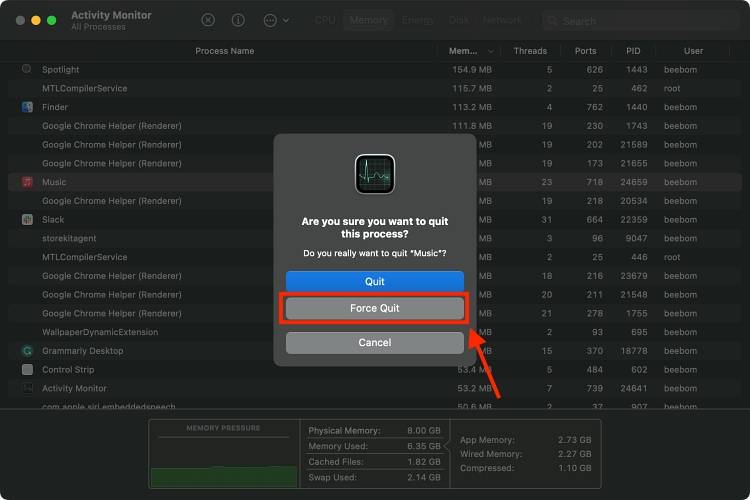
- Now, in the pop-up window that appears,
- click on the "Force Quit" button .
- Use Spotlight Search to launch the Terminal app on your Mac.
- Here, type
- Killall "Application Name" and press Enter, your Mac will force quit the application.

Note: The killall command works at the system level, which means the "Autosave" option will not work. Therefore, make sure to save any unsaved work before force quitting the application as you may lose unsaved changes.
6. Force restart your MacIf all else fails, a good old fashioned force restart can work wonders. It gives your Mac a fresh start and clears up any issues that are causing applications to behave erratically. Here's how to do it:- Hold down the
- Control Command power key until your Mac shuts down. Now, wait 5 seconds and your Mac will restart normally.
- Alternatively, you can
- press and hold the power key to force your Mac to shut down, then press the power button again to start it.
Frequently Asked Questions (FAQ)
Q. How to shut down an unresponsive Mac?
You can force shut down your Mac by holding down the power button until your Mac shuts down. Or, if your Mac is unresponsive, you can force restart it.Q. How do I unfreeze my Mac without force quitting?
If you want to unfreeze an application without force quitting it, restarting your Mac is the only option.The above is the detailed content of Six Ways to Force Quit on Mac. For more information, please follow other related articles on the PHP Chinese website!

Hot AI Tools

Undresser.AI Undress
AI-powered app for creating realistic nude photos

AI Clothes Remover
Online AI tool for removing clothes from photos.

Undress AI Tool
Undress images for free

Clothoff.io
AI clothes remover

AI Hentai Generator
Generate AI Hentai for free.

Hot Article
Hot Tools

Notepad++7.3.1
Easy-to-use and free code editor

SublimeText3 Chinese version
Chinese version, very easy to use

Zend Studio 13.0.1
Powerful PHP integrated development environment

Dreamweaver CS6
Visual web development tools

SublimeText3 Mac version
God-level code editing software (SublimeText3)
Hot Topics
 1376
1376
 52
52

 How to make Google Maps the default map in iPhone
Apr 17, 2024 pm 07:34 PM
How to make Google Maps the default map in iPhone
Apr 17, 2024 pm 07:34 PM
The default map on the iPhone is Maps, Apple's proprietary geolocation provider. Although the map is getting better, it doesn't work well outside the United States. It has nothing to offer compared to Google Maps. In this article, we discuss the feasible steps to use Google Maps to become the default map on your iPhone. How to Make Google Maps the Default Map in iPhone Setting Google Maps as the default map app on your phone is easier than you think. Follow the steps below – Prerequisite steps – You must have Gmail installed on your phone. Step 1 – Open the AppStore. Step 2 – Search for “Gmail”. Step 3 – Click next to Gmail app
 How to write a simple countdown program in C++?
Nov 03, 2023 pm 01:39 PM
How to write a simple countdown program in C++?
Nov 03, 2023 pm 01:39 PM
C++ is a widely used programming language that is very convenient and practical in writing countdown programs. Countdown program is a common application that can provide us with very precise time calculation and countdown functions. This article will introduce how to use C++ to write a simple countdown program. The key to implementing a countdown program is to use a timer to calculate the passage of time. In C++, we can use the functions in the time.h header file to implement the timer function. The following is the code for a simple countdown program
 Why are wallpapers gone after wallpaperengine exits?
Mar 12, 2024 pm 05:40 PM
Why are wallpapers gone after wallpaperengine exits?
Mar 12, 2024 pm 05:40 PM
Users can get various wallpapers by using wallpaperengine. Many users don't know why the wallpapers are gone after wallpaperengine exits. Dynamic wallpapers can only run on the desktop when the software you installed the wallpaper is turned on. Why are the wallpapers gone after wallpaperengine exits? 1. Dynamic wallpapers can only run on the desktop when the software you installed the wallpaper is turned on. 2. WallpaperEngine overwrites the original wallpaper, and of course it will be gone when you exit. 3. The wallpaper is still there after it is turned off, unless the file format is an image type, which can be obtained through some means, but it is not dynamic. 4. There is no video or dynamic image as a wall in Windows.
 Clock app missing in iPhone: How to fix it
May 03, 2024 pm 09:19 PM
Clock app missing in iPhone: How to fix it
May 03, 2024 pm 09:19 PM
Is the clock app missing from your phone? The date and time will still appear on your iPhone's status bar. However, without the Clock app, you won’t be able to use world clock, stopwatch, alarm clock, and many other features. Therefore, fixing missing clock app should be at the top of your to-do list. These solutions can help you resolve this issue. Fix 1 – Place the Clock App If you mistakenly removed the Clock app from your home screen, you can put the Clock app back in its place. Step 1 – Unlock your iPhone and start swiping to the left until you reach the App Library page. Step 2 – Next, search for “clock” in the search box. Step 3 – When you see “Clock” below in the search results, press and hold it and
 How to open a website using Task Scheduler
Oct 02, 2023 pm 11:13 PM
How to open a website using Task Scheduler
Oct 02, 2023 pm 11:13 PM
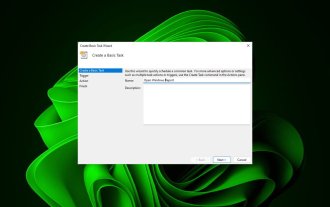
Do you frequently visit the same website at about the same time every day? This can lead to spending a lot of time with multiple browser tabs open and cluttering the browser while performing daily tasks. Well, how about opening it without having to launch the browser manually? It's very simple and doesn't require you to download any third-party apps, as shown below. How do I set up Task Scheduler to open a website? Press the key, type Task Scheduler in the search box, and then click Open. Windows On the right sidebar, click on the Create Basic Task option. In the Name field, enter the name of the website you want to open and click Next. Next, under Triggers, click Time Frequency and click Next. Select how long you want the event to repeat and click Next. Select enable
 Microsoft account exit tutorial: How to exit Win11 account
Dec 25, 2023 pm 08:04 PM
Microsoft account exit tutorial: How to exit Win11 account
Dec 25, 2023 pm 08:04 PM
In previous win11 updates, we could skip logging in with a Microsoft account, but the latest win11 home version forces users to log in with a Microsoft account to install. However, logging in with a Microsoft account will cause a lot of trouble. Many friends want to log out after the installation is completed. Let me teach you how to exit. How to log out of Microsoft account in win11 1. First click on the start menu below and find "Settings" in it, as shown in the picture. 2. Find the "Users" or "accounts" option in the settings interface. 3. Find "Log in with a local account instead" in the user interface, which is a line of blue text. 4. Then just enter the password of our local account to log in to the local account and log out of the Microsoft account.
 iOS 17: How to organize iMessage apps in Messages
Sep 18, 2023 pm 05:25 PM
iOS 17: How to organize iMessage apps in Messages
Sep 18, 2023 pm 05:25 PM
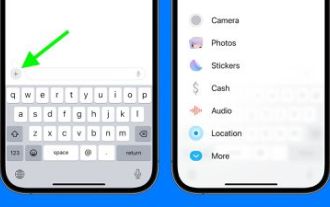
In iOS 17, Apple not only added several new messaging features, but also tweaked the design of the Messages app to give it a cleaner look. All iMessage apps and tools, such as the camera and photo options, can now be accessed by tapping the "+" button above the keyboard and to the left of the text input field. Clicking the "+" button brings up a menu column with a default order of options. Starting from the top, there's camera, photos, stickers, cash (if available), audio, and location. At the very bottom is a "More" button, which when tapped will reveal any other installed messaging apps (you can also swipe up to reveal this hidden list). How to reorganize your iMessage app You can do this below
 Can't allow access to camera and microphone in iPhone
Apr 23, 2024 am 11:13 AM
Can't allow access to camera and microphone in iPhone
Apr 23, 2024 am 11:13 AM
Are you getting "Unable to allow access to camera and microphone" when trying to use the app? Typically, you grant camera and microphone permissions to specific people on a need-to-provide basis. However, if you deny permission, the camera and microphone will not work and will display this error message instead. Solving this problem is very basic and you can do it in a minute or two. Fix 1 – Provide Camera, Microphone Permissions You can provide the necessary camera and microphone permissions directly in settings. Step 1 – Go to the Settings tab. Step 2 – Open the Privacy & Security panel. Step 3 – Turn on the “Camera” permission there. Step 4 – Inside, you will find a list of apps that have requested permission for your phone’s camera. Step 5 – Open the “Camera” of the specified app