How to crop screenshots on Mac
1. Crop Screenshots Using Keyboard Shortcuts
While you can use your Mac’s built-in screenshot tool to capture a screenshot, sometimes the specific part you need to focus on may show up later. In this case, you can use the preview tool to crop the screenshot on your Mac or MacBook. Not only can you crop screenshots using the preview tool, you can also resize them or annotate them. With that said, here's how to crop a screenshot on Mac using keyboard shortcuts:
- In your preferred Mac window, press "Shift Command 3” keyCapture a screenshot of the entire screen.

- Now, by clicking the thumbnail in the lower right corner Open the screenshot directly, or wait for it to appear on the desktop and then open it.
- In the screenshot preview window, use your MacBook's mouse pad to select the rectangle of the area you want to crop from the screenshot.
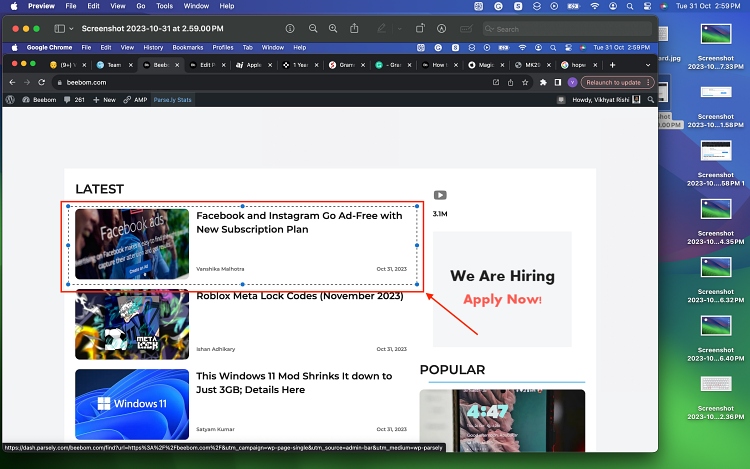
- When finished, simultaneously press the "Command K" key on your Mac keyboard, from the screenshot Crop the selected area.
2. Crop screenshot on Mac using menu bar
- Follow the first three steps of the previous method to take a screenshot and select a part of it.
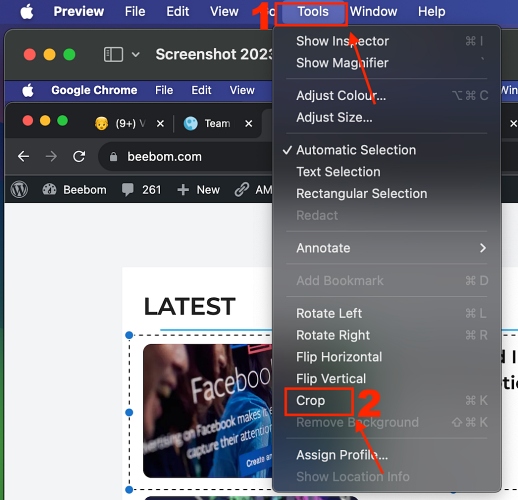
- When finished, click "Tools" in the top menu bar and select "Crop" from the drop-down menu.
- This way, the area you selected in the previous step will be cropped out of the screenshot.
3. Crop screenshots on Mac using Touch Bar
While cropping screenshots on Mac using keyboard shortcuts is simple, Older MacBook Pro models make the process simpler. You can crop the screenshot using the Touch Bar It works like this:
- As we already mentioned, capture the screenshot and make a rectangle like above choose.

- Now, find and click the Crop icon (the square icon with extended corners) to crop on your MacBook Pro’s TouchBar The area you selected previously.

- Here’s how the cropped screenshot looks in all the above methods:

NOTE: Your Mac will automatically save the cropped screenshot, so always remember to create a copy of the original screenshot in advance to protect yourself from any data loss.
4. Crop screenshots using the Photos app
In addition to the preview tool, you can also use Mac’s Photos app to edit and crop screenshots. In addition to cropping, the Photos app also allows advanced editing, allowing you to adjust colors, resize images, apply filters, and more. Here's how to edit screenshots on Mac using the Photos app:
- On your preferred Mac application, press the "Shift Command 3" key to capture a screenshot of the entire screen.
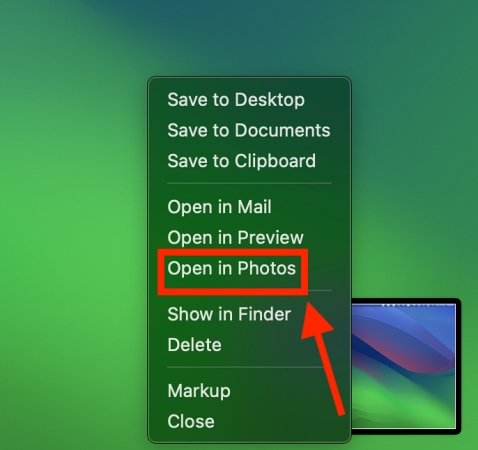
- Now, right-click on the preview thumbnail of the screenshot shown in the lower right corner and select the Open in Photos option from the pop-up menu.
- Now, click the Edit button in the upper right corner of the Photos app.
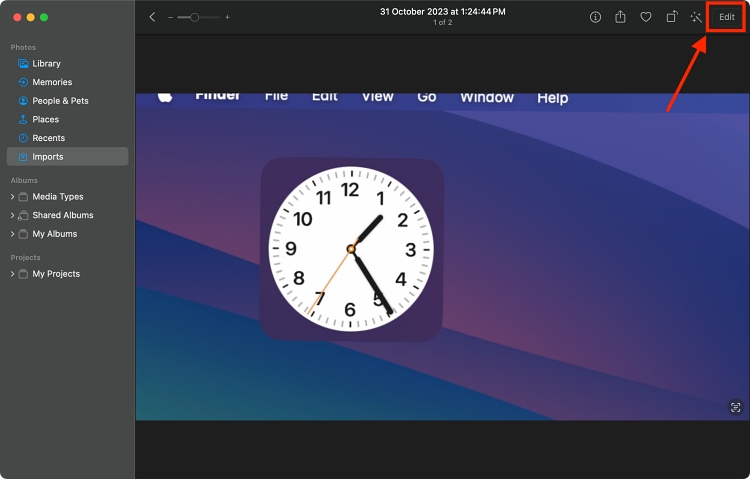
- Here,
- click the Crop button at the top of the editing toolbar that appears. Crop handles will now appear around your screenshot, allowing you to adjust the crop area.
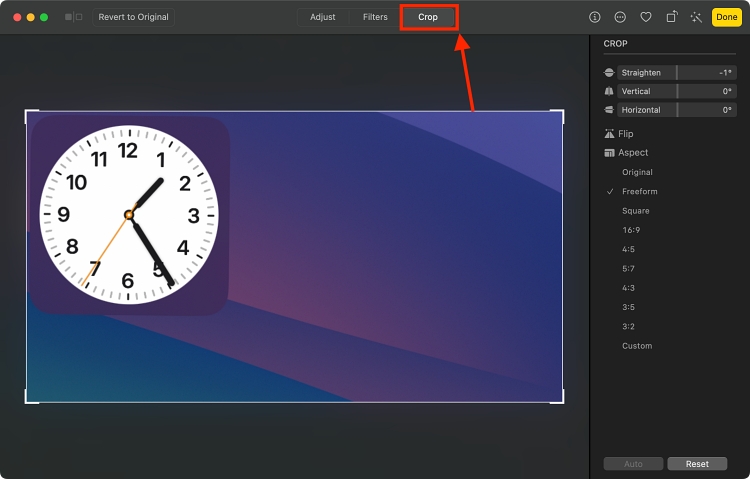
- Click and drag the handle to resize the
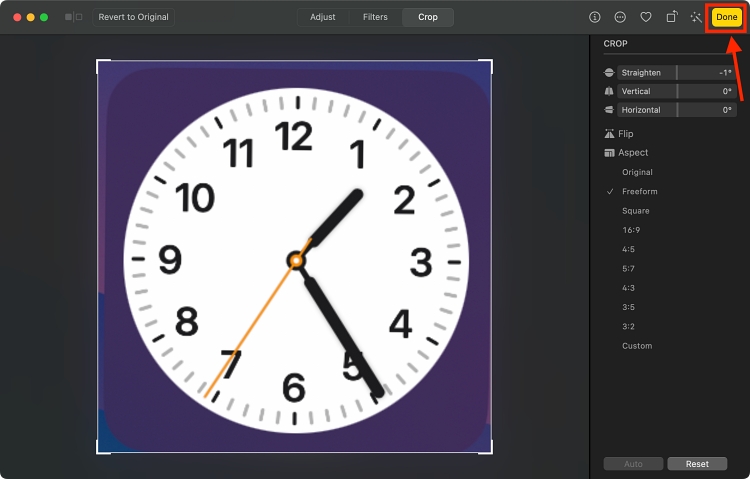
- cropping box on the screenshot. You can also move the entire crop box around the screenshot by clicking inside it and dragging. When you are satisfied with your crop selection, press Enter or click the
- Done button in the upper right corner of the window.
The above is the detailed content of How to crop screenshots on Mac. For more information, please follow other related articles on the PHP Chinese website!

Hot AI Tools

Undresser.AI Undress
AI-powered app for creating realistic nude photos

AI Clothes Remover
Online AI tool for removing clothes from photos.

Undress AI Tool
Undress images for free

Clothoff.io
AI clothes remover

Video Face Swap
Swap faces in any video effortlessly with our completely free AI face swap tool!

Hot Article

Hot Tools

Notepad++7.3.1
Easy-to-use and free code editor

SublimeText3 Chinese version
Chinese version, very easy to use

Zend Studio 13.0.1
Powerful PHP integrated development environment

Dreamweaver CS6
Visual web development tools

SublimeText3 Mac version
God-level code editing software (SublimeText3)

Hot Topics
 1386
1386
 52
52
 What to do if a black screen appears when taking a screenshot on a win10 computer_How to deal with a black screen when taking a screenshot on a win10 computer
Mar 27, 2024 pm 01:01 PM
1. Press the win key + r key, enter regedit, and click OK. 2. In the opened registry editor window, expand: HKEY_LOCAL_MACHINESYSTEMCurrentControlSetControlGraphicsDriversDCI, select Timeout on the right and double-click. 3. Then change 7 in [Numeric Data] to 0, and confirm to exit.
 iPhone screenshots not working: How to fix it
May 03, 2024 pm 09:16 PM
Screenshot feature not working on your iPhone? Taking a screenshot is very easy as you just need to hold down the Volume Up button and the Power button at the same time to grab your phone screen. However, there are other ways to capture frames on the device. Fix 1 – Using Assistive Touch Take a screenshot using the Assistive Touch feature. Step 1 – Go to your phone settings. Step 2 – Next, tap to open Accessibility settings. Step 3 – Open Touch settings. Step 4 – Next, open the Assistive Touch settings. Step 5 – Turn on Assistive Touch on your phone. Step 6 – Open “Customize Top Menu” to access it. Step 7 – Now you just need to link any of these functions to your screen capture. So click on the first
 How to take screenshots on Redmi 13c?
Mar 04, 2024 pm 09:13 PM
Recently, many consumers are considering replacing their mobile phones, and Redmi13C is a very cost-effective choice. The performance configuration of this phone is excellent. In order to facilitate daily use, let me briefly introduce how to take screenshots on Redmi 13C. Let’s find out together! How to take a screenshot on Redmi 13c 1. Shortcut key to take a screenshot: Press the power button and volume down key of the Redmi phone at the same time to take a screenshot. 2. Gesture screenshot: Enter the settings of the Redmi phone, find "More settings", find and click "Gesture and key shortcuts", then enable the "three-finger pull-down" operation and set it to take a screenshot. In this way, when you need to take a screenshot, you only need to slide down on the screen with three fingers to take a screenshot. 3. Take a screenshot of the notification bar: from the phone screen
 How to use shortcut keys to take screenshots in Win8?
Mar 28, 2024 am 08:33 AM
How to use shortcut keys to take screenshots in Win8? In our daily use of computers, we often need to take screenshots of the content on the screen. For users of Windows 8 system, taking screenshots through shortcut keys is a convenient and efficient operation method. In this article, we will introduce several commonly used shortcut keys to take screenshots in Windows 8 system to help you take screenshots more quickly. The first method is to use the "Win key + PrintScreen key" key combination to perform full
 How to adjust the color when the screen turns black and white. Detailed introduction: How to exit black and white mode on your mobile phone.
Mar 21, 2024 pm 01:12 PM
When many friends are using their mobile phones, they suddenly find that the operation interface of the mobile phone has turned into "black and white" color. They don't know what causes it or how to solve it. This article uses Android mobile phones as an example to teach you how to make it work. The color of the mobile phone's operating interface returns to normal. 1. Set up the interface of the mobile phone and find the "gear-shaped" icon in the operation interface. As shown below: Click this icon to enter the phone’s settings interface. 2. Options The operating interface of the mobile phone has changed to black and white, which is related to the "Display" setting of the mobile phone. After entering the settings interface of the mobile phone, find the "Display and Theme" option in the drop-down menu, as shown below: Then click "Display and Theme" option to enter the details page. 3. After changing the screen color and entering the "Display and Theme" option, find the "
 How to Undo Delete from Home Screen in iPhone
Apr 17, 2024 pm 07:37 PM
Deleted something important from your home screen and trying to get it back? You can put app icons back on the screen in a variety of ways. We have discussed all the methods you can follow and put the app icon back on the home screen. How to Undo Remove from Home Screen in iPhone As we mentioned before, there are several ways to restore this change on iPhone. Method 1 – Replace App Icon in App Library You can place an app icon on your home screen directly from the App Library. Step 1 – Swipe sideways to find all apps in the app library. Step 2 – Find the app icon you deleted earlier. Step 3 – Simply drag the app icon from the main library to the correct location on the home screen. This is the application diagram
 How to close the 'Do not cover the top of the screen' Detailed explanation: How to close the 'Do not cover the top of the screen' message that appears frequently on your phone
Mar 03, 2024 pm 01:31 PM
I believe many friends have encountered the problem that their mobile phones suddenly prompt: Do not cover the top of the screen. So why does the mobile phone suddenly appear like this? Let’s take a look together below. In fact, when this happens, something is blocking the distance sensor of the phone, so this prompt is received on the screen of the phone. So why did I suddenly receive such a prompt? In fact, it may be that you have accidentally turned on the [anti-accidental touch mode] on your phone, so this problem occurs. So how do we close it? In fact, the method is very simple. Let’s take a look at it together. Method 1: Directly follow the on-screen prompts to close using the shortcut key combination. Method 2: If the above method does not work, you can also open the phone’s [Settings]
 6000 mAh silicon negative battery! Xiaomi 15Pro upgrade leaked again
Jul 24, 2024 pm 12:45 PM
According to news on July 23, blogger Digital Chat Station broke the news that the battery capacity of Xiaomi 15 Pro has been increased to 6000mAh and supports 90W wired flash charging. This will be the Pro model with the largest battery in Xiaomi’s digital series. Digital Chat Station previously revealed that the battery of Xiaomi 15Pro has ultra-high energy density and the silicon content is much higher than that of competing products. After silicon-based batteries are tested on a large scale in 2023, second-generation silicon anode batteries have been identified as the future development direction of the industry. This year will usher in the peak of direct competition. 1. The theoretical gram capacity of silicon can reach 4200mAh/g, which is more than 10 times the gram capacity of graphite (the theoretical gram capacity of graphite is 372mAh/g). For the negative electrode, the capacity when the lithium ion insertion amount reaches the maximum is the theoretical gram capacity, which means that under the same weight


