

LNMP环境搭建MySQL篇_MySQL

1.Install MySQL
<code class="hljs ruby">root@kallen:~# apt-get install mysql-server-5.5 mysql-client-5.5</code>
<strong>2.Add Users</strong>
<strong>(1) 选择数据表</strong><br />
语句如下:use mysql;<br />
<strong>(2) 在mysql的user表中增加连接用户帐号:</strong><br />
这里不要直接使用INSERT语句添加user记录,使用INSERT可能出现错误:
ERROR 1364 (HY000): Field ‘ssl_cipher’ doesn’t have a default value
不过早期的MYSQL版本倒没出现这个错误,因为一直都是直接修改user表或直接使用INSERT语句完成,后来升级MYSQL到5.1的时候,发现可能会出现这个错误。<br />
建议使用GRANT语句进行授权,语句如下:
<code class="hljs ruby"><code class="hljs sql">GRANT USAGE ON *.* TO 'username'@'localhost' IDENTIFIED BY 'password' WITH GRANT OPTION;</code></code>
<code class="hljs sql">上句:
<code class="hljs sql">“username”替换为将要授权的用户名,比如clientusr;<br /> “password”替换为clientusr设置的密码;
<code class="hljs sql">(3) 可访问数据表授权
<code class="hljs sql">创建好帐户之后,就开始给上面的common user进行数据表授权,步骤3中增加的连接用户默认权限都是“N”的,必须在db表中为该帐户授权,允许其访问专用数据库,当然超级用户就不说了。
<code class="hljs sql">使用下面语句:
<code class="hljs ruby"><code class="hljs sql"><code class="hljs sql">GRANT SELECT,INSERT,UPDATE,DELETE,CREATE,DROP ON tablename.* TO 'username'@'localhost' IDENTIFIED BY 'password';</code></code></code>
<code class="hljs sql"><code class="hljs sql">本语句中的权限根据实际需要确定:
<code class="hljs sql"><code class="hljs sql">“tablename”替换为授权访问的数据表table名<br /> “username” 是步骤2授权用户名<br /> “password” 是步骤2授权用户的设置密码
<code class="hljs sql"><code class="hljs sql">这样就为该用户授予了对某数据表的SELECT, INSERT, UPDATE, DELETE, CAREATE, DROP权限。
<code class="hljs sql"><code class="hljs sql">(4) 生效授权,创建完毕
<code class="hljs sql"><code class="hljs sql">一句话即可:FLUSH PRIVILEGES;
<code class="hljs sql"><code class="hljs sql"><strong>3.Install phpmyadmin</strong>
<code class="hljs sql"><code class="hljs sql">用随便一个支持PHP的web服务器(如Apache、Nginx、Lighttpd),下载phpmyadmin,装之。
<code class="hljs ruby"><code class="hljs sql"><code class="hljs sql"><code class="hljs bash">sudo apt-get install phpmyadmin #注意这是安装到/usr/share/phpmyadmin</code></code></code></code>
<code class="hljs sql"><code class="hljs sql"><code class="hljs bash">在ubuntu下,sudo apt-getinstall phpmyadmin后会有一些设置,如选择服务器、密码设定等等内容。安装完成后,访问http://localhost/phpmyadmin会出现404错误,这是因为没有将phpmyadmin目录映射到apache目录下面,运行下面命令即可:
<code class="hljs ruby"><code class="hljs sql"><code class="hljs sql"><code class="hljs bash"><code class="hljs bash">sudo ln -s /usr/share/phpmyadmin /var/www/html</code></code></code></code></code>
<code class="hljs sql"><code class="hljs sql"><code class="hljs bash"><code class="hljs bash"><strong>[常见错误]</strong>
<code class="hljs sql"><code class="hljs sql"><code class="hljs bash"><code class="hljs bash"><strong>(1) 安装错误:</strong>
<code class="hljs ruby"><code class="hljs sql"><code class="hljs sql"><code class="hljs bash"><code class="hljs bash"><code class="hljs http">Error: Package: php54w-tidy-5.4.41-1.w6.x86_64 (webtatic)

 Requires: libtidy-0.99.so.0()(64bit)

 You could try using --skip-broken to work around the problem

 You could try running: rpm -Va --nofiles --nodigest </code></code></code></code></code></code>
<code class="hljs sql"><code class="hljs sql"><code class="hljs bash"><code class="hljs bash"><code class="hljs http">需要安装libtidy-0.99.so:
<code class="hljs ruby"><code class="hljs sql"><code class="hljs sql"><code class="hljs bash"><code class="hljs bash"><code class="hljs http"><code class="hljs ruby">[root@amtt02 html]# rpm -ivh libtidy-0.99.0-19.20070615.1.el6.x86_64.rpm</code></code></code></code></code></code></code>
<code class="hljs sql"><code class="hljs sql"><code class="hljs bash"><code class="hljs bash"><code class="hljs http"><code class="hljs ruby"><strong>(2) 访问错误:</strong><br />
在http.conf文件中加入:
<code class="hljs ruby"><code class="hljs sql"><code class="hljs sql"><code class="hljs bash"><code class="hljs bash"><code class="hljs http"><code class="hljs ruby"><code class="hljs apache"><directory phpmyadmin="" share="" usr="">

AllowOverride None

Order allow,deny

Allow from all

</directory> </code></code></code></code></code></code></code></code>
<code class="hljs ruby"><code class="hljs sql"><code class="hljs sql"><code class="hljs bash"><code class="hljs bash"><code class="hljs http"><code class="hljs ruby"><code class="hljs apache"><code class="hljs ">service httpd restart </code></code></code></code></code></code></code></code></code>
<code class="hljs sql"><code class="hljs sql"><code class="hljs bash"><code class="hljs bash"><code class="hljs http"><code class="hljs ruby"><code class="hljs apache"><code class="hljs ">之后,就能成功启动httpd服务了,问题解决。
<code class="hljs sql"><code class="hljs sql"><code class="hljs bash"><code class="hljs bash"><code class="hljs http"><code class="hljs ruby"><code class="hljs apache"><code class="hljs ">访问phpMyAdmin提示:
<code class="hljs sql"><code class="hljs sql"><code class="hljs bash"><code class="hljs bash"><code class="hljs http"><code class="hljs ruby"><code class="hljs apache"><code class="hljs ">配置文件权限错误,无法写入!
<code class="hljs sql"><code class="hljs sql"><code class="hljs bash"><code class="hljs bash"><code class="hljs http"><code class="hljs ruby"><code class="hljs apache"><code class="hljs ">解决办法:
<code class="hljs ruby"><code class="hljs sql"><code class="hljs sql"><code class="hljs bash"><code class="hljs bash"><code class="hljs http"><code class="hljs ruby"><code class="hljs apache"><code class="hljs "><code class="hljs perl">chmod -R 755 ./phpmyadmin</code></code></code></code></code></code></code></code></code></code>
<code class="hljs sql"><code class="hljs sql"><code class="hljs bash"><code class="hljs bash"><code class="hljs http"><code class="hljs ruby"><code class="hljs apache"><code class="hljs "><code class="hljs perl">这样设置下phpMyAdmin目录权限属性为755就可以访问了。原来phpMyAdmin必须在755权限下才可以运行。
<code class="hljs sql"><code class="hljs sql"><code class="hljs bash"><code class="hljs bash"><code class="hljs http"><code class="hljs ruby"><code class="hljs apache"><code class="hljs "><code class="hljs perl">注意:在777下也是错误的,估计是phpMyAdmim为安全着想。
<code class="hljs sql"><code class="hljs sql"><code class="hljs bash"><code class="hljs bash"><code class="hljs http"><code class="hljs ruby"><code class="hljs apache"><code class="hljs "><code class="hljs perl"><strong>4.Can’t connect to MySQL server on ‘localhost’(10038)</strong>
<code class="hljs sql"><code class="hljs sql"><code class="hljs bash"><code class="hljs bash"><code class="hljs http"><code class="hljs ruby"><code class="hljs apache"><code class="hljs "><code class="hljs perl">查一下你的MYSQL用户表里, 是否允许远程连接
<code class="hljs sql"><code class="hljs sql"><code class="hljs bash"><code class="hljs bash"><code class="hljs http"><code class="hljs ruby"><code class="hljs apache"><code class="hljs "><code class="hljs perl"><strong>(1)给用户授权</strong>
<code class="hljs ruby"><code class="hljs sql"><code class="hljs sql"><code class="hljs bash"><code class="hljs bash"><code class="hljs http"><code class="hljs ruby"><code class="hljs apache"><code class="hljs "><code class="hljs perl"><code class="hljs lasso">mysql>grant all privileges on *.*to'root'@'%' identified by 'youpassword' with grant option;</code></code></code></code></code></code></code></code></code></code></code>
<code class="hljs ruby"><code class="hljs sql"><code class="hljs sql"><code class="hljs bash"><code class="hljs bash"><code class="hljs http"><code class="hljs ruby"><code class="hljs apache"><code class="hljs "><code class="hljs perl"><code class="hljs lasso"><code class="hljs ">mysql>flush privileges;</code></code></code></code></code></code></code></code></code></code></code></code>
<code class="hljs sql"><code class="hljs sql"><code class="hljs bash"><code class="hljs bash"><code class="hljs http"><code class="hljs ruby"><code class="hljs apache"><code class="hljs "><code class="hljs perl"><code class="hljs lasso"><code class="hljs "><strong>(2)修改/etc/mysql/my.conf</strong>
<code class="hljs sql"><code class="hljs sql"><code class="hljs bash"><code class="hljs bash"><code class="hljs http"><code class="hljs ruby"><code class="hljs apache"><code class="hljs "><code class="hljs perl"><code class="hljs lasso"><code class="hljs ">找到bind-address =127.0.0.1这一行<br />
改为bind-address =0.0.0.0 即可
<code class="hljs ruby"><code class="hljs sql"><code class="hljs sql"><code class="hljs bash"><code class="hljs bash"><code class="hljs http"><code class="hljs ruby"><code class="hljs apache"><code class="hljs "><code class="hljs perl"><code class="hljs lasso"><code class="hljs "><code class="hljs vhdl">root@kallen:/etc/selinux# vim /etc/mysql/
# Instead of skip-networking the default is now to listen only on
# localhost which is more compatible and is not less secure.
# bind-address = 127.0.0.1
# Remote Access to MySQL on port 3306
# Kallen Ding, Jun 11 2015
bind-address = 0.0.0.0</code></code></code></code></code></code></code></code></code></code></code></code></code>

Hot AI Tools

Undresser.AI Undress
AI-powered app for creating realistic nude photos

AI Clothes Remover
Online AI tool for removing clothes from photos.

Undress AI Tool
Undress images for free

Clothoff.io
AI clothes remover

AI Hentai Generator
Generate AI Hentai for free.

Hot Article
Hot Tools

Notepad++7.3.1
Easy-to-use and free code editor

SublimeText3 Chinese version
Chinese version, very easy to use

Zend Studio 13.0.1
Powerful PHP integrated development environment

Dreamweaver CS6
Visual web development tools

SublimeText3 Mac version
God-level code editing software (SublimeText3)
Hot Topics
 1382
1382
 52
52

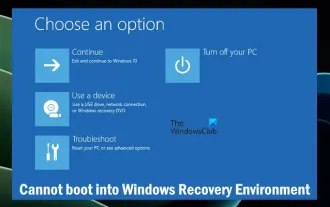 Unable to boot into Windows recovery environment
Feb 19, 2024 pm 11:12 PM
Unable to boot into Windows recovery environment
Feb 19, 2024 pm 11:12 PM
Windows Recovery Environment (WinRE) is an environment used to repair Windows operating system errors. After entering WinRE, you can perform system restore, factory reset, uninstall updates, etc. If you are unable to boot into WinRE, this article will guide you through fixes to resolve the issue. Unable to boot into the Windows Recovery Environment If you cannot boot into the Windows Recovery Environment, use the fixes provided below: Check the status of the Windows Recovery Environment Use other methods to enter the Windows Recovery Environment Did you accidentally delete the Windows Recovery Partition? Perform an in-place upgrade or clean installation of Windows below, we have explained all these fixes in detail. 1] Check Wi
 What are the differences between Python and Anaconda?
Sep 06, 2023 pm 08:37 PM
What are the differences between Python and Anaconda?
Sep 06, 2023 pm 08:37 PM
In this article, we will learn about the differences between Python and Anaconda. What is Python? Python is an open source language that places great emphasis on making the code easy to read and understand by indenting lines and providing whitespace. Python's flexibility and ease of use make it ideal for a variety of applications, including but not limited to scientific computing, artificial intelligence, and data science, as well as creating and developing online applications. When Python is tested, it is immediately translated into machine language because it is an interpreted language. Some languages, such as C++, require compilation to be understood. Proficiency in Python is an important advantage because it is very easy to understand, develop, execute and read. This makes Python
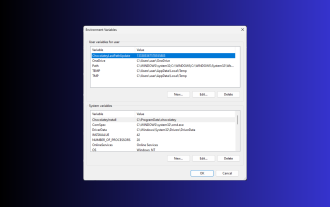 11 Ways to Set Environment Variables on Windows 3
Sep 15, 2023 pm 12:21 PM
11 Ways to Set Environment Variables on Windows 3
Sep 15, 2023 pm 12:21 PM
Setting environment variables on Windows 11 can help you customize your system, run scripts, and configure applications. In this guide, we'll discuss three methods along with step-by-step instructions so you can configure your system to your liking. There are three types of environment variables System environment variables – Global variables are the lowest priority and are accessible to all users and applications on Windows and are typically used to define system-wide settings. User Environment Variables – Higher priority, these variables only apply to the current user and process running under that account, and are set by the user or application running under that account. Process environment variables – have the highest priority, they are temporary and apply to the current process and its sub-processes, providing the program
 What are the PHP integrated environment packages?
Jul 24, 2023 am 09:36 AM
What are the PHP integrated environment packages?
Jul 24, 2023 am 09:36 AM
PHP integrated environment packages include: 1. PhpStorm, a powerful PHP integrated environment; 2. Eclipse, an open source integrated development environment; 3. Visual Studio Code, a lightweight open source code editor; 4. Sublime Text, a A popular text editor, widely used in various programming languages; 5. NetBeans, an integrated development environment developed by the Apache Software Foundation; 6. Zend Studio, an integrated development environment designed for PHP developers.
 Common problems and solutions for Laravel environment configuration file .env
Mar 10, 2024 pm 12:51 PM
Common problems and solutions for Laravel environment configuration file .env
Mar 10, 2024 pm 12:51 PM
Common problems and solutions for Laravel environment configuration file .env When using the Laravel framework to develop projects, the environment configuration file .env is very important. It contains key configuration information of the project, such as database connection information, application keys, etc. However, sometimes there are some common problems when configuring the .env file. This article will introduce these problems and provide solutions, and attach specific code examples for reference. Problem 1: Unable to read the .env file when we have configured the .env file
 Easily delete the Conda environment: Tips for efficiently cleaning up useless environments
Jan 04, 2024 am 08:15 AM
Easily delete the Conda environment: Tips for efficiently cleaning up useless environments
Jan 04, 2024 am 08:15 AM
Deleting Conda Environments with One Click: Tips for Quickly Cleaning Up Useless Environments With the rapid development of data science and machine learning, the need to use Python for development and analysis is becoming stronger and stronger. Conda, as a popular Python package manager and environment management tool, is widely used in project development and environment configuration. However, over time, we often leave many useless Conda environments on the computer, which not only wastes disk space, but may also lead to environment clutter and unnecessary trouble. This article will introduce
 Python web development environment setup tutorial
Jun 17, 2023 pm 02:10 PM
Python web development environment setup tutorial
Jun 17, 2023 pm 02:10 PM
Python is a high-level programming language. Because of its cross-platform, easy-to-learn, and powerful features, some large companies, such as Google and Dropbox, choose to use Python for development. As Web applications have gradually become mainstream applications in recent years, Python has gradually become the preferred development language for Web applications. This article will introduce how to build a Python Web development environment on Windows systems, including Pyth
 How to configure the go language environment
Jan 06, 2021 am 11:37 AM
How to configure the go language environment
Jan 06, 2021 am 11:37 AM
Go language environment configuration method: 1. Download the go language compiler and double-click to run the installation program; 2. Accept the license agreement and click next; 3. Set the installation directory and click OK; 4. After the installation is completed, change the go installation directory Just add the bin directory to the environment variable.
