

Stable Video Diffusion is here, code weight is online

Stability AI, a well-known company for AI drawing, has finally entered the AI-generated video industry.
This Tuesday, Stable Video Diffusion, a video generation model based on stable diffusion, was launched, and the AI community immediately started a discussion

Many people said "We have finally waited."
Project link: https://github.com/Stability-AI/generative-models
Now, you can use existing static images to generate a few seconds of video
Based on Stability AI’s original Stable Diffusion graph model, Stable Video Diffusion has become open source or commercial One of the few video generative models in the industry.


But it is not available to everyone yet, Stable Video Diffusion has opened user waiting list registration (https://stability.ai/contact).
According to the introduction, Stable Video Propagation can be easily adapted to a variety of downstream tasks, including multi-view synthesis from a single image by fine-tuning multi-view datasets. Stable AI says it is planning various models that build and expand this foundation, similar to the ecosystem built around Stable Proliferation

With stable video transmission, 14 and 25 frames of video can be generated at customizable frame rates from 3 to 30 frames per second
In external evaluation, Stability AI confirms that these models outperform leading closed-source models in user preference research:

Stability AI highlights, Stable Video Diffusion is not suitable for real-world or direct commercial applications at this stage, and the model will be refined based on user insights and feedback on safety and quality.

Paper address: https://stability.ai/research/stable-video-diffusion-scaling-latent-video-diffusion-models- to-large-datasets
Stable video transmission is a member of the stable AI open source model family. It now appears that their products cover multiple modalities such as images, language, audio, 3D and code, which fully demonstrates their commitment to improving artificial intelligence
Stable Video Diffusion The technical level
The stable video diffusion model, as a potential diffusion model for high-resolution videos, has reached the SOTA level of text-to-video or image-to-video. Recently, latent diffusion models trained on 2D image synthesis were turned into generative video models by inserting temporal layers and fine-tuning them on small high-quality video datasets. However, training methods vary widely in the literature, and the field has yet to agree on a unified strategy for video data curation
In the paper Stable Video Diffusion, Stability AI identifies and evaluates successful training videos Three distinct stages of the latent diffusion model: text-to-image pre-training, video pre-training, and high-quality video fine-tuning. They also demonstrate the importance of carefully prepared pre-training datasets for generating high-quality videos and describe a systematic curation process to train a strong base model, including subtitles and filtering strategies.
Stability AI also explores in the paper the impact of fine-tuning the base model on high-quality data and trains a text-to-video model that is comparable to closed-source video generation. The model provides powerful motion representation for downstream tasks such as image-to-video generation and adaptability to camera motion-specific LoRA modules. In addition, the model can also provide a powerful multi-view 3D prior, which can be used as the basis of a multi-view diffusion model. The model generates multiple views of an object in a feed-forward manner, requiring only small computing power requirements , the performance is also better than image-based methods.

Specifically, training the model successfully requires the following three stages:
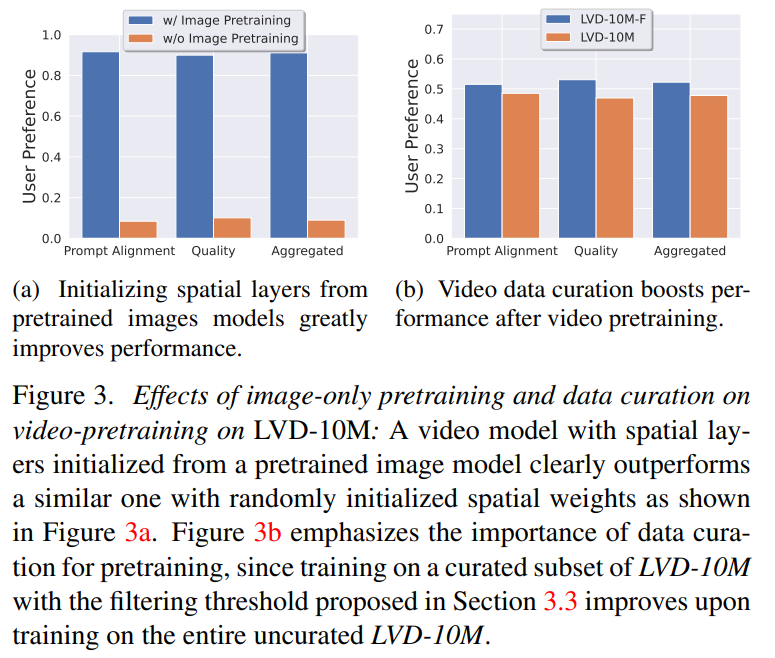
Phase 1: Image pre-training. This article regards image pre-training as the first stage of the training pipeline, and builds the initial model on Stable Diffusion 2.1, thus equipping the video model with a powerful visual representation. In order to analyze the effect of image pre-training, this article also trains and compares two identical video models. Figure 3a results show that the image pre-trained model is preferred in terms of both quality and cue tracking.
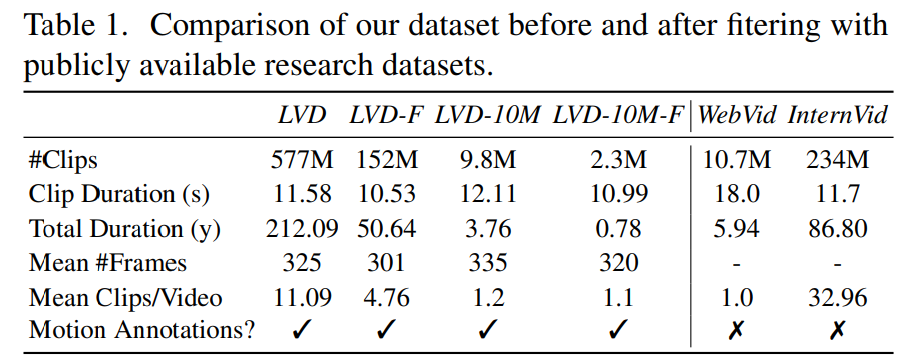
Phase 2: Video pre-training data set. This article relies on human preferences as signals to create suitable pre-training datasets. The data set created in this article is LVD (Large Video Dataset), which consists of 580M pairs of annotated video clips.
Further investigation revealed that the generated dataset contained some examples that may degrade the performance of the final video model. Therefore, in this paper we use dense optical flow to annotate the data set
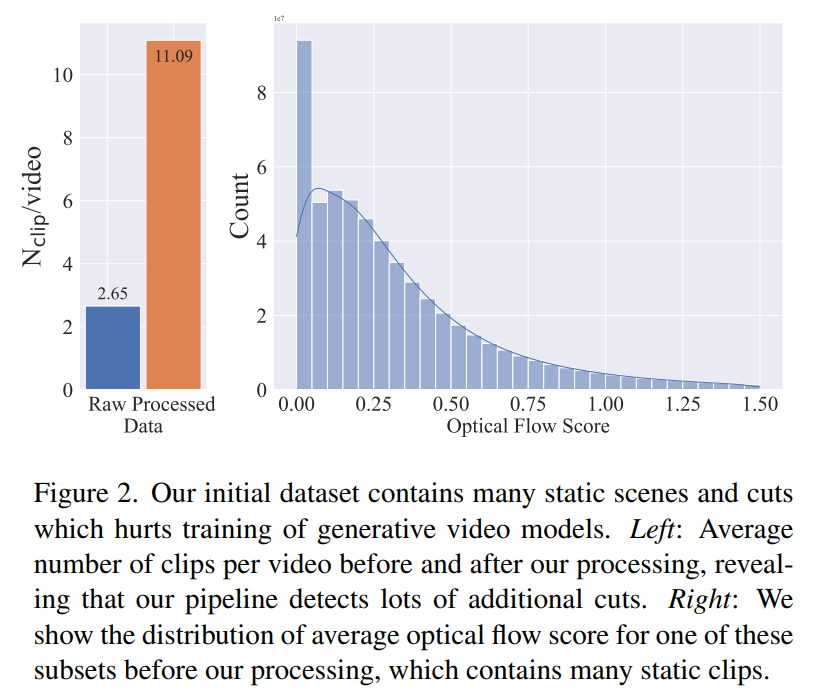
In addition, this paper also applies optical character recognition to remove a large number of Text clipping. Finally, we use CLIP embeddings to annotate the first, middle, and last frames of each clip. The following table provides some statistics for the LVD dataset:
Phase 3: High-quality fine-tuning. To analyze the impact of video pre-training on the final stage, this paper fine-tunes three models that differ only in initialization. Figure 4e shows the results.

Looks like this is a good start. When will we be able to use AI to directly generate a movie?
The above is the detailed content of Stable Video Diffusion is here, code weight is online. For more information, please follow other related articles on the PHP Chinese website!

Hot AI Tools

Undresser.AI Undress
AI-powered app for creating realistic nude photos

AI Clothes Remover
Online AI tool for removing clothes from photos.

Undress AI Tool
Undress images for free

Clothoff.io
AI clothes remover

AI Hentai Generator
Generate AI Hentai for free.

Hot Article
Hot Tools

Notepad++7.3.1
Easy-to-use and free code editor

SublimeText3 Chinese version
Chinese version, very easy to use

Zend Studio 13.0.1
Powerful PHP integrated development environment

Dreamweaver CS6
Visual web development tools

SublimeText3 Mac version
God-level code editing software (SublimeText3)
Hot Topics
 1378
1378
 52
52

 How to configure Debian Apache log format
Apr 12, 2025 pm 11:30 PM
How to configure Debian Apache log format
Apr 12, 2025 pm 11:30 PM
This article describes how to customize Apache's log format on Debian systems. The following steps will guide you through the configuration process: Step 1: Access the Apache configuration file The main Apache configuration file of the Debian system is usually located in /etc/apache2/apache2.conf or /etc/apache2/httpd.conf. Open the configuration file with root permissions using the following command: sudonano/etc/apache2/apache2.conf or sudonano/etc/apache2/httpd.conf Step 2: Define custom log formats to find or
 How Tomcat logs help troubleshoot memory leaks
Apr 12, 2025 pm 11:42 PM
How Tomcat logs help troubleshoot memory leaks
Apr 12, 2025 pm 11:42 PM
Tomcat logs are the key to diagnosing memory leak problems. By analyzing Tomcat logs, you can gain insight into memory usage and garbage collection (GC) behavior, effectively locate and resolve memory leaks. Here is how to troubleshoot memory leaks using Tomcat logs: 1. GC log analysis First, enable detailed GC logging. Add the following JVM options to the Tomcat startup parameters: -XX: PrintGCDetails-XX: PrintGCDateStamps-Xloggc:gc.log These parameters will generate a detailed GC log (gc.log), including information such as GC type, recycling object size and time. Analysis gc.log
 How to implement file sorting by debian readdir
Apr 13, 2025 am 09:06 AM
How to implement file sorting by debian readdir
Apr 13, 2025 am 09:06 AM
In Debian systems, the readdir function is used to read directory contents, but the order in which it returns is not predefined. To sort files in a directory, you need to read all files first, and then sort them using the qsort function. The following code demonstrates how to sort directory files using readdir and qsort in Debian system: #include#include#include#include#include//Custom comparison function, used for qsortintcompare(constvoid*a,constvoid*b){returnstrcmp(*(
 How to optimize the performance of debian readdir
Apr 13, 2025 am 08:48 AM
How to optimize the performance of debian readdir
Apr 13, 2025 am 08:48 AM
In Debian systems, readdir system calls are used to read directory contents. If its performance is not good, try the following optimization strategy: Simplify the number of directory files: Split large directories into multiple small directories as much as possible, reducing the number of items processed per readdir call. Enable directory content caching: build a cache mechanism, update the cache regularly or when directory content changes, and reduce frequent calls to readdir. Memory caches (such as Memcached or Redis) or local caches (such as files or databases) can be considered. Adopt efficient data structure: If you implement directory traversal by yourself, select more efficient data structures (such as hash tables instead of linear search) to store and access directory information
 How to configure firewall rules for Debian syslog
Apr 13, 2025 am 06:51 AM
How to configure firewall rules for Debian syslog
Apr 13, 2025 am 06:51 AM
This article describes how to configure firewall rules using iptables or ufw in Debian systems and use Syslog to record firewall activities. Method 1: Use iptablesiptables is a powerful command line firewall tool in Debian system. View existing rules: Use the following command to view the current iptables rules: sudoiptables-L-n-v allows specific IP access: For example, allow IP address 192.168.1.100 to access port 80: sudoiptables-AINPUT-ptcp--dport80-s192.16
 How debian readdir integrates with other tools
Apr 13, 2025 am 09:42 AM
How debian readdir integrates with other tools
Apr 13, 2025 am 09:42 AM
The readdir function in the Debian system is a system call used to read directory contents and is often used in C programming. This article will explain how to integrate readdir with other tools to enhance its functionality. Method 1: Combining C language program and pipeline First, write a C program to call the readdir function and output the result: #include#include#include#includeintmain(intargc,char*argv[]){DIR*dir;structdirent*entry;if(argc!=2){
 How to learn Debian syslog
Apr 13, 2025 am 11:51 AM
How to learn Debian syslog
Apr 13, 2025 am 11:51 AM
This guide will guide you to learn how to use Syslog in Debian systems. Syslog is a key service in Linux systems for logging system and application log messages. It helps administrators monitor and analyze system activity to quickly identify and resolve problems. 1. Basic knowledge of Syslog The core functions of Syslog include: centrally collecting and managing log messages; supporting multiple log output formats and target locations (such as files or networks); providing real-time log viewing and filtering functions. 2. Install and configure Syslog (using Rsyslog) The Debian system uses Rsyslog by default. You can install it with the following command: sudoaptupdatesud
 Debian mail server SSL certificate installation method
Apr 13, 2025 am 11:39 AM
Debian mail server SSL certificate installation method
Apr 13, 2025 am 11:39 AM
The steps to install an SSL certificate on the Debian mail server are as follows: 1. Install the OpenSSL toolkit First, make sure that the OpenSSL toolkit is already installed on your system. If not installed, you can use the following command to install: sudoapt-getupdatesudoapt-getinstallopenssl2. Generate private key and certificate request Next, use OpenSSL to generate a 2048-bit RSA private key and a certificate request (CSR): openss
