

How to Fix Last Backup Unable to Complete iCloud Issue

Determine the root cause
Before delving into the solution, you must determine the root cause of the "Last backup could not be completed" error. Here are some common factors that may cause this issue:
- Insufficient iCloud storage: iCloud Backup requires enough storage space to accommodate the device's data. Check your iCloud storage availability and make sure you have enough space for backups.
- Unstable Wi-FiConnection: A stable internet connection is crucial for seamless iCloud backup. Verify that your Wi-Fi network is strong and reliable.
- Device Software Issues: Outdated or defective device software may interfere with iCloud backups. Update your iPhone or iPad to the latest iOS or iPadOS version.
- Temporary iCloud service hiccup: Sometimes, temporary issues with the iCloud servers can interrupt backups. Check Apple's System Status page to see if any outages have been reported.
Troubleshooting Steps
Now that you have identified the potential cause, let’s explore the troubleshooting steps to resolve the “Last backup could not be completed” error:
Step 1: Check iCloud Storage Availability
- Access Settings on your iPhone or iPad.
- Click your name at the top of the settings menu.
- Select "iCloud".
- Click Manage Storage.
- Under Storage Plans, check the available iCloud storage.
- If your iCloud storage space is low, consider upgrading your storage plan or deleting unnecessary data to free up space.
Step 2: Verify Wi-Fi connection stability
- Make sure your iPhone or iPad is connected to a stable Wi-Fi network.
- If your Wi-Fi connection is weak or unstable, try connecting to a different Wi-Fi network or switching to cellular data.
- If the problem persists, consider restarting the Wi-Fi router to refresh the connection.
Step 3: Update device software
Open the Settings app on your iPhone or iPad.
- Click on General.
- Select "Software Update".
- If an update is available, click Download and Install.
- Follow the on-screen instructions to install the update.
Step 4: Restart the device
A simple reboot can often resolve temporary glitches that may be causing backup issues.
- Press and hold the power button until the power off slider appears.
- Slide the power off slider and wait for the device to shut down completely.
- After a few seconds, press and hold the power button again to power on the device.
Step 5: Delete the existing iCloud backup
Sometimes, deleting the existing iCloud backup can eliminate any conflict or corruption issues.
- Go to "iCloud > Storage" > "Settings".
- Click Manage Storage.
- Under "Backup," select your device.
- Click to delete the backup.
- Confirm deletion by clicking Delete.
Step 6: Try to back up on another Wi-Fi network
If the current Wi-Fi network problem persists, try connecting to another Wi-Fi network or using cellular Move data to initiate backup. This helps identify any network-related issues.
Step 7: Contact Apple Support
If none of the troubleshooting steps resolve the "Last backup could not be completed" error, we recommend contacting Apple Support for further assistance. They may be able to identify potential technical issues or provide additional guidance.
The above is the detailed content of How to Fix Last Backup Unable to Complete iCloud Issue. For more information, please follow other related articles on the PHP Chinese website!

Hot AI Tools

Undresser.AI Undress
AI-powered app for creating realistic nude photos

AI Clothes Remover
Online AI tool for removing clothes from photos.

Undress AI Tool
Undress images for free

Clothoff.io
AI clothes remover

AI Hentai Generator
Generate AI Hentai for free.

Hot Article
Hot Tools

Notepad++7.3.1
Easy-to-use and free code editor

SublimeText3 Chinese version
Chinese version, very easy to use

Zend Studio 13.0.1
Powerful PHP integrated development environment

Dreamweaver CS6
Visual web development tools

SublimeText3 Mac version
God-level code editing software (SublimeText3)
Hot Topics
 1382
1382
 52
52

 How to backup Google Chrome extensions
Jan 30, 2024 pm 12:36 PM
How to backup Google Chrome extensions
Jan 30, 2024 pm 12:36 PM
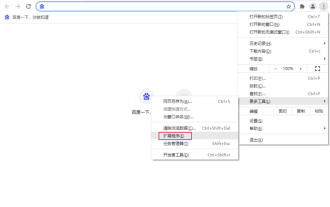
How to backup Google Chrome extension? For most Google Chrome users, more or less plug-ins are installed during daily use. The existence of plug-ins can improve our usage experience. When we reinstall the system or browser, these plug-ins cannot be retained, and it is troublesome to download and install them again. So is there a way to back up the currently installed plug-ins? Here’s how to do it. The tutorial method of backing up chrome plug-ins first opens Google Chrome, click the menu in the upper right corner, and select More Tools - Extensions. Click Package extension above the extensions page. In C:UsersAdministratorAppDataLocalGoogleChromeUserDataDe
 How to solve the problem that photos on iPhone cannot be synced to 'iCloud Photos”?
Feb 22, 2024 pm 06:46 PM
How to solve the problem that photos on iPhone cannot be synced to 'iCloud Photos”?
Feb 22, 2024 pm 06:46 PM
In order to avoid accidental loss of photos or videos, many iPhone users will turn on the iCloud photo function to synchronize the photos in the device to Apple servers for storage. If the photos or videos on your device cannot be synced to "iCloud Photos" during synchronization, you can refer to this tutorial to try to solve the problem. When "iCloud Photos" cannot be synced, please do not turn off the function immediately. Sync may be paused for a variety of reasons, such as certain device settings being turned on or the need for additional iCloud storage space. 1. View the gallery status in the Photos app. Open the Photos app on iPhone, go to the "Gallery" tab interface, tap "All Photos", and scroll to the bottom to view the status bar. Check whether there is relevant status information in the status bar, and then
 What should I do if there is an error when iCloud connects to the server?
Mar 06, 2024 pm 06:55 PM
What should I do if there is an error when iCloud connects to the server?
Mar 06, 2024 pm 06:55 PM
iCloud is a cloud service space provided by Apple to users. iCloud can help users store some important data on their mobile phones. When using iCloud, you often encounter various problems, such as iCloud failing to connect to the server, reporting errors, and being unable to connect to the server. 1: iCloud failed to connect to the server 1. First check whether your mobile phone network is working normally. You can open the browser and try to use it. If the network can be used, find the cellular network in the settings, and then scroll to the bottom to find the iCloud disk function. Turn this option on. If this function is not turned on, there will be a failure to connect to the server. 2. Try to log in to iCloud using a computer to see if the computer can connect to the iCloud space.
 How to delete startup backup in Windows 11's File Explorer
Feb 18, 2024 pm 05:40 PM
How to delete startup backup in Windows 11's File Explorer
Feb 18, 2024 pm 05:40 PM
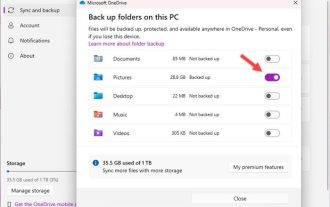
If you wish to hide the "Start Backup" option in Windows 11's File Explorer, here's what you can do. There are several ways to disable or hide the startup backup option in File Explorer, and we'll briefly list some methods to help you accomplish this task quickly. Before you get started, you need to understand that this option is closely tied to OneDrive. Once you open a library folder (such as Document, Pictures, Music, etc.), it will immediately appear in the file explorer's path. How to delete startup backup in Windows 11’s File Explorer To delete startup backup in Windows 11’s File Explorer, follow the steps below
 How to use MySQL backup and restore in PHP?
Jun 03, 2024 pm 12:19 PM
How to use MySQL backup and restore in PHP?
Jun 03, 2024 pm 12:19 PM
Backing up and restoring a MySQL database in PHP can be achieved by following these steps: Back up the database: Use the mysqldump command to dump the database into a SQL file. Restore database: Use the mysql command to restore the database from SQL files.
 How to restore the deleted hosts file
Feb 22, 2024 pm 10:48 PM
How to restore the deleted hosts file
Feb 22, 2024 pm 10:48 PM
Title: How to restore the hosts file after deletion Summary: The hosts file is a very important file in the operating system and is used to map domain names to IP addresses. If you accidentally delete the hosts file, you may be unable to access certain websites or have other network problems. This article will introduce how to recover accidentally deleted hosts file in Windows and Mac operating systems. Text: 1. Restore hosts file in Windows operating system. Hosts file in Windows operating system
 How to install, uninstall, and reset Windows server backup
Mar 06, 2024 am 10:37 AM
How to install, uninstall, and reset Windows server backup
Mar 06, 2024 am 10:37 AM
WindowsServerBackup is a function that comes with the WindowsServer operating system, designed to help users protect important data and system configurations, and provide complete backup and recovery solutions for small, medium and enterprise-level enterprises. Only users running Server2022 and higher can use this feature. In this article, we will explain how to install, uninstall or reset WindowsServerBackup. How to Reset Windows Server Backup If you are experiencing problems with your server backup, the backup is taking too long, or you are unable to access stored files, then you may consider resetting your Windows Server backup settings. To reset Windows
 How to backup system with ghost-ghost backup tutorial
Mar 06, 2024 pm 04:30 PM
How to backup system with ghost-ghost backup tutorial
Mar 06, 2024 pm 04:30 PM
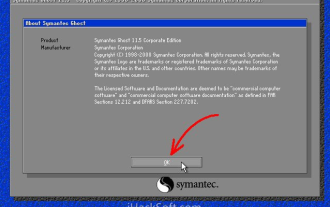
Recently, many friends have asked the editor how to back up the system with ghost. Next, let us learn the tutorial on how to back up the system with ghost. I hope it can help everyone. 1. After running Ghost, click "OK", as shown in the figure. 2. Click "Local" → "Partition" → "ToImage" (meaning: local → partition → to image file), as shown in the figure. 3. The Select Local Hard Disk window appears, click the hard disk where the partition to be backed up is located, and then click "OK", as shown in the figure. 4. The Select Source Partition window appears (the source partition is the partition you want to back up), click on the partition where the system is located (usually Zone 1, be sure to get it right), and then click "OK", as shown in the figure. 5. Play at this time