pycharm connection server tutorial
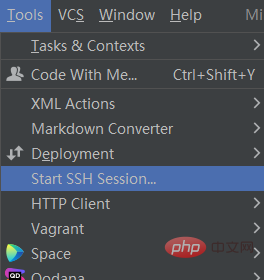
pycharm has three steps to connect to the server: "operation steps", "connection steps" and "code running": 1. Select "setting"->"Project:..."->"Python Interpreter" Pull down to select the created compilation environment; 2. Click "Tools" -> "Start SSH Session" and select the created connection; 3. Connect to the server and use pycharm to edit the code.
#The operating system of this tutorial: Windows 10 system, PyCharm 2023.3 version, Dell G3 computer.
The tutorial for pycharm to connect to the server is as follows:
1. Operation steps:
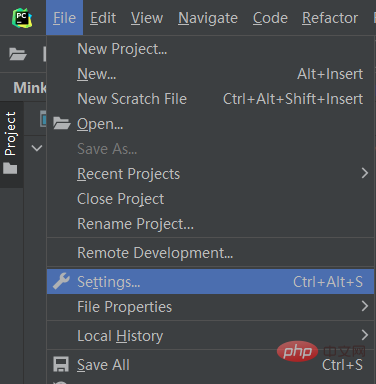
1. Open pycharm, select "File", and select "setting"
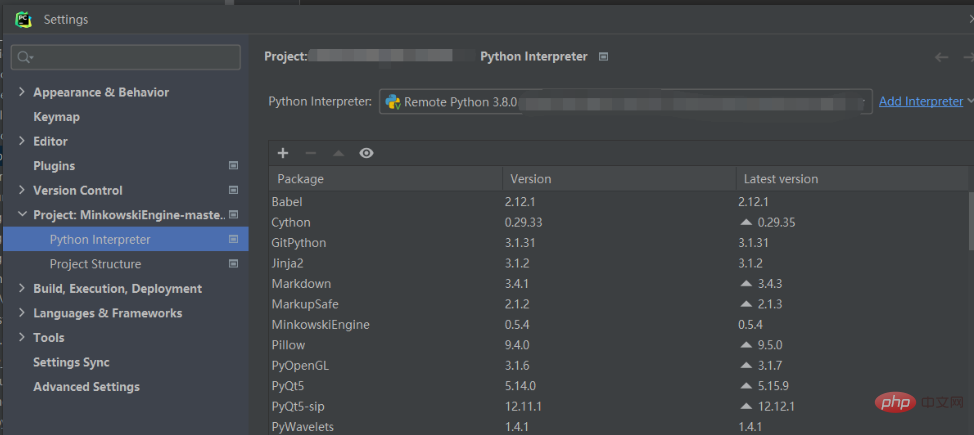
2. Select "Project:..." in the left toolbar, then select "Python Interpreter"
Then select "Add Interpreter" in the upper right corner
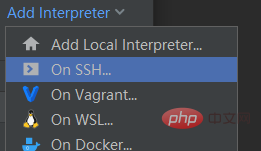
3. Click "Add Interpreter", select "on SSH", and enter the next step
4. If setting up for the first time, select " new", enter the host number IP address and user name in turn, click "Next"
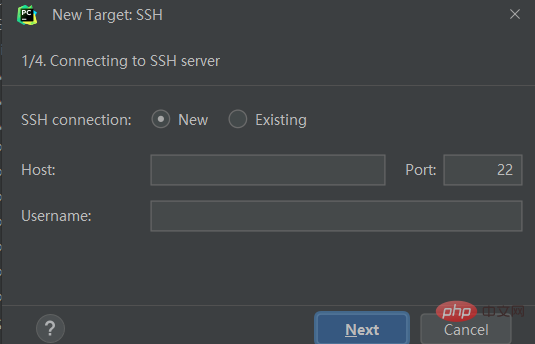
5. If not, select "Existing", select the host number that has been set, and click "Next"
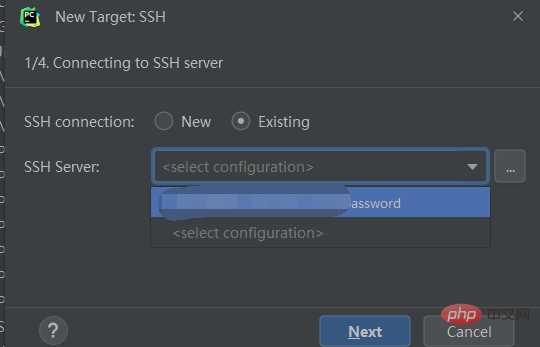
6. Then press "Next" until you reach the following interface
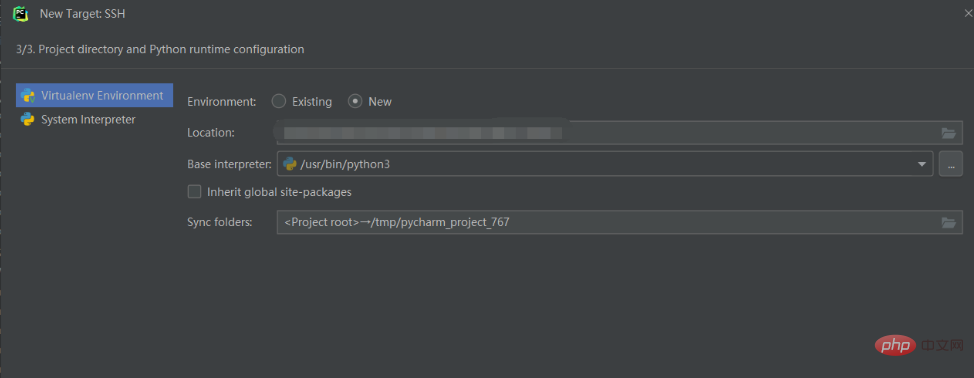
7. Select " System Interpreter",
The "Interpreter" above is the compiler, fill in the installation location of python in your server.
(If you installed conda and created a virtual environment, the address should be
"/home/username/anaconda3/envs/virtual environment name/python")


8. The "Sync folders" below are the storage addresses on the server corresponding to local files. Choose your own
Click the folder image on the right
(Similarly, if you installed conda, and created a virtual environment, then the address should be
"/home/user name/folder name")
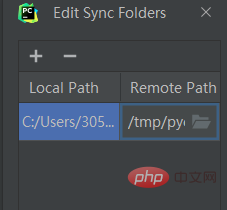
After filling in, the setting is complete . Click "create" to complete the setting.
Then, return to the initial interface, select "setting"->"Project:..."->"Python Interpreter"
Pull down and select the compilation environment you just created.
2. Connection steps:
1. Click "Tools" -> "Start SSH Session" and select the connection created above
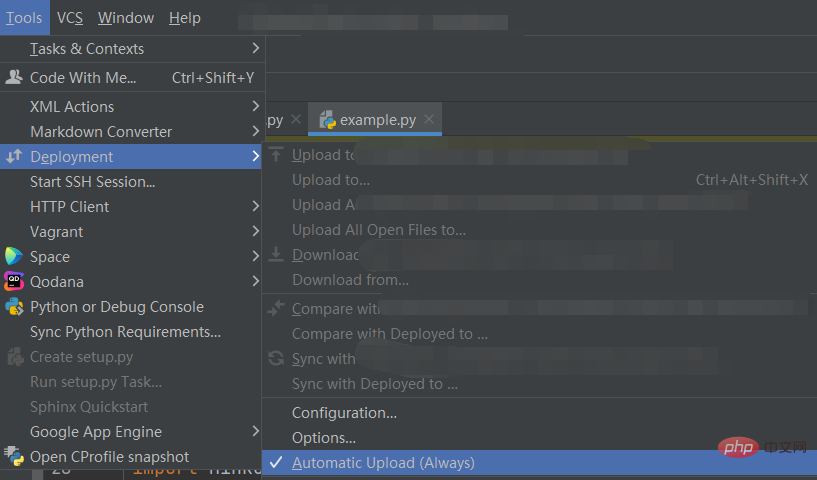
2. Select "Tools"->"Deployment"->"Automatic Upload(Alaways)"
This option can ensure that the code on the server and the local code are maintained in time consistent.
3. Code running:
After completing the above steps, connect to the server and use pycharm to edit the code
Select under pycharm "Terminal" can be used to enter terminal commands. Server running
can also be directly right-clicked and selected to run directly

The above is the detailed content of pycharm connection server tutorial. For more information, please follow other related articles on the PHP Chinese website!

Hot AI Tools

Undresser.AI Undress
AI-powered app for creating realistic nude photos

AI Clothes Remover
Online AI tool for removing clothes from photos.

Undress AI Tool
Undress images for free

Clothoff.io
AI clothes remover

Video Face Swap
Swap faces in any video effortlessly with our completely free AI face swap tool!

Hot Article

Hot Tools

Notepad++7.3.1
Easy-to-use and free code editor

SublimeText3 Chinese version
Chinese version, very easy to use

Zend Studio 13.0.1
Powerful PHP integrated development environment

Dreamweaver CS6
Visual web development tools

SublimeText3 Mac version
God-level code editing software (SublimeText3)

Hot Topics
 1392
1392
 52
52
 The reason why pycharm runs very slowly
Apr 25, 2024 am 05:42 AM
Reasons for PyCharm to run slowly include: Hardware limitations: low CPU performance, insufficient memory, and insufficient storage space. Software related issues: Too many plugins, indexing issues, and large project sizes. Project configuration: Improper configuration of the Python interpreter, excessive file monitoring, and excessive resource consumption by the code analysis function.
 How to run ipynb file in pycharm
Apr 25, 2024 am 04:03 AM
To run an ipynb file in PyCharm: open the ipynb file, create a Python environment (optional), run the code cell, use an interactive environment.
 How to solve pycharm crash
Apr 25, 2024 am 05:09 AM
Solutions to PyCharm crashes include: check memory usage and increase PyCharm's memory limit; update PyCharm to the latest version; check plug-ins and disable or uninstall unnecessary plug-ins; reset PyCharm settings; disable hardware acceleration; reinstall PyCharm; contact Support staff asked for help.
 How to delete the pycharm interpreter
Apr 25, 2024 am 05:54 AM
To remove the PyCharm interpreter: Open the Settings window and navigate to Interpreters. Select the interpreter you want to delete and click the minus button. Confirm the deletion and reload the project if necessary.
 How to export py files with pycharm
Apr 25, 2024 am 06:24 AM
How to export Py files in PyCharm: Open the file to be exported, click the "File" menu, select "Export File", select the export location and file name, and click the "Export" button
 How to change python to Chinese
May 05, 2024 pm 07:48 PM
Method to modify the Python interface to Chinese: Set the Python language environment variable: set PYTHONIOENCODING=UTF-8 Modify the IDE settings: PyCharm: Settings>Appearance and Behavior>Appearance>Language (Chinese); Visual Studio Code: File>Preferences>Search "locale" > Enter "zh-CN" to modify the system locale: Windows: Control Panel > Region > Format (Chinese (China)); macOS: Language and Region > Preferred Language (Chinese (Simplified) drag to the top of the list)
 How to install pandas module in pycharm
Apr 25, 2024 am 10:03 AM
How to install the Pandas module using PyCharm: Open PyCharm, create a new project, and configure the Python interpreter. Enter the command pip install pandas in the terminal to install Pandas. Verify installation: Import pandas in PyCharm's Python script. If there are no errors, the installation is successful.
 How to bring up the pycharm menu bar
Apr 25, 2024 am 10:48 AM
The menu bar in PyCharm provides quick access to various functions and options. To restore the menu bar: Click the View menu. Select the "Toolbar" option. Check the "Menu Bar" checkbox. Click OK. The menu bar contains the following menus: File, Edit, View, Navigate, Refactor, Run, Debug, Tools, VCS, Window, and Help.


