

MySQL利用xtrabackup进行增量备份详细过程汇总_MySQL

1,创建mysql备份用户
mysql -uroot --password="" -e"CREATE USER 'backup'@'192.168.%' IDENTIFIED BY '123456'";
mysql -uroot --password="" -e"GRANT RELOAD, LOCK TABLES, REPLICATION CLIENT, CREATE TABLESPACE, SUPERON *.* TO 'backup'@'192.168.%'";
2,xtrabackup进行全量备份
备份命令:
xtrabackup --defaults-file=/etc/my.cnf--user=backup --password="123456" --port=3306 --backup--target-dir=/data/backups/mysql/full_incre_$(date +%Y%m%d)
PS: 2>/tmp/fullbackup.log 将备份信息放入文件中。
备份过程信息如下:
1 2 3 4 5 6 7 8 9 10 11 12 13 14 15 16 17 18 19 20 21 22 23 24 25 26 27 28 29 30 31 32 33 34 35 36 37 38 39 40 41 42 43 44 45 46 47 48 49 50 51 52 53 54 55 56 57 58 59 60 61 62 63 64 65 66 67 68 69 70 71 72 |
|
3,xtrabackup进行增量备份
3.1先录入一张表,实现第一次增量数据:
1 2 3 4 5 6 7 8 9 10 |
|
3.2 再进行增量备份1
xtrabackup --defaults-file=/etc/my.cnf--backup --user=backup --password="123456" --port=3306 --target-dir=/data/backups/mysql/incre_20150320/--incremental-basedir=/data/backups/mysql/full_incre_201503192>/tmp/incre_backup_1.log
查看备份日志信息:
1 2 3 4 5 6 7 8 9 10 11 12 13 14 15 16 17 18 19 20 21 22 23 24 25 26 27 28 29 30 31 32 33 34 35 36 37 38 39 40 41 42 43 44 45 46 47 48 49 50 51 52 53 54 55 56 57 58 59 60 61 62 63 64 65 66 67 68 69 70 71 72 73 74 |
|
3.3 再建立表2,实现第二天增量数据
建立一张表t_incre_2:
1 2 3 4 5 6 7 8 9 10 11 12 13 14 15 16 17 18 19 20 |
|
3.4 进行第二天的增量备份
备份命令:
xtrabackup --defaults-file=/etc/my.cnf--backup --user=backup --password="123456" --port=3306 --target-dir=/data/backups/mysql/incre_20150321/--incremental-basedir=/data/backups/mysql/incre_20150320 2>/tmp/incre_backup_2.log
备份信息记录如下:
1 2 3 4 5 6 7 8 9 10 11 12 13 14 15 16 17 18 19 20 21 22 23 24 25 26 27 28 29 30 31 32 33 34 35 36 37 38 39 40 41 42 43 44 45 46 47 48 49 50 51 52 53 54 55 56 57 58 59 60 61 62 63 64 65 66 67 68 69 70 71 72 73 74 75 76 77 78 79 80 81 82 83 |
|
4,xtrabackup进行增量恢复
4.1为了验证比对,先删除两个增量备份前表里面的数据
1 2 3 4 5 6 7 8 9 10 11 12 13 |
|
4.2开始全备份恢复PREPARE THE BASE BACKUP
备份命令如下:
xtrabackup --defaults-file=/etc/my.cnf--prepare --user=backup --password="123456" --apply-log-only--target-dir=/data/backups/mysql/full_incre_20150319 2>/tmp/full_restore.log
备份信息记录如下:
1 2 3 4 5 6 7 8 9 10 11 12 13 14 15 16 17 18 19 20 21 22 23 24 25 26 27 28 29 30 31 32 33 34 35 36 37 38 39 40 41 42 43 |
|
4.3 恢复到第一次增量的时刻
恢复命令:
xtrabackup --defaults-file=/etc/my.cnf--prepare --user=backup --password="123456" --apply-log-only--target-dir=/data/backups/mysql/full_incre_20150319--incremental-dir=/data/backups/mysql/incre_20150320 2>/tmp/restore_incre_1.log
恢复过程:
1 2 3 4 5 6 7 8 9 10 11 12 13 14 15 16 17 18 19 20 21 22 23 24 25 26 27 28 29 30 31 32 33 34 35 36 37 38 39 40 41 42 43 44 45 46 47 48 49 50 51 52 53 54 55 56 57 58 59 60 61 62 63 64 65 66 67 68 69 70 71 72 73 74 75 76 77 78 79 80 81 82 83 84 85 86 87 88 89 90 91 92 93 94 95 96 |
|
4.4 恢复到第二次增量备份前面:
恢复命令:
xtrabackup --defaults-file=/etc/my.cnf--prepare --user=backup --password="123456" --apply-log-only --target-dir=/data/backups/mysql/full_incre_20150319--incremental-dir=/data/backups/mysql/incre_201503212>/tmp/restore_incre_2.log
恢复过程:
1 2 3 4 5 6 7 8 9 10 11 12 13 14 15 16 17 18 19 20 21 22 23 24 25 26 27 28 29 30 31 32 33 34 35 36 37 38 39 40 41 42 43 44 45 46 47 48 49 50 51 52 53 54 55 56 57 58 59 60 61 62 63 64 65 66 67 68 69 70 71 72 73 74 75 76 77 78 79 80 81 82 83 84 85 86 87 88 89 90 91 92 93 94 95 96 97 98 99 |
|
4.5 恢复整个库
恢复命令:
xtrabackup --defaults-file=/etc/my.cnf--prepare --user=backup --password="123456"--target-dir=/data/backups/mysql/full_incre_20150319 2>/tmp/restore_end_3.log
停止mysql服务:
service mysqld5612 stop
开始rsync数据文件:
cd /data/backups/mysql/full_incre_20150319
rsync -rvt --exclude'xtrabackup_checkpoints' --exclude 'xtrabackup_logfile' ./ /home/data/mysql/data
授予mysql访问权限:
chown -R mysql:mysql /home/data/mysql/data
启动mysql服务:
service mysqld5612 start
4.6,验证
登录mysql,看到以前在备份之后删除的t4以及t_incre_2表的数据已经通过2次增量备份恢复过来了,如下所示:
1 2 3 4 5 6 7 8 9 10 11 12 13 14 15 16 17 18 19 |
|
5,innobackupex先做全量备份
命令如下:
innobackupex --defaults-file=/etc/my.cnf--user=backup --password="123456" --host=192.168.52.129/data/backups/mysql/innobackupex_full_20150319/ --no-timestamp 2>/tmp/innobackupex_full.log
备份过程信息:
1 2 3 4 5 6 7 8 9 10 11 12 13 14 15 16 17 18 19 20 21 22 23 24 25 26 27 28 29 30 31 32 33 34 35 36 37 38 39 40 41 42 43 44 45 46 47 48 49 50 51 52 53 54 55 56 57 58 59 60 61 62 63 64 65 66 67 68 69 70 71 72 73 74 75 76 77 78 79 80 81 82 83 84 85 86 87 88 89 90 91 92 93 94 95 96 97 98 99 100 101 102 103 104 105 106 107 108 109 110 111 112 113 114 115 116 117 118 119 120 121 122 123 124 125 126 127 128 129 130 131 132 133 134 135 136 137 138 139 140 141 142 143 144 145 146 147 148 149 150 151 |
|
6,innobackupex做增量备份
6.1做第一次增量备份
先录入增量数据
1 2 3 4 5 6 7 8 9 10 11 12 13 |
|
再进行增量备份,命令如下:
innobackupex --incremental/data/backups/mysql/innobackex_incre_1--incremental-basedir=/data/backups/mysql/innobackupex_full_20150319/--user=backup --password="123456" --host=192.168.52.129 --no-timestamp2>/tmp/innobackex_incre_1.log
备份过程信息如下:
1 2 3 4 5 6 7 8 9 10 11 12 13 14 15 16 17 18 19 20 21 22 23 24 25 26 27 28 29 30 31 32 33 34 35 36 37 38 39 40 41 42 43 44 45 46 47 48 49 50 51 52 53 54 55 56 57 58 59 60 61 62 63 64 65 66 67 68 69 70 71 72 73 74 75 76 77 78 79 80 81 82 83 84 85 86 87 88 89 90 91 92 93 94 95 96 97 98 99 100 101 102 103 104 105 106 107 108 109 110 111 112 113 114 115 116 117 118 119 120 121 122 123 124 125 126 127 128 129 130 131 132 133 134 135 136 137 138 139 140 141 142 143 144 145 146 147 148 149 150 151 152 153 154 155 156 157 158 159 |
|
6.2 基于全备和第一个增量备份来做第二次增量备份
先录入增量数据录入
1 2 3 4 5 6 7 8 9 10 11 12 13 14 |
|
开始进行第二次增量备份,备份命令:
innobackupex --incremental/data/backups/mysql/innobackex_incre_2 --incremental-basedir=/data/backups/mysql/innobackex_incre_1/--user=backup --password="123456" --host=192.168.52.129 --no-timestamp2>/tmp/innobackex_incre_2.log
备份过程信息如下:
1 2 3 4 5 6 7 8 9 10 11 12 13 14 15 16 17 18 19 20 21 22 23 24 25 26 27 28 29 30 31 32 33 34 35 36 37 38 39 40 41 42 43 44 45 46 47 48 49 50 51 52 53 54 55 56 57 58 59 60 61 62 63 64 65 66 67 68 69 70 71 72 73 74 75 76 77 78 79 80 81 82 83 84 85 86 87 88 89 90 91 92 93 94 95 96 97 98 99 100 101 102 103 104 105 106 107 108 109 110 111 112 113 114 115 116 117 118 119 120 121 122 123 124 125 126 127 128 129 130 131 132 133 134 135 136 137 138 139 140 141 142 143 144 145 146 147 148 149 150 151 152 153 154 155 156 |
|
7,innobackupex做增量恢复
7.1先删除两次增量数据,用来查看验证恢复结果
1 2 3 4 5 6 7 8 9 10 11 |
|
7.2 开始做恢复,恢复全备份
备份命令如下:
innobackupex --user=backup--password="123456" --host=192.168.52.129 --apply-log/data/backups/mysql/innobackupex_full_20150319/2>/tmp/innobackex_restore_full.log
备份过程信息如下:
......
InnoDB: Last MySQL binlog file position 0915, file name mysql-bin.000053

xtrabackup: st

Hot AI Tools

Undresser.AI Undress
AI-powered app for creating realistic nude photos

AI Clothes Remover
Online AI tool for removing clothes from photos.

Undress AI Tool
Undress images for free

Clothoff.io
AI clothes remover

AI Hentai Generator
Generate AI Hentai for free.
Hot Article
Hot Tools

Notepad++7.3.1
Easy-to-use and free code editor

SublimeText3 Chinese version
Chinese version, very easy to use

Zend Studio 13.0.1
Powerful PHP integrated development environment

Dreamweaver CS6
Visual web development tools

SublimeText3 Mac version
God-level code editing software (SublimeText3)
Hot Topics
 1377
1377
 52
52

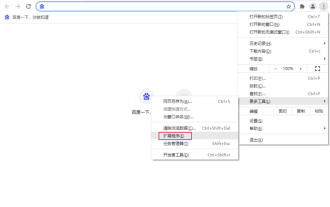 How to backup Google Chrome extensions
Jan 30, 2024 pm 12:36 PM
How to backup Google Chrome extensions
Jan 30, 2024 pm 12:36 PM
How to backup Google Chrome extension? For most Google Chrome users, more or less plug-ins are installed during daily use. The existence of plug-ins can improve our usage experience. When we reinstall the system or browser, these plug-ins cannot be retained, and it is troublesome to download and install them again. So is there a way to back up the currently installed plug-ins? Here’s how to do it. The tutorial method of backing up chrome plug-ins first opens Google Chrome, click the menu in the upper right corner, and select More Tools - Extensions. Click Package extension above the extensions page. In C:UsersAdministratorAppDataLocalGoogleChromeUserDataDe
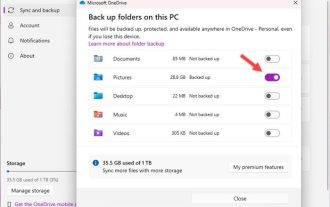 How to delete startup backup in Windows 11's File Explorer
Feb 18, 2024 pm 05:40 PM
How to delete startup backup in Windows 11's File Explorer
Feb 18, 2024 pm 05:40 PM
If you wish to hide the "Start Backup" option in Windows 11's File Explorer, here's what you can do. There are several ways to disable or hide the startup backup option in File Explorer, and we'll briefly list some methods to help you accomplish this task quickly. Before you get started, you need to understand that this option is closely tied to OneDrive. Once you open a library folder (such as Document, Pictures, Music, etc.), it will immediately appear in the file explorer's path. How to delete startup backup in Windows 11’s File Explorer To delete startup backup in Windows 11’s File Explorer, follow the steps below
 How to use MySQL backup and restore in PHP?
Jun 03, 2024 pm 12:19 PM
How to use MySQL backup and restore in PHP?
Jun 03, 2024 pm 12:19 PM
Backing up and restoring a MySQL database in PHP can be achieved by following these steps: Back up the database: Use the mysqldump command to dump the database into a SQL file. Restore database: Use the mysql command to restore the database from SQL files.
 How to restore the deleted hosts file
Feb 22, 2024 pm 10:48 PM
How to restore the deleted hosts file
Feb 22, 2024 pm 10:48 PM
Title: How to restore the hosts file after deletion Summary: The hosts file is a very important file in the operating system and is used to map domain names to IP addresses. If you accidentally delete the hosts file, you may be unable to access certain websites or have other network problems. This article will introduce how to recover accidentally deleted hosts file in Windows and Mac operating systems. Text: 1. Restore hosts file in Windows operating system. Hosts file in Windows operating system
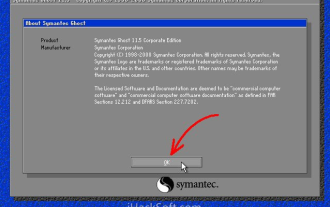 How to backup system with ghost-ghost backup tutorial
Mar 06, 2024 pm 04:30 PM
How to backup system with ghost-ghost backup tutorial
Mar 06, 2024 pm 04:30 PM
Recently, many friends have asked the editor how to back up the system with ghost. Next, let us learn the tutorial on how to back up the system with ghost. I hope it can help everyone. 1. After running Ghost, click "OK", as shown in the figure. 2. Click "Local" → "Partition" → "ToImage" (meaning: local → partition → to image file), as shown in the figure. 3. The Select Local Hard Disk window appears, click the hard disk where the partition to be backed up is located, and then click "OK", as shown in the figure. 4. The Select Source Partition window appears (the source partition is the partition you want to back up), click on the partition where the system is located (usually Zone 1, be sure to get it right), and then click "OK", as shown in the figure. 5. Play at this time
 How to install, uninstall, and reset Windows server backup
Mar 06, 2024 am 10:37 AM
How to install, uninstall, and reset Windows server backup
Mar 06, 2024 am 10:37 AM
WindowsServerBackup is a function that comes with the WindowsServer operating system, designed to help users protect important data and system configurations, and provide complete backup and recovery solutions for small, medium and enterprise-level enterprises. Only users running Server2022 and higher can use this feature. In this article, we will explain how to install, uninstall or reset WindowsServerBackup. How to Reset Windows Server Backup If you are experiencing problems with your server backup, the backup is taking too long, or you are unable to access stored files, then you may consider resetting your Windows Server backup settings. To reset Windows
 How to perform system backup and restore on Kirin OS?
Aug 07, 2023 pm 02:22 PM
How to perform system backup and restore on Kirin OS?
Aug 07, 2023 pm 02:22 PM
How to perform system backup and restore on Kirin OS? Kirin operating system is an open source operating system independently developed in China and is widely used in various scenarios. System backup and recovery is a very important task when using Kirin operating system. Backup systems can prevent data loss due to malfunctions or misoperations, while system recovery can quickly restore normal functionality in the event of a system crash. This article will introduce in detail how to perform system backup and recovery on Kirin operating system, and attach relevant code examples. Backing Up the System In order to backup the entire system we can
 GitLab's code base backup and recovery functions and implementation steps
Oct 20, 2023 pm 12:04 PM
GitLab's code base backup and recovery functions and implementation steps
Oct 20, 2023 pm 12:04 PM
GitLab is an open source code hosting platform that provides rich features, including code base backup and recovery. Code base backup is one of the important steps to ensure the security of the code and it can help us recover the data when unexpected things happen. This article will introduce GitLab's code base backup and recovery functions, and provide corresponding implementation steps and code examples. GitLab's code base backup function GitLab provides two types of backup: incremental backup and full backup. Incremental backup: Incremental backup means backing up only the latest changed data
