

10 Ways to Adjust Brightness on Windows 11

Screen brightness is an integral part of using modern computing devices, especially when you look at the screen for long periods of time. It helps you reduce eye strain, improve legibility, and view content easily and efficiently.
However, depending on your settings, it can sometimes be difficult to manage brightness, especially on Windows 11 with the new UI changes. If you're having trouble adjusting brightness, here are all the ways to manage brightness on Windows 11.
How to Change Brightness on Windows 11 [10 Ways Explained]
Single monitor users can use the following methods to adjust brightness on Windows 11. This includes desktop systems using a single monitor as well as laptops. let's start.
Method 1: Use Action Center
Action Center is the easiest way to access and adjust your computer's brightness.
Press to launch Action Center. You can also click the taskbar icon in the lower right corner of the screen. Windows A
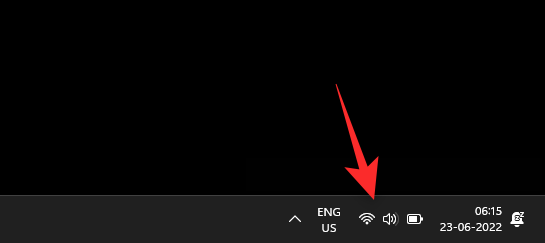
Now click on the slider and adjust the screen brightness as per your requirement.
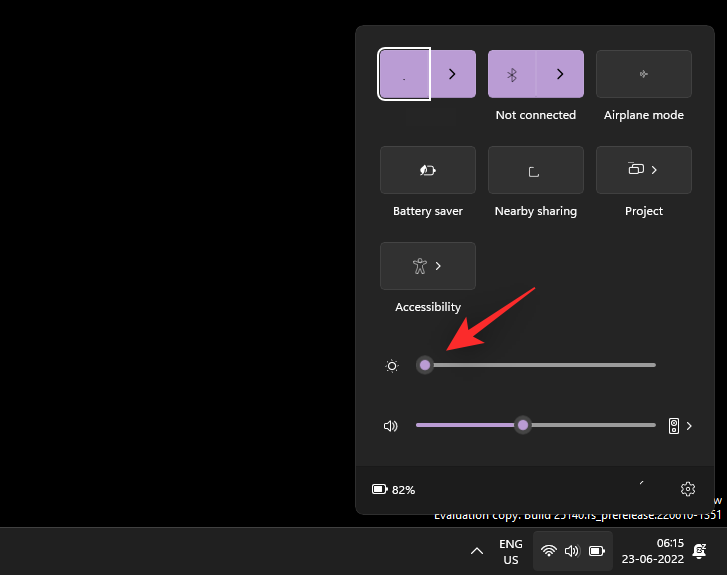
Now you will adjust the brightness from the Action Center.
Method 2: Use Keyboard Hotkeys
If you are using a keyboard with dedicated hotkeys, you can use the same hotkeys to adjust the brightness. This mainly applies to laptops and third-party keyboards.
Look for the brightness icon on your keyboard. Most keyboards have the keypad located in the Function or Fn keys, while third-party keyboards may have dedicated keys on the top.
Just use these keys to adjust the brightness. If you are a laptop user, you will most likely need to use a combination to adjust the brightness. This is because the key will act as a function key unless a dedicated Fn key is used as a modifier to use its alternate function. Fn Brightness key
If you wish, you can change this behavior on Windows using the Fn Lock feature on most keyboards.
Fn lock is usually activated by or . If you have this feature, you can use these combinations to quickly change the function of the function keys. Fn Caps LockFn Esc
However, if your keyboard does not have Fn Lock functionality, you must continue to use the dedicated key combinations on your keyboard to control brightness.
Method 3: Use dedicated monitor controls
If you can't access the brightness slider in Action Center, it might be because you're using an external monitor.
Unless your external monitor comes with a dedicated driver or utility, Windows cannot control brightness using built-in utilities.
In this case, you will have to use your monitor's OSD to change and adjust its brightness. Most monitors will use the following terms in their OSD for brightness settings.
- Brightness
- Backlight
- Backlight Intensity
##Note: If your monitor has both "Brightness" and "Backlight" options, then Backlight will help you adjust the actual brightness of your monitor. In contrast, the Brightness option will adjust the Gamma of the PC display output.
Here are some common monitor OEMs and their dedicated apps to help you control monitor brightness and more. Use any of the links below, depending on the monitor's OEM.- LG Company| Link
- Samsung| Link
- ASUS| Link
- Acer| Link
- AOC Company| Link
- GIGABYTE| Link
- BenQ| Link
- Alien| Link
- MSI| Link
- ViewSonic| Link
- Dell| Link
- Lenovo| Link
 ##Do.
##Do.
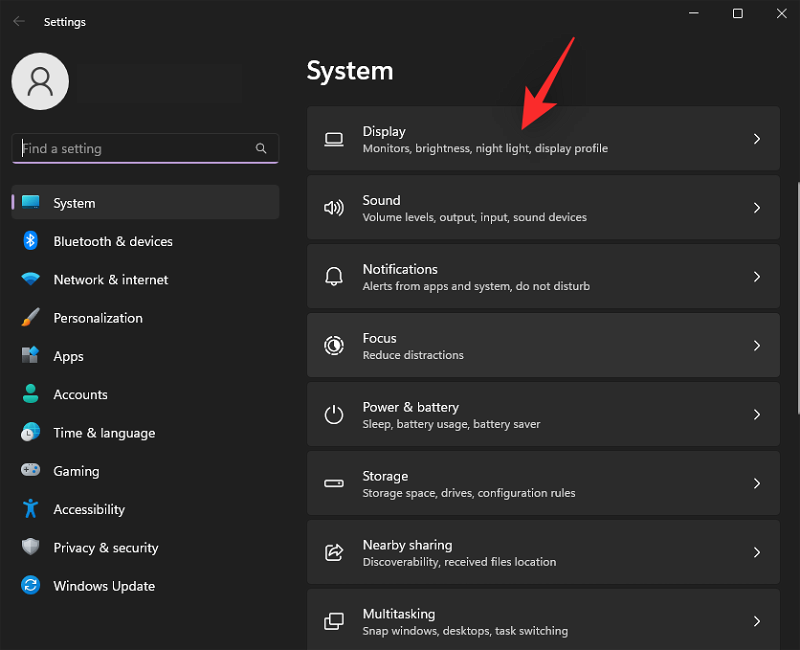
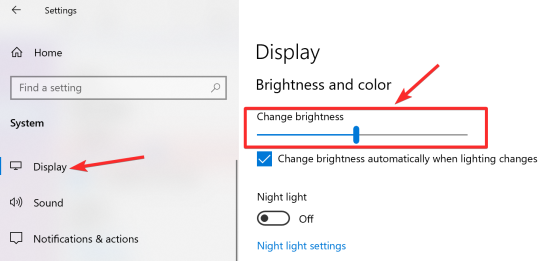
Method 4: Use the Settings app
You can also use the Settings app to adjust brightness in Windows 11. Please follow the guide below to help you through the process.
Press and click
to display. Windows i<p><img src="/static/imghw/default1.png" data-src="https://img.php.cn/upload/article/000/465/014/170288051542756.png" class="lazy" alt="10种在 Windows 11 上调整亮度的方法"></p>
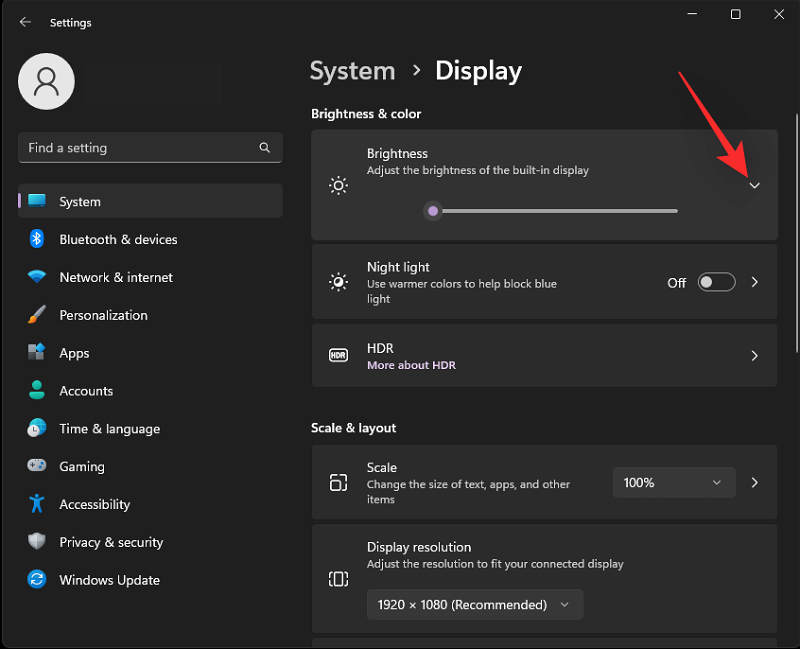
<p>Now adjust the "<strong>Brightness</strong>" slider under "Brightness<strong> and Color</strong>". </p>
<p><img src="/static/imghw/default1.png" data-src="https://img.php.cn/upload/article/000/465/014/170288051552417.png" class="lazy" alt="10种在 Windows 11 上调整亮度的方法"></p>
<p>You will now adjust the brightness from the Settings app. </p>
<h3 id="Method-Use-PowerShell">Method 5: Use PowerShell</h3>
<p>If you're having driver issues or can't access the brightness slider, you can try using PowerShell commands to adjust the brightness on your PC. Let's take a quick look at the process. </p>
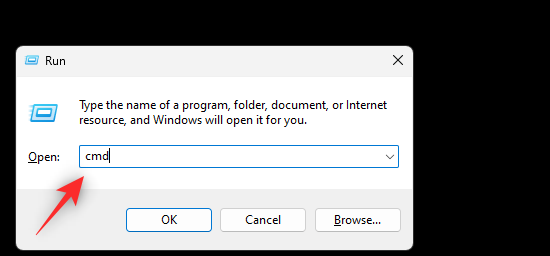
<p>Press to start <strong>Run</strong>. <code>Windows R
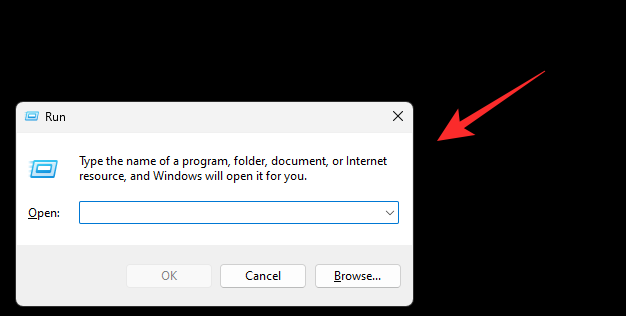
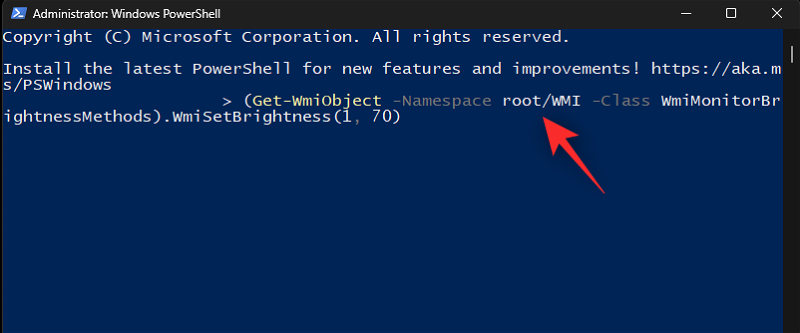
Enter the following command and press the keyboard. Ctrl Shift Enter
powershell

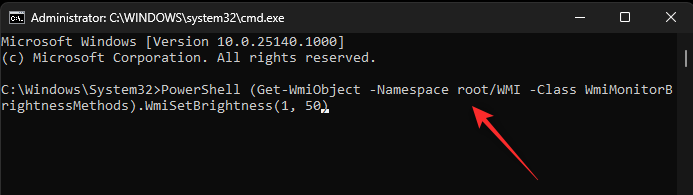
BrightnessValue with a number between 1 and 100. One is the lowest brightness level supported by the monitor, while 100 is the highest.
(Get-WmiObject -Namespace root/WMI -Class WmiMonitorBrightnessMethods).WmiSetBrightness(1, BrightnessValue<strong>)</strong>
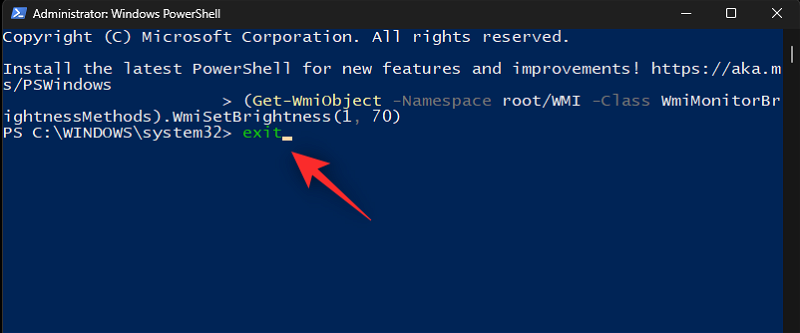
exit
Windows R
Ctrl Shift Enter
cmd
Note: If you are in a recovery environment , you can press the keyboard to start CMD as administrator. Shift F10
BrightnessValue with a number between 1 and 100. One is the lowest brightness value supported by the monitor, while 100 is the highest.
PowerShell (Get-WmiObject -Namespace root/WMI -Class WmiMonitorBrightnessMethods).WmiSetBrightness(1, BrightnessValue<strong>)</strong>
exit
Move Center. Windows
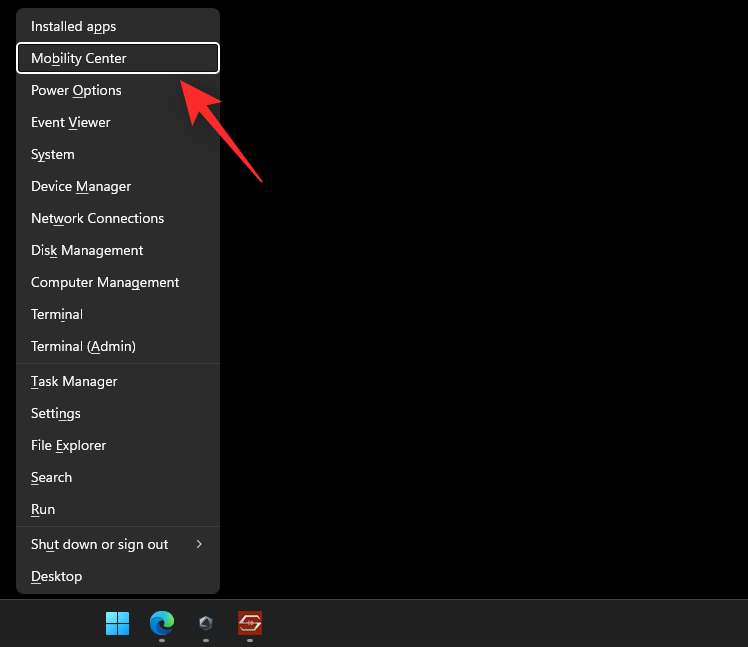 That's it! You will now use Mobility Center on Windows 11 to change screen brightness.
Method 8: Using the graphics card panelYou can also use the graphics control panel provided by the graphics card OEM to control the brightness of the monitor. Follow one of the following sections, depending on your graphics card manufacturer.
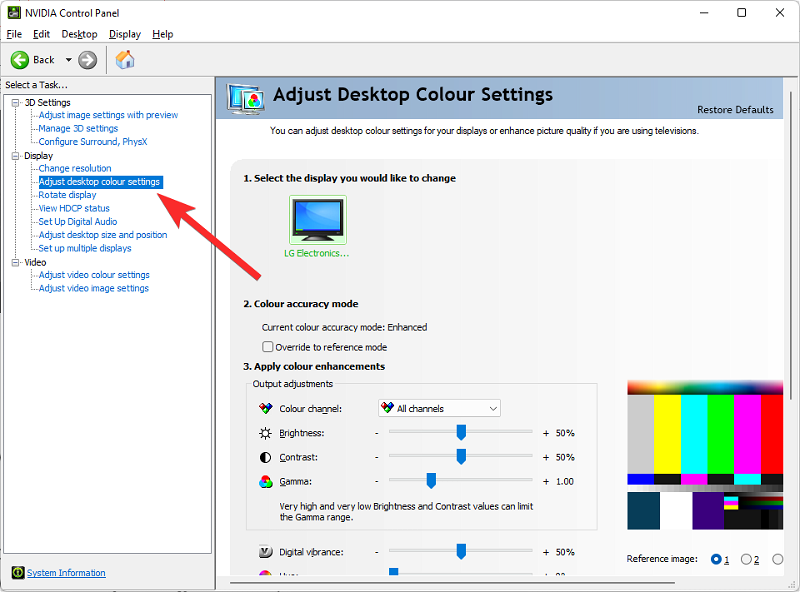
For Nvidia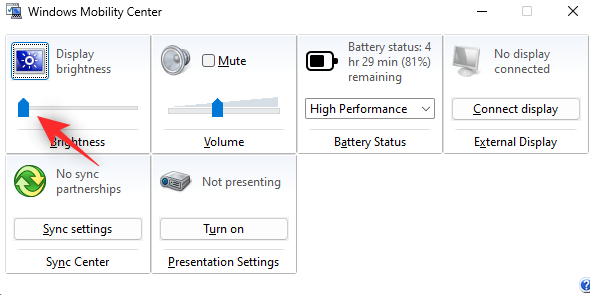
Now, under "Display", click "Adjust desktop color settings".
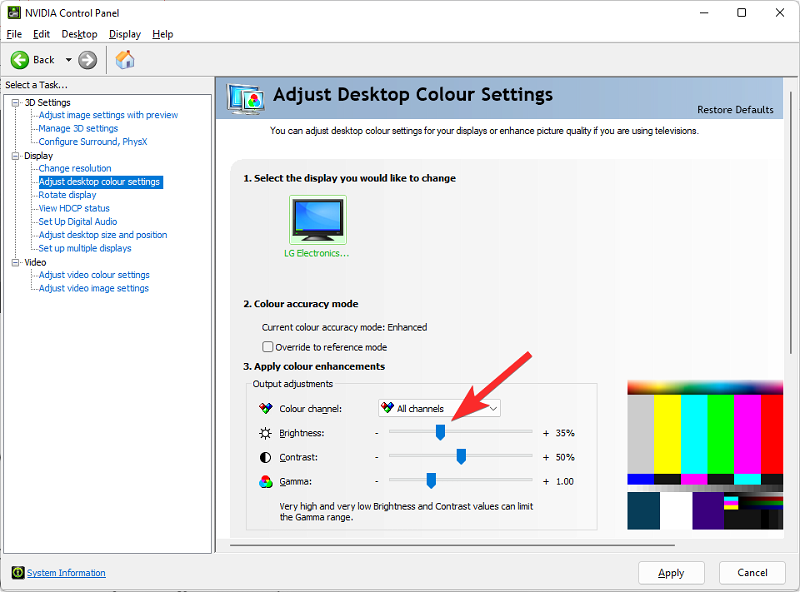
Now adjust the brightness slider to adjust the monitor brightness.
Once you are satisfied with your settings, click Apply.
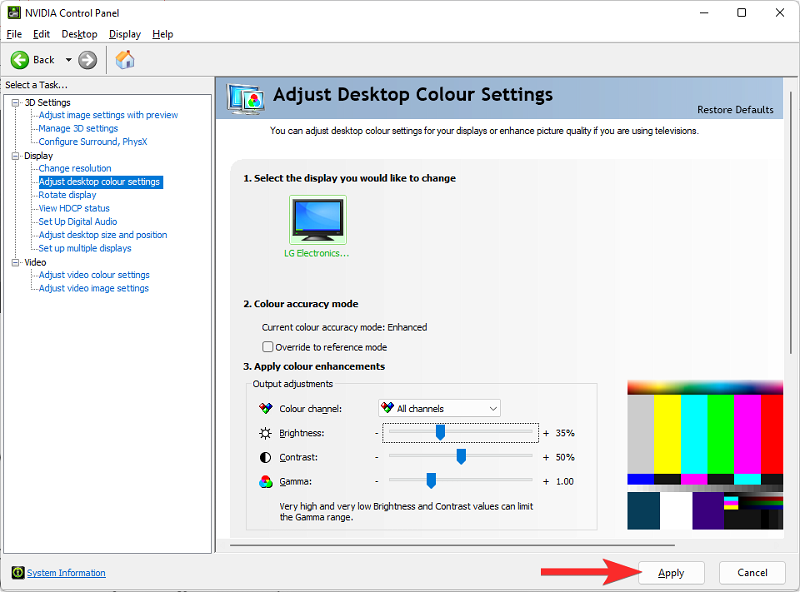
That's it! You will now change the brightness from the Nvidia Graphics Control Panel.
For AMD Catalyst Center
Make sure you have the AMD Catalyst Control Center software installed on your PC. If not, get it from here. Launch AMD Catalyst Control Center from the Start menu. Now click on "DesktopManage" on the left and select "Desktop Color". If your monitor says "Digital Flat Panel Monitor," click on the monitor and select Display Color (Digital Flat Panel Monitor).
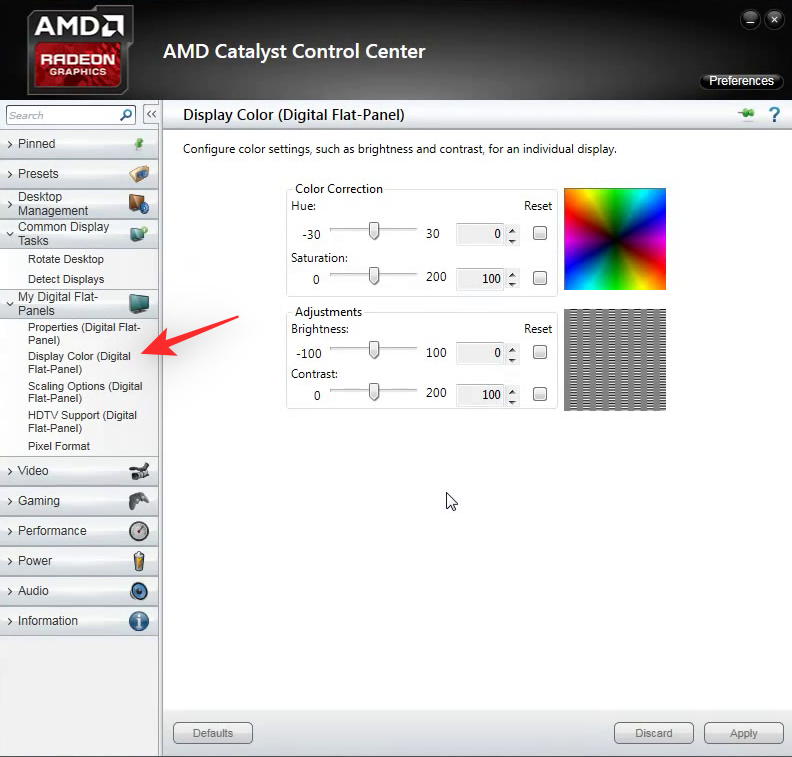
You will now have a brightness slider for your current monitor on the right. Use it to adjust the brightness on your PC as needed.
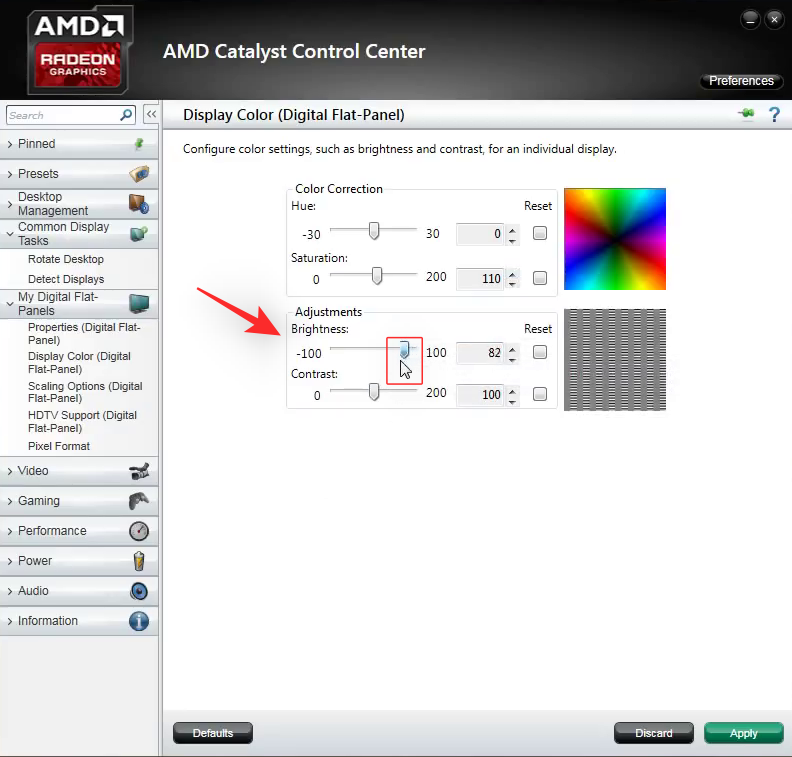
Click Apply.
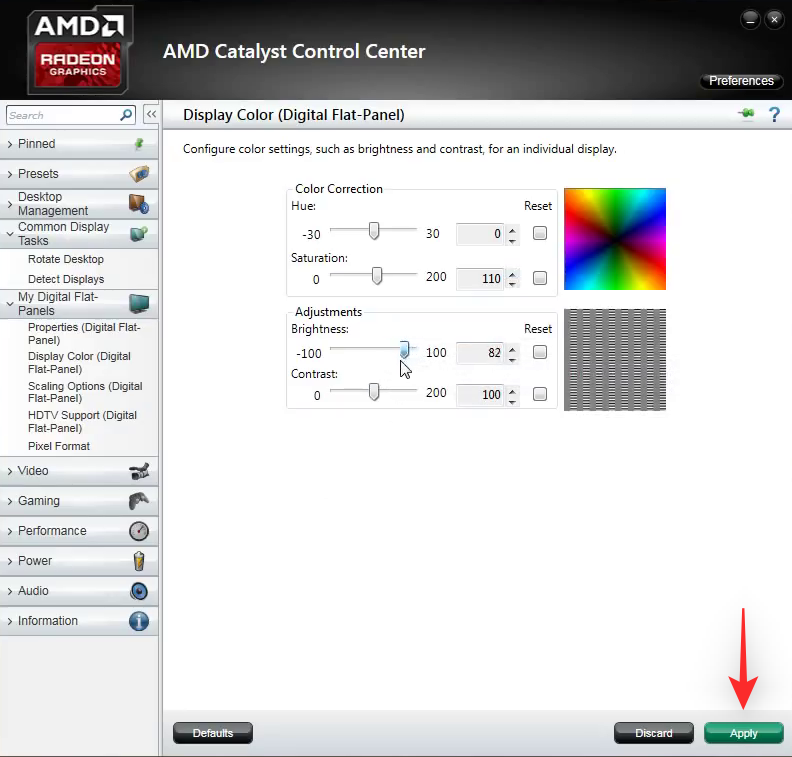
You will now adjust the brightness using AMD Catalyst Center.
For AMD Radeon Settings
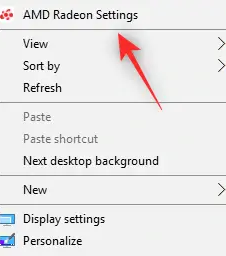
Right-click an empty area of the desktop and select AMD Radeon Settings.
Now click "Show ".
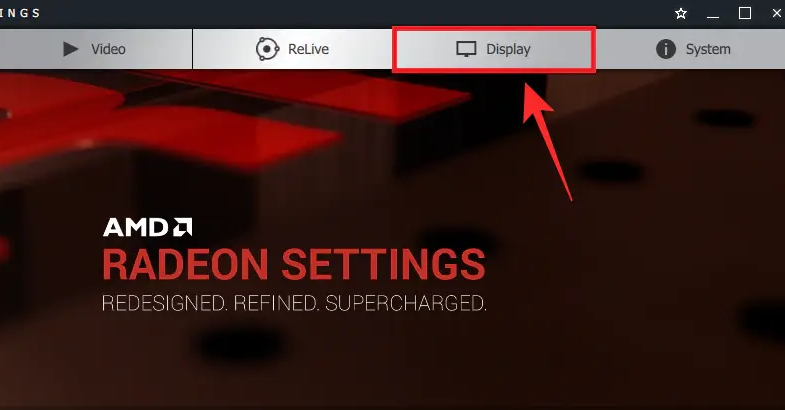
Now you will see all the output monitors connected to your PC. Click on the color of the relevant display .
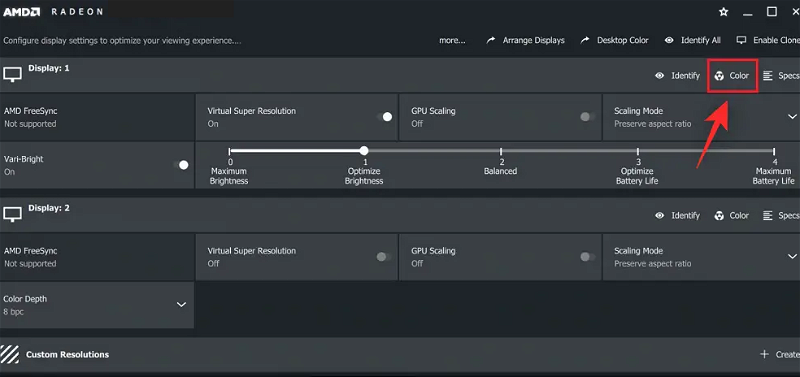
Now use the brightness slider to adjust the brightness as desired.

You can now turn off AMD Radeon settings and continue working if you wish.
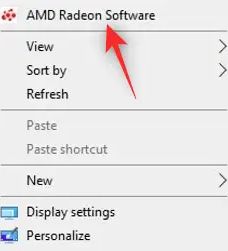
For AMD Radeon Software
Right-click on your desktop and select the same AMD Radeon Software.
Click the gear (
Failed to collect, please handle it manuallyhttps:// lh3.googleusercontent.com/p3J-ZSPOLtuBBR_ofWTFDfdgAYQgi8mR5c76ie8XQ2wjegk7-yyU5zdRVHKybQgUlQ=w36-h36?width=200) icon.
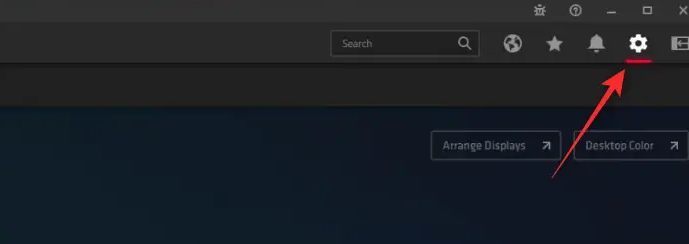
Click "Show ".
Now use the Brightness slider under Custom Color to adjust the brightness
.
NOTE:
The Intel Graphics Control Center allows you to adjust the brightness of the overall display signal received by your monitor. This means if you go too far it can mess up your color settings. We recommend that you pay close attention to your overall color when adjusting brightness using the Intel Graphics Control Center.- Intel Graphics Control Center | Download Link
Use the link above to download and install Intel Graphics Control Center on your PC. You will be redirected to the Microsoft Store. Just click"Install
" to install the same on your PC.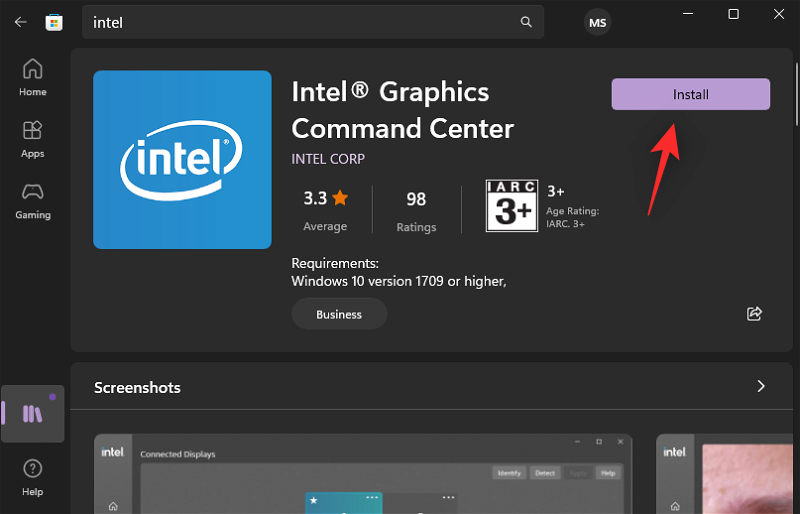
Now launch the Intel Graphics Control Center from the Start menu and click "Show " on the left.
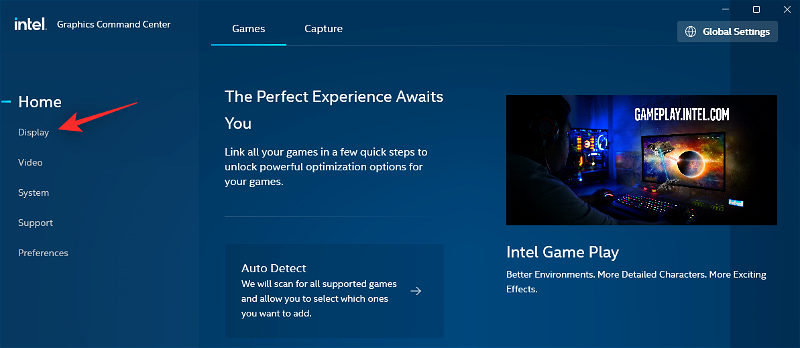
Click "Color".

Now use the slider next to "All Colors" under "Brightness Enhancement" to adjust the display brightness.
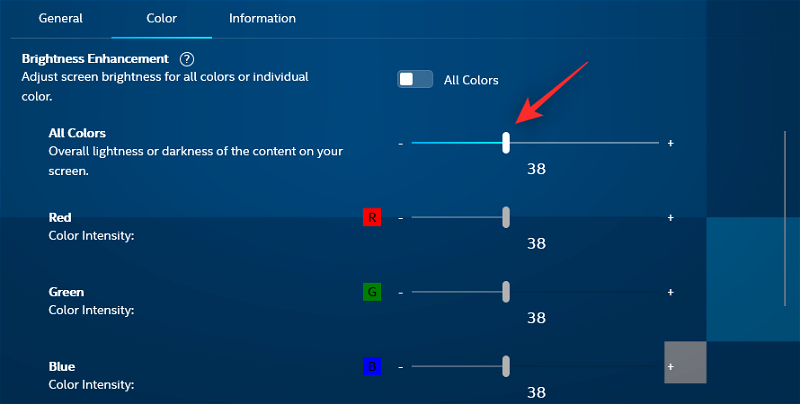
Note: This is the recommended way to adjust the brightness of your monitor to avoid messing up the colors. However, if your monitor's color profile does not match this setting, you can adjust the individual brightness of the RGB by disabling the toggle for "All Colors".
Once you are satisfied with the brightness of your monitor, you can close the Intel Graphics Control Center on your PC.
Method 9: Use a third-party application
As a last resort, you can try using a third-party application on your PC to adjust the brightness. We recommend the following apps that can help you adjust brightness easily.
Please note that some of these apps may affect your display colors rather than their backlight values. In this case, you can choose other utilities in case it doesn't help your display.
- Win10 Brightness Slider | Download Link
- Click Monitor DDC |Download Link
- Dimming Device |Download link
- Ganmi |Download link
- Brightness Tray |Download Link
- CareUEyes |Download Link
Method 10: Automatically let Windows adjust brightness
You can also let Windows automatically adjust the brightness of the display based on your current ambient light. This feature is primarily available on laptops and all-in-one PCs with built-in light sensors.
We recommend checking your PC documentation for more information. Follow these steps to enable and use auto-brightness on Windows 11.
Press and click to display . Windows i
Now expand Brightness by clicking the arrow next to it.
Check the "Automatically change brightness when lighting changes" box.
You can also check the "Help improve battery by optimizing the content and brightness of the display" box. This option will allow Windows to automatically optimize the brightness on your computer based on what is displayed on the screen.
Close the Settings app and Windows 11 should now be able to automatically manage the brightness on your computer.
Tips for changing brightness on Windows 11 When multiple monitors
If you have a multi-monitor setup, you have few options when it comes to managing brightness across all monitors. You can use the OSD and dedicated keys on your monitor, or you can choose a third-party utility to help you. Please follow any of the sections below based on your current preferences and requirements.
Tip 1: Use the dedicated monitor keys
Most external monitors come with a built-in OSD display that allows you to access the monitor's features and adjust its display output. This OSD can be accessed using a dedicated key on the monitor or its dedicated remote control.
Launch the OSD on your monitor and look for a slider or value named one of the following.
- Brightness
- Brightness
- Backlight
Once found, adjust its value to increase or decrease the brightness of the display.
This is the recommended way to increase the brightness of your monitor without dealing with errors and unwanted artifacts.
Your monitor can also have a dedicated OEM utility that helps you manage its brightness, color space, and more. Use the link below to help you check if it is the same.
- LG Company| Link
- Samsung| Link
- ASUS| Link
- Acer| Link
- AOC Company| Link
- GIGABYTE| Link
- BenQ| Link
- Alien| Link
- MSI| Link
- ViewSonic| Link
- Dell| Link
- Lenovo| Link
However, if you Having a monitor that does not have a built-in OSD or brightness settings, then you can use one of the third-party apps mentioned below to adjust the brightness of your monitor.
Tip 2: Use third-party apps
We recommend using the following apps to adjust brightness for multi-monitor setups. Our top picks are Monitorian and Dimmer. Both apps are suitable for multi-monitor setups and have built-in support for most screens currently on the market.
Monitorian is our top choice because the tool can connect directly to your monitor's backlight and adjust its brightness. On the other hand, if no compatible driver is found, the dimmer will resort to adjusting brightness and gamma to increase or decrease brightness. Use the links below to download and test the apps and find the one that works best for your current setup.
- Monitor |Download link
- DimmerDownloader |Download link
- Pangobright |Download link
- Click on the monitor DDC |Download Link
Note: ClickMonitorDDC is a long-established application that has been used by users worldwide to adjust their monitors. However, the app hasn't been updated in a while, and a known bug appears to be slowing down its performance on Windows 11. If you encounter this error, simply close the tool's Reread the values to fix it.
- Twinkle Tray |Download Link
Why is my brightness slider gray?
There may be several reasons why the brightness slider on your computer is grayed out or missing. The most common ones are listed below.
Third-Party Monitor
If you are using an external third-party monitor, you most likely adjusted its brightness using its OSD and dedicated keys. You may also have a remote control for easy access to the OSD on your monitor.
This is a good reason why the brightness slider is not showing up in Windows. We recommend that you try adjusting the brightness using the dedicated keys on your monitor.
Your OEM may also have a dedicated Windows utility that can be used to manage OSD settings in Windows. We recommend that you check the OEM's support website for more information.
GPO Restrictions
Some computers may have Group Policy restrictions that prevent them from adjusting monitor brightness from within Windows. This typically applies to computers issued or managed by an organization.
Some organizations prefer to block brightness adjustments on older computers to prevent exploits from being used on their systems. If you have administrator access on your PC, you can use the next section to disable this restriction accordingly.
Regedit Limitations
You can also use the Registry Editor to limit brightness adjustments. Ideally, this shouldn't happen to your PC, but if it was or is managed by an organization, this may be the case for you.
Also, if you have installed a third-party program or OEM utility that can edit registry settings, then this may also be the reason why you cannot use the brightness slider. You can use the dedicated section below to fix it.
How to fix gray brightness slider Windows 11
You can use the following fixes to fix gray brightness slider in Windows 11. let's start.
Method 1: Using a Dedicated Key
As mentioned above, if your monitor has a dedicated menu key with a built-in OSD, then we recommend that you use the same menu key to adjust the brightness. Brightness will be labeled in your OSD as one of the following terms.
- Brightness
- Brightness
- Backlight
Many older monitors are limited to the OSD when it comes to adjusting the color and brightness of an image. This is probably the main reason why you can't use the brightness slider. At this point, using the dedicated keys to adjust the brightness is the only option.
Method 2: Check GPO Settings
If you suspect that brightness adjustments are restricted using Group Policy Editor, you can use the following steps to check and enable brightness adjustments.
Press the keyboard to start running. Windows R

Now enter the following and press Enter. If necessary, you can also click OK.
gpedit.msc
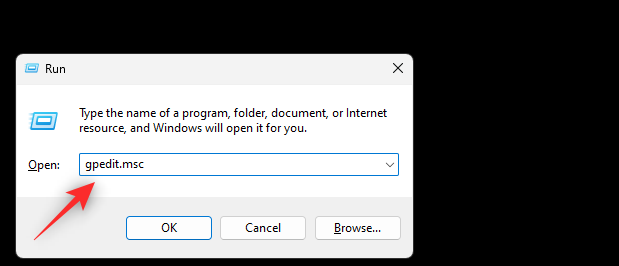
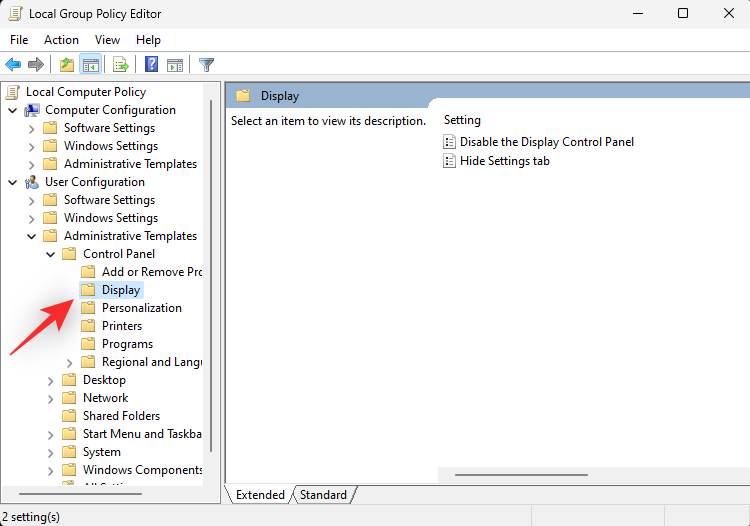
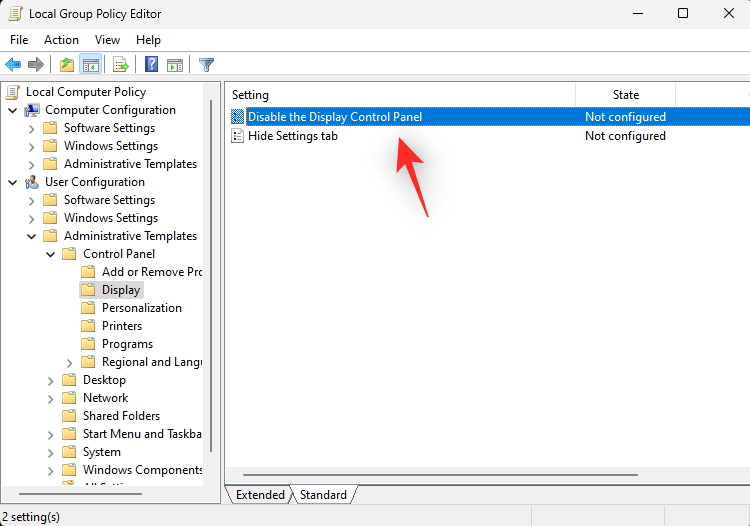
Use the left sidebar to navigate to the following location.
User Configuration > Administrative Templates > Control Panel > Display
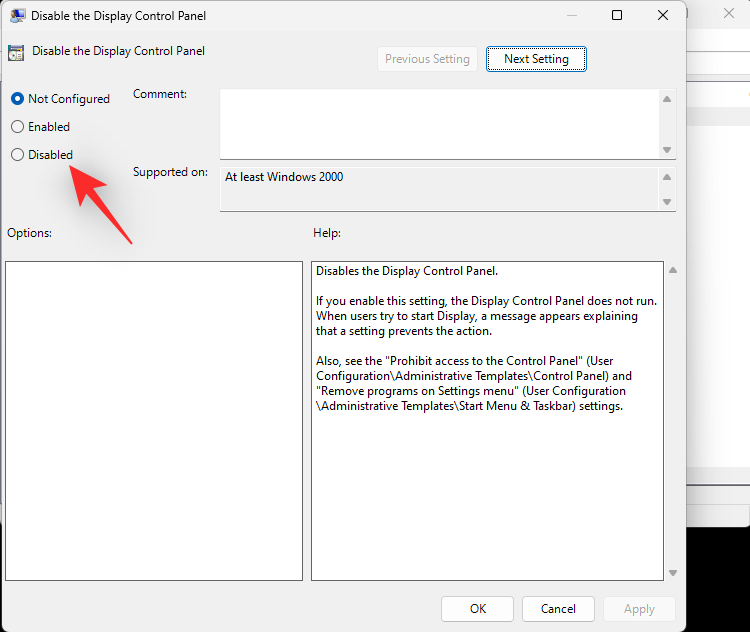
Disable display of the control panel.
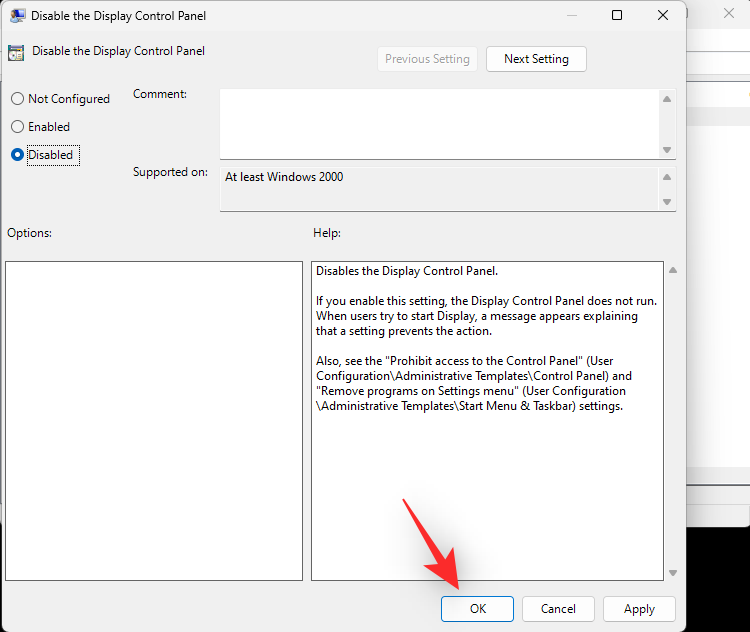
"Disabled".
"OK".
Restart your PC for good measure. If GPO restrictions prevented you from adjusting the brightness on your PC, the problem should now be resolved.
Method 3: Check the Registry Settings
You can also check the Registry settings to see if the display brightness adjustment is disabled. Use the following steps to help you through the process.
Press to start running. Windows R
Type the following and press Enter. If necessary, you can also click OK.
regedit
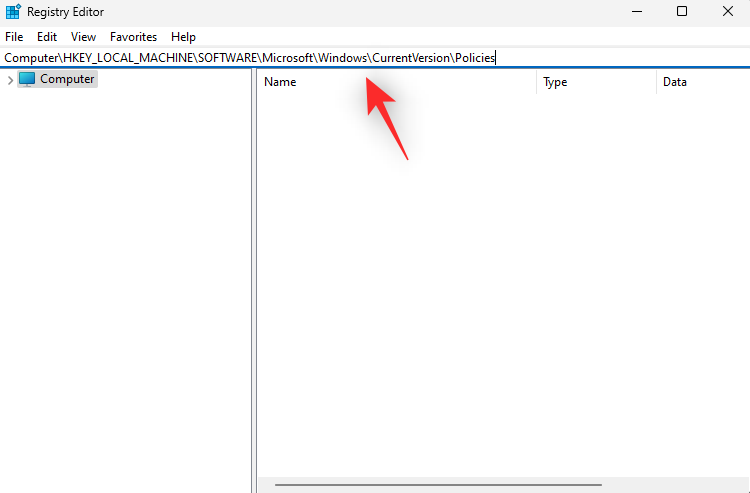
Now use the left sidebar to navigate to the following path. You can also copy and paste it into the address bar at the top.
Computer\HKEY_LOCAL_MACHINE\SOFTWARE\Microsoft\Windows\CurrentVersion\Policies
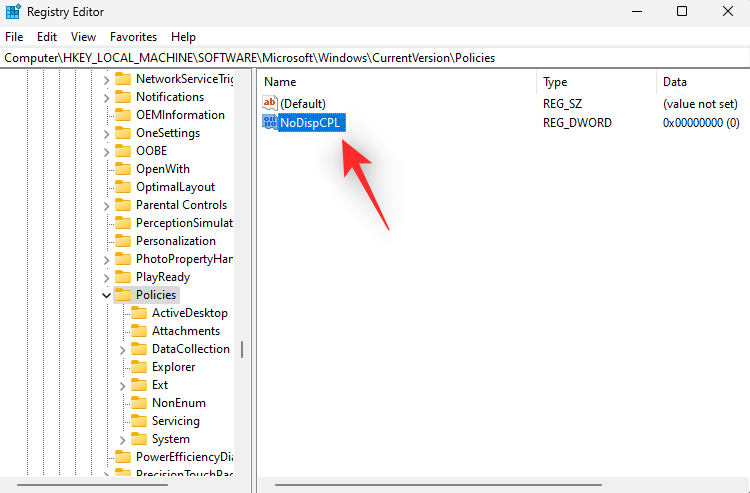
Double-click on the right side named NoDispCPL DWORD value.
Enter 0 as its numeric data: to disable brightness limiting.
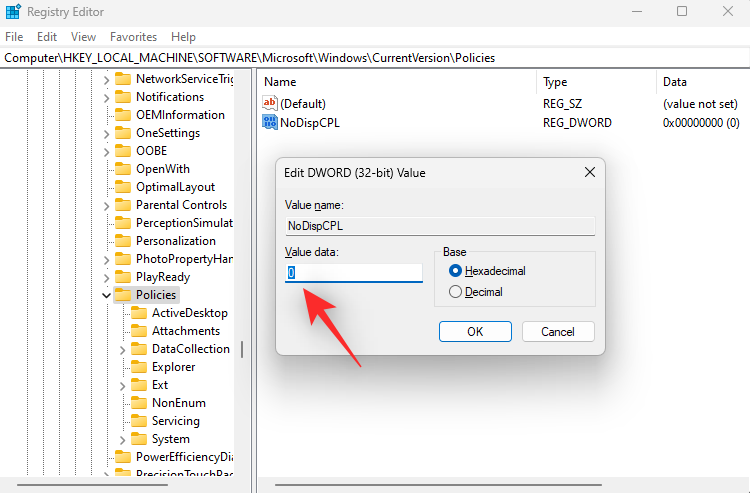
Click "OK".
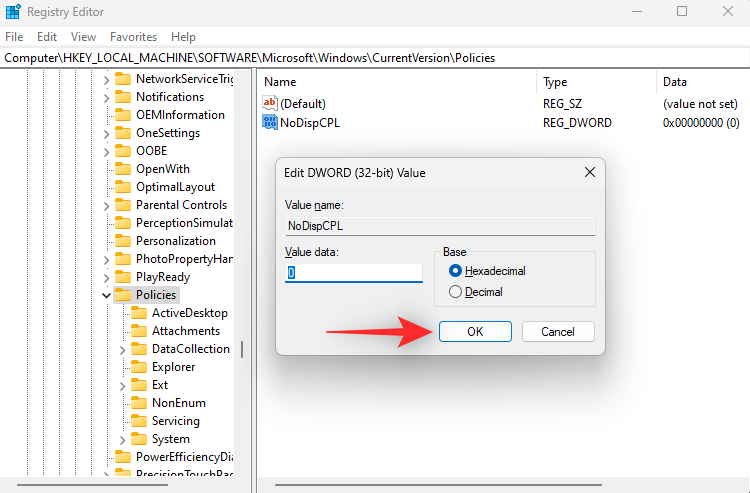
Close Registry Editor and restart your PC. If a restriction in the registry value prevents you from adjusting the brightness, the issue should now be resolved on your system.
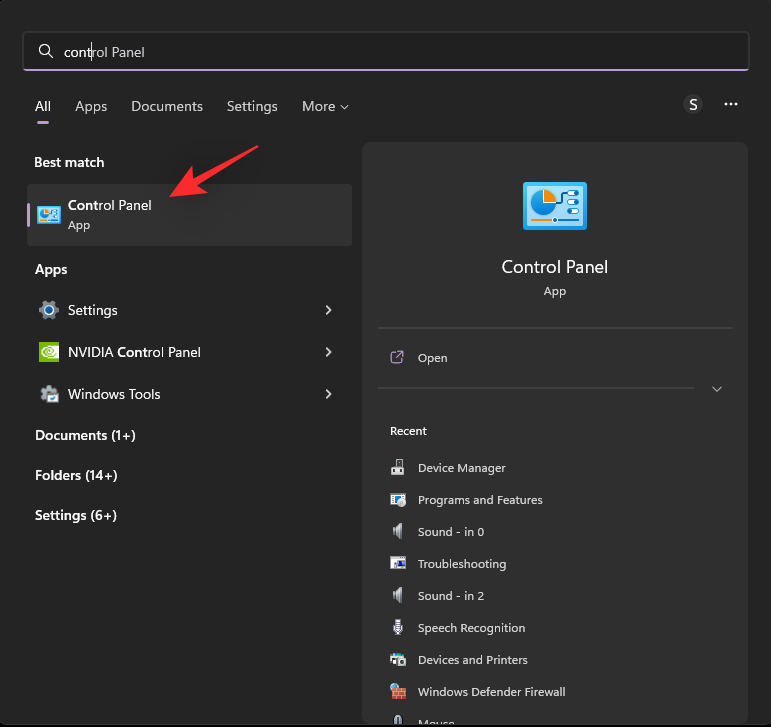
Method 4: Uninstall Teamviewer
If you are a TeamViewer user, it is a known utility that causes brightness adjustment issues on several systems. Uninstalling it will help you resolve this issue, here’s how you can do the same on PC.
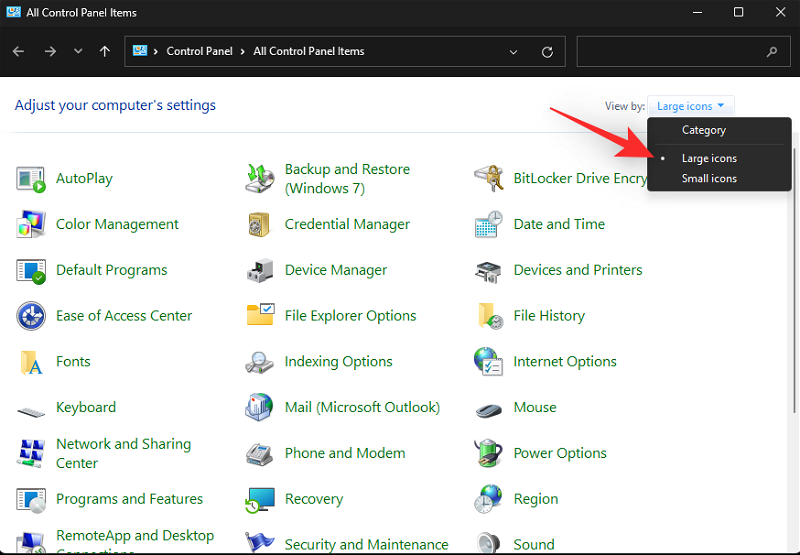
Launch the Start menu, search "Control Panel" and launch the same menu from the search results.
Click the drop-down menu in the upper right corner and select Large Icon.
Click "Programs and Features".
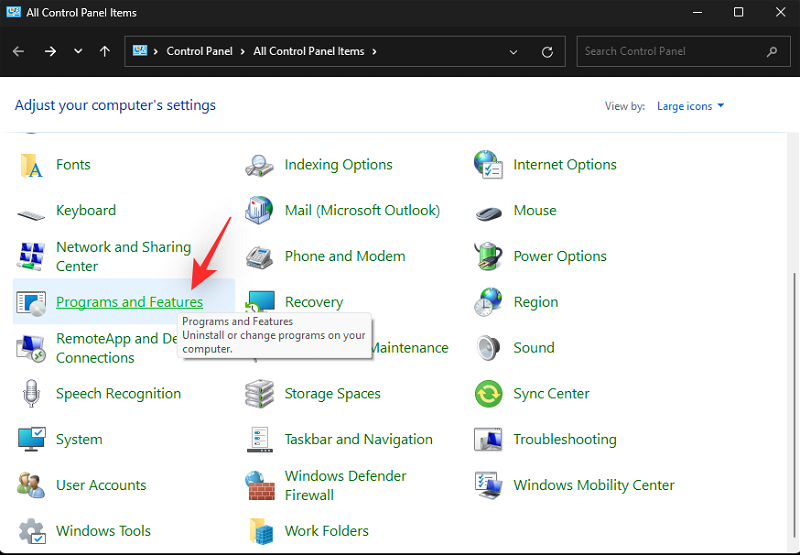
Now you will see the list of programs and utilities installed on your PC. Click and select TeamViewer from the list.
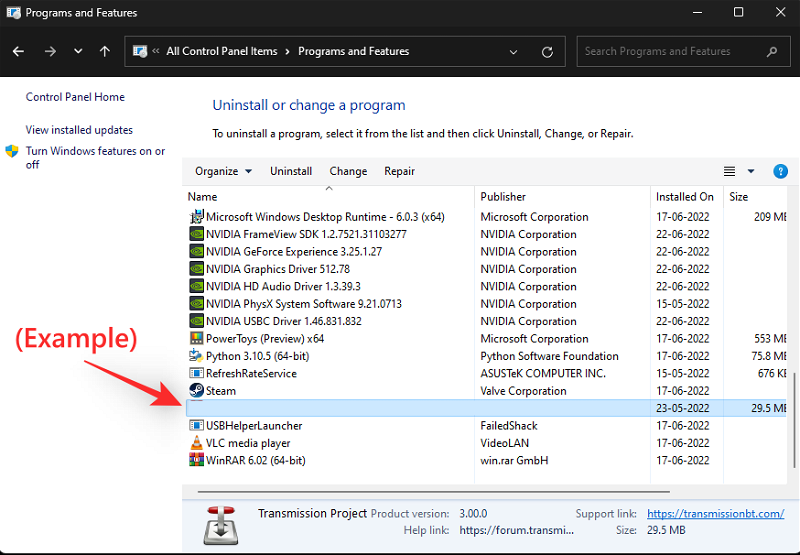
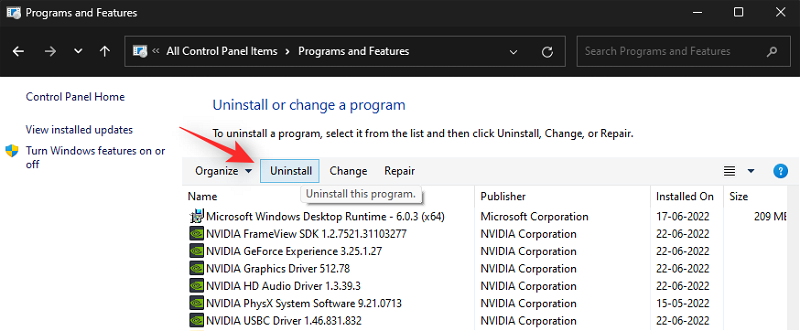
Click Uninstall at the top.
#Now, follow the on-screen instructions to uninstall TeamViewer from your PC. Once completed, restart your PC. If it is a TeamViewer error that is causing PC brightness issues, then you should fix it now.
Method 5: Update the monitor driver
You can also try updating the monitor driver. Microsoft uses universal drivers for most monitors connected to a PC. These drivers are very comprehensive, but can sometimes cause problems on high-end monitors with specialized features that require specialized drivers.
We first recommend that you check the OEM website for specific drivers for your monitor. However, if your monitor does not have a dedicated driver, then you can try updating the driver manually using the following guide.
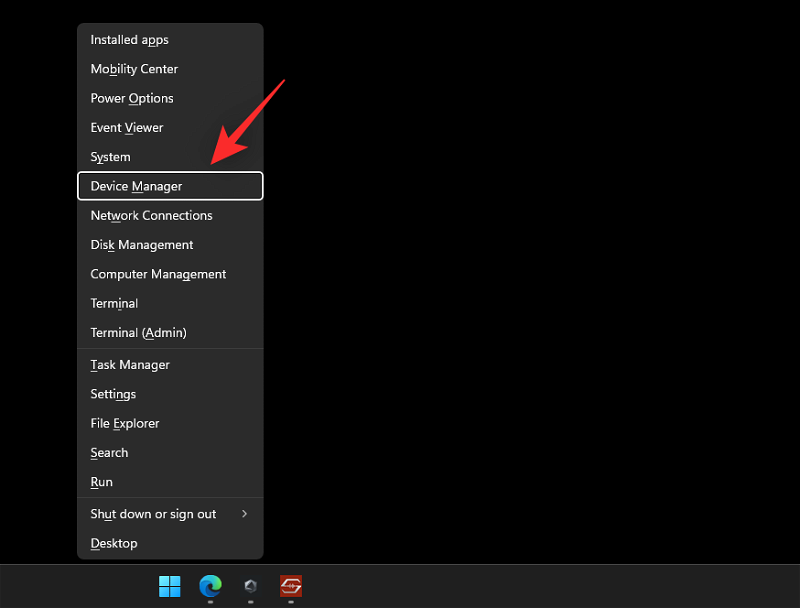
News and select Device Manager. Windows X
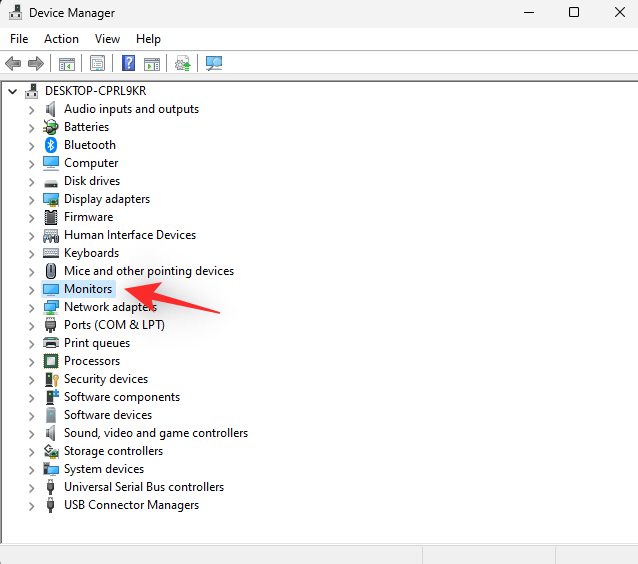
Double-click Monitors.
Double-click the monitor below the same.
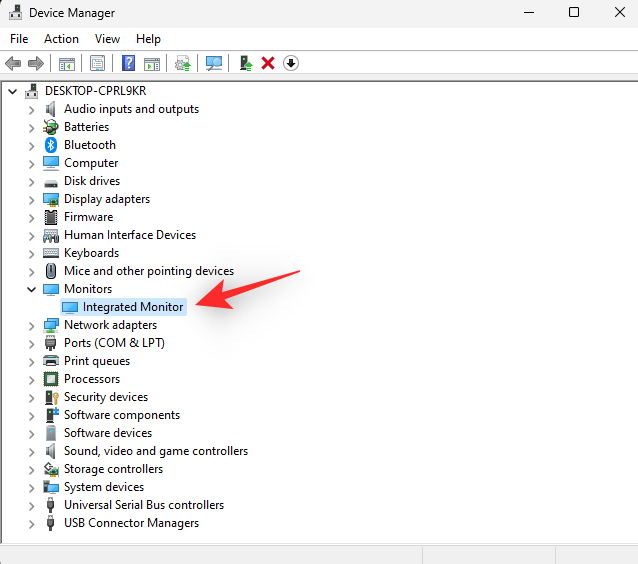
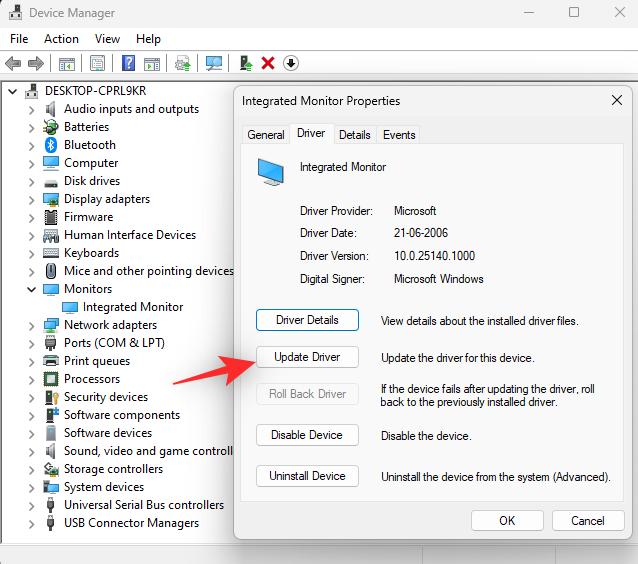
Click and switch to the "Driver" tab.

Now click Update Driver.
Click and select Search automatically for drivers.
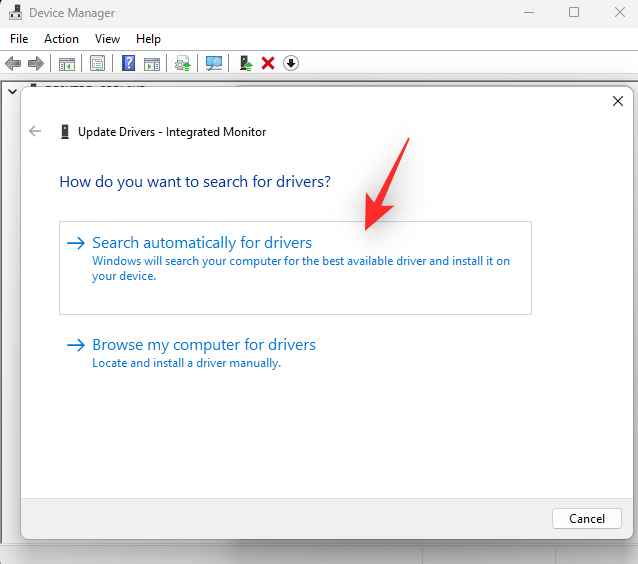
Windows will now search for and install the best driver for your monitor. Click Close when finished.
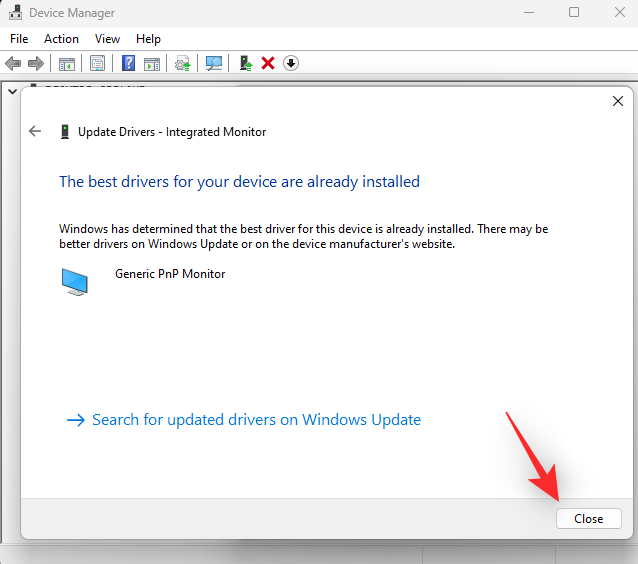
#If Windows is able to update your monitor's driver, restart your PC for good results. However, if the driver is not found, you can move to the next step below.
Method 6: Reinstall your monitor
You can also reinstall your monitor to fix background conflicts and errors with the driver used by your monitor. Please follow the guide below to help you through the process.
Press and click Device Manager. Windows X
Now double click on Monitor.
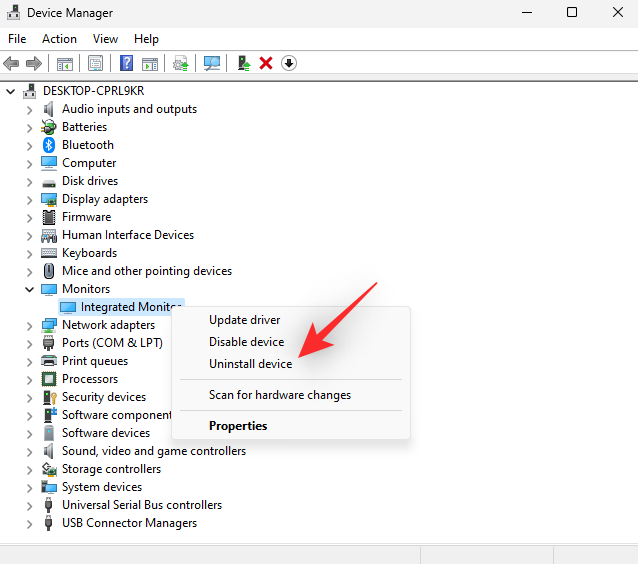
Right click on the monitor below the same.
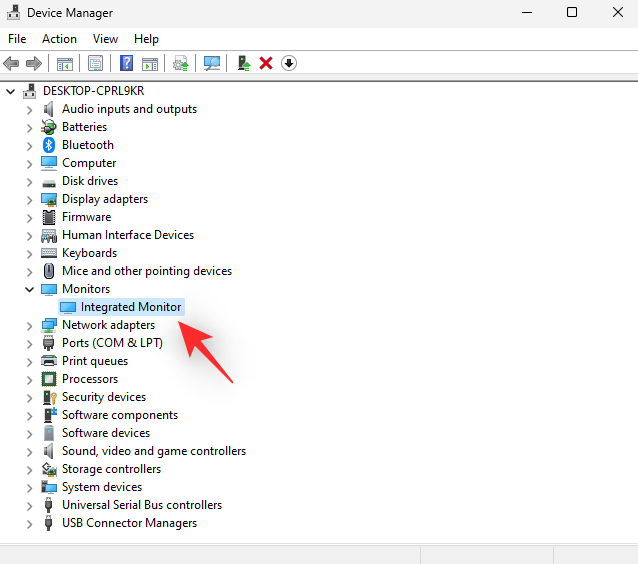
Select Uninstall device.
Click "Uninstall" to confirm your choice.
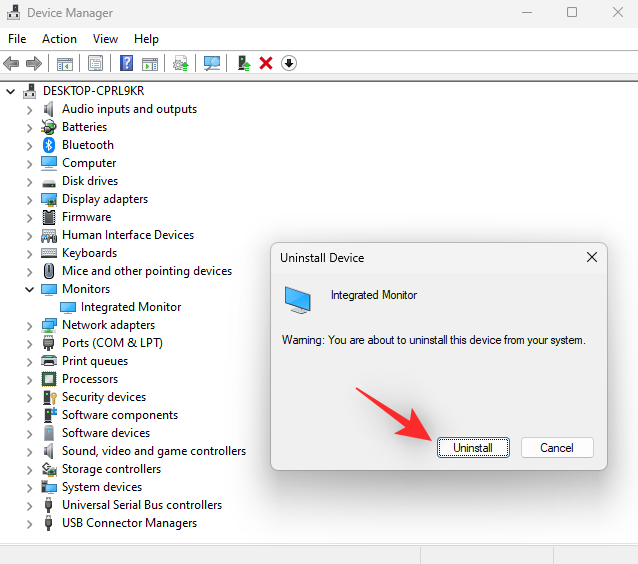
#The monitor will now be uninstalled from your PC. Don't worry, you will still have a display signal. Once done, click the Scan for Hardware Changes icon at the top.
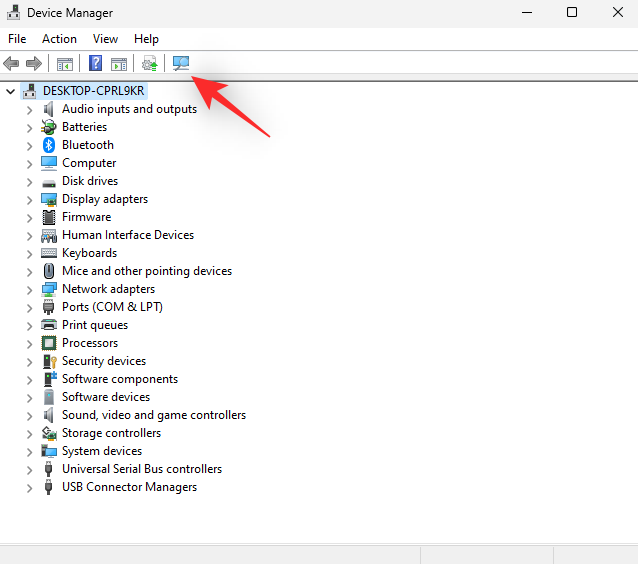 That's it! Windows will now reinstall your monitor.
 #If a background driver conflict prevented you from accessing the brightness slider on your PC, this issue should now be fixed.
Method 7: Restart the Display Enhancement Service
At this point, as a last resort, you can try to restart the Display Enhancement Service in Windows. Windows 11 is designed with background display management services and tools in mind. The service helps watch DRM content, stream HDR videos, and automatically adjust video settings and color profiles based on the content playing on your PC.
While powerful, they sometimes conflict with monitors that have similar functionality built into them. Restarting the Display Enhancement Service can help resolve the same issue. Use the guide below to help you through the process.
Press to start
Run. Windows R
Type the following and press Enter. You can also click
.
services.msc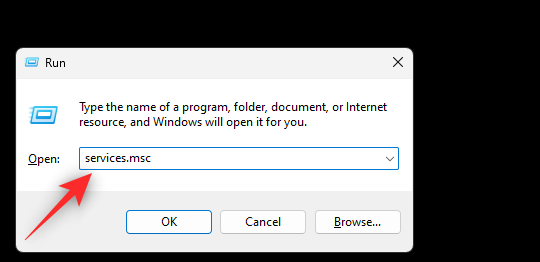 Now, find
in the list on the screen and then Right click on it.
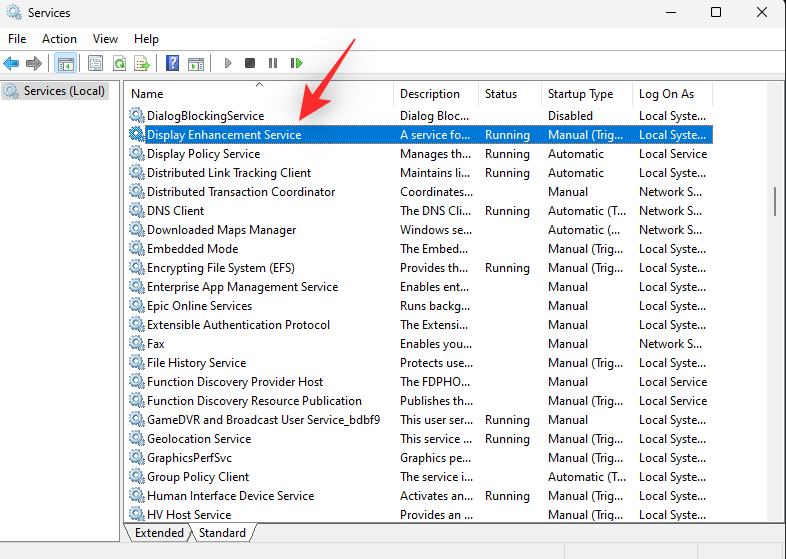 Select
" from the context menu.
 After restarting the service, try accessing the brightness slider again. If Windows 11 background conflicts are the cause of your issues, they should be fixed on your system now.
How to toggle display dimming when your PC is low on battery
If you are experiencing dim display or brightness issues when your PC is low on battery with power saver mode turned on, then this is Since Windows 11 is designed to manage battery life on your device. You can disable this feature for better legibility and visibility, but at the cost of extra power usage. Please follow the guide below to help you through the process.
Press and click
Power and Battery. Windows i
 Click and expand
.
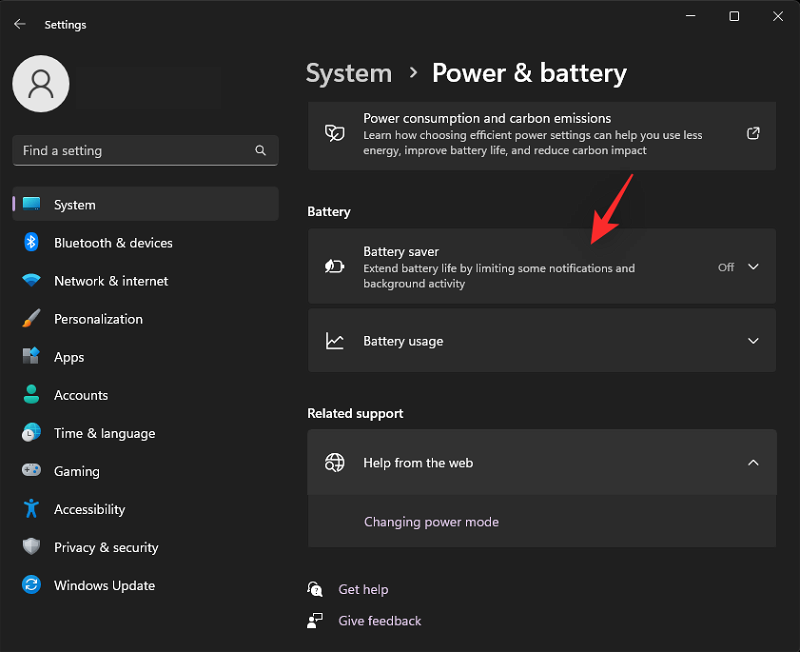
Now turn off the toggle switch Reduce screen brightness when using power saver mode.
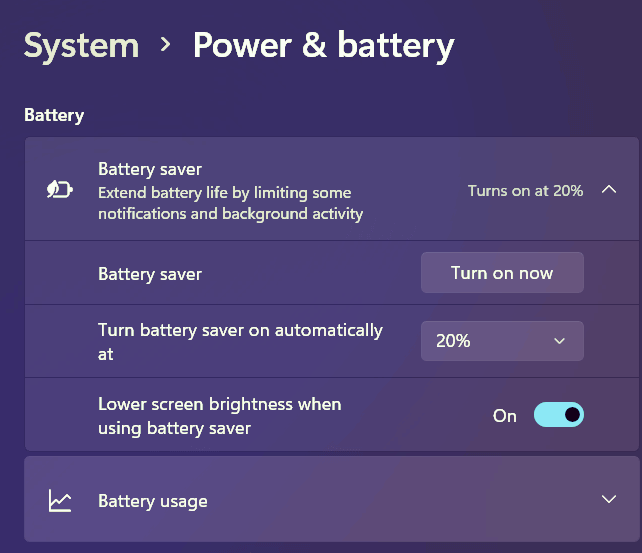
That's it! Screen brightness will no longer dim when using the device in power saving mode.
The above is the detailed content of 10 Ways to Adjust Brightness on Windows 11. For more information, please follow other related articles on the PHP Chinese website!

Hot AI Tools

Undresser.AI Undress
AI-powered app for creating realistic nude photos

AI Clothes Remover
Online AI tool for removing clothes from photos.

Undress AI Tool
Undress images for free

Clothoff.io
AI clothes remover

Video Face Swap
Swap faces in any video effortlessly with our completely free AI face swap tool!
Hot Article
Hot Tools

Notepad++7.3.1
Easy-to-use and free code editor

SublimeText3 Chinese version
Chinese version, very easy to use

Zend Studio 13.0.1
Powerful PHP integrated development environment

Dreamweaver CS6
Visual web development tools

SublimeText3 Mac version
God-level code editing software (SublimeText3)
Hot Topics


 SANC launches 23.8-inch G52 Plus monitor: 2K native 180Hz FastIPS, 799 yuan
Jul 29, 2024 pm 09:57 PM
SANC launches 23.8-inch G52 Plus monitor: 2K native 180Hz FastIPS, 799 yuan
Jul 29, 2024 pm 09:57 PM
According to news from this site on July 29, SANC launched a G52 monitor in December last year, with a 23.8-inch 2K180Hz, with a starting price of 798 yuan. Now it has launched a G52Plus monitor, with a starting price of 799 yuan. Compared with the G52, the color gamut and brightness are slightly smaller. promote. This monitor still uses a 23.8-inch Fast panel with 2560*1440 resolution, 180Hz refresh rate, brightness increased to 350 nits, 10bit color depth, 1msGTG response time, 100% sRGB/97%DCI-P3 color gamut, G-Sync compatible. This website noticed that this monitor has also been upgraded with a lifting and rotating bracket, and the design is more low-key. It is also equipped with an under-screen night light and supports Owl
 Discover ways to solve ghosting problems on HP monitors (How to eliminate ghosting on HP monitors)
Aug 08, 2024 am 01:11 AM
Discover ways to solve ghosting problems on HP monitors (How to eliminate ghosting on HP monitors)
Aug 08, 2024 am 01:11 AM
As a common computer peripheral, HP monitors will inevitably have some problems. One of them is the ghosting problem. When we use HP monitors, blur, ghosting or lag appears on the screen, which will not only affect our visual experience, but also reduce our work efficiency. How should we solve this problem? Understand the phenomenon of ghosting - Ghosting is when a copy of an object or text appears on the monitor screen, causing the image to be blurred or overlapping. -Ghosting issues can be caused by a variety of factors, such as monitor aging, signal transmission issues, etc. Check the connecting cables - Check that the cables connecting the computer and monitor are intact. - Make sure the connection cable is appropriately tight and not loose or broken. Adjust resolution and refresh rate - in operating system settings
 KTC '25GR950' 24.5-inch monitor is now available: 1080P 180Hz Fast IPS, 579 yuan
Aug 19, 2024 pm 10:45 PM
KTC '25GR950' 24.5-inch monitor is now available: 1080P 180Hz Fast IPS, 579 yuan
Aug 19, 2024 pm 10:45 PM
According to news from this website on August 19, KTC launched a 24.5-inch monitor with model number "25GR950" on JD.com today. This monitor features "1080P180Hz" and the initial price is 579 yuan. As of the time of publication of this website, the machine has not yet been displayed. Specific sales time. According to reports, this monitor uses a 1920x1080 resolution 180Hz panel, a response speed of 1ms, a static contrast ratio of 1000:1, a brightness of 350 nits, supports 8-Bit color, and covers 99% sRGB and 95% DCI-P3 color gamut. This monitor stand supports tilting, and the monitor body supports VESA100x100mm wall mounting. It provides 1 DP1.4 interface, 2 HDMI2.0 interfaces, and 1 3.
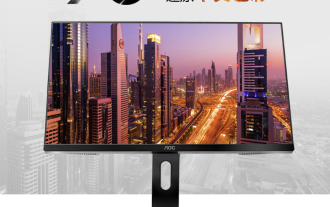
 AOC launches 'U24P10R' 23.8-inch monitor: 4K 60Hz + 90W PD USB-C, 1699 yuan
Aug 16, 2024 am 07:34 AM
AOC launches 'U24P10R' 23.8-inch monitor: 4K 60Hz + 90W PD USB-C, 1699 yuan
Aug 16, 2024 am 07:34 AM
According to news from this site on August 15, AOC launched a 23.8-inch monitor model "U24P10R" on JD.com today. This monitor features "4K60Hz + 90WPD USB-C" and is currently on sale, with an initial price of 1,699 yuan. According to reports, this monitor is equipped with a 3840x2160 resolution 60Hz IPS panel, a brightness of 400 nits, a response speed of 4ms, a static contrast ratio of 1300:1, supports 10-Bit color, and covers 100% sRGB and 95% DCI-P3 color gamut. In addition, this monitor stand supports tilt/lift/rotate/tilt, the monitor body supports 100x100mm VESA wall mounting, and provides 2 HDMI2.0 interfaces and 1 DP1
 Rating of screen brightness of top ten flagship mobile phones in 2024
Jul 29, 2024 pm 04:02 PM
Rating of screen brightness of top ten flagship mobile phones in 2024
Jul 29, 2024 pm 04:02 PM
2024 Top Ten Flagship Mobile Phone Screen Brightness Review Original Xiaobai Evaluation Tap to view the original Xiaobai Evaluation Swipe up to see the next GotItScanwithWeixintousethisMiniProgramCancelAllowCancelAllow:, .VideoMiniProgramLike, double tap to cancel Wow, double tap to cancel watching ShareCommentFavorite
 AOC 'Q24B35' 23.8-inch monitor is now available: 2K 120Hz, 749 yuan
Aug 17, 2024 pm 07:44 PM
AOC 'Q24B35' 23.8-inch monitor is now available: 2K 120Hz, 749 yuan
Aug 17, 2024 pm 07:44 PM
According to news from this site on August 17, AOC launched a 23.8-inch monitor with the model number "Q24B35" in its JD flagship store today. This monitor features "2K120Hz", but it is currently out of stock. The product page shows that the price of the monitor is 749 yuan. According to reports, this monitor uses a 2560x1440 resolution 120Hz IPS panel, a brightness of 250 nits, a static contrast ratio of 1300:1, a response speed of 4ms, and supports 8-Bit color. In addition, the monitor stand supports tilt/lift/rotate/tilt, the main body supports VESA100x100mm wall mounting, and provides 1 HDMI2.0 interface and 1 DP1.4 interface. This site organizes the currently known monitor parameter information as follows:
 MSI showcases MAG 321CUPDF: the world's first curved dual-mode monitor, supporting 4K 160Hz / 1080P 320Hz
Aug 23, 2024 am 11:17 AM
MSI showcases MAG 321CUPDF: the world's first curved dual-mode monitor, supporting 4K 160Hz / 1080P 320Hz
Aug 23, 2024 am 11:17 AM
According to news from this website on August 23, MSI attended the Cologne Games Show in Germany and showed off the new MAG321CUPDF monitor, claiming to be the world's first curved dual-mode monitor. MSI initially showed the details of the monitor at the 2024 Taipei International Computer Show held in June this year, but the model at the time was MPG321CUPF, but now the official model and series have been adjusted, and it is now called MAG321CUPDF. The MAG321CUPDF display is 31.5 inches in size and supports a 160Hz refresh rate at 4K (3840x2160) resolution and a 320Hz refresh rate at 1080P resolution. Users can switch to high resolution or high refresh rate according to needs. MAG321CUPD
 Zhuowei XL2566X + professional gaming monitor: new generation Fast TN panel + 400Hz refresh rate, 5699 yuan
Aug 10, 2024 pm 10:41 PM
Zhuowei XL2566X + professional gaming monitor: new generation Fast TN panel + 400Hz refresh rate, 5699 yuan
Aug 10, 2024 pm 10:41 PM
According to news from this site on August 10, Zhuowei XL2566X+ professional gaming monitor is now available on JD.com, priced at 5,699 yuan. The product page shows that Zhuowei XL2566X+ monitor uses a 24.1-inch new generation FastTN panel (resolution 1920*1080, brightness 320cd/㎡), which is said to be "optimized based on the resolution commonly used by professional players to provide clearer enemy outlines for FPS games"; The new panel adopts a faster electrical conduction design, which further improves the native response speed of liquid crystal molecules and improves the clarity of dynamic images. In addition, based on Zhuowei's specially tuned panel hardware design, DyAc2 can provide players with better dynamic picture clarity, thereby improving the overall visual perception in FPS scenes. X+ series