

Detailed guide to solve win7 parallel configuration error

When friends who use the old win7 system open the application again, many people must have encountered incorrect parallel configuration, and they don’t know how to deal with it. For this reason, today we have brought a tutorial to see if the parallel configuration is incorrect. How to deal with win7 correctly.
How to deal with incorrect parallel configuration in win7:
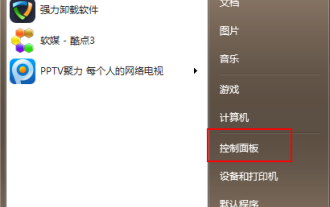
1. First, click Start in the lower left corner, and then click "Control Panel".

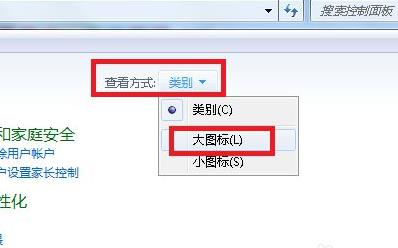
2. Click the category next to the viewing method and click "Large Icon".
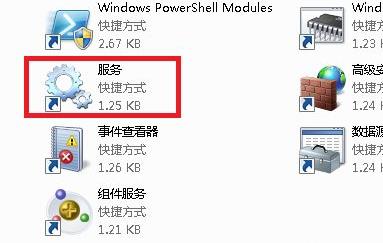
3. Then select "Management Tools" on the right.

4. Double-click to enter "Services".
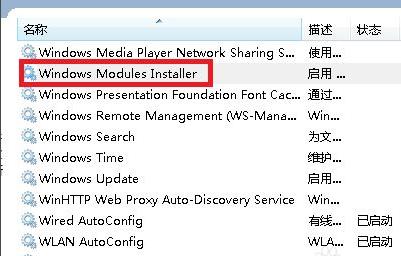
5. Find the "Windows Modules Installer" service on the right.
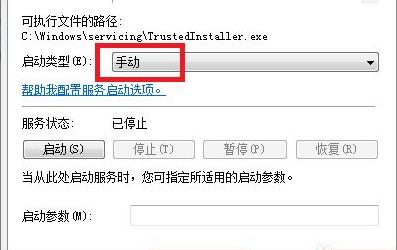
6. Finally, select the startup type and click "Manual".
The above is the detailed content of Detailed guide to solve win7 parallel configuration error. For more information, please follow other related articles on the PHP Chinese website!

Hot AI Tools

Undresser.AI Undress
AI-powered app for creating realistic nude photos

AI Clothes Remover
Online AI tool for removing clothes from photos.

Undress AI Tool
Undress images for free

Clothoff.io
AI clothes remover

AI Hentai Generator
Generate AI Hentai for free.

Hot Article
Hot Tools

Notepad++7.3.1
Easy-to-use and free code editor

SublimeText3 Chinese version
Chinese version, very easy to use

Zend Studio 13.0.1
Powerful PHP integrated development environment

Dreamweaver CS6
Visual web development tools

SublimeText3 Mac version
God-level code editing software (SublimeText3)
Hot Topics


 Tutorial: How to allocate D drive space to C drive
Dec 25, 2023 pm 02:25 PM
Tutorial: How to allocate D drive space to C drive
Dec 25, 2023 pm 02:25 PM
Many friends want to allocate the D drive space to the C drive because there is not enough space in the C drive, but they don’t know how to operate win11. In fact, we can expand the C drive as long as we delete the D drive. How to allocate D drive space to C drive in win11: 1. First, right-click this computer and open Computer "Management" 2. Then enter "Disk Management" under storage on the left 3. Then right-click "D drive" and select "Delete Volume" 4. Click "Yes" again to delete the d drive. (Deleting the d drive will cause the files in it to be lost, so it is recommended to back it up in advance) 5. After deletion, right-click "c drive" and select "Extend Volume" 6. Enter the extend volume wizard, keep the default settings, and click "Next Page" 7. Finally, click "Finish" to allocate the D drive space to the C drive.
 Step-by-step tutorial for upgrading win7 to win10
Jul 11, 2023 pm 06:05 PM
Step-by-step tutorial for upgrading win7 to win10
Jul 11, 2023 pm 06:05 PM
How to upgrade Windows 7 system to Windows 10 system? With the gradual improvement of the Win10 system, many users have upgraded their computer systems to the Win10 system. Win7 can be directly upgraded to the Win10 system through system update settings. Today, the editor will tell you about the step-by-step tutorial on upgrading win7 to win10. Let's learn it together. 1. Click the "Start" button and select the "Control Panel" option in the menu bar. 2. After entering the control panel interface, click "System and Security". 3. Find the “Check for Updates” option and click to enter. 4. Select Win10 from the detected update package and click the update button. You need to remain online during this process. 5. After the upgrade package is downloaded,
 Detailed tutorial on upgrading pirated win7 to win11
Jul 12, 2023 am 10:17 AM
Detailed tutorial on upgrading pirated win7 to win11
Jul 12, 2023 am 10:17 AM
The win11 system is Microsoft's latest operating system, which has certain requirements for computer configuration. Currently, only the win10 system can be upgraded directly through the dev channel for free. Some friends who use pirated win7 systems also want to upgrade and install win11 experience, but they don’t know how to upgrade pirated win7 to win11 system. So today, the editor will bring you a detailed tutorial on upgrading pirated win7 to win11. Friends in need, come and take a look! 1. First, you need to prepare a USB flash drive of more than 8G and make it into a system disk. 2. After the production is completed, search and download the win11 system image file by yourself, and put it into the USB flash drive. Then insert the USB disk into the computer, restart the computer and keep pressing the quick start key f12 or d
 Acer laptop win10 to win7 tutorial
Jul 12, 2023 pm 09:05 PM
Acer laptop win10 to win7 tutorial
Jul 12, 2023 pm 09:05 PM
How to set up the bios of Acer computer from win10 to win7? After buying an Acer desktop computer, many friends tried to change win10 to win7 system but failed. The editor below will tell you how to install win7 system on Acer laptop computer. 1. First, we open the computer browser and search the official website of Magic Pig One-Click System Reinstallation, download it and open it. 2. After downloading, we open it and click online reinstallation. 3. Next, we will wait patiently for it to be installed. 4. The installation is complete. Next we need to click to restart the computer now. 5. After restarting the computer, we still need to return to the main interface to continue completing the installation. Then our installation is completed. The above are the details of changing Acer notebook from win10 to win7.
 Tutorial on how to enter the bios and set up the hard disk to boot in win7
Jul 14, 2023 pm 01:13 PM
Tutorial on how to enter the bios and set up the hard disk to boot in win7
Jul 14, 2023 pm 01:13 PM
Currently, Bios boot modes include Legacy+MBR (traditional boot mode) and UEFI+GPT. If the hard disk boot location is set incorrectly, the system may not start. In response to this problem, the editor will tell you a tutorial on how to enter the BIOS to set up the hard disk startup in win7. Let's take a look. 1. First, press the Enter key on the computer startup screen. 2. After entering the bios interface, you will see the "main" main interface displayed. 3. Use the direction keys to move the cursor right to the "startup" option. 4. Then move the cursor to the "boot" option and press Enter to enter. 5. Select the sixth hard disk item and press the "+" key to move to the first item. 6. Then press the "F10" button. 7. Next meeting
 How to change mouse pointer pattern in Win10 Mouse pointer change pattern Win10 tutorial
Jul 17, 2023 pm 11:49 PM
How to change mouse pointer pattern in Win10 Mouse pointer change pattern Win10 tutorial
Jul 17, 2023 pm 11:49 PM
How to change mouse pointer pattern in Win10? Many good friends have been using the default mouse pattern of Win10 for decades, but they don’t know that the pattern can actually be replaced. If we want more diverse logos, how do we change the mouse pointer pattern of Win10? The editor below will provide you with a simple change method! How to change mouse pointer pattern in Win10? 1. First, right-click the menu bar and open "Settings". 2. Then turn on "Personalization" in it. 3. Then click the "Theme" option in the left column. 4. Then click the "mouse cursor" on the right side of the theme. 5. After entering, you can change the mouse scheme and icon.
 Detailed tutorial for upgrading win7 system from xp system
Jul 09, 2023 am 10:25 AM
Detailed tutorial for upgrading win7 system from xp system
Jul 09, 2023 am 10:25 AM
The XP system has stopped updating a long time ago, and the current computer system requirements are getting higher and higher. Therefore, many users hope to upgrade the XP system to the win7 system, but they do not know how to upgrade to the win7 system without removing the XP system. Therefore, the editor today brings you a detailed tutorial on upgrading the XP system to the Win7 system. Friends in need, come and take a look! 1. Download the win7 system iso image to the local hard disk, right-click and use tools such as WinRAR to extract it; 2. Place the largest win7.gho file and the Onekeyghost tool in the same directory, such as D drive, not C drive or desktop; 3. Double-click Open the Onekeyghost installation tool, select "Restore Partition", and select the gho file for the image path.
 How to reinstall the system on Acer computer? How to reinstall the system on Acer computer? Win10 tutorial
Jul 18, 2023 pm 07:58 PM
How to reinstall the system on Acer computer? How to reinstall the system on Acer computer? Win10 tutorial
Jul 18, 2023 pm 07:58 PM
How to reinstall the system on Acer computer? Many friends buy and use acer computers. It is not called Zhanteng, it should be Acer (qí). So how to reinstall Win10 on these brands of computers? Today the editor has provided a detailed tutorial for my friends. Let’s take a look at the process of reinstalling Win10 on acer computers. It is recommended that you use Master Shi’s one-click reinstallation software. Master Shi’s method for reinstalling the Win10 system on Acer computers 1. After entering the page, customers can follow the prompts to select the system to install. Note: The gray button means that the current hardware configuration or partition format is not compatible with installing this system. 2. After selecting the system, click Next and wait for the PE data and system to be downloaded. 3. Download
