

Teach you how to change Win7 U disk startup settings

When the system cannot be used and needs to be reinstalled or a new computer system is installed, we may need to use the USB disk to reinstall. At this time, we need to change the USB disk to the first startup item, but many people do not know this How to change, let’s follow the editor to see how to change it for different computers.
win7u disk boot change tutorial
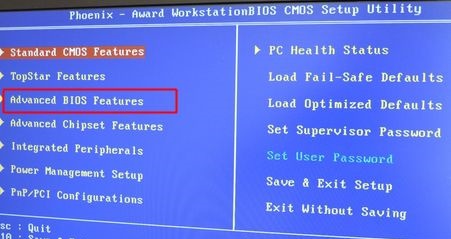
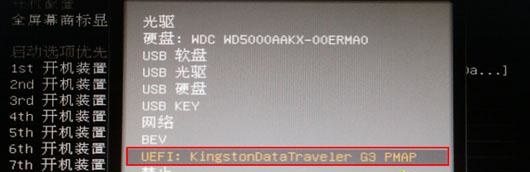
1. Old motherboard CMOC
1. Enter the bios settings and find the icon option.
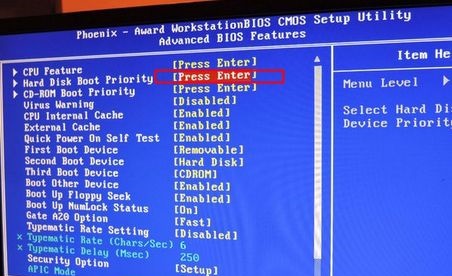
2. After entering, find “Hard Disk Boot Priority” and press Enter to enter.
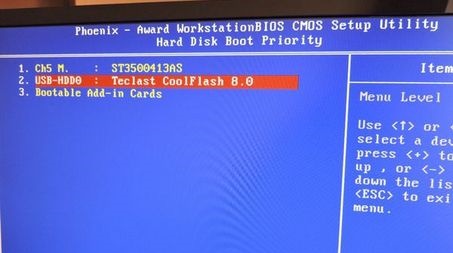
#3. After entering, just move the USB disk with the word USB to position 1. (Use F5/F6 or pageup/pagedown)
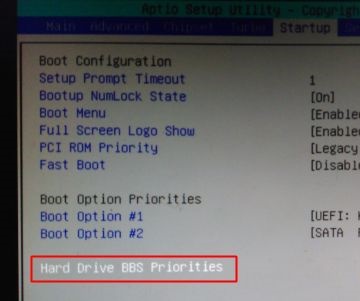
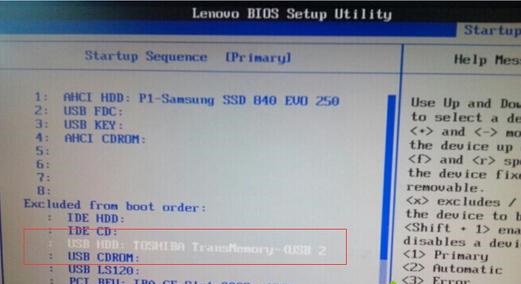
2. Aptio Setup Utility
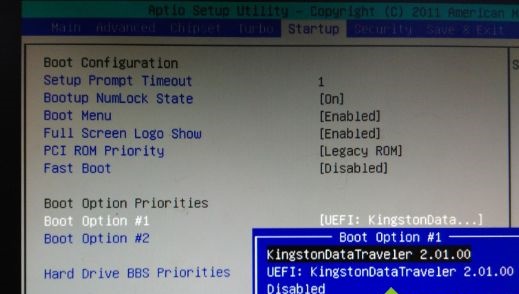
1. After entering the bios settings, find the icon under "Startup" options.
#2. Press Enter to enter, select your own USB disk, and press Enter to confirm.
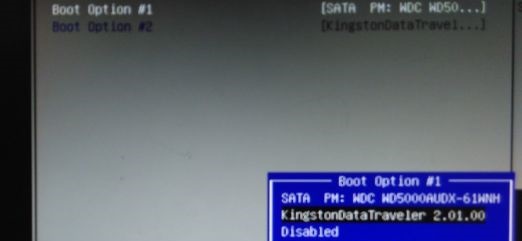
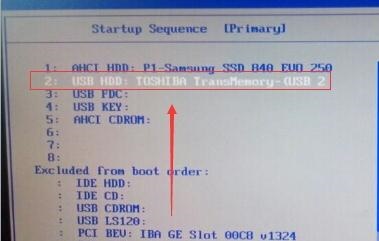
#3. Then return to the previous menu and set "Boot Option#1" to the USB disk.
3. Lenovo computer
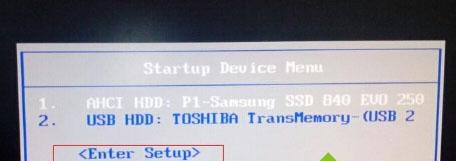
1. Use the hotkey to enter the following interface. If you can directly select usb startup above, just start it directly. If not, select "Enter Setup" below
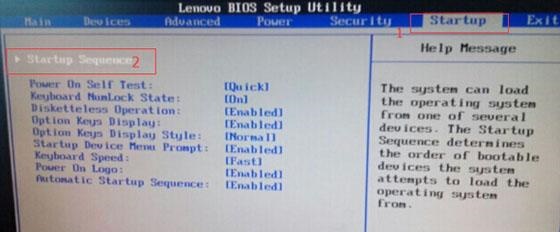
2. Use the "→" direction key to enter "Startup" and then enter the icon option.
#3. Find our USB flash drive, select it and press "F" and then press "X" to move up.
#4. After moving to the digital sequence, use " " to move to position 1.
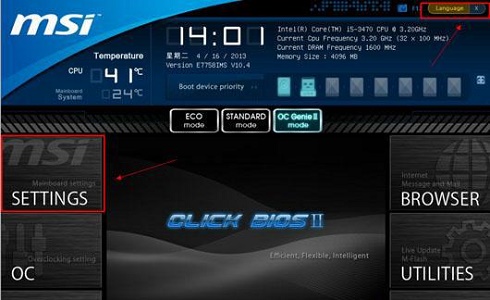
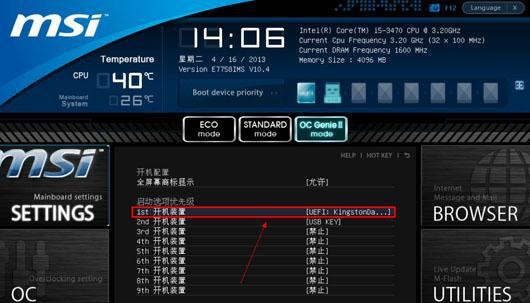
4. MSI motherboard
1. First change the interface to Chinese in the upper right corner of the icon, and then click "SETTINGS" on the left
2. Then select "Start"
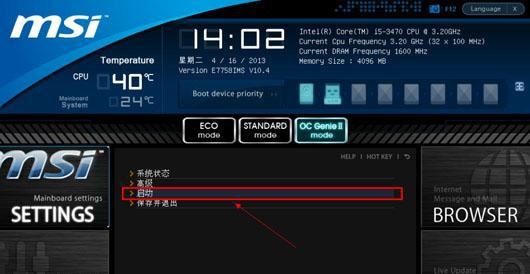
3. Select "1st boot device"

4. Find our USB disk.
#5. After the settings are completed, press "F10" to save.
The above is the detailed content of Teach you how to change Win7 U disk startup settings. For more information, please follow other related articles on the PHP Chinese website!

Hot AI Tools

Undresser.AI Undress
AI-powered app for creating realistic nude photos

AI Clothes Remover
Online AI tool for removing clothes from photos.

Undress AI Tool
Undress images for free

Clothoff.io
AI clothes remover

Video Face Swap
Swap faces in any video effortlessly with our completely free AI face swap tool!
Hot Article
Hot Tools

Notepad++7.3.1
Easy-to-use and free code editor

SublimeText3 Chinese version
Chinese version, very easy to use

Zend Studio 13.0.1
Powerful PHP integrated development environment

Dreamweaver CS6
Visual web development tools

SublimeText3 Mac version
God-level code editing software (SublimeText3)
Hot Topics
 1666
1666
 14
1425
52
1327
25
1273
29
1252
24
14
1425
52
1327
25
1273
29
1252
24

 How to change computer name in Windows 7
Jan 01, 2024 pm 08:35 PM
How to change computer name in Windows 7
Jan 01, 2024 pm 08:35 PM
The computer name is different from the user name and is the name displayed when performing operations such as file sharing or LAN. Generally speaking, the default computer names are very complicated and difficult to remember. Therefore, if we have relevant needs, it is recommended to change the computer name to a simple and easy-to-recognize computer name. Let’s take a look at how to change it. Win7 computer name changing tutorial 1. First, right-click the computer and open "Properties" 2. Then click "Change Settings" in the lower right corner 3. Then click "Change" in the system properties 4. Double-click to select the default computer name. 5. Change the computer name to the one you want. 6. We need to restart the computer to complete the changes. 7. After restarting, you will find that our computer name has been changed.
 Win11 font changing tutorial
Dec 25, 2023 pm 03:41 PM
Win11 font changing tutorial
Dec 25, 2023 pm 03:41 PM
The system generally has a default font, but it is relatively mediocre. Many friends who like personalization want to change their favorite fonts, but they don’t know how to change the font in win11. In fact, we only need to install the font in the list and change it. Let’s take a look below. Win11 font change: 1. The system does not have its own font changing function, so we need to download a "noMeiryoUI" software. 2. After the download is completed, open the software and click the "Select" button. 3. Then select the font you want to use in the font name and click "OK" 4. After the selection is completed, click "Apply" to complete the font change. 5. We can also modify the fonts of title bar, icon text, menu and other individual items below. 6.
 Learn how to change win7 startup interface
Dec 21, 2023 pm 07:03 PM
Learn how to change win7 startup interface
Dec 21, 2023 pm 07:03 PM
Many friends like to change the desktop and lock screen interface, but still use the system's default startup screen. In fact, the screen displayed at startup can also be changed, but we need to complete the changes in the registry, which is more troublesome. Let’s take a look at the specific methods below. Tutorial on changing the win7 startup screen 1. First prepare a picture in jpg format. The best resolution is the same as the computer resolution. 2. Then use "win+r" to open the run, enter "regedit" and press Enter to confirm. 3. Copy and paste the following path to the location as shown in the picture "HKEY_LOCAL_MACHINE\SOFTWARE\Microsoft\Windows\CurrentVersion"
 Teach you how to change win7 user path
Dec 23, 2023 pm 01:37 PM
Teach you how to change win7 user path
Dec 23, 2023 pm 01:37 PM
If we have not changed the user path, the default is on the c drive, which is our system disk. This means that if we store too many files in the user folder, it may affect the system running speed. The editor recommends using the following method to change the path. Let’s take a look. Win7user path change tutorial 1. First use the "win+r" shortcut key to open run, enter "regedit" and press Enter to confirm. 2. Copy and paste this path into the path above, as shown in the picture. "Computer\HKEY_CURRENT_USER\SOFTWARE\Microsoft\Windows\CurrentVersion\Explorer\S
 Teach you how to change the login method of win7
Jan 08, 2024 am 11:37 AM
Teach you how to change the login method of win7
Jan 08, 2024 am 11:37 AM
win7 provides many interactive login methods to choose from, such as those that require the use of shortcut keys when logging in and those that do not require the use of shortcut keys. We can find it in the security options and make changes. Let’s take a look at the specific ones. Change your approach. Tutorial on changing the win7 login method 1. Use the key combination "win+r" to open the run box, enter "secpol.msc" and press Enter to confirm. 2. Open the local security policy and click on "Site Policy" 3. Click on "Security Options", and then we can find many interactive login files on the right side. Double-click to open the method you want to change and you can make changes. 4. For example, turn on "Do not display the last user name". If it is disabled, the user name will be displayed, and if it is enabled, it will not be displayed. 5. Or open
 How to adjust the memory capacity of Win7
Dec 25, 2023 pm 09:09 PM
How to adjust the memory capacity of Win7
Dec 25, 2023 pm 09:09 PM
When we use win7 system, we may encounter the situation that the memory is not enough. At this time, some friends want to change the memory size. However, our physical memory is related to the hardware. It can only be changed by updating the configuration. The situation of insufficient memory can only be alleviated by setting up virtual memory. Win7 memory size change tutorial 1. First of all, our physical memory is closely related to the memory stick used by our computer. If you want to increase the memory, you can turn on the host to see if it supports multiple memory slots, and then choose to add or replace the memory stick. 2. If you can also temporarily alleviate the shortage of memory by setting virtual memory. 3. First, right-click the computer and open the "Properties" panel. 4. Enter "Advanced System Settings" 5. Find the performance settings, and then
 How to modify the default browser of Win7
Jan 09, 2024 pm 02:33 PM
How to modify the default browser of Win7
Jan 09, 2024 pm 02:33 PM
The default browser of win7 is generally Internet Explorer, which means that when we open a web page, it will automatically be opened with this browser. But we often download and use other browsers. At this time, we need to change the default browser to a commonly used browser. Let’s take a look at the specific methods below. Tutorial on changing the default browser in win7 1. First open the "Control Panel" in the start menu 2. Set the viewing mode in the upper right corner to "Small Icons" 3. Find and open "Default Programs" 4. Click "Settings" at the icon location "Default program" 5. Find the default browser that needs to be set in the left column and click "Set this program as default" 6. After clicking OK, you will return to the graphic interface and the change is completed.
 How to change the user name of win7 computer
Dec 26, 2023 am 09:53 AM
How to change the user name of win7 computer
Dec 26, 2023 am 09:53 AM
When we use win7 computers, we generally do not have the habit of changing the computer user name, so it will always be the default administrator. But if we have multiple users, we need to change the user name to distinguish them. Let’s take a look at how to change the computer user name in win7. Tutorial on changing the user name of win7 computer 1. Double-click to open "Computer" 2. Click "Open Control Panel" above to enter the control panel. 3. Click "Add or Delete User Account" in the icon position. 4. Then find the account whose user name needs to be changed and select "Change Account Name". 5. Finally, enter the account name here and click "Change Name".
