How to recover hidden win7 files
When we use the win7 operating system, if we have hidden some important files before and want to display them again, many friends still don't know what to do. So for this problem, I think we can make relevant selection settings in the folder search item above the system folder options. Let’s take a look at how the editor did it for detailed steps~ I hope it can help you.
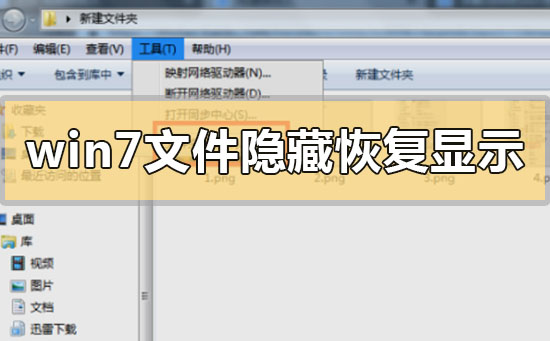

How to restore and show hidden files in win7
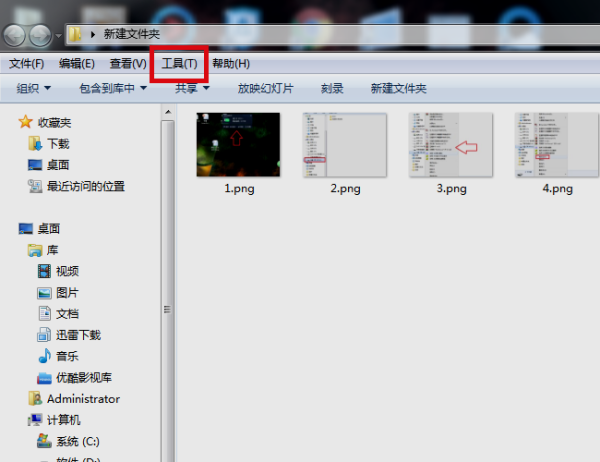
1. First open a folder on your computer and click The menu option "Tools" at the top of the interface.
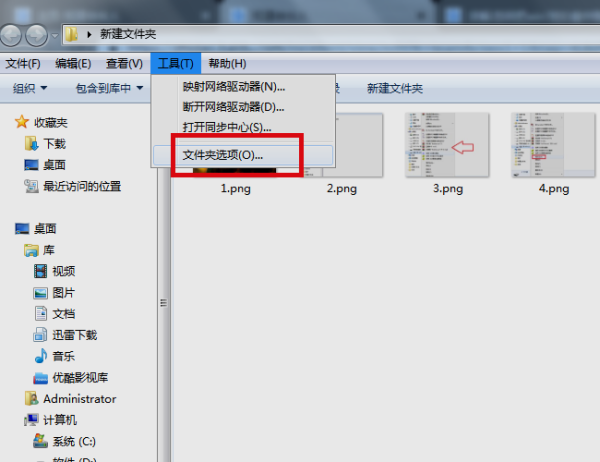
2. Then click "Folder Options" in the drop-down menu that appears.
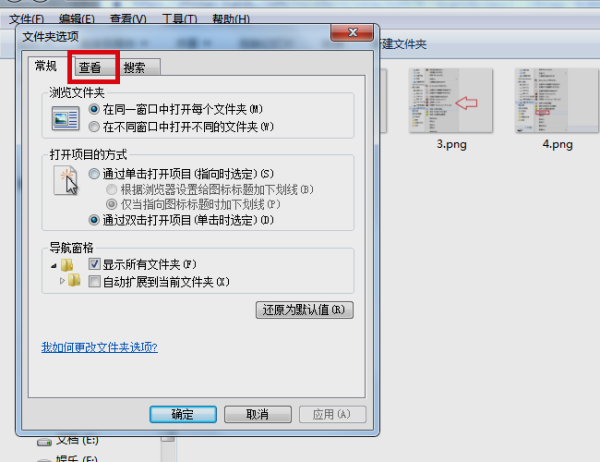
3. Then in the window that appears, click the "View" button.
4. Then in the view page, select the "Show hidden files, folders, or drives" option.
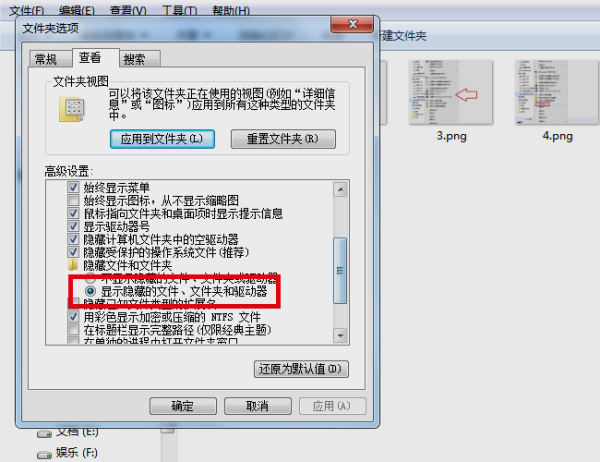
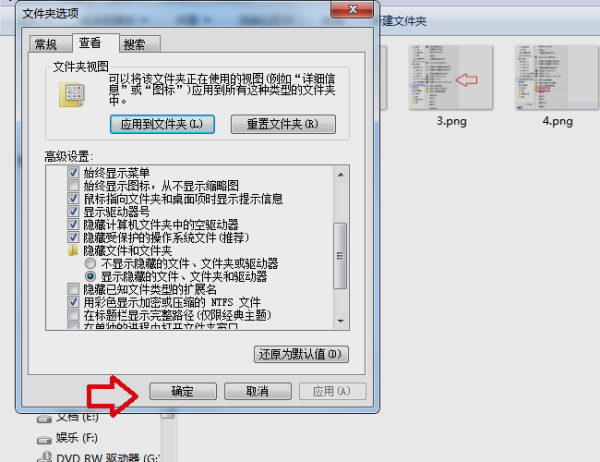
5. Finally, click the "OK" button. After completing the above settings, you can display the hidden folders in the D drive of win7.
More detailed information about win7 files:
>>>How to solve the problem that the win7 folder has become an application
>>>Where to open win7 system file manager
>>>How to set up win7 file LAN sharing
>>>How to display the file extension name in win7
The above is the detailed content of How to recover hidden win7 files. For more information, please follow other related articles on the PHP Chinese website!

Hot AI Tools

Undresser.AI Undress
AI-powered app for creating realistic nude photos

AI Clothes Remover
Online AI tool for removing clothes from photos.

Undress AI Tool
Undress images for free

Clothoff.io
AI clothes remover

AI Hentai Generator
Generate AI Hentai for free.

Hot Article

Hot Tools

Notepad++7.3.1
Easy-to-use and free code editor

SublimeText3 Chinese version
Chinese version, very easy to use

Zend Studio 13.0.1
Powerful PHP integrated development environment

Dreamweaver CS6
Visual web development tools

SublimeText3 Mac version
God-level code editing software (SublimeText3)

Hot Topics
 1359
1359
 52
52
 How to restore chat spark on TikTok
Mar 16, 2024 pm 01:25 PM
On Douyin, a short video platform full of creativity and vitality, we can not only enjoy a variety of exciting content, but also have in-depth communications with like-minded friends. Among them, chat sparks are an important indicator of the intensity of interaction between the two parties, and they often inadvertently ignite the emotional bonds between us and our friends. However, sometimes due to some reasons, the chat spark may be disconnected. So what should we do if we want to restore the chat spark? This tutorial guide will bring you a detailed introduction to the content strategy, hoping to help everyone. How to restore the spark of Douyin chat? 1. Open the Douyin message page and select a friend to chat. 2. Send messages and chat to each other. 3. If you send messages continuously for 3 days, you can get the spark logo. On a 3-day basis, send pictures or videos to each other
 What to do if the 0x80004005 error code appears. The editor will teach you how to solve the 0x80004005 error code.
Mar 21, 2024 pm 09:17 PM
When deleting or decompressing a folder on your computer, sometimes a prompt dialog box "Error 0x80004005: Unspecified Error" will pop up. How should you solve this situation? There are actually many reasons why the error code 0x80004005 is prompted, but most of them are caused by viruses. We can re-register the dll to solve the problem. Below, the editor will explain to you the experience of handling the 0x80004005 error code. Some users are prompted with error code 0X80004005 when using their computers. The 0x80004005 error is mainly caused by the computer not correctly registering certain dynamic link library files, or by a firewall that does not allow HTTPS connections between the computer and the Internet. So how about
 How to use shortcut keys to take screenshots in Win8?
Mar 28, 2024 am 08:33 AM
How to use shortcut keys to take screenshots in Win8? In our daily use of computers, we often need to take screenshots of the content on the screen. For users of Windows 8 system, taking screenshots through shortcut keys is a convenient and efficient operation method. In this article, we will introduce several commonly used shortcut keys to take screenshots in Windows 8 system to help you take screenshots more quickly. The first method is to use the "Win key + PrintScreen key" key combination to perform full
 Win11 Tips Sharing: Skip Microsoft Account Login with One Trick
Mar 27, 2024 pm 02:57 PM
Win11 Tips Sharing: One trick to skip Microsoft account login Windows 11 is the latest operating system launched by Microsoft, with a new design style and many practical functions. However, for some users, having to log in to their Microsoft account every time they boot up the system can be a bit annoying. If you are one of them, you might as well try the following tips, which will allow you to skip logging in with a Microsoft account and enter the desktop interface directly. First, we need to create a local account in the system to log in instead of a Microsoft account. The advantage of doing this is
 Comparing the performance of Win11 and Win10 systems, which one is better?
Mar 27, 2024 pm 05:09 PM
The Windows operating system has always been one of the most widely used operating systems on personal computers, and Windows 10 has long been Microsoft's flagship operating system until recently when Microsoft launched the new Windows 11 system. With the launch of Windows 11 system, people have become interested in the performance differences between Windows 10 and Windows 11 systems. Which one is better between the two? First, let’s take a look at W
 Must read before purchasing a system: Analysis of the advantages and disadvantages of Win11 and Win10
Mar 28, 2024 pm 01:33 PM
In today's information age, personal computers play an important role as an indispensable tool in our daily lives. As one of the core software of computers, the operating system affects our usage experience and work efficiency. In the market, Microsoft's Windows operating system has always occupied a dominant position, and now people face the choice between the latest Windows 11 and the old Windows 10. For ordinary consumers, when choosing an operating system, they do not just look at the version number, but also understand its advantages and disadvantages.
 How to hide Smart Island on Xiaomi Mi 14?
Mar 18, 2024 pm 03:40 PM
In addition to the amazing hardware configuration and excellent functions, Xiaomi Mi 14 also hides a fascinating place - Smart Island. Here, users can enjoy personalized customization and unlimited creative mobile phone experience. But not everyone likes this feature, so how does Xiaomi Mi 14 hide Smart Island? Let’s find out together. How to hide Smart Island on Xiaomi Mi 14? 1. Open the settings application of Xiaomi 14 mobile phone. 2. Scroll to find the "Features" option and click to enter. 3. Find the "Hide Smart Island" option on the features page and turn it on. 4. After confirming that hiding the Smart Island is turned on, return to the desktop and you will see that the Smart Island has been hidden.
 Detailed tutorial on hiding works on Douyin
Mar 25, 2024 pm 03:11 PM
1. First click [+] to shoot. 2. Then click the check mark in the lower right corner to confirm the completion of shooting. Click] Next[, 3. Click [Who can see]. Just select [Private]. Scenario 2: The work has been taken. 1. Click [Me] and select [Work]. 2. Click the [three dots] logo on the right. 3. Swipe left to find [Permission Settings], 4. Click [Set as Private].


