
 System Tutorial
Windows Series
How to configure the front panel of realtek high definition audio manager
System Tutorial
Windows Series
How to configure the front panel of realtek high definition audio manager
How to configure the front panel of realtek high definition audio manager

realtek High Definition Audio Manager is a program that manages the sound on our computers! What the editor brings to you today is the front panel setting method of realtek high-definition audio manager! Let’s take a look.
Audio manager front panel setting method:
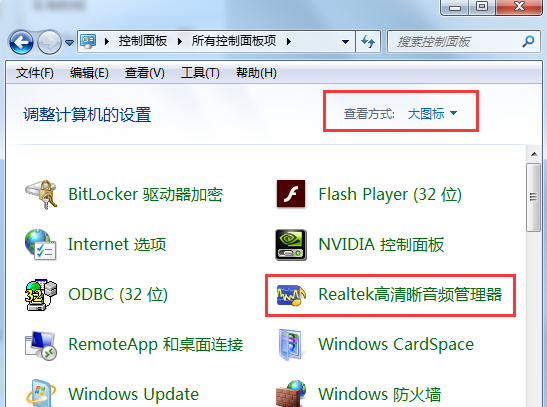
1. Use the search input control panel in the lower left corner of the desktop and click to enter, then find "realtek HD Audio Management in the interface of the control panel "Tools" and click.
2. Continue to click on the settings of the realtek high-definition audio manager interface as shown.

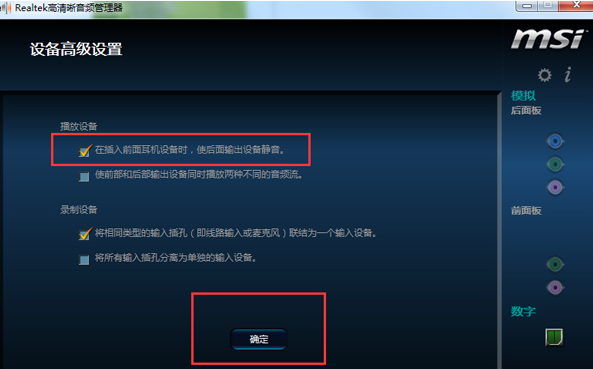
3. After entering the settings page of realtek HD Audio Manager. As shown in the figure, uncheck the option "Mute the rear output device when the front headphone device is plugged in" and click OK;
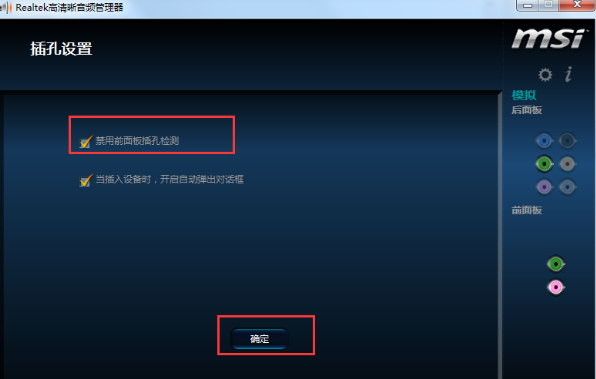
4. Finally, click on the lower right corner "Wrench" icon, enter the panel settings, check "Disable socket detection" and confirm.
The above is the detailed content of How to configure the front panel of realtek high definition audio manager. For more information, please follow other related articles on the PHP Chinese website!

Hot AI Tools

Undresser.AI Undress
AI-powered app for creating realistic nude photos

AI Clothes Remover
Online AI tool for removing clothes from photos.

Undress AI Tool
Undress images for free

Clothoff.io
AI clothes remover

Video Face Swap
Swap faces in any video effortlessly with our completely free AI face swap tool!

Hot Article
Hot Tools

Notepad++7.3.1
Easy-to-use and free code editor

SublimeText3 Chinese version
Chinese version, very easy to use

Zend Studio 13.0.1
Powerful PHP integrated development environment

Dreamweaver CS6
Visual web development tools

SublimeText3 Mac version
God-level code editing software (SublimeText3)
Hot Topics


 Installation of Realtek HD audio driver failed with error 0101
Feb 19, 2024 am 10:57 AM
Installation of Realtek HD audio driver failed with error 0101
Feb 19, 2024 am 10:57 AM
This article will discuss how to solve the problem of failed installation of RealtekHD audio driver with error 0101 in Windows 11/10. When you encounter driver issues, the device in question may stop working or not function properly. Reinstalling or updating device drivers often resolves these issues. According to reports, users are unable to fix sound issues on their computers as RealtekHD audio driver installation failed with error code 0101. Installing RealtekHD Audio Driver failed with Error 0101 If you see "InstallRealtekHDAudioDriverFailure, Error010" while installing RealtekHD Audio Driver
 Installation of Realtek HD audio driver failed with error 0x00005b3
Feb 19, 2024 am 10:42 AM
Installation of Realtek HD audio driver failed with error 0x00005b3
Feb 19, 2024 am 10:42 AM
If you encounter RealtekHD audio driver failure error code 0x00005b3 on Windows 11/10 PC, please refer to the following steps to resolve the issue. We'll guide you through troubleshooting and resolving the error. Error code 0x00005b3 may be caused by audio driver installation issues. It may be that the current driver is corrupted or partially uninstalled, affecting the installation of the new driver. This issue can also be caused by insufficient disk space or an audio driver that is incompatible with your Windows version. Installation of RealtekHD audio driver failed! ! [Error Code: 0x00005B3] If there is a problem with the Realtek Audio Driver Installation Wizard, continue reading
 Realtek cannot be opened after clicking it - How to download realtek high-definition audio?
Mar 18, 2024 pm 07:43 PM
Realtek cannot be opened after clicking it - How to download realtek high-definition audio?
Mar 18, 2024 pm 07:43 PM
Realtek High Definition Audio Manager cannot be opened. Solution: Method 1: 1. First open the "Control Panel" and select "Hardware and Sound". 2. You can find "realtek High Definition Audio Manager" in the "Hardware and Sound" interface and click to open it. Method 2: 1. First use the shortcut key "win r" to open the run, then enter "msconfig" in the run and press the Enter key to confirm. 2. Then check "realtek High Definition Audio Manager" under the startup of the system configuration program to confirm the restart. 3. After restarting, you can find "realtek High Definition Audio Manager" on the taskbar and double-click it to open it. Note: If you cannot find realtek high-definition audio management according to the above two methods
 Detailed explanation of the location of Realtek High Definition Audio Manager under win10 operating system
Jan 13, 2024 pm 01:09 PM
Detailed explanation of the location of Realtek High Definition Audio Manager under win10 operating system
Jan 13, 2024 pm 01:09 PM
When we use the win10 system, we want to set up the realtek high-definition audio manager but cannot find it. For this problem, the editor thinks that we can check whether it exists in the device manager, or search in the control panel. Let’s take a look at the specific steps to see how the editor did it~ I hope it can help you. Where is win10realtek high-definition audio manager: 1. Check the control panel: 1. For example, in win10 system, if the audio icon cannot be found in the tray in the lower right corner of the taskbar, we can click Start to enter the window system and open the "Control Panel". 2. Then select large icon display. If you can directly see the Realtek High Definition Audio Manager, then we can
 What is the use of Win10realtek High Definition Audio Manager? How to set it up?
Feb 09, 2024 pm 09:24 PM
What is the use of Win10realtek High Definition Audio Manager? How to set it up?
Feb 09, 2024 pm 09:24 PM
There is something called realtek high-definition audio manager in our computer, so what is its function? How should we set up the audio manager? There are still many friends who are not familiar with it, so here is the introduction and setting steps of realtek high-definition audio manager, let’s take a look. What is the use of realtek high definition audio manager? Answer: You can perform audio management, system sound event management, microphone, headphone, and audio volume-related gain and special effects adjustments. Setting method 1. Open the control panel in win10 system, view it as a small icon, and click Realtek High Definition Audio Manager. 2. After entering the Realtek High Definition Audio Manager interface
 Learn how to hide realtek HD Audio Manager
Jan 02, 2024 am 11:11 AM
Learn how to hide realtek HD Audio Manager
Jan 02, 2024 am 11:11 AM
The win10 system is an excellent system that can carry out diversified settings. Today, the editor will bring you how to hide the realtek high-definition audio manager! Friends who are interested, please come and take a look. How to hide realtek high-definition audio manager: 1. First find realtek high-definition audio manager in the lower right corner of the desktop. 2. Right-click on the realtek High Definition Audio Manager and select "Sound Manager" at the top. 3. After opening the sound manager, find the symbol as shown in the lower right corner of the interface and click to open it. 4. After opening it, find "Show icon in notification area" as shown in the picture below and click on it before the option. 5. After clicking, follow the prompts step by step to complete the real
 How to solve the problem of no sound when plugging headphones into the front panel of win10 computer case
Jul 11, 2023 pm 08:53 PM
How to solve the problem of no sound when plugging headphones into the front panel of win10 computer case
Jul 11, 2023 pm 08:53 PM
Recently, a friend reported that there is sound when the headphones are plugged into the back panel at the back of the case, but when plugged into the front panel, there is no sound at all from the headphones. I don’t know how to solve the problem. Next, we will tell you how to solve the problem of no sound when the headphones are plugged into the front panel of the win10 computer case. How to solve the problem of no sound from the front panel of the win10 computer case when the headset is plugged in: 1. Find the computer mouse on the desktop, right-click to open the properties option in the menu; 2. After entering the properties window, click the control panel homepage in the upper left corner to enter; 3. .Then click to enter Hardware and Sound, and the viewing method is Category; 4. Click Realtek HD Audio Manager to enter the Hardware and Sound window; 5. After entering, there is a small gear in the upper right corner. Click to pop up two options. We click
 Solution to the problem that win7 cannot open realtek high-definition audio manager
Jul 10, 2023 am 09:17 AM
Solution to the problem that win7 cannot open realtek high-definition audio manager
Jul 10, 2023 am 09:17 AM
There is a realtek high-definition audio manager in the lower right corner of the computer taskbar, which is mainly used to adjust the computer's sound. However, some Win7 customers report that they cannot open the realtek high-definition audio manager. What is going on? Let’s take a look at two detailed solutions. Solution to the problem that realtek high-definition audio manager cannot be opened in win7 1. First open the "Operation Control Panel" and select "Hardware Configuration and Sound". 2. You can find "realtek High Definition Audio Manager" on the "Hardware and Sound" page and click to open it. Method 2: 1. First use the shortcut key "win+r" to open the run, then enter "msconfig" in the run and press
