Computer name not recognized for network sharing
win10 system is an excellent system chosen by most users! Powerful work ability is the most eye-catching label of win10 system! Basically, most work involving computers generally uses the win10 system. Recently, many friends have reported that the computer name cannot be found in network sharing when using computers. Today, the editor will bring you the network Let’s take a look at the solution for sharing that the other party’s computer cannot be found.
Solution to the problem that the computer name cannot be found in network sharing:
Operation steps:
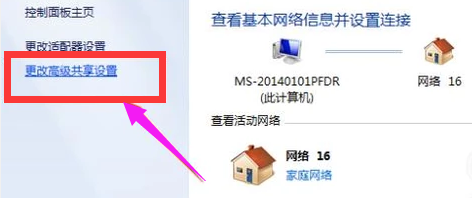
1. Right-click the lower right corner of the computer desktop network connection icon.
#2. Click ‘Change advanced sharing settings’ in the upper left corner. Enter the sharing settings page.
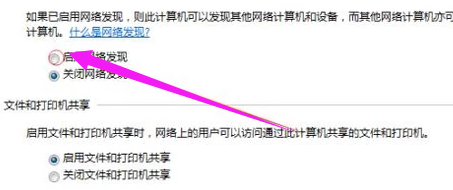
#3. Many people often do not turn on network discovery and cannot find shared computers. Mouse click to enable network discovery.
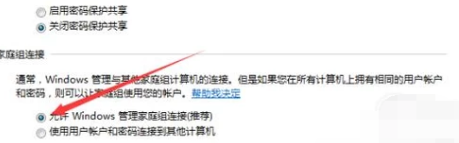
#4. Use the mouse to drag the progress bar on the right to the bottom. There is a management home group connection. Mouse click selection in front of Allow.
#5. Then click Save Changes below to save the settings just now.
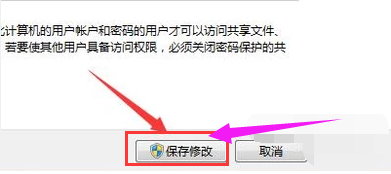
#6. After saving, you can see the shared computer in My Computer and Network.
The above is the detailed content of Computer name not recognized for network sharing. For more information, please follow other related articles on the PHP Chinese website!

Hot AI Tools

Undresser.AI Undress
AI-powered app for creating realistic nude photos

AI Clothes Remover
Online AI tool for removing clothes from photos.

Undress AI Tool
Undress images for free

Clothoff.io
AI clothes remover

AI Hentai Generator
Generate AI Hentai for free.

Hot Article

Hot Tools

Notepad++7.3.1
Easy-to-use and free code editor

SublimeText3 Chinese version
Chinese version, very easy to use

Zend Studio 13.0.1
Powerful PHP integrated development environment

Dreamweaver CS6
Visual web development tools

SublimeText3 Mac version
God-level code editing software (SublimeText3)

Hot Topics


We often encounter situations where two computers share the same folder, but most people don't know how to turn on this feature. Today I have brought you a detailed tutorial, let’s take a look at it. Tutorial method one for sharing folders between two win10 computers: Use storage devices such as mobile hard drives and USB flash drives to transfer data. Connect the external hard drive to the first computer, open the corresponding file management tool, find and locate your new device. To operate by copying the required files, connect the external hard drive to the second computer and copy-paste the files. Method 2: Use the network for file sharing and transfer. We first connect two computers to the same network, and enable file sharing and printer sharing services for them respectively. Click on "Control Panel

How to perform network sharing and file transfer on Kirin OS? Kirin operating system is an operating system developed based on the Linux kernel and is highly regarded for its stability and security. Network sharing and file transfer are very convenient on Kirin OS. This article will introduce you to some simple methods and code examples. 1. Use Samba for network sharing Samba is a software suite for sharing files and printers between Linux and Windows systems. The following is how to set up Samba on Kirin OS

Network sharing allows users to transfer and receive files to and from other users on the local network. It's perfect for people with multiple devices in the office or at home. However, many users have reported that network sharing does not work properly after upgrading to Windows 11. This can be due to a number of reasons, including issues with the operating system installer version. In addition to this, misconfigured settings, missing critical services, or missing permissions can cause network shares to not work in Windows 11. Many people who use both Windows 10 and Windows 11 devices on their local network have noticed that while the device running Windows 11 is able to access the Windows 10 PC, the reverse is not possible

When we use the win10 operating system, have we ever encountered a situation where the win10usb network shared computer is unresponsive? If you encounter this situation, do you know how to solve it? Let the editor tell you how to solve the problem of unresponsive win10usb network sharing computer! win10usb network sharing computer is not responding 1. Find this computer on the desktop, right-click and select "Manage". 2. Then click Device Manager and open "Universal Serial Bus Controller". 3. Then find the USB-related controller and uninstall the devices one by one, then "restart the computer", and the system will automatically reinstall the USB controller.

When using a network adapter, you may accidentally remove the only valid network adapter driver from your computer. Then what should be done? If you don't have an external WiFi adapter, you can't even use the internet to download the latest network adapter! Therefore, you must use another method to solve this problem. Fix 1 – Use USB tethering to download drivers You can use your Android/iOS internet connection to download and install driver updates. Step 1 – Connect using USB tethering All these steps you have to make on your phone. Step 1 – Connect your smartphone to your computer using a USB cable. Step 2 - Unlock your phone and open settings. Just drop down

Network shared folders are a very convenient feature that allows multiple computers to share files and folders on the same network. If users want to create and manage network shared folders on Windows computers, there are a few simple steps. Step 1: Set up network sharing To set up network sharing, you first need to make sure that your computer is connected to the network and that the network connection is enabled. To check the network connection status, press Win+R keys, type "ncpa.cpl" and press Enter. Next, select the network you want to use

The win10 system is an excellent system chosen by most users! Powerful work ability is the most eye-catching label of win10 system! Basically, most work involving computers generally uses the win10 system. Recently, many friends have reported that the computer name cannot be found in network sharing when using computers. Today, the editor will bring you the network Let’s take a look at the solution for sharing that the other party’s computer cannot be found. Solution to the problem that the computer name cannot be found in network sharing: Operation steps: 1. Right-click the network connection icon in the lower right corner of the computer desktop. 2. Click ‘Change advanced sharing settings’ in the upper left corner. Enter the sharing settings page. 3. Many people often do not turn on network discovery and cannot find shared computers.

1. Open the Control Panel and click [Select Home Group and Sharing Options]; as shown in the figure: 2. Click [Change advanced sharing settings]; as shown in the figure: 3. Select [Turn off network discovery] and [Turn off Files and Printers] Share] and finally click [Save Changes]. as the picture shows:
