How to connect to a wireless network on Windows 10
When we use win10 system, the function of connecting to wifi is also commonly used by us. Some friends may not know how to connect to wifi in win10. The editor thinks that we can find the network and Internet in the settings of the wim10 computer to make relevant settings, or use the services.ms service to make modifications during operation. Let’s take a look at the specific steps to see how the editor did it~ I hope it can help you.
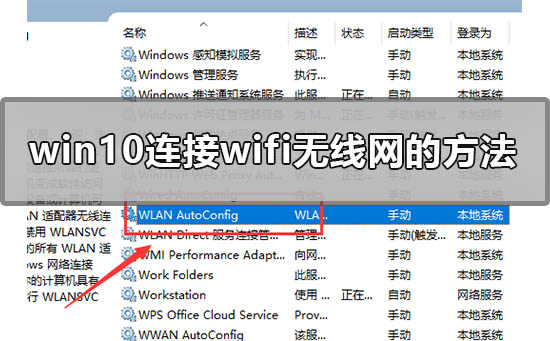

How to connect to wifi wireless network in windows10
Method 1
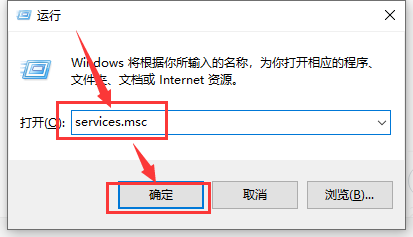
1. Press on the desktop Press the Win R key combination to open Run, enter services.msc and press Enter.
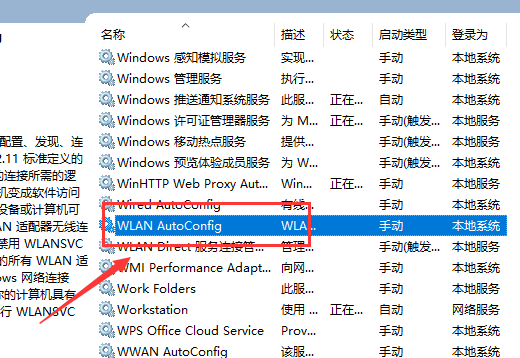
2. Then the service list below will open and find the WLAN AutoConfig service. This service is the wireless network service under the Win10 system.
It can be understood from the service description that stopping this service will cause all WLAN adapters on the computer to be unable to access Windows network connections, resulting in the wireless network being unable to connect and configure.
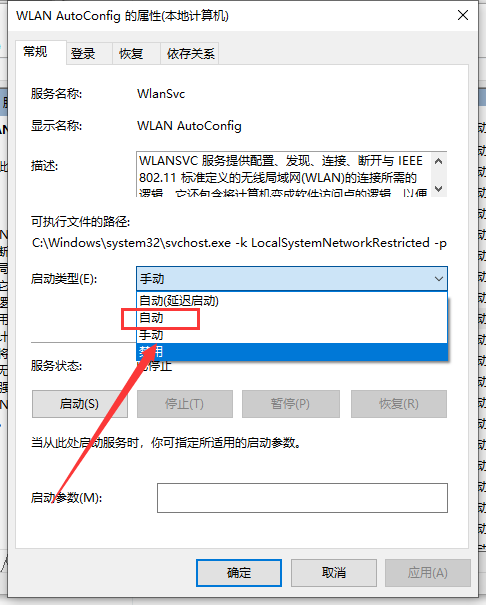
3. Double-click the left button to open the properties page of this service. In General, change the startup type to the default automatic, and then click Start to start this service
Then click Apply, OK, and save the changes so that you can turn on the wireless network service.
4. Now we are started.
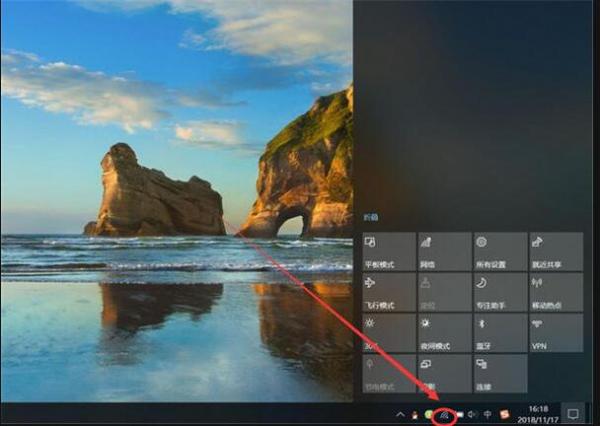
Method 2
1. Find the computer settings and open it.
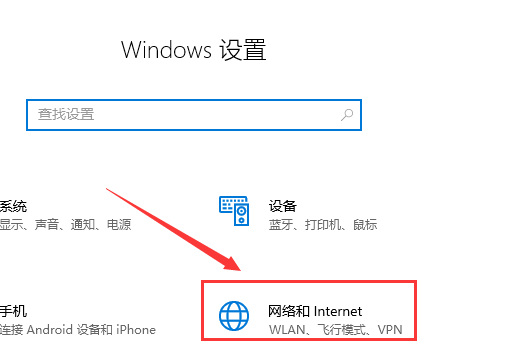
2. After clicking in, click Network and Internet.
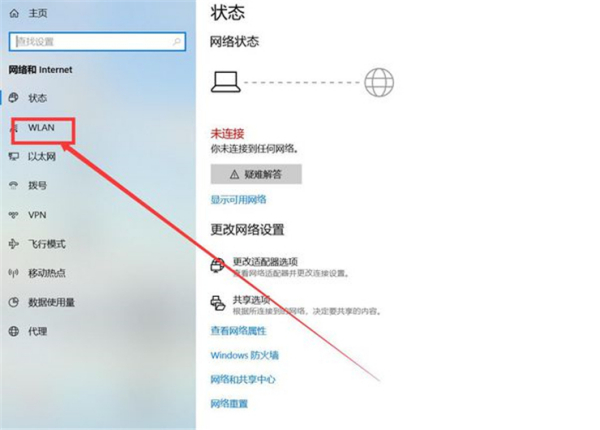
3. Then click WLAN as shown in the picture.
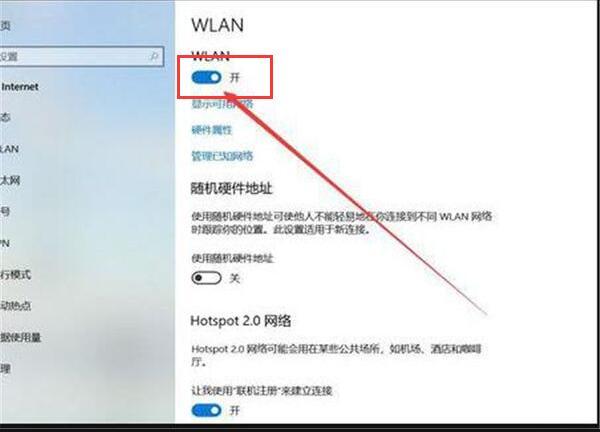
4. Then click to open.
More information about connecting to wifi in win10:
>>>Win10 cannot connect to wifi after update
>>>How to check WiFi password in Win10
>>>Win10 system laptop WiFi always disconnects automatically
The above is the detailed content of How to connect to a wireless network on Windows 10. For more information, please follow other related articles on the PHP Chinese website!

Hot AI Tools

Undresser.AI Undress
AI-powered app for creating realistic nude photos

AI Clothes Remover
Online AI tool for removing clothes from photos.

Undress AI Tool
Undress images for free

Clothoff.io
AI clothes remover

AI Hentai Generator
Generate AI Hentai for free.

Hot Article

Hot Tools

Notepad++7.3.1
Easy-to-use and free code editor

SublimeText3 Chinese version
Chinese version, very easy to use

Zend Studio 13.0.1
Powerful PHP integrated development environment

Dreamweaver CS6
Visual web development tools

SublimeText3 Mac version
God-level code editing software (SublimeText3)

Hot Topics
 How to connect keep body fat scale
Mar 07, 2024 pm 04:50 PM
How to connect the keep body fat scale? Keep has a specially designed body fat scale, but most users do not know how to connect the keep body fat scale. Next is the graphic tutorial on the connection method of the keep body fat scale that the editor brings to users. , interested users come and take a look! How to connect the keep body fat scale 1. First open the keep software, go to the main page, click [My] in the lower right corner, and select [Smart Hardware]; 2. Then on the My Smart Devices page, click the [Add Device] button in the middle; 3 , then select the device you want to add interface, select [Smart Body Fat/Weight Scale]; 4. Then on the device model selection page, click the [keep body fat scale] option; 5. Finally, in the interface shown below, finally [Add Now] at the bottom
 What to do if the HP printer cannot connect to wifi - What to do if the HP printer cannot connect to wifi
Mar 06, 2024 pm 01:00 PM
When many users use HP printers, they are not familiar with what to do if the HP printer cannot connect to wifi. Below, the editor will bring you solutions to the problem of HP printers not connecting to wifi. Let us take a look below. Set the mac address of the HP printer to automatically select and automatically join the network. Check to change the network configuration. Use dhcp to enter the password to connect to the HP printer. It shows that it is connected to wifi.
 Why can't I connect to Wi-Fi in Windows 10?
Jan 16, 2024 pm 04:18 PM
When we use the win10 operating system to connect to a wifi wireless network, we will find a prompt that the wifi network cannot be connected and is restricted. For this kind of problem, I think you can try to find your own network in the Network and Sharing Center, and then make a series of adjustments. Let’s take a look at the specific steps to see how the editor did it~Why can’t Win10 connect to wifi? Method 1: 1. Right-click the wireless WIFI icon in the notification area at the bottom of the computer screen, select “Open Network and Internet Settings”, and then Click the "Change Adapter Options" button. 2. In the pop-up network connection interface, look for the wireless connection named "WLAN", right-click again, and select "Close" (or "Disable"). 3. Wait
 What does printer error code 0x0000011b mean?
Feb 18, 2024 pm 10:02 PM
What does 0x0000011b mean when connecting to a printer? Users often encounter various error codes when using computers, laptops or other devices. Among them, 0x0000011b is a common printer connection error code. So, what does connecting printer 0x0000011b mean? First, we need to understand the basic principles of printer connection. When we need to print files from the computer, we usually need to connect the printer to the computer for data transfer between the two. This connection can be made via
 Solution to Win11 unable to display WiFi
Jan 29, 2024 pm 04:03 PM
WiFi is an important medium for us to surf the Internet, but many users have recently reported that Win11 does not display WiFi, so what should we do? Users can directly click on the service under the search option, and then select the startup type to change to automatic or click on the network and internet on the left to operate. Let this site carefully introduce to users the analysis of the problem of Win11 computer not displaying the wifi list. Method 1 to resolve the problem that the Wi-Fi list cannot be displayed on the win11 computer: 1. Click the search option. 3. Then we change the startup type to automatic. Method 2: 1. Press and hold win+i to enter settings. 2. Click Network and Internet on the left. 4. Subsequently
 How to solve limited network connection in Windows 10
Feb 19, 2024 pm 09:20 PM
Solutions to Restricted Network Connections in Win10 With the rapid development of technology, the Internet has become an indispensable part of people's lives. However, sometimes we may encounter some problems when connecting to the Internet on computers using the Windows 10 operating system, one of which is restricted connections. In this case, we cannot access web pages, download files, or use network functions normally. So, is there any way to solve this problem? This article will introduce you to several common solutions. 1. Check the network connection settings. First, I
 Shared printer cannot connect to printer
Feb 22, 2024 pm 01:09 PM
With the development of the digital era, shared printers have become an indispensable part of the modern office environment. However, sometimes we may encounter the problem that the shared printer cannot be connected to the printer, which will not only affect work efficiency, but also cause a series of troubles. This article aims to explore the reasons and solutions for why a shared printer cannot connect to the printer. There are many reasons why a shared printer cannot connect to the printer, the most common of which is network issues. If the network connection between the shared printer and the printer is unstable or interrupted, normal operation will not be possible.
 What is the reason why the wifi function cannot be turned on? Attachment: How to fix the wifi function that cannot be turned on
Mar 14, 2024 pm 03:34 PM
Nowadays, in addition to data and wifi, mobile phones have two ways to access the Internet, and OPPO mobile phones are no exception. But what should we do if we can’t turn on the wifi function when using it? Don't worry yet, you might as well read this tutorial, it will help you! What should I do if my phone’s wifi function cannot be turned on? It may be because there is a slight delay when the WLAN switch is turned on. Please wait 2 seconds to see if it is turned on. Do not click continuously. 1. You can try to enter "Settings>WLAN" and try to turn on the WLAN switch again. 2. Please turn on/off airplane mode and try to turn on the WLAN switch again. 3. Restart the phone and try to see if WLAN can be turned on normally. 4. It is recommended to try restoring factory settings after backing up data. If none of the above methods solve your problem, please bring the purchased


