

Win7 startup speed optimization tutorial

Win7 startup speed is a very important part for us to measure the performance of a computer, and it is related to whether we can put it into use quickly. Startup speed is not only related to hardware configuration, but can also be optimized through system configuration. Let’s take a look at it below.
win7 startup speed optimization tutorial
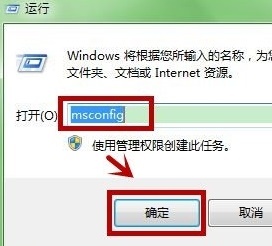
1. First open Run, enter "msconfig" and click "OK"

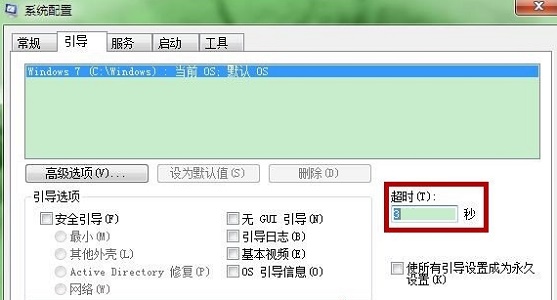
2. In the figure Display location to change the timeout to "3" seconds.
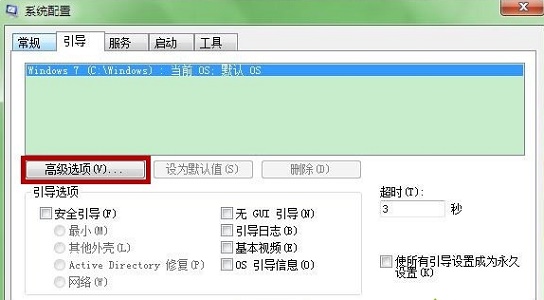
3. Then click "Advanced Options"
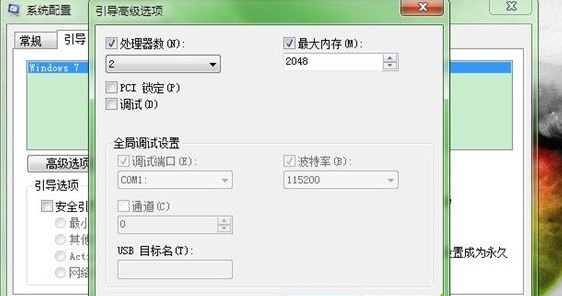
4. Change the number of processors to "2". Check "Maximum Memory" as shown in the figure.
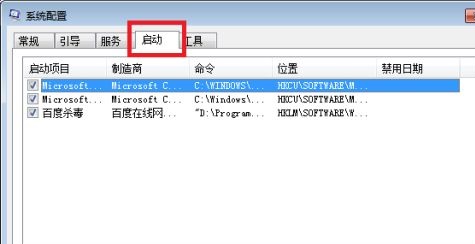
#5. Then go to the "Startup" tab and uncheck unnecessary startup items.
The above is the detailed content of Win7 startup speed optimization tutorial. For more information, please follow other related articles on the PHP Chinese website!

Hot AI Tools

Undresser.AI Undress
AI-powered app for creating realistic nude photos

AI Clothes Remover
Online AI tool for removing clothes from photos.

Undress AI Tool
Undress images for free

Clothoff.io
AI clothes remover

Video Face Swap
Swap faces in any video effortlessly with our completely free AI face swap tool!
Hot Article
Hot Tools

Notepad++7.3.1
Easy-to-use and free code editor

SublimeText3 Chinese version
Chinese version, very easy to use

Zend Studio 13.0.1
Powerful PHP integrated development environment

Dreamweaver CS6
Visual web development tools

SublimeText3 Mac version
God-level code editing software (SublimeText3)
Hot Topics
 1657
1657
 14
1415
52
1309
25
1257
29
1230
24
14
1415
52
1309
25
1257
29
1230
24

 Improving the visual effects of Windows 7: Optimization Guide
Jan 06, 2024 am 08:59 AM
Improving the visual effects of Windows 7: Optimization Guide
Jan 06, 2024 am 08:59 AM
Visual effects are our most subjective experience when using win7. Therefore, the system is very user-friendly and has designed a way for us to directly change the visual effects settings. We only need to find the visual effects in the advanced system settings in the system to proceed directly. The settings have been optimized, let’s take a look below. Win7 visual effects optimization tutorial 1. First, we right-click to open the computer and click "Properties" 2. Find the "Advanced System Settings" option. 3. Click "Settings" under Performance 4. Under the Visual Effects tab, you can optimize the visual effects. If you want the best performance, you can check "Adjust for best performance". If you want the best appearance, check "Adjust for best performance". Select "Adjust for best appearance" 5. If you don't know how to optimize, just check "Let windo
 How to optimize Win11 game performance? 7 Tutorials to Optimize Win11 Game Performance
Jan 29, 2024 pm 06:24 PM
How to optimize Win11 game performance? 7 Tutorials to Optimize Win11 Game Performance
Jan 29, 2024 pm 06:24 PM
Many users find that playing games is not very smooth after upgrading their win11 system. In order to give us another good gaming experience, we can choose to optimize game performance. So how do we do this? Let this site carefully introduce to users 7 ways to optimize Win11 game performance. Interested users can take a look. 7 ways to optimize Win11 game performance. Method 1: Cancel the function of improving pointer precision. If you are using a portable computer (notebook), it is recommended to enable the function of improving pointer precision in Win11 to improve the touchpad experience. For desktop computer users, it is recommended to disable this feature in Win11 for a better gaming experience. Step 1. Press Win
 Guide to optimizing Win7 network settings
Dec 28, 2023 pm 12:09 PM
Guide to optimizing Win7 network settings
Dec 28, 2023 pm 12:09 PM
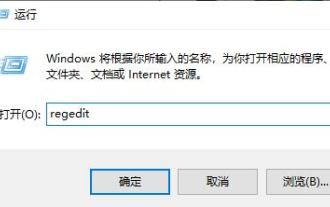
When we use win7 system, we may encounter poor network conditions and insufficient network speed. At this time, we can alleviate this problem by optimizing network settings. You only need to make relevant edits in the registry. Let’s take a look below. Win7 network settings optimization tutorial 1. First, we use "win+r" to open the run, enter "regedit" and press Enter to confirm. 2. Go to this path location: "HKEY_LOCAL_MACHINE\SYSTEM\CurrentControlSet\services\Tcpip\Parameters" and double-click to open the "DefaultTTL" file on the right. 3. Change its value to "80
 'Skidrow.dll in computer' appears when Win7 starts the game
Jul 09, 2023 pm 05:41 PM
'Skidrow.dll in computer' appears when Win7 starts the game
Jul 09, 2023 pm 05:41 PM
How to solve the "Skidrow.dll in PC" issue when launching a game in Win7? When users start the game under Win7 system, they encounter the prompt "Skidrow.dll in the computer" and the game cannot be loaded. How to solve this problem? You can take a look at the introduction below. Here's how it works: 1. Download the Skidrow.dll file. 2. Unzip this folder, and then copy the file Skidrow.dll to the system directory. 32-bit system: C:\WINNT\System32. 64-bit system: C:\Windows\SysWOW64. 3. Then click "Start-Run" and enter "regsvr32skid" in the run input box.
 Win7 startup speed optimization tutorial
Dec 27, 2023 am 08:10 AM
Win7 startup speed optimization tutorial
Dec 27, 2023 am 08:10 AM
Win7 startup speed is a very important part for us to measure the performance of a computer, and it is related to whether we can put it into use quickly. Startup speed is not only related to hardware configuration, but can also be optimized through system configuration. Let’s take a look at it below. Win7 startup speed optimization tutorial 1. First open Run, enter "msconfig" and click "OK" 2. Change the timeout to "3" seconds in the icon position. 3. Then click "Advanced Options" 4. Change the number of processors to "2" and check "Maximum Memory", as shown in the figure. 5. Then go to the "Startup" tab and uncheck unnecessary startup items.
 What should I do if Win10 keeps spinning at startup? Solution for Win10 that keeps spinning at startup
Jul 15, 2023 am 11:57 AM
What should I do if Win10 keeps spinning at startup? Solution for Win10 that keeps spinning at startup
Jul 15, 2023 am 11:57 AM
Many users have encountered the problem that win10 keeps spinning at startup, so what should they do if win10 keeps spinning at startup? Users first need to enter msconfig, and then make settings through the settings in the system settings section. Through some simple Modifications can then solve the problem, so the following is the actual solution for win10 to spin up at startup. If you install it according to this method, it will be solved. What should I do if win10 keeps spinning at startup? 1. Press and hold the [win+R] keyboard shortcut on the keyboard to bring up the running window, type [msconfig] in the box, and press Enter to enter. 2. Go to the system settings page, select [Tools] on it, then find and select [Change UAC Settings], and click
 What should I do if Win10 keeps getting stuck in the bios loop when it starts and I can't exit? What should I do if Win10 keeps getting stuck in the bios loop when I start up?
Jul 08, 2023 am 08:02 AM
What should I do if Win10 keeps getting stuck in the bios loop when it starts and I can't exit? What should I do if Win10 keeps getting stuck in the bios loop when I start up?
Jul 08, 2023 am 08:02 AM
What should I do if win10 keeps stuck in bios loop during startup and cannot exit? This is a bug-like problem that many users have encountered. When users run win10 system software, they will find that the system software cannot be entered but keeps entering repeatedly. BIOS, so what should you do when you encounter this complicated problem? Users can follow the Win10 startup always looping BIOS solution provided here, enter the BIOS and perform settings, and this problem can be solved in the future. . What should I do if win10 keeps getting stuck in the BIOS loop when starting up? 1. Press the F2 key or the Delete key to enter the BIOS at startup, and switch the computer keyboard keys to Save&Exit 2. Select
 win7 solid state drive optimization tutorial
Jan 05, 2024 pm 11:32 PM
win7 solid state drive optimization tutorial
Jan 05, 2024 pm 11:32 PM
Nowadays, many friends have installed SSD solid state drives on their computers, which can greatly improve the reading and writing speed of the hard drive. But many of them don't know how to maximize the performance of solid-state drives, because they still need to perform a series of optimizations in the system settings. Let's take a look below. Win7 Solid State Drive Optimization Tutorial 1. Change the hard drive mode 1. Run and enter "regedit" and press Enter to confirm to open the registry. 2. Go to the "HKEY_LOCAL_MACHINESYSTEMCurrentControlSetServicesmsahci" path, double-click "Start" on the right and change the value to "0" 2. Turn on TRIM1 and open the "Command Prompt" as an administrator
