

How to solve win7 network limitation

Many friends don’t know what to do if win7 network is limited? Today, the editor will bring you a method to remove network restrictions on Windows 7 computers. Let’s take a look.

Win7 network restricted release method:
Method 1:
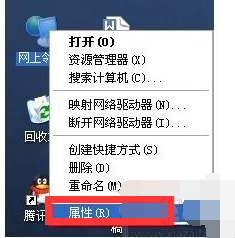
1. Right-click "My Computer" and then click "Properties".
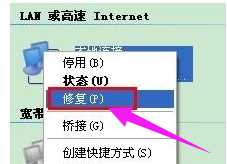
2. Then right-click "Local Area Connection" and click the "Repair" option.
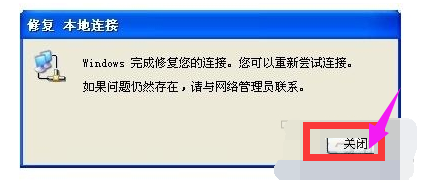
3. Then wait for the repair to be completed. Generally, the problem of limited or no local connection can be solved after repair.
Method 2:
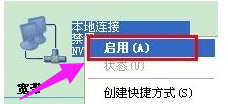
1. Generally, if the above method cannot solve the problem, you can try the following method, or think of method 1 first. Steps, first open Network Neighborhood!! Then right-click on the local area connection, and then click the "Deactivate" button
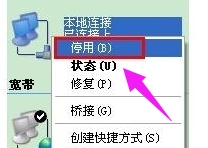
2. After deactivating, right-click on the "Local Area Connection"! Then Click the "Enable Button"! Then OK.
(The above is the solution that the editor brings to you on how to deal with limited win7 network! If it helps your problem, please pay attention to this site)
The above is the detailed content of How to solve win7 network limitation. For more information, please follow other related articles on the PHP Chinese website!

Hot AI Tools

Undresser.AI Undress
AI-powered app for creating realistic nude photos

AI Clothes Remover
Online AI tool for removing clothes from photos.

Undress AI Tool
Undress images for free

Clothoff.io
AI clothes remover

Video Face Swap
Swap faces in any video effortlessly with our completely free AI face swap tool!

Hot Article
Hot Tools

Notepad++7.3.1
Easy-to-use and free code editor

SublimeText3 Chinese version
Chinese version, very easy to use

Zend Studio 13.0.1
Powerful PHP integrated development environment

Dreamweaver CS6
Visual web development tools

SublimeText3 Mac version
God-level code editing software (SublimeText3)
Hot Topics
 1393
1393
 52
1207
24
52
1207
24

 How to quickly set up a network connection in Win11
Jan 08, 2024 pm 01:33 PM
How to quickly set up a network connection in Win11
Jan 08, 2024 pm 01:33 PM
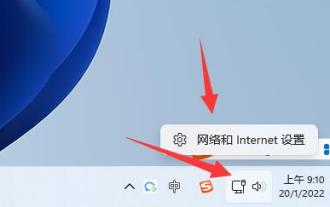
For most computer enthusiasts, when we connect to broadband, we usually need to enter the network sharing center to find the broadband connection and make relevant settings before we can successfully connect to the Internet. However, some users may want to create a broadband connection shortcut directly on the desktop because they find it troublesome to find it. Tutorial on setting win11 network connection as a shortcut 1. First, open the desktop of the computer, find the taskbar, click the lower right corner area, and find the network icon. 2. Then right-click the network icon and click the option "Network and Sharing Center". 3. Then click and position the mouse cursor on the "Change Adapter Settings" tab. 4. Finally, right-click on the "Broadband Connection" tab again and select "Create Shortcut".
 How to disable network recovery win11 tutorial
Jan 01, 2024 pm 12:04 PM
How to disable network recovery win11 tutorial
Jan 01, 2024 pm 12:04 PM
If we disable the network, it will cause problems such as being unable to connect to the Internet or being unable to use the network. So how to restore the disabled network in win11? In fact, we only need to re-enable it in the network and internet settings. How to restore disabled network in win11: 1. First click on the icon location to open the start menu. 2. Then open "Settings" in the start menu 3. Then click "Network and Internet" on the left sidebar 4. Then click "Advanced network settings" on the right 5. Finally find the disabled network and click "Enable" The network can be restored.
 How to quickly open network settings in win11
Dec 24, 2023 am 08:57 AM
How to quickly open network settings in win11
Dec 24, 2023 am 08:57 AM
In the system, we often speed up our Internet speed or related content by changing network settings. So how to quickly call up the network settings in win11? In fact, you only need to find the network icon in the lower right corner. How to quickly call up the network settings in win11: 1. We only need to right-click the "Network Icon" in the lower right corner. 2. After clicking, you can open the "Network and Internet Settings". 3. After opening, you can view various network properties in the Ethernet. 4. There are dial-up and advanced network settings below that can be modified.
 How to enable the computer network after it is disabled in win7 system
Jul 14, 2023 pm 01:37 PM
How to enable the computer network after it is disabled in win7 system
Jul 14, 2023 pm 01:37 PM
In the process of using the computer, sometimes we encounter the problem of being unable to access the Internet. The computer network is banned. Many friends ask how to use the win7 system after the computer network is banned? Today, Xiaobian will bring you how to enable win7 computer network. How to enable computer network after disabling win7 system? 1. First, we click on the Start icon to search for Control Panel and click on it. After clicking, we will pop up a new window. We can see a control panel option on this window. You can click to enter and then click to select Network & Internet options. 2. Then, we enter a new interface, we can see a Network and Sharing Center option, click to enter. 3. After that, we switch to a new interface and we can see a change adaptation
 How to solve the problem of network not being recognized when booting up win7 system
Jun 29, 2023 pm 12:48 PM
How to solve the problem of network not being recognized when booting up win7 system
Jun 29, 2023 pm 12:48 PM
How to solve the problem that the network is not recognized when the win7 system is turned on? When using a computer, some users encountered an error message that the network was not recognized after turning on the computer, causing the network at home to be unable to connect normally. How to solve this problem quickly by yourself? Many friends don’t know how to operate in detail. The editor below has compiled the solutions to the problem of network not being recognized when the win7 system is turned on. If you are interested, follow the editor and take a look below. ! Solution to the problem that the network is not recognized when the win7 system is started 1. Right-click the properties button on the computer icon. 2. Click the Device Manager command in the homepage bar of the Control Panel. 3. Expand Network Adapters in the pop-up Device Manager window and double-click
 How to solve the problem of red cross on Win11 network
Jul 01, 2023 am 10:02 AM
How to solve the problem of red cross on Win11 network
Jul 01, 2023 am 10:02 AM
How to solve the problem of red cross on Win11 network? Recently, when some Win11 users first started their computers and connected to the network, a red cross appeared on the network icon in the lower right corner of the computer, causing the network connection to fail. So is there any way to solve this situation? Many friends don’t know how to operate in detail. The editor below has sorted out the solutions to the red crosses appearing on the Win11 system network. If you are interested, follow the editor and take a look below! Solution to the red cross appearing on the Win11 system network Method 1. Troubleshooting 1. Right-click the network icon in the lower right corner, select Troubleshoot, and then wait for the system to automatically detect the problem. 2. Then select I encountered other problems on the pop-up page. 3.
 How to add network in win11
Jan 15, 2024 pm 03:36 PM
How to add network in win11
Jan 15, 2024 pm 03:36 PM
In this ever-changing digital world, the Internet has gradually evolved into one of the key elements supporting our daily learning, work, and leisure and entertainment. Therefore, we must master the skills of how to add a network to the Windows 11 operating system, which is undoubtedly crucial to our life and work. How to add a network in win11: 1. First, you need to click on the broadband icon located in the lower right corner of the screen, so that you can easily open the "Network and Internet Settings" function interface. 2. Next, please enter the "Dial-up" section in the network settings area. 3. When you successfully enter the "Dial-up" page, please tap the "Set up a new connection" tab at the top of the screen. 4. On the page that appears, click to select the "Set up a new network" option.
 How to solve win7 network limitation
Dec 28, 2023 pm 08:59 PM
How to solve win7 network limitation
Dec 28, 2023 pm 08:59 PM
Many friends don’t know what to do if win7 network is limited? Today, the editor will bring you a method to remove network restrictions on Windows 7 computers. Let’s take a look. Method to remove network restrictions in Windows 7: Method 1: 1. Right-click "My Computer" and then click "Properties". 2. Then right-click on "Local Area Connection" and click on the "Repair" option. 3. Then wait for the repair to be completed. Generally, the problem of limited local connection or no connection can be solved after repair. Method 2: 1. Generally, if the above method cannot solve the problem, you can try the following method, or think of method 1. The first step is to open Network Neighborhood!! Then right-click the local area connection, and then click the "Deactivate" button 2. After deactivating, right-click "Local Area Connection"!
