
 System Tutorial
Windows Series
How to effectively solve the problem of automatic lock screen in win10
System Tutorial
Windows Series
How to effectively solve the problem of automatic lock screen in win10
How to effectively solve the problem of automatic lock screen in win10

Win10’s automatic lock screen interface is very annoying. We can turn it off to avoid affecting our normal use. But sometimes we find that closing the lock screen is useless. At this time, it may be because we have not completely closed it. We can check each place that needs to be closed one by one to solve the problem.
Solution to turning off automatic screen lock in win10 is useless
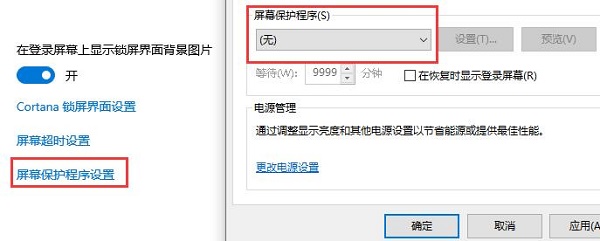
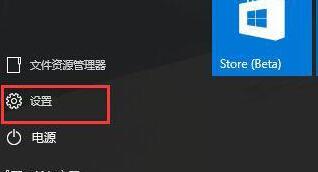
1. First, we enter settings and select “Personalization”

2. Then click "Lock Screen" on the left

3. Find the "Screen Saver Settings" below and confirm that the screen saver is "None"
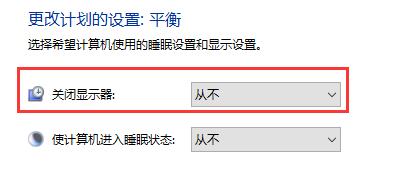
4. Then click "Change Power Settings" below

5. Click the icon button on the left.

6. Confirm the display is "Never"

7. Return to the previous interface and select " Change computer sleep time"

8. Confirm that turning off the monitor is "Never"
The above is the detailed content of How to effectively solve the problem of automatic lock screen in win10. For more information, please follow other related articles on the PHP Chinese website!

Hot AI Tools

Undresser.AI Undress
AI-powered app for creating realistic nude photos

AI Clothes Remover
Online AI tool for removing clothes from photos.

Undress AI Tool
Undress images for free

Clothoff.io
AI clothes remover

Video Face Swap
Swap faces in any video effortlessly with our completely free AI face swap tool!
Hot Article
Hot Tools

Notepad++7.3.1
Easy-to-use and free code editor

SublimeText3 Chinese version
Chinese version, very easy to use

Zend Studio 13.0.1
Powerful PHP integrated development environment

Dreamweaver CS6
Visual web development tools

SublimeText3 Mac version
God-level code editing software (SublimeText3)
Hot Topics
 1657
1657
 14
1415
52
1309
25
1257
29
1230
24
14
1415
52
1309
25
1257
29
1230
24

 How to turn off AirPlay on Mac
Apr 16, 2023 am 09:49 AM
How to turn off AirPlay on Mac
Apr 16, 2023 am 09:49 AM
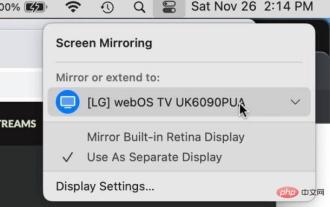
Turn off AirPlay on Mac via Control Center You can quickly turn off AirPlay in Mac OS Ventura 13 or later by doing the following: On a Mac with AirPlay enabled, go to Control Center in the upper right corner by clicking the two switch appearance icon and select " "Screen Mirroring" From the menu that appears, select the screen your Mac is AirPlay mirroring to. This will disconnect AirPlay and turn it off. You can also turn on ScreenMirroring and AirPlay this way, which you probably already know by now if you enabled it in the first place. . Disconnect AirPla on Mac via system settings
 What impact will changing the registry have on my computer?
Feb 18, 2024 pm 02:26 PM
What impact will changing the registry have on my computer?
Feb 18, 2024 pm 02:26 PM
Modifying the registry is a common task in computer operation. The registry is an important database for storing configuration information in the Windows operating system. It contains a lot of data about software and hardware configurations, user settings, and system options. By modifying the registry, users can make highly personalized customizations to the system. However, this operation may also have some impact on the computer. First, modifying the registry can change the behavior of the system. By modifying relevant key values, adding or deleting items, users can adjust the system's default settings, such as changing
 Win10 power option does not have high performance
Feb 07, 2024 pm 09:12 PM
Win10 power option does not have high performance
Feb 07, 2024 pm 09:12 PM
For notebook users, using Win10 power settings can run computers and games efficiently, but the problem of high-performance settings disappearing may bother you. The following will provide you with solutions to win10 power settings high performance missing to help you solve this problem. There is no high-performance solution for win10 power options: 1. Click the view mode at the top of the win10 system control panel window and switch to the "Large Icons" menu. 2. Click the power options icon, as shown in the figure. 3. The power options interface shows balanced mode, but there is no high-performance mode. 4. Click "Create Power Plan" on the left. 5. Select "High Performance", name it and click Next. 6. Set the time to turn off the display or enter sleep mode, and click Create.
 How to set up USB disk boot in the system
Feb 12, 2024 pm 07:45 PM
How to set up USB disk boot in the system
Feb 12, 2024 pm 07:45 PM
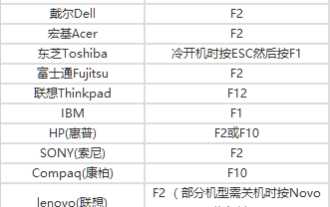
Many friends don’t know how to enter the BIOS interface of a laptop, set the startup options and then create a U disk boot tool. First, you need to know what brand your laptop is. Next, I will teach you how to enter the BIOS interface. Friends in need can refer to it. After using Xiaobai's one-click reinstallation system to create a U disk boot tool, insert the U disk into the reinstalled computer. I don’t know how to enter the BIOS to set the USB boot options, so I can’t enter the Xiaobai PE interface to install the system. How to enter the BIOS interface on a laptop? In fact, this is a great solution. Let’s learn how to enter your laptop’s BIOS! Laptop startup BIOS shortcut keys: General brands of laptops include
 How to solve the problem that win7 window becomes an old version
Jan 09, 2024 am 10:29 AM
How to solve the problem that win7 window becomes an old version
Jan 09, 2024 am 10:29 AM
Some win7 users reported that when they were using the system, they suddenly found that the window interface had changed to an old version, which was very uncomfortable and inconvenient to use, but they could not find the version they used before in personalization. What should we do? In fact, we only need to turn on the theme service. Let’s take a look below. The win7 window becomes an old version. Solution 1. First, click the start menu in the lower left corner, find the run box, enter "services.msc" 2. Then run the corresponding program in the search results above. 3. Find “themes” and double-click to open it. 4. Set the startup type to "Startup", and then click "Start" below. 5. After confirming that it is completed, return to the desktop, right-click the blank space and select "Personalize" 6. Finally, click the icon
 Detailed step-by-step tutorial on where to set up win7 hibernation settings
Jul 20, 2023 pm 07:33 PM
Detailed step-by-step tutorial on where to set up win7 hibernation settings
Jul 20, 2023 pm 07:33 PM
When we do not use the win7 computer for a while, the running win7 system will automatically enter the hibernation state. At this time, some running programs in the system will inevitably be interrupted. Next, the editor will teach you how to set up win7 hibernation. . Where are the hibernation settings in win7: 1. First, we press the "win+R" keys to open the run window, enter the command "cmd" and press Enter. 2. In the command prompt window that opens, enter the command "powercfg-hon" and press Enter to confirm. This will enable the computer's hibernation function. 3. Then we right-click the start menu and see the "Hibernate" option. Method Two: 1. Click the "Power" icon in the lower right corner of the desktop, and in the pop-up
 Steps to set up automatic network search in WIN10 system
Mar 27, 2024 pm 05:00 PM
Steps to set up automatic network search in WIN10 system
Mar 27, 2024 pm 05:00 PM
1. Open the [Start] menu and click the [Settings] option in the list. 2. Click [Network and Internet] in settings. 3. After opening the network and Internet interface, if you are currently using a wired network, select [Ethernet] network; if it is a wireless network, select [WiFi]. 4. Click on the currently active network signal, and a [Find Devices and Content] switch will appear. If it is off, just drag the slider to turn it on.
 Where can I find the settings of win7 system?
Jul 11, 2023 pm 04:41 PM
Where can I find the settings of win7 system?
Jul 11, 2023 pm 04:41 PM
Many friends may not be familiar with how to use it when they first upgraded the win7 system, and they don’t know where to find the system settings. Let me tell you where to open the settings of the win7 system. 1. First, we right-click "Computer" on the desktop, and then select the "Properties" option. 2. Then click [Control Panel Home] in the upper left corner. 3. Then you can open the control home page to adjust settings. 4. Of course, users can also click the Start menu directly and click [Control Panel] in the right column. In summary, through the above steps, you can open the win7 computer system setting options. In this setting interface, we can make some basic settings for the system, including the most basic visual effects such as wallpaper and brightness. Let's go and experience it.
