Learn how to install third-party fonts on Red Hat Linux
Many friends who have used Windows and then use Red Hat Linux will definitely feel that the fonts of Red Hat Linux pale in comparison. Of course, if you want Red Hat Linux to look more beautiful, the best way is to "move" your favorite fonts to the Red Hat system. However, compared with installing fonts on Windows, adding a third-party font on Linux is simply "difficult" for some Linux novices. So, what exactly do you need to do to add third-party fonts to Red Hat Linux?
1. File attribute location
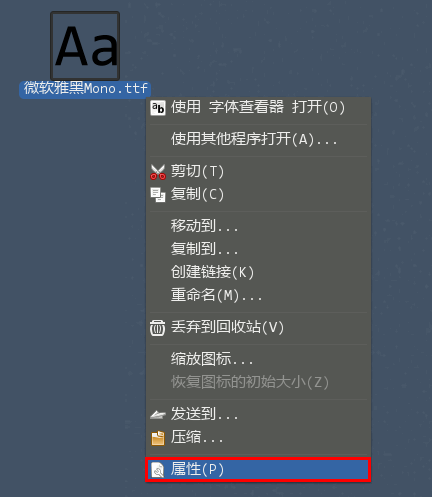
1. First, find the font you want to replace in the Red Hat Linux system, then right-click the font and click "Properties".
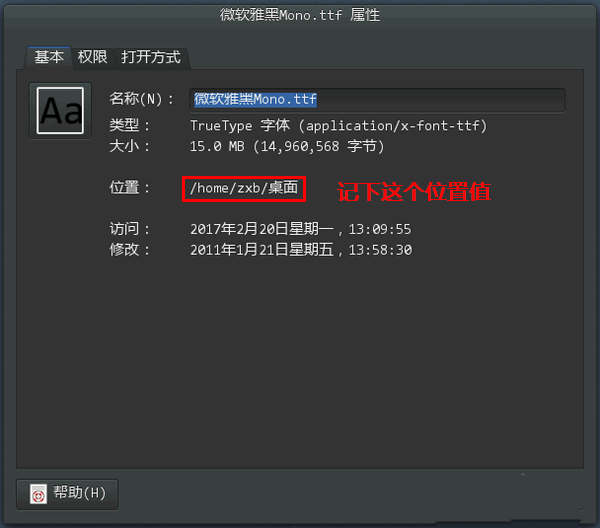
2. Then, find the location of the font file in the font file properties , write it down, and finally close the properties window.
2. Copy the font file to the system font folder
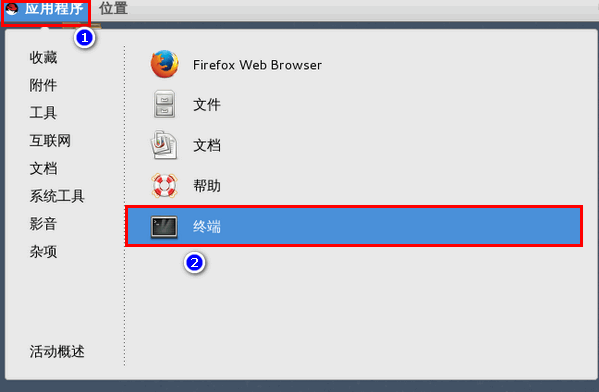
1. Click "Application" to start "Terminal".
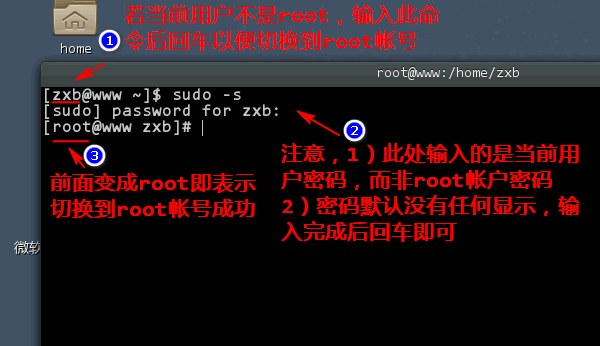
2. After opening the terminal, if the current user is not the root user, switch to the root user.
1) Type sudo -s
2) Enter the current user password and press Enter (note, not the root user password)
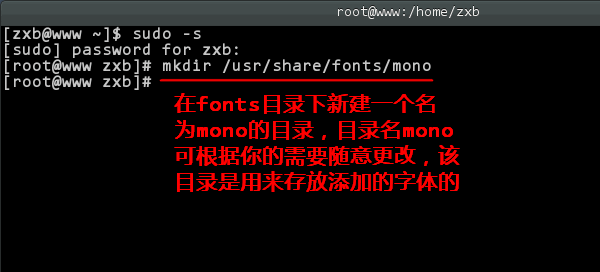
3. Use the mkdir command to create a new folder in the /usr/share/fonts directory. This folder is used to store the files we want to add. font file. The name of the folder can be customized. For example, I named it mono.
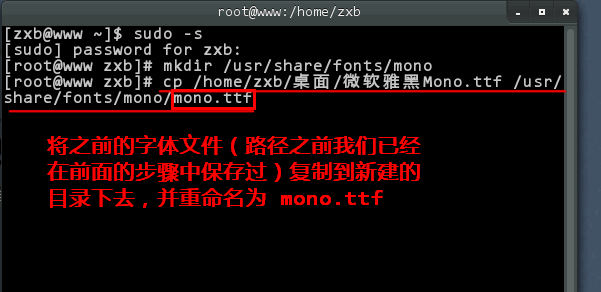
4. Then use the cp command to copy the font file to the newly created folder. Note that the last item is the name of the copied file, which can be different from the original font file name (but the extension must be the same), here it is mono.ttf.
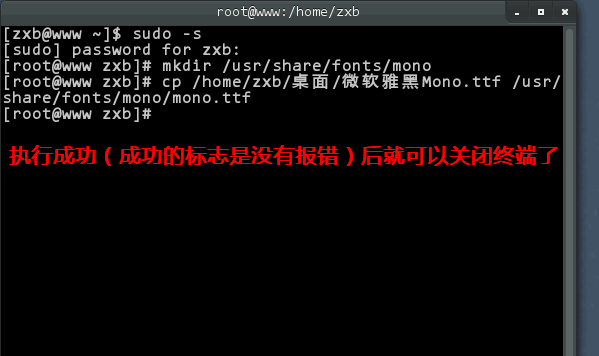
5. After the copy is successful, you can close the terminal window.
Notice:
1) The sign of successful copying is that no error message is given.
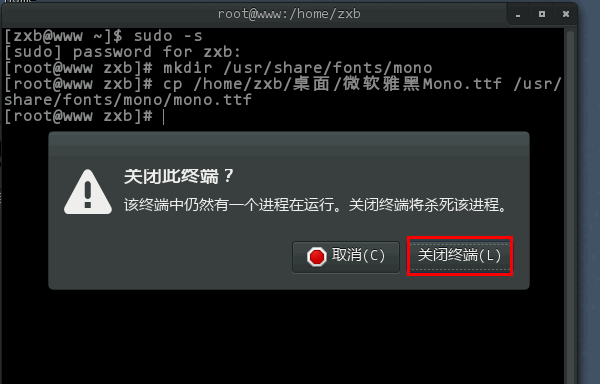
2) When closing the terminal, if a warning prompt pops up, just ignore it.
3. Use new fonts
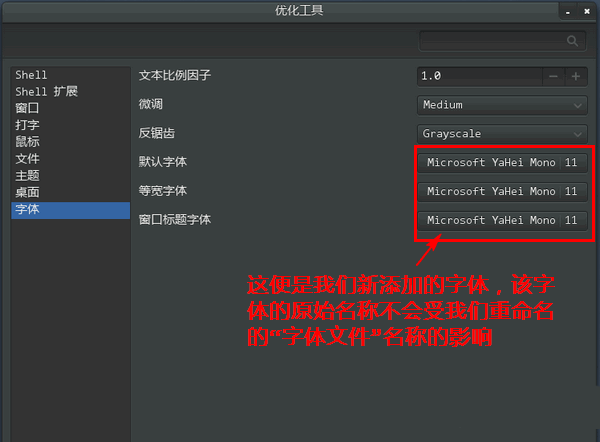
1. Now, we can replace the system interface font with our newly added font in "Optimization Tool"-"Font" .
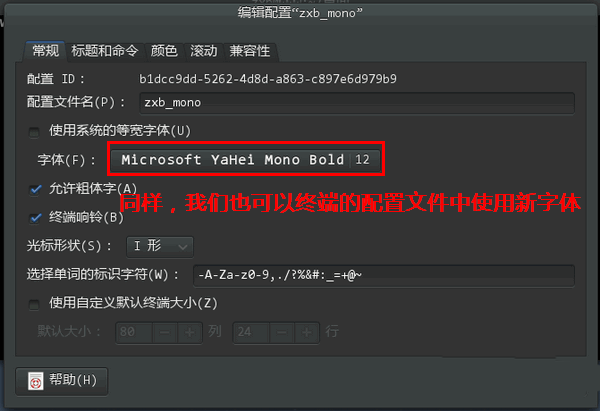
2. Of course, we can also change the terminal configuration file and set the terminal font to our newly added font.
related suggestion:
How to install Thunder Express Edition on Linux?
How to install MeituXiuXiu in Linux?
How to enable gc settings for logs in tomcat in Linux?
The above is the detailed content of Learn how to install third-party fonts on Red Hat Linux. For more information, please follow other related articles on the PHP Chinese website!

Hot AI Tools

Undresser.AI Undress
AI-powered app for creating realistic nude photos

AI Clothes Remover
Online AI tool for removing clothes from photos.

Undress AI Tool
Undress images for free

Clothoff.io
AI clothes remover

AI Hentai Generator
Generate AI Hentai for free.

Hot Article

Hot Tools

Notepad++7.3.1
Easy-to-use and free code editor

SublimeText3 Chinese version
Chinese version, very easy to use

Zend Studio 13.0.1
Powerful PHP integrated development environment

Dreamweaver CS6
Visual web development tools

SublimeText3 Mac version
God-level code editing software (SublimeText3)

Hot Topics
 Android TV Box gets unofficial Ubuntu 24.04 upgrade
Sep 05, 2024 am 06:33 AM
For many users, hacking an Android TV box sounds daunting. However, developer Murray R. Van Luyn faced the challenge of looking for suitable alternatives to the Raspberry Pi during the Broadcom chip shortage. His collaborative efforts with the Armbia
 deepseek web version entrance deepseek official website entrance
Feb 19, 2025 pm 04:54 PM
DeepSeek is a powerful intelligent search and analysis tool that provides two access methods: web version and official website. The web version is convenient and efficient, and can be used without installation; the official website provides comprehensive product information, download resources and support services. Whether individuals or corporate users, they can easily obtain and analyze massive data through DeepSeek to improve work efficiency, assist decision-making and promote innovation.
 How to install deepseek
Feb 19, 2025 pm 05:48 PM
There are many ways to install DeepSeek, including: compile from source (for experienced developers) using precompiled packages (for Windows users) using Docker containers (for most convenient, no need to worry about compatibility) No matter which method you choose, Please read the official documents carefully and prepare them fully to avoid unnecessary trouble.
 BitPie Bitpie wallet app download address
Sep 10, 2024 pm 12:10 PM
How to download BitPie Bitpie Wallet App? The steps are as follows: Search for "BitPie Bitpie Wallet" in the AppStore (Apple devices) or Google Play Store (Android devices). Click the "Get" or "Install" button to download the app. For the computer version, visit the official BitPie wallet website and download the corresponding software package.
 BITGet official website installation (2025 beginner's guide)
Feb 21, 2025 pm 08:42 PM
BITGet is a cryptocurrency exchange that provides a variety of trading services including spot trading, contract trading and derivatives. Founded in 2018, the exchange is headquartered in Singapore and is committed to providing users with a safe and reliable trading platform. BITGet offers a variety of trading pairs, including BTC/USDT, ETH/USDT and XRP/USDT. Additionally, the exchange has a reputation for security and liquidity and offers a variety of features such as premium order types, leveraged trading and 24/7 customer support.
 Detailed explanation: Shell script variable judgment parameter command
Sep 02, 2024 pm 03:25 PM
The system variable $n is the parameter passed to the script or function. n is a number indicating the number of parameters. For example, the first parameter is $1, and the second parameter is $2$? The exit status of the previous command, or the return value of the function. Returns 0 on success, 1 on failure $#Number of parameters passed to the script or function $* All these parameters are enclosed in double quotes. If a script receives two parameters, $* is equal to $1$2$0The name of the command being executed. For shell scripts, this is the path to the activated command. When $@ is enclosed in double quotes (""), it is slightly different from $*. If a script receives two parameters, $@ is equivalent to $1$2$$the process number of the current shell. For a shell script, this is the process I when it is executing
 Zabbix 3.4 Source code compilation installation
Sep 04, 2024 am 07:32 AM
1. Installation environment (Hyper-V virtual machine): $hostnamectlStatichostname:localhost.localdomainIconname:computer-vmChassis:vmMachineID:renwoles1d8743989a40cb81db696400BootID:renwoles272f4aa59935dcdd0d456501Virtualization:microsoftOperatingSystem:CentOS Linux7(Core)CPEOSName:cpe:
 Ouyi okx installation package is directly included
Feb 21, 2025 pm 08:00 PM
Ouyi OKX, the world's leading digital asset exchange, has now launched an official installation package to provide a safe and convenient trading experience. The OKX installation package of Ouyi does not need to be accessed through a browser. It can directly install independent applications on the device, creating a stable and efficient trading platform for users. The installation process is simple and easy to understand. Users only need to download the latest version of the installation package and follow the prompts to complete the installation step by step.


