

How to solve KB4512474 installation failure problem

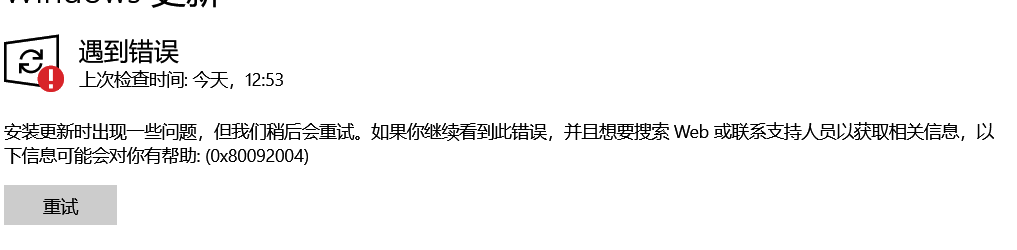
When we installed the KB4512474 patch, the installation failed. I think you can try to check whether windows update, app readiness, Cryptographic Services and other services are turned on, or if there are external devices, remove the external devices and set the C drive Ensure that space reservation is above 25GB and other solutions. For more detailed solutions, please take a look at the solution tutorial brought by the editor~
What to do if KB4512474 fails to install
It may vary depending on the situation. The editor has prepared five solutions
Solution 1
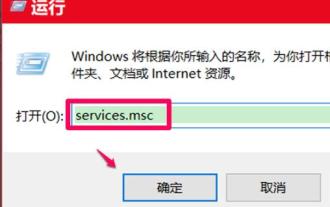
1. Check whether the...
2. Make sure to reserve more than 25GB of C drive space.
3. If there is an external device, remove the external device.
4. Delete this folder. It is recommended to make a file backup.
5. If yes, open the third-party protection and optimization software, check whether there are system services in the optimization project list, and restore the optimization project.
6. If it is installed, uninstall it and check again.
7. Installing certain plug-ins may also cause this problem. Uninstall them to eliminate the problem.
Option 2: Re-download and install the patch
During the process of downloading the patch, we may encounter file corruption, so the damaged patch installation package cannot be installed successfully. In this case, you can try to download a patch installation package and reinstall it.
Option three, upgrade version
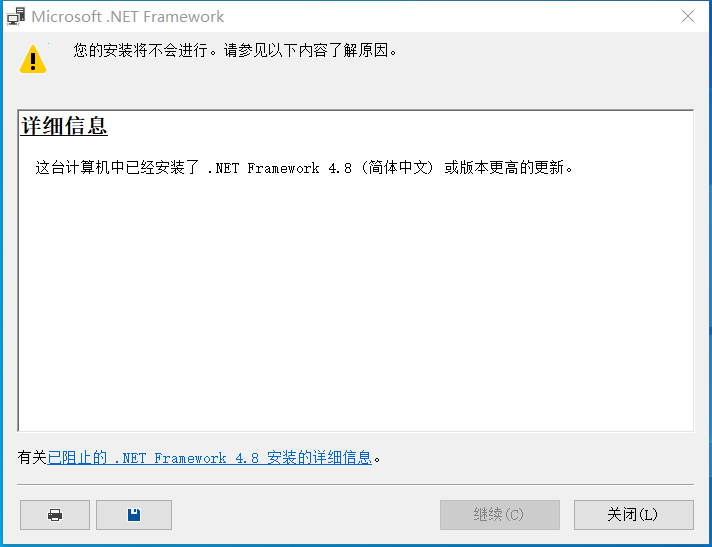
Update and upgrade the latest .net framework (currently version 4.8)
Option four
1. Click the Start button > Enter cmd > Right-click "Command Prompt" in the search results > Run as administrator
2. Run in the opened command prompt window:
net stop wuauserv
net Stop cryptSvc
ren C:\Windows\SoftwareDistribution SoftwareDistribution.old
ren C:\Windows\System32\catroot2 catroot201d
net Start wuauserv
net start cryptSvc
Option 5
1. Uninstall third-party security software from the device and system optimization software (if available).
2. Press "Windows logo key R", enter "msconfig", and press Enter to start the system configuration page. Click "Services" > "Hide all Microsoft services" and click "Disable all".
3. Right-click the taskbar to start the Task Manager. Click the "Startup" tab to disable all startup items.
4. Restart the device through the start menu (please choose to restart the device, do not choose to shut down and then restart).
The above is the detailed content of How to solve KB4512474 installation failure problem. For more information, please follow other related articles on the PHP Chinese website!

Hot AI Tools

Undresser.AI Undress
AI-powered app for creating realistic nude photos

AI Clothes Remover
Online AI tool for removing clothes from photos.

Undress AI Tool
Undress images for free

Clothoff.io
AI clothes remover

AI Hentai Generator
Generate AI Hentai for free.

Hot Article
Hot Tools

Notepad++7.3.1
Easy-to-use and free code editor

SublimeText3 Chinese version
Chinese version, very easy to use

Zend Studio 13.0.1
Powerful PHP integrated development environment

Dreamweaver CS6
Visual web development tools

SublimeText3 Mac version
God-level code editing software (SublimeText3)
Hot Topics


 Win11 system update fails and prompts 0x8007001F
Mar 06, 2024 pm 03:10 PM
Win11 system update fails and prompts 0x8007001F
Mar 06, 2024 pm 03:10 PM
Win11 system update fails and prompts 0x8007001F. Recently, when trying to update the win11 system, I encountered the problem that the update failed and prompted error code 0x8007001F. I don’t know how to solve it. Is there any way to solve this problem? Solution: 1. Check the network connection: First, make sure your network connection is stable, because the system update requires a good network connection to proceed smoothly. Try reconnecting to the network or try updating again in a different network environment. 2. Clear the update cache: Sometimes the update cache may cause the update to fail. You can try clearing the update cache to solve the problem. Open a command prompt (run as administrator), enter the following command and press Enter to execute: netstopw
 When will Win11 24H2 be released? Attached is a summary of issues with Win1124H2 update failure
Feb 29, 2024 pm 03:50 PM
When will Win11 24H2 be released? Attached is a summary of issues with Win1124H2 update failure
Feb 29, 2024 pm 03:50 PM
When will Win1124H2 be released? Windows 1124H2 will be pre-installed (OEM) in June and will be officially rolled out to existing Windows 11 users on a large scale in September. Windows 1124H2 will support the next generation of AIPC, and some AIPCs will be pre-installed with the 24H2 version as early as June. The whistleblower found mention of "Windows 11 Version 24H2" in the group policy "EnableDelegatedManagedServiceAccountlogons" (enable authorized managed service account login), but this does not rule out the possibility of an official clerical error from Microsoft. Microsoft Plan 2
 How to solve win10 system update error code 0x80070006
Jan 15, 2024 am 11:42 AM
How to solve win10 system update error code 0x80070006
Jan 15, 2024 am 11:42 AM
When our win10 system computers are undergoing system upgrades, some friends will find that their computers display an error message: 0x80070006. For this problem, I think it may be due to the settings of our system. You can try to make relevant settings and modifications in the storage in the system settings options. Let’s take a look at how the editor did it for the specific steps~ I hope it can help you. , Win10 system update failed 0x80070006 solution steps: 1. Open the device, click the Windows menu in the lower right corner, and then click Settings; 2. After the settings window pops up, find and select the "System" option; 3. Then, in the system settings window Select the "Storage" column and click on the right side
 steam update failed
Jan 10, 2024 pm 05:18 PM
steam update failed
Jan 10, 2024 pm 05:18 PM
Solutions to failed steam update: 1. Check network connection; 2. Check disk space; 3. Restart Steam; 4. Delete temporary files; 5. Check firewall settings; 6. Reset Steam settings. Detailed introduction: 1. Check the network connection to ensure that the network connection is normal and can connect to the Steam server. If the network is unstable, you can try to switch to another network environment; 2. Check the disk space to ensure that the disk installed by Steam has enough space for updates. , if there is insufficient disk space, you can try cleaning and so on.
 What to do if Win11 24H2 update fails
Mar 02, 2024 pm 12:20 PM
What to do if Win11 24H2 update fails
Mar 02, 2024 pm 12:20 PM
Win11 is also very popular, but recently many friends have encountered the problem of Win1124H2 update failure. In fact, this problem is also a relatively frequent problem in recent days. To solve this problem, we first need to analyze the cause of the problem. What to do if the Win1124H2 update fails? 1. Press the keys at the same time to bring up the run window, enter and press Enter. 2. Use directory location to find and start the service, then click to pause, and then set it to manual start. 3. Open the folder in the system disk, select and clear the folder. 4. Restart the service, turn it on, and finally restart the computer.
 Solution to 0xc8000442 error, successfully fix Win10 update problem
Jan 13, 2024 pm 09:39 PM
Solution to 0xc8000442 error, successfully fix Win10 update problem
Jan 13, 2024 pm 09:39 PM
Win10 system is prone to malfunctions during automatic or manual updates, especially problems such as 0xc8000442, but it doesn't matter. Let's introduce the detailed solutions to you, let's take a look. What to do if win10 update fails 0xc8000442: Step 1: Turn off the Windows update service. 1. Press "Win+R" to open and enter services.msc. 2. Find "windowsupdate service" in the service window and double-click it. 3. Click "Stop" under General. 4. Then click "OK" again. 5. Return to the service window and you can see that windowsupdate has stopped. Step 2: Delete the update file. 1,
 What should I do if Win10 update fails and keeps undoing it? What should I do if Win10 cannot complete the update and is undoing the changes?
Feb 29, 2024 pm 06:30 PM
What should I do if Win10 update fails and keeps undoing it? What should I do if Win10 cannot complete the update and is undoing the changes?
Feb 29, 2024 pm 06:30 PM
When we update the Win10 system, we sometimes encounter the error message "Unable to complete update, undoing changes". What should we do at this time? This article will introduce several solutions to help you solve this problem. 1. Solution to booting up Method 1: Local Group Policy Editor 1. Press the [Win+R] key combination on the keyboard to open Run, enter the [gpedit.msc] command, and press [OK or Enter]; 2. In the Local Group Policy Editor window, expand to: Computer Configuration > Administrative Templates > Windows Components > Windows Update, then find [Configure Automatic Updates] and double-click to open it; 3. In the Configure Automatic Updates window, select
 The latest solution to win7 update prompt error code 0x80072f8f-0x20000
Feb 11, 2024 am 08:36 AM
The latest solution to win7 update prompt error code 0x80072f8f-0x20000
Feb 11, 2024 am 08:36 AM
More and more users are starting to use the win10 system, and some win7 users have received the error 0x80072f8f-0x20000 during the upgrade process. How to solve this? In order to solve this problem, the editor has compiled three solutions, which I will share with you below. Solution to win7 update win10 error code 0x80072f8f-0x20000 1. Verify the date and time of the computer 1. Go to "Start", click the "Start Menu" button icon, and then select "Settings" > "Time and Language" > "Date and Time&rdqu
