
 System Tutorial
LINUX
Guide to Configuring and Installing Windows Operating Systems in KVM for Ubuntu
System Tutorial
LINUX
Guide to Configuring and Installing Windows Operating Systems in KVM for Ubuntu
Guide to Configuring and Installing Windows Operating Systems in KVM for Ubuntu


Why bother with KVM virtual machine
Recently, due to company affairs, I don’t have much time to write, so I will use a technical article to make up for it.
The thing is like this, our company has a small thing that is developed based on an embedded system and does not belong to the Android or iOS platform. Well, what does this mean? This means that the language for developing this little thing is C language, not Java, Objective-C or Swift. So we need a Cross Compiler, also known as a cross-compilation environment, to compile this code.
In fact, the iOS App compiled by Xcode also belongs to the category of cross-compilation.
However, this cross-compilation environment is only for Windows platform! In fact, it seems that apart from GCC, the most useful cross-compilation environments are those under Windows. It is estimated that many students who play embedded systems should know that the Keil and IAR series are commonly used in the industry now. Unfortunately, both are Windows-specific and there are no macOS or Linux versions.
Why does Windows make me so unhappy? Because usually in order to better improve work efficiency, except when the industry application software that we have to use must run under Windows, we only use Mac instead of Windows. So, we basically don’t have idle and wealthy Windows hosts, no! There is no such thing at all. There is no such thing as "basically no".
On the server side, don’t even talk to me about Windows Server. As a crazy user of macOS and Ubuntu, it is impossible for me to run a Windows Server on Bare metal. We only run Linux on the server and are not interested in anything else.
Then the question is, we have an automated compilation system, which is also known as CI system (Continuous integration), using Atlassian's family bucket: Bitbucket, Bamboo, JIRA and Confluence, etc., all running on In a Docker virtualization container on the Linux platform.
Now we want to automate the compiler for this little thing, so as to better release manpower and make it easier to track and manage the content of each Release in the future. The first problem to solve is: we do not have a Windows server.
Since virtualization is so popular now, let’s use the existing Ubuntu server to virtualize a Windows. Okay, let’s go!
What is KVM
The full name of KVM is: Kernel-based Virtual Machine. In a simple sentence, it is a virtualization management system based on the Linux kernel.
This feature has been integrated since Linux kernel version 2.6.20. Simply understand that Docker is virtualization at the application layer, while KVM is virtualization at the system layer.
The difference is that the content of Docker virtualization must share the kernel with the Host host, which means that it can only run Linux-type systems.
KVM virtualizes the entire host, so it can install different operating systems and is not limited to Linux itself. When I have a fit later, I'll see if I can virtualize macOS on Ubuntu. In this way, there is no need to get a separate Mac host to automatically compile the iOS App.
Install KVM
I am using the Ubuntu 16.04 LTS version here. Considering long-term use and stability, I basically only choose the LTS version. The other versions are not much different, so just refer to it.
The first step is to install the KVM-related package files. Because my server is all command line and the X desktop is not installed, I added the --no-install-recommends parameter. Otherwise it will install packages like virt-viewer, which have X11 and many graphics libraries among their dependencies, none of which are needed. But if you enable the desktop system, you do not need to add this parameter.
$ sudo apt-get install --no-install-recommends qemu-kvm qemu-utils libvirt-bin virtinst cpu-checker
Let’s verify if everything is OK
$ kvm-ok
INFO: /dev/kvm exists
KVM acceleration can be used
Very good, everything goes well, let's get another bridge network. In fact, this is not necessary, it depends on your usage scenario.
KVM will create a virbr0 bridge network by itself, but this is a NAT network and there is no way to communicate with other hosts in the LAN, so don’t be lazy and build a bridge network yourself.
The reference configuration is as follows:
$ cat /etc/network/interfaces
# This file describes the network interfaces available on your system
# and how to activate them. For more information, see interfaces(5).
source /etc/network/interfaces.d/*
# The loopback network interface
auto lo
iface lo inet loopback
# The bridged network interface
auto br0
iface br0 inet static
address 1.2.3.4
netmask 255.255.255.0
gateway 1.2.3.1
dns-nameservers 1.2.3.1
bridge_ports enp9s0
bridge_stop off
bridge_fd 0
bridge_maxwait 0
Restart the network and verify the bridge status:
$ sudo systemctl restart networking
$ sudo brctl show
bridge name bridge id STP enabled interfaces
br0 8000.f079593874d9 no enp9s0
virbr0 8000.525400087ef2 yes virbr0-nic
OK, everything is normal and you can start creating a virtual host.
Create virtual host
KVM has only completed the first step, we still need to create a virtual host before we can continue.
Before we start, we need to prepare a few things:
1.Windows installation image
2.Virtio ISO and floppy disk image
3.VNC client (included with macOS)
I am using Virtio 0.1.126-2 version here. The operating system version is: Ubuntu 16.04.1 LTS.
Everything is ready, use the virt-install command to help create a virtual machine:
virt-install \
--name win10 \
--memory 2048 \
--vcpus sockets=1,cores=1,threads=2 \
--cdrom=/path/to/windows_10.iso \
--os-variant=win8.1 \
--disk /path/to/win10/win10.qcow2,bus=virtio,size=40 \
--disk /path/to/virtio/virtio-win-0.1.126_amd64.vfd,device=floppy \
--network bridge=br0,model=virtio \
--graphics vnc,password=Passw0rd,port=5910 \
--hvm \
--virt-type kvm
Basically the configuration information is all above, the virtual information machine configuration is as follows:
2G memory
1 CPU, 1 core, 2 threads
1 CDROM (Windows installation disc)
40G hard disk (system disk)
1 floppy drive (Virtio driver)
Open a VNC remote desktop on port 5910
If you enter the command correctly, you should get a similar feedback message:
Starting install...
Creating domain...
Domain installation still in progress. Waiting for installation to complete.
To put it simply, the virtual machine has been created, but because there is no graphical interface, there is no way to proceed. Once we have VNC connected, we can continue. This prompt will only appear once. After the system is installed, this startup waiting situation will not occur.
Install Windows 10
Although when we created the virtual machine, we specified the use of port 5910 to provide VNC remote desktop. However, this port cannot be accessed directly because it is bound to 127.0.0.1 by default, which means it can only be accessed locally. We need to first map the remote local port to the local port.
ssh -L 5910:127.0.0.1:5910 server
Then under macOS, ⌘ Space calls out Spotlight, and then enter:
vnc://127.0.0.1:5910
Enter the password in the pop-up window: Passw0rd
Then you can happily install the Windows system. If the hard disk cannot be recognized, you need to manually load the driver and select drive A and the corresponding Windows directory. Similarly, if the network card does not have a driver, the same method applies.
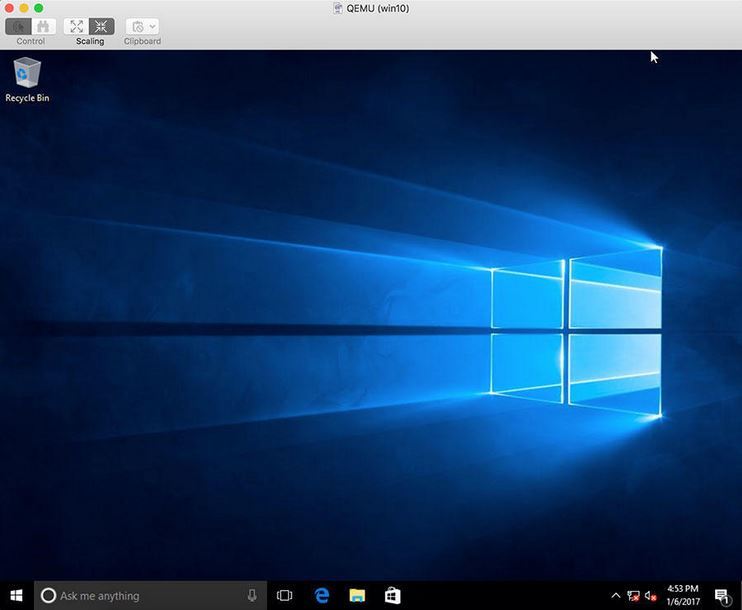
Attached is a screenshot of the installation completion:
The above is the detailed content of Guide to Configuring and Installing Windows Operating Systems in KVM for Ubuntu. For more information, please follow other related articles on the PHP Chinese website!

Hot AI Tools

Undresser.AI Undress
AI-powered app for creating realistic nude photos

AI Clothes Remover
Online AI tool for removing clothes from photos.

Undress AI Tool
Undress images for free

Clothoff.io
AI clothes remover

Video Face Swap
Swap faces in any video effortlessly with our completely free AI face swap tool!

Hot Article
Hot Tools

Notepad++7.3.1
Easy-to-use and free code editor

SublimeText3 Chinese version
Chinese version, very easy to use

Zend Studio 13.0.1
Powerful PHP integrated development environment

Dreamweaver CS6
Visual web development tools

SublimeText3 Mac version
God-level code editing software (SublimeText3)
Hot Topics
 1387
1387
 52
52

 Can I install mysql on Windows 7
Apr 08, 2025 pm 03:21 PM
Can I install mysql on Windows 7
Apr 08, 2025 pm 03:21 PM
Yes, MySQL can be installed on Windows 7, and although Microsoft has stopped supporting Windows 7, MySQL is still compatible with it. However, the following points should be noted during the installation process: Download the MySQL installer for Windows. Select the appropriate version of MySQL (community or enterprise). Select the appropriate installation directory and character set during the installation process. Set the root user password and keep it properly. Connect to the database for testing. Note the compatibility and security issues on Windows 7, and it is recommended to upgrade to a supported operating system.
 How to speed up the loading speed of PS?
Apr 06, 2025 pm 06:27 PM
How to speed up the loading speed of PS?
Apr 06, 2025 pm 06:27 PM
Solving the problem of slow Photoshop startup requires a multi-pronged approach, including: upgrading hardware (memory, solid-state drive, CPU); uninstalling outdated or incompatible plug-ins; cleaning up system garbage and excessive background programs regularly; closing irrelevant programs with caution; avoiding opening a large number of files during startup.
 How to solve mysql cannot connect to local host
Apr 08, 2025 pm 02:24 PM
How to solve mysql cannot connect to local host
Apr 08, 2025 pm 02:24 PM
The MySQL connection may be due to the following reasons: MySQL service is not started, the firewall intercepts the connection, the port number is incorrect, the user name or password is incorrect, the listening address in my.cnf is improperly configured, etc. The troubleshooting steps include: 1. Check whether the MySQL service is running; 2. Adjust the firewall settings to allow MySQL to listen to port 3306; 3. Confirm that the port number is consistent with the actual port number; 4. Check whether the user name and password are correct; 5. Make sure the bind-address settings in my.cnf are correct.
 How to pull the vertical reference line of PS
Apr 06, 2025 pm 08:18 PM
How to pull the vertical reference line of PS
Apr 06, 2025 pm 08:18 PM
Pull vertical guides in Photoshop: Enable ruler view (View > ruler). Hover the mouse over the vertical edge of the ruler, and then the cursor becomes a vertical line with double arrows and hold and drag the mouse to pull out the reference line. Click Delete by dragging the guide, or hovering it into a cross.
 Solutions to the errors reported by MySQL on a specific system version
Apr 08, 2025 am 11:54 AM
Solutions to the errors reported by MySQL on a specific system version
Apr 08, 2025 am 11:54 AM
The solution to MySQL installation error is: 1. Carefully check the system environment to ensure that the MySQL dependency library requirements are met. Different operating systems and version requirements are different; 2. Carefully read the error message and take corresponding measures according to prompts (such as missing library files or insufficient permissions), such as installing dependencies or using sudo commands; 3. If necessary, try to install the source code and carefully check the compilation log, but this requires a certain amount of Linux knowledge and experience. The key to ultimately solving the problem is to carefully check the system environment and error information, and refer to the official documents.
 MySQL can't be installed after downloading
Apr 08, 2025 am 11:24 AM
MySQL can't be installed after downloading
Apr 08, 2025 am 11:24 AM
The main reasons for MySQL installation failure are: 1. Permission issues, you need to run as an administrator or use the sudo command; 2. Dependencies are missing, and you need to install relevant development packages; 3. Port conflicts, you need to close the program that occupies port 3306 or modify the configuration file; 4. The installation package is corrupt, you need to download and verify the integrity; 5. The environment variable is incorrectly configured, and the environment variables must be correctly configured according to the operating system. Solve these problems and carefully check each step to successfully install MySQL.
 Unable to access mysql from terminal
Apr 08, 2025 pm 04:57 PM
Unable to access mysql from terminal
Apr 08, 2025 pm 04:57 PM
Unable to access MySQL from the terminal may be due to: MySQL service not running; connection command error; insufficient permissions; firewall blocks connection; MySQL configuration file error.
 Is PS slow loading related to other programs that are running?
Apr 06, 2025 pm 06:03 PM
Is PS slow loading related to other programs that are running?
Apr 06, 2025 pm 06:03 PM
The secrets to mastering Office software include: understanding different versions and platforms, correctly installing and configuring, proficient in using the software interface, in-depth understanding of feature operations, application collaboration and sharing functions, utilizing templates and styles, mastering advanced skills, and solving common problems. In addition, you need to choose a version that suits your needs, make good use of templates and styles, develop backup habits, and learn shortcut keys and advanced techniques to improve efficiency.
