

How to build a network storage device using Raspberry Pi

| Introduction | Do you have an idle mobile hard drive and Raspberry Pi? You can use these to build a cheap and low-power NAS. The end result is definitely not as good as a $500 NAS, such as those made by Synology DiskStation. But it's possible to build a low-power network storage platform - and especially for those who are tired of the National Security Agency's data surveillance, you can hide your data in this "little attic". |
You need a Raspberry Pi and one or two free external hard drives. The smaller 2.5mm hard drive can be powered directly by the USB interface, but we need a USB splitter with power supply function because the power provided by the Raspberry Pi's USB interface is not enough to power the mobile hard drive. Alternatively you can use a thumbdrive or even an SD card. In fact, what I am using now is built with a USB port mobile hard disk and a thumbdrive, and the operation process is the same.

With only one hard drive, you can build a network storage for sharing files, but with two hard drives, you can set up data backup in case one of the hard drives fails.
The initial step is to format the hard drive on your desktop computer. This is for convenience. If something goes wrong, we can unplug the hard drive from the NAS and read the data on it on a PC.
It can be formatted on the Raspberry Pi, but it will take a few hours. Formatting from the desktop is much faster. Do it now.
Set up SSH, enable the root user, and first set a password for the root user:
sudo -i
passwd root
(Enter your password)
Then run the raspi-config script on the command line. You can use the sudo command, or you can log out of the current user, and then log in as the root user. In the advanced options menu, turn on SSH.

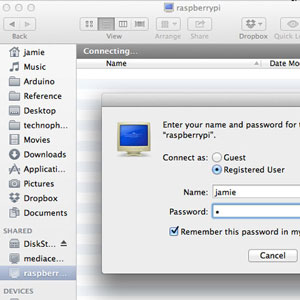
After restarting, you should be able to log in from another machine on the Internet (if you are on Windows, you can use Putty):
SSH root@[IP地址]
After logging in, find out what the number of the connected hard disk is under /dev. The following assumes that two hard drives are used to create a data backup. enter
fdisk -l
The mounted storage devices will be displayed. You should see a screen similar to this:
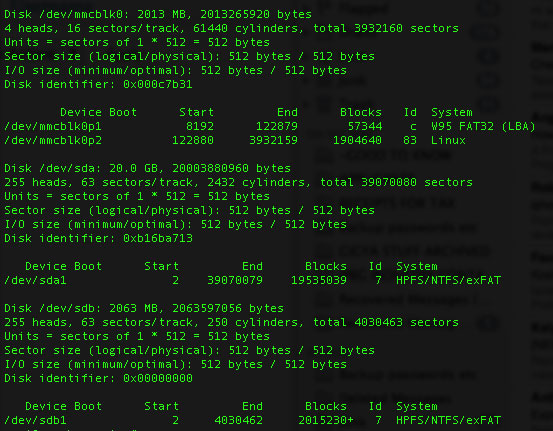
/dev/mmc is the partition of the Raspberry Pi system, and mmc refers to the SD card. /dev/sda1 and /dev/sdb1 have nothing to do with SD cards. These are USB hard disks that you plug in (originally meant to be SCSI drives, but now used to refer to any SATA port or other storage)
Install the ntfs-3g module, so we can read and write NTFS formatted hard drives.
apt-get install ntfs-3g
Then create a directory and use this directory as a mount point to mount the hard disk. For simplicity, we will refer to them as 1 and 2 below.
mkdir /media/1
mkdir /media/2
mount -t auto /dev/sda1 /media/1
mount -t auto /dev/sdb1 /media/2
mkdir /media/1/shares
mkdir /media/2/shares
Next we set up Samba. Samba is a network file sharing protocol used by Windows (in fact, the latest OSX Mavericks also supports it)
apt-get install samba
apt-get install samba-common-bin
cp /etc/samba/smb.conf /etc/samba/smb.conf.bak
nano /etc/samba/smb.conf
If you are not familiar with this type of configuration file, the # at the beginning of the line indicates that this line is a comment, so the configuration of this line will not take effect. To enable a function, you can add a line yourself, or you can remove the comment symbol in front of a certain line to make it take effect.
Let's start user security first; press CTRL-W and enter "security" to find the relevant options. Remove the comment symbol in front of this line:
security = user
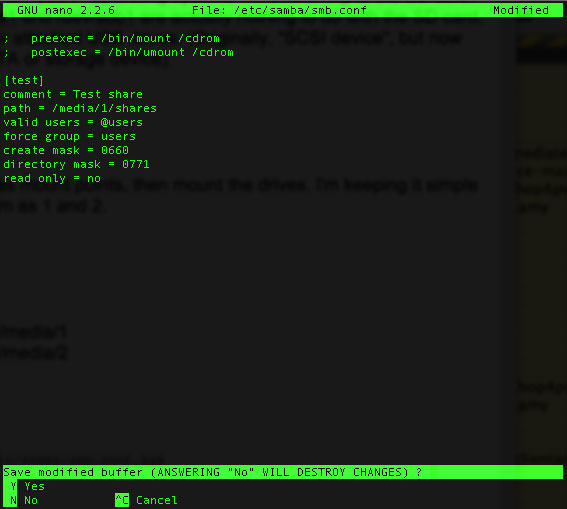
Then, move to the end of the text (or hold CTRL V until you reach the end) and add network shares, the number depends on your own needs. Use this format:
[test] comment = Test share
path = /media/1/shares
valid users = @users
force group = users
create mask = 0660
directory mask = 0771
read only = no
Only the configuration of the first hard drive - we will use the second hard drive to synchronize with the first one later for backup.
Then restart Samba with the following command.
service samba restart
Now add a user to your Raspberry Pi, assuming you don’t want to use the same user to access ("jamie" below is the username)
useradd jamie -m -G users
Enter the following command to set a password for the new user, and confirm after completion.
passwd jamie
Then we add this user to Samba. You need to confirm your password twice.
smbpasswd -a jamie
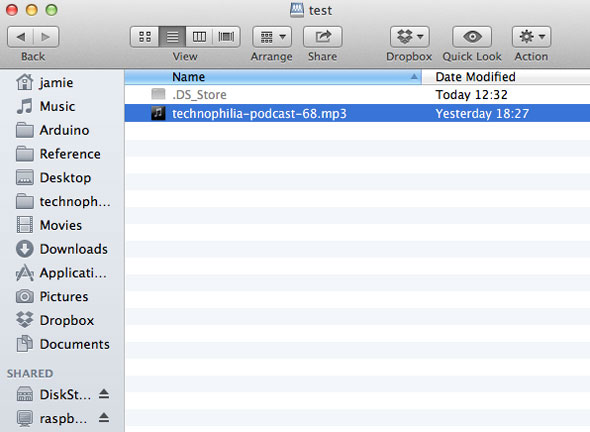
Then test the network storage function. You should be able to see it on other machines (Windows or Mac), and you should be able to write files to it.
There is still one problem. If you restart the Raspberry Pi, the drive mount will become invalid. To solve this problem, we need to install autofs.
apt-get install autofs
nano /etc/auto.master
Add a line below auto.master:
/media/ /etc/auto.ext-usb –timeout=10,defaults,user,exec,uid=1000
You can now restart safely without damaging the configuration.
data backupIf you have installed two hard drives, we can now use a script to synchronize data. If one hard drive fails, there will be a backup. We use rsync for backup.
apt-get install rsync
crontab -e
The crontab under Linux is a software used to automatically run a certain task. I briefly mentioned it in "Automatically Back Up Your Website". Add this line:
30 5 * * * rsync -av –delete /media/1/shares /media/2/shares/
The format of numbers is like this:
Minutes | Hours | Day of the month | Month | Day of the week
所以我们加进去的那一行,rsync命令会在每天的早晨5点30分运行(*通配符表示“所有”,所以会在“每个月的每一天”运行)
如果你想立刻进行一次备份,只要粘贴这个rsync的命令:
rsync -av –delete /media/1/shares /media/2/shares/
取决于共享文件夹里放的东西,耗费的时间可能只要几秒钟,也可能会长一些,在完成之后会给你一个报告。rsync最棒的地方在于它会记录哪些文件更新了,哪些文件添加近来或是应该被删除。你可以再试一遍那个命令,应该立刻就会完成的,因为rsync知道没有文件发生了变动。
教程到这里就结束了——现在你搭建起了自己的NAS,虽然细节上有待改进,但是现在就可以用起来了。虽然没有市面上出售的NAS那些华丽的特性,但是它也能漂亮地完成任务,而且耗电会少很多。
有问题请在评论区提出,我会尽力帮忙的,但是请确定你在使用最新的树莓派系统镜像。
The above is the detailed content of How to build a network storage device using Raspberry Pi. For more information, please follow other related articles on the PHP Chinese website!

Hot AI Tools

Undresser.AI Undress
AI-powered app for creating realistic nude photos

AI Clothes Remover
Online AI tool for removing clothes from photos.

Undress AI Tool
Undress images for free

Clothoff.io
AI clothes remover

AI Hentai Generator
Generate AI Hentai for free.

Hot Article
Hot Tools

Notepad++7.3.1
Easy-to-use and free code editor

SublimeText3 Chinese version
Chinese version, very easy to use

Zend Studio 13.0.1
Powerful PHP integrated development environment

Dreamweaver CS6
Visual web development tools

SublimeText3 Mac version
God-level code editing software (SublimeText3)
Hot Topics
 1377
1377
 52
52

 Unable to log in to mysql as root
Apr 08, 2025 pm 04:54 PM
Unable to log in to mysql as root
Apr 08, 2025 pm 04:54 PM
The main reasons why you cannot log in to MySQL as root are permission problems, configuration file errors, password inconsistent, socket file problems, or firewall interception. The solution includes: check whether the bind-address parameter in the configuration file is configured correctly. Check whether the root user permissions have been modified or deleted and reset. Verify that the password is accurate, including case and special characters. Check socket file permission settings and paths. Check that the firewall blocks connections to the MySQL server.
 C language conditional compilation: a detailed guide for beginners to practical applications
Apr 04, 2025 am 10:48 AM
C language conditional compilation: a detailed guide for beginners to practical applications
Apr 04, 2025 am 10:48 AM
C language conditional compilation is a mechanism for selectively compiling code blocks based on compile-time conditions. The introductory methods include: using #if and #else directives to select code blocks based on conditions. Commonly used conditional expressions include STDC, _WIN32 and linux. Practical case: Print different messages according to the operating system. Use different data types according to the number of digits of the system. Different header files are supported according to the compiler. Conditional compilation enhances the portability and flexibility of the code, making it adaptable to compiler, operating system, and CPU architecture changes.
 What are the 5 basic components of Linux?
Apr 06, 2025 am 12:05 AM
What are the 5 basic components of Linux?
Apr 06, 2025 am 12:05 AM
The five basic components of Linux are: 1. The kernel, managing hardware resources; 2. The system library, providing functions and services; 3. Shell, the interface for users to interact with the system; 4. The file system, storing and organizing data; 5. Applications, using system resources to implement functions.
 How to solve mysql cannot be started
Apr 08, 2025 pm 02:21 PM
How to solve mysql cannot be started
Apr 08, 2025 pm 02:21 PM
There are many reasons why MySQL startup fails, and it can be diagnosed by checking the error log. Common causes include port conflicts (check port occupancy and modify configuration), permission issues (check service running user permissions), configuration file errors (check parameter settings), data directory corruption (restore data or rebuild table space), InnoDB table space issues (check ibdata1 files), plug-in loading failure (check error log). When solving problems, you should analyze them based on the error log, find the root cause of the problem, and develop the habit of backing up data regularly to prevent and solve problems.
 Can mysql run on android
Apr 08, 2025 pm 05:03 PM
Can mysql run on android
Apr 08, 2025 pm 05:03 PM
MySQL cannot run directly on Android, but it can be implemented indirectly by using the following methods: using the lightweight database SQLite, which is built on the Android system, does not require a separate server, and has a small resource usage, which is very suitable for mobile device applications. Remotely connect to the MySQL server and connect to the MySQL database on the remote server through the network for data reading and writing, but there are disadvantages such as strong network dependencies, security issues and server costs.
 Solutions to the errors reported by MySQL on a specific system version
Apr 08, 2025 am 11:54 AM
Solutions to the errors reported by MySQL on a specific system version
Apr 08, 2025 am 11:54 AM
The solution to MySQL installation error is: 1. Carefully check the system environment to ensure that the MySQL dependency library requirements are met. Different operating systems and version requirements are different; 2. Carefully read the error message and take corresponding measures according to prompts (such as missing library files or insufficient permissions), such as installing dependencies or using sudo commands; 3. If necessary, try to install the source code and carefully check the compilation log, but this requires a certain amount of Linux knowledge and experience. The key to ultimately solving the problem is to carefully check the system environment and error information, and refer to the official documents.
 MySQL can't be installed after downloading
Apr 08, 2025 am 11:24 AM
MySQL can't be installed after downloading
Apr 08, 2025 am 11:24 AM
The main reasons for MySQL installation failure are: 1. Permission issues, you need to run as an administrator or use the sudo command; 2. Dependencies are missing, and you need to install relevant development packages; 3. Port conflicts, you need to close the program that occupies port 3306 or modify the configuration file; 4. The installation package is corrupt, you need to download and verify the integrity; 5. The environment variable is incorrectly configured, and the environment variables must be correctly configured according to the operating system. Solve these problems and carefully check each step to successfully install MySQL.
 How to solve the problem of missing dependencies when installing MySQL
Apr 08, 2025 pm 12:00 PM
How to solve the problem of missing dependencies when installing MySQL
Apr 08, 2025 pm 12:00 PM
MySQL installation failure is usually caused by the lack of dependencies. Solution: 1. Use system package manager (such as Linux apt, yum or dnf, Windows VisualC Redistributable) to install the missing dependency libraries, such as sudoaptinstalllibmysqlclient-dev; 2. Carefully check the error information and solve complex dependencies one by one; 3. Ensure that the package manager source is configured correctly and can access the network; 4. For Windows, download and install the necessary runtime libraries. Developing the habit of reading official documents and making good use of search engines can effectively solve problems.
