How to turn off the automatic lock screen function in Win11
I believe that many people often encounter automatic screen lock when watching videos or playing games on their computers, which is very annoying. So if you want to know how to turn off the automatic screen lock in win11, in fact, we only need to enter the system You can turn off automatic screen lock in the power settings.
How to turn off the automatic lock screen in win11:
The first step is to click on the "Windows Logo" at the bottom to open the start menu.
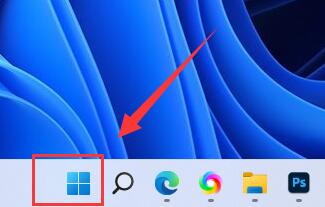
The second step is to click the “Settings” button in the start menu.

The third step is to open the "Power" option on the right.
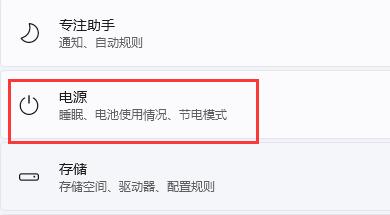
The fourth step is to click on "Screen and Sleep" on the right and click on the following two options.
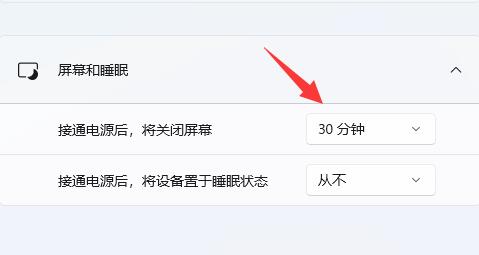
The fifth step is to select "Never" in the drop-down menu and change both options to "Never" to turn off the automatic lock screen.
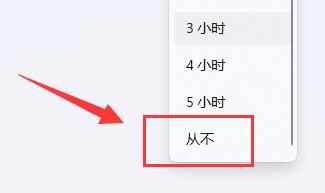
If you encounter automatic screen lock caused by some software, you only need to close the software.
The above is the detailed content of How to turn off the automatic lock screen function in Win11. For more information, please follow other related articles on the PHP Chinese website!

Hot AI Tools

Undresser.AI Undress
AI-powered app for creating realistic nude photos

AI Clothes Remover
Online AI tool for removing clothes from photos.

Undress AI Tool
Undress images for free

Clothoff.io
AI clothes remover

AI Hentai Generator
Generate AI Hentai for free.

Hot Article

Hot Tools

Notepad++7.3.1
Easy-to-use and free code editor

SublimeText3 Chinese version
Chinese version, very easy to use

Zend Studio 13.0.1
Powerful PHP integrated development environment

Dreamweaver CS6
Visual web development tools

SublimeText3 Mac version
God-level code editing software (SublimeText3)

Hot Topics
 How to turn off Win11 Program Compatibility Assistant
Jan 14, 2024 pm 12:00 PM
The program compatibility assistant often pops up for no reason during use, which greatly affects the experience. So how to close the win11 program compatibility assistant? In fact, you can close it by just opening the service list. How to turn off the Win11 program compatibility assistant: 1. First press the "win+r" key combination on the keyboard to open the run, 2. Then enter "services.msc" and press Enter to open the service. 3. Then double-click to open the "ProgramCompatibilityAssistantService" service. 4. After opening, change the startup type to "Disabled" and click "Stop" below. 5. Finally, click "OK" below to close the Program Compatibility Assistant.
 How to turn off the automatic lock screen function in Win11
Dec 31, 2023 pm 12:35 PM
I believe that many people often encounter automatic screen lock when watching videos or playing games on their computers, which is very annoying. So if you want to know how to turn off the automatic screen lock in Win11, in fact, we only need to enter the power settings under the system. You can turn off automatic screen lock. How to turn off the automatic lock screen in win11: The first step is to click the "Windows logo" at the bottom to open the start menu. In the second step, click the "Settings" button in the start menu. The third step is to open the "Power" option on the right. Step 4: Click "Screen and Sleep" on the right and click the following two options. Step 5: Select "Never" in the drop-down menu and change both options to "Never" to turn off automatic screen lock. If you encounter automatic screen lock caused by some software, you only need to turn it off
 Tutorial to turn off the automatic repair function of win10
Dec 28, 2023 am 10:35 AM
Win10 automatic repair is a remedy after computer failure, but many users don't know how to turn it off, which causes more trouble. Today I will show you how to turn off automatic repair. How to turn off Win10 automatic repair: 1. Press the shortcut key "Win+R" to open "Run" and enter cmd 2. Open the "Command Prompt" 3. Enter bcdedit/setrecoveryenabled at the command prompt NO press "Enter" to turn it off 4 , it can no longer be opened after it is closed. If you need to open it, enter cdedit/setrecoveryenabledYES.
 How to turn off the real-time subtitles function in win11
Jan 03, 2024 am 10:34 AM
Win11 provides users with a subtitle function that is easy to use when there is no sound in the system. However, not everyone wants to use it. So how to turn off real-time subtitles in Win11? In fact, just delete the subtitles in the settings. How to turn off real-time subtitles in win11: The first step is to click the "Windows Logo" on the bottom taskbar to open the start menu. Step 2: Open "Settings" in the start menu. Step 3: Click "Accessibility" in the lower left corner. Step 4: Find and click "Subtitle Style" on the right. Step 5: Click "Delete" in the subtitle style. Subtitles can be turned off.
 Instructions for turning off the automatic lock screen in Win10
Jan 02, 2024 pm 08:29 PM
The win10 automatic lock screen interface can modify and set our various lock screen parameters. If we do not want others to modify the lock screen settings, we can directly turn off the automatic lock screen interface in the Group Policy Editor, so that the settings of this interface cannot be used. Okay, let’s take a look at the specific methods below. Tutorial on closing win10 automatic lock screen interface 1. First press "win+r" to open run. 2. Enter "gpedit.msc" and press Enter to confirm. 3. Enter the Group Policy Editor and enter "Administrative Templates" - "Control Panel" - "Personalization". 4. Find "Don't show lock screen" in Personalization and double-click to open it. 5. Change "Not Configured" to "Enabled" 6. Then click "OK" below.
 Tutorial on how to close win10 shutdown prompt
Jan 07, 2024 pm 04:05 PM
Sometimes when we shut down, we will find a pop-up prompt saying that a program is preventing the shutdown, or asking whether to shut down, etc. This is all because we have turned on Allow Applications to Prevent Shutdown, and we just need to turn it off in Group Policy. Let’s take a look at how to close it. Tutorial on closing the win10 shutdown prompt 1. First press "win+r" on the keyboard, enter "gpedit.msc" and press Enter to confirm. 2. Then follow the steps to find "Administrative Templates" and "System" 3. Find "Shutdown Options" in the system 4. Double-click the file to the right of the shutdown option. 5. Change Not Configured to "Enabled" and click "OK".
 Learn how to use win10's f1 to f12 shortcut keys to close tutorial
Jan 01, 2024 pm 01:10 PM
When we use the win10 system, there are few situations where we need to use the f1-f12 shortcut keys, so if we are afraid that it will affect our normal use, we can choose to turn it off. We only need to turn off the hotkey mode in the bios settings. Okay, let’s take a look below. Win10 shortcut keys f1 to f12 close tutorial 1. First, use the hotkey to enter the bios settings when booting (usually "F2", "F12", "DEL", etc.) 2. Use the direction keys to enter "configuration" 3. Change the Change "hotkeymode" to "disabled" 4. Finally press "F10" to save. If there is a pop-up window, select "Yes"
 Teach you how to turn off the win11 self-starting software
Jan 09, 2024 pm 03:10 PM
We sometimes find that we start a lot of software when we turn on the computer. Some of them do not need to be started at all, which is very troublesome. At this time, you can solve the problem by closing these self-starting software. Let's follow the editor. Check out the closing tutorial. How to turn off the self-starting software in win11: 1. First, we press "Win+i" on the keyboard to open the settings, as shown in the picture. 2. Then find and enter "Applications" on the left. 3. Then click on the right and enter "Startup" settings. 4. Under the startup application, change the sorting basis to "Status" 5. Finally, you can close the software that starts automatically at startup.


