
 Computer Tutorials
Computer Knowledge
How to set up the keyboard boot function on a GIGABYTE motherboard (enable keyboard boot mode on GIGABYTE motherboard)
Computer Tutorials
Computer Knowledge
How to set up the keyboard boot function on a GIGABYTE motherboard (enable keyboard boot mode on GIGABYTE motherboard)
How to set up the keyboard boot function on a GIGABYTE motherboard (enable keyboard boot mode on GIGABYTE motherboard)

How to set up keyboard startup on Gigabyte's motherboard

First of all, to support keyboard startup, it must be a PS2 keyboard! ! The setting steps are as follows:
Step 1: Press Del or F2 to enter the bios after booting, and go to the Advanced (advanced) mode of the bios
Ordinary motherboards enter the EZ (easy) mode of the motherboard by default. You need to press F7 switches to advanced mode. ROG series motherboards enter the advanced mode of bios by default (we use simplified Chinese to demonstrate)
Step 2: Select to - [Advanced] - [Advanced Power Management (APM)]
Step 3: Find the option [Wake up by PS2 keyboard]
Step 4: This option is Disabled by default. After pulling down, you can see three different setting options. You can press the [Spacebar] to turn on the computer, press the key combination [Ctrl Esc] to turn on the computer, and press the power button to turn on the computer. You can choose the boot method you need.
The mouse cannot be used when installing the system on Gigabyte motherboard

Solution:
1. First unplug all the live wires on the motherboard, including network cables and power cords , video cable.
2. Disconnect the battery from the motherboard, wait for 1 minute and then put it back. After this step, the USB mouse and keyboard or round mouse and keyboard can be used after powering on. If it still cannot be used, continue to use the following steps to solve the problem:
3. Find the CMOS clear jumper on the motherboard, next to it is marked "CLEAR CMOS", unplug the jumper cap, and use tweezers or copper Use a short circuit such as a wire to clear the CMOS.
4. Reinsert the jumper, turn on the computer, and the mouse and keyboard will light up.
After installing win7 on the Gigabyte motherboard, there is no mouse and keyboard
The driver is missing.
The most direct way is to change the system to one that comes with its own mouse driver. If you don't want to change, you can only download and install the mouse driver. Specific method: Use the keyboard instead of the mouse to move (switch: left ALT left SHIFT NUM LOCK, movement key: right small keyboard 8
2 4 6 7 9
1 3, / is the left button, - means right-click, 5 means click, means double-click, 0 means drag and drop). If you can connect to the Internet, download the driver yourself. If you can't, just use a USB flash drive or memory card reader to transfer the driver elsewhere.
How to set up the power on Gigabyte motherboard
1.
First enter the BIOS, use the up, down, left and right keys on the keyboard to control the options, select the POWERMANAGEMENT main option, and select in the main option The first item controls whether to support incoming call activation. The default is off; ;
3.
After selecting, press and hold Enter, and it will be set to support incoming calls.
4.
You also need to set the startup time. The startup time is in the last item, and the default setting is not allowed (Disabled);
5.
Hold down the Enter key on the keyboard, select Enabled, and press Enter;
The Gigabyte motherboard is stuck in the logo interface and the keyboard cannot be used
This situation may be due to the computer self-testing Sometimes a certain piece of hardware cannot be detected or is stuck in detecting a piece of hardware.
1. Keyboard and mouse. The power-on self-test will detect the mouse and keyboard. If a problem occurs, it will be stuck in the self-test interface. The solution is to unplug the keyboard and mouse and check whether it passes the self-test. If it passes the self-test, replace it. Mouse and keyboard.
2. Hard drive and optical drive, most likely hard drive and optical drive. For desktop computers, you need to open the case and unplug the power cord of the hard drive and optical drive to see if it passes the self-test. If it passes, further rule out the problem of the hard drive or the data cable.
3. If none of the above are true, then the most likely problem is that there is a problem with the motherboard bios and it needs to be returned to the factory for repair.
The above is the detailed content of How to set up the keyboard boot function on a GIGABYTE motherboard (enable keyboard boot mode on GIGABYTE motherboard). For more information, please follow other related articles on the PHP Chinese website!

Hot AI Tools

Undresser.AI Undress
AI-powered app for creating realistic nude photos

AI Clothes Remover
Online AI tool for removing clothes from photos.

Undress AI Tool
Undress images for free

Clothoff.io
AI clothes remover

AI Hentai Generator
Generate AI Hentai for free.

Hot Article
Hot Tools

Notepad++7.3.1
Easy-to-use and free code editor

SublimeText3 Chinese version
Chinese version, very easy to use

Zend Studio 13.0.1
Powerful PHP integrated development environment

Dreamweaver CS6
Visual web development tools

SublimeText3 Mac version
God-level code editing software (SublimeText3)
Hot Topics


 'Valkyrie' joins hands with 'Silver', Biostar displays two Intel Z890 motherboards
Jun 09, 2024 am 11:14 AM
'Valkyrie' joins hands with 'Silver', Biostar displays two Intel Z890 motherboards
Jun 09, 2024 am 11:14 AM
According to news from this website on June 5, according to foreign media TechPowerUp, Biostar exhibited two LGA1851 socket Z890 motherboards supporting Intel's next-generation desktop CPU at the 2024 Taipei International Computer Show. These two motherboards are the flagship Z890VALKYRIE "Valkyrie" and the mainstream Z890A-SILVER. Both are ATX specifications and do not have pre-installed wireless network cards. This website summarizes the detailed parameters of the two motherboards as follows: Z890VALKYRIE continues the gold-powder double-wing elements of the "Valkyrie" family, uses a 23-phase power supply design, and is equipped with 4 DDR5 memory slots. ▲Image source TechPowerUp, the same as below. This motherboard provides 3 alloy-reinforced PCIeG
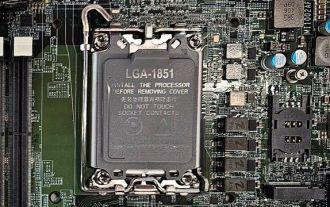 Close-up of LGA-1851 socket, Guangji showcases new embedded motherboard: supports Intel Core Ultra 200 series processors
Apr 11, 2024 pm 09:22 PM
Close-up of LGA-1851 socket, Guangji showcases new embedded motherboard: supports Intel Core Ultra 200 series processors
Apr 11, 2024 pm 09:22 PM
According to the news from this site on April 11, according to the German technology media ComputeBase, Guangji Technology attended the EmbeddedWorld2024 conference and publicly demonstrated a motherboard using the LGA-1851 slot for the first time. This motherboard is compatible with Intel Meteor Lake processors and is mainly used in embedded systems. The media took an in-depth look and shared multiple photos, confirming that LGA-1851 is the same size as Intel’s existing LGA-1700 socket. The relevant pictures attached to this site are as follows: Not compatible with CPU, but compatible with CPU coolers but not LGA-1851 socket 151 additional pins were added and the CPU locking system was adjusted, so it is not compatible with existing LGA-1700 socket processors. But because LG
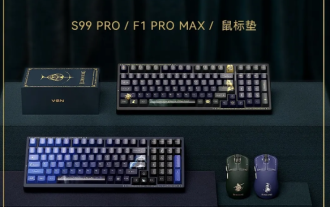 VGN co-branded 'Elden's Circle' keyboard and mouse series products are now on the shelves: Lani / Faded One custom theme, starting from 99 yuan
Aug 12, 2024 pm 10:45 PM
VGN co-branded 'Elden's Circle' keyboard and mouse series products are now on the shelves: Lani / Faded One custom theme, starting from 99 yuan
Aug 12, 2024 pm 10:45 PM
According to news from this site on August 12, VGN launched the co-branded "Elden Ring" keyboard and mouse series on August 6, including keyboards, mice and mouse pads, designed with a customized theme of Lani/Faded One. The current series of products It has been put on JD.com, priced from 99 yuan. The co-branded new product information attached to this site is as follows: VGN丨Elden Law Ring S99PRO Keyboard This keyboard uses a pure aluminum alloy shell, supplemented by a five-layer silencer structure, uses a GASKET leaf spring structure, has a single-key slotted PCB, and the original height PBT material Keycaps, aluminum alloy personalized backplane; supports three-mode connection and SMARTSPEEDX low-latency technology; connected to VHUB, it can manage multiple devices in one stop, starting at 549 yuan. VGN丨Elden French Ring F1PROMAX wireless mouse the mouse
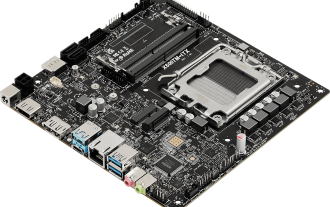 'The world's first Thin Mini ITX motherboard supporting AM5', ASRock releases X600TM-ITX: up to 96GB memory, 4 external monitors
Jul 27, 2024 am 10:37 AM
'The world's first Thin Mini ITX motherboard supporting AM5', ASRock releases X600TM-ITX: up to 96GB memory, 4 external monitors
Jul 27, 2024 am 10:37 AM
According to news from this site on July 27, ASRock recently announced the launch of the X600TM-ITX motherboard, claiming to be "the world's first ThinMiniITX motherboard that supports AM5". The motherboard size is 17*17 cm and supports AMD Ryzen 9000/8000/7000 series processing. device. ASRock said that this motherboard is suitable for products such as mini computers, all-in-one computers, smart mirrors, educational tools, and home theater computers, and can handle various tasks in daily offices, presentations, and work. X600TM-ITX supports the latest AM5 processor, which improves performance by up to 1.33 times compared to the previous generation. This means faster speeds, increased multitasking capabilities, better gaming experiences, faster data processing, and
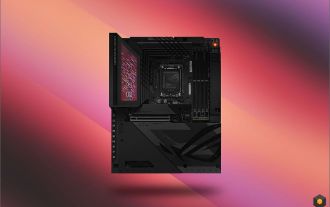 ASUS releases BIOS update for Z790 motherboards to alleviate instability issues with Intel's 13th/14th generation Core processors
Aug 09, 2024 am 12:47 AM
ASUS releases BIOS update for Z790 motherboards to alleviate instability issues with Intel's 13th/14th generation Core processors
Aug 09, 2024 am 12:47 AM
According to news from this website on August 8, MSI and ASUS today launched a beta version of BIOS containing the 0x129 microcode update for some Z790 motherboards in response to the instability issues in Intel Core 13th and 14th generation desktop processors. ASUS's first batch of motherboards to provide BIOS updates include: ROGMAXIMUSZ790HEROBetaBios2503ROGMAXIMUSZ790DARKHEROBetaBios1503ROGMAXIMUSZ790HEROBTFBetaBios1503ROGMAXIMUSZ790HEROEVA-02 joint version BetaBios2503ROGMAXIMUSZ790A
 Sapphire launches NITRO+ B650I WIFI ultra-platinum motherboard, 1679 yuan
Apr 22, 2024 pm 01:58 PM
Sapphire launches NITRO+ B650I WIFI ultra-platinum motherboard, 1679 yuan
Apr 22, 2024 pm 01:58 PM
According to news from this site on April 22, Sapphire (Sapphire Technology) recently launched the NITRO+B650IWIFI ultra-platinum motherboard. The e-commerce platform sells it for 1,689 yuan. You can get a 10 yuan coupon, and the price is 1,679 yuan. According to inquiries on this site, Sapphire released a NITRO+B550I motherboard in 2021, and this new product can be regarded as the successor of that product. Sapphire NITRO+B650IWIFI adopts 8-layer PCB+8-phase digital power supply design, uses PowerStage70ADr.MOS, and supports DDR5-6000+ memory overclocking. In terms of storage, it is equipped with 2 Gen4x4 M.2 interfaces and 4 SATA3 interfaces. This motherboard is covered with MOS power supply and front M.2 bay.
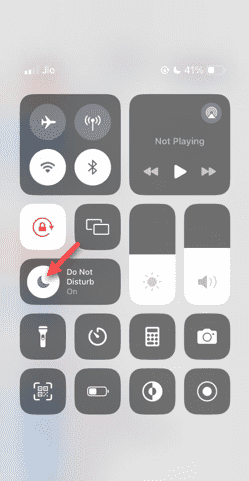 Do Not Disturb Mode Not Working in iPhone: Fix
Apr 24, 2024 pm 04:50 PM
Do Not Disturb Mode Not Working in iPhone: Fix
Apr 24, 2024 pm 04:50 PM
Even answering calls in Do Not Disturb mode can be a very annoying experience. As the name suggests, Do Not Disturb mode turns off all incoming call notifications and alerts from emails, messages, etc. You can follow these solution sets to fix it. Fix 1 – Enable Focus Mode Enable focus mode on your phone. Step 1 – Swipe down from the top to access Control Center. Step 2 – Next, enable “Focus Mode” on your phone. Focus Mode enables Do Not Disturb mode on your phone. It won't cause any incoming call alerts to appear on your phone. Fix 2 – Change Focus Mode Settings If there are some issues in the focus mode settings, you should fix them. Step 1 – Open your iPhone settings window. Step 2 – Next, turn on the Focus mode settings
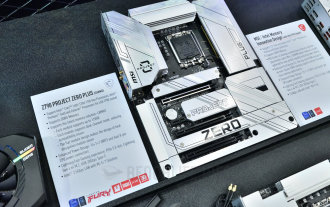 Supporting the new generation of CAMM2 memory modules, MSI and ASRock exhibited special Intel motherboards
Jun 07, 2024 am 11:23 AM
Supporting the new generation of CAMM2 memory modules, MSI and ASRock exhibited special Intel motherboards
Jun 07, 2024 am 11:23 AM
According to news from this site on June 4, based on reports from Taiwanese media BenchLife.info and updates from X platform user @wagipon, both MSI and ASRock exhibited special Intel motherboards that support CAMM2 memory modules at the 2024 Taipei International Computer Show. Among them, MSI brought the previously warmed-up Z790PROJECTZEROPLUS (CAMM2) motherboard, which is equipped with the FURYImpactDDR5CAMM2 prototype memory module from Kingston. ▲Picture source BenchLife.info MSI stated that the DDR5CAMM2 memory module can support up to 128GB capacity, and a single module can achieve dual channels, which can reduce compatibility issues (Note from this site: Even if only the batch number is different, the traditional
