Centos 7 compression and decompression command overview
1.zip file compression
Syntax: zip plus the compressed file name plus the file name to be compressed.
[root@localhost ~]# zip test.zip test.txt
  adding: test.txt (deflated 100%)
[root@localhost ~]#
indicates that the compression has been completed. Then you can verify in ll to see if there is a file package you named.
[root@localhost ~]# ll
总用量 820004
-rw-------. 1 root root      1587 3月  22 16:58 anaconda-ks.cfg
-rw-r--r--. 1 root root      1635 3月  22 17:00 initial-setup-ks.cfg
-rw-r--r--. 1 root root 838860800 3月  26 14:56 test.txt
-rw-r--r--. 1 root root    814270 3月  26 14:57 test.zip
[root@localhost ~]#
2. Unzip the zip file
To decompresszip, add un in front of zip. If you want to specify the path, add -d
The syntax is unzip The file name to be decompressed -d Specify the decompression path
[root@localhost ~]# unzip test.zip -d /tmp/
Archive:  test.zip
  inflating: /tmp/test.txt
[root@localhost ~]#
Isn’t it very simple? Then use ls and add the path you specified to verify whether there are files you decompressed. If there are, it means you are successful. Congratulations on successfully learning zip compression and zip decompression! ! ! Then we continue....
[root@localhost ~]# ls /tmp
test.txt
[root@localhost ~]#
3.tar compression and decompression
tar parameters are
-c Create a compressed file
-x Unzip a compressed file
-t View the files in the tar compressed file
-z Use gzip compression
-j Use bzip2 compression
-v displays files* during compression (commonly used) but is not recommended for background execution
-f uses the file name, note: f must be followed immediately by the file name, and no parameters can be added
Notice:
tar creates a file command
Syntax: tar [parameter] files and directories... ...
[root@localhost ~]# tar -czvf user /etc
tar: 从成员名中删除开头的“/”
/etc/
/etc/fstab
/etc/crypttab
/etc/mtab
/etc/resolv.conf
/etc/fonts/
/etc/fonts/conf.d/
/etc/fonts/conf.d/57-dejavu-serif.conf
/etc/fonts/conf.d/65-1-vlgothic-gothic.conf
/etc/fonts/conf.d/31-cantarell.conf
/etc/fonts/conf.d/65-0-lohit-nepali.conf
/etc/fonts/conf.d/59-liberation-mono.conf
There are a lot of things at the back that I can’t understand, so I went to the back and checked with ls to see if they exist.
[root@localhost ~]# ls
anaconda-ks.cfg  initial-setup-ks.cfg  test.txt  test.zip  user
[root@localhost ~]#
Then let’s talk about decompression...
4. tar decompression
tar Add parameters and file name
[root@localhost ~]# tar -xvf user
etc/
etc/fstab
etc/crypttab
etc/mtab
etc/resolv.conf
etc/fonts/
etc/fonts/conf.d/
etc/fonts/conf.d/57-dejavu-serif.conf
There are a lot of decompression processes later, so I will omit them. Anyway, the decompression is successful
The following are the additions from other netizens
1. Linux version

2. Unzip the .tar.gz package to the current directory
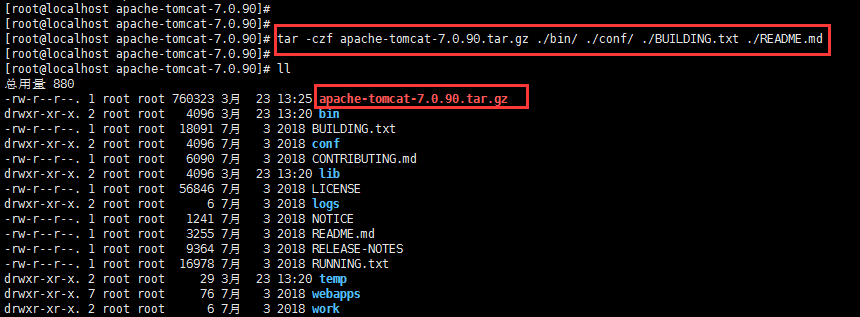
tar -xzvf apache-tomcat-7.0.90.tar.gz


3. Compress the specified file into a .tar.gz package
tar -czf apache-tomcat-7.0.90.tar.gz ./bin/ ./conf/ ./BUILDING.txt ./README.md

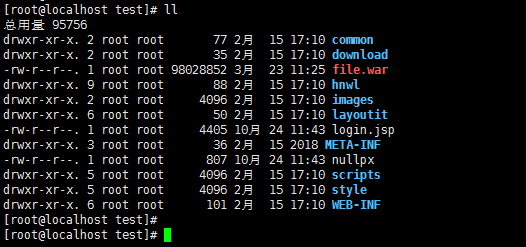
4. Unzip the .war package to the current directory
jar -xvf file.war


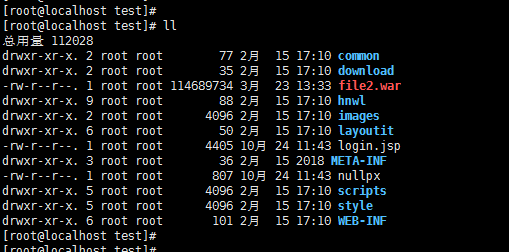
5. Compress all files in the current directory into a .war package
jar -cvfM0 file2.war ./


6. Unzip the .tar package to the current directory
tar -xvf desk.tar
7. Compress the specified file into a .tar package
tar -czf desk2.tar ./file.pdf ./abc/
The above is the detailed content of Centos 7 compression and decompression command overview. For more information, please follow other related articles on the PHP Chinese website!

Hot AI Tools

Undresser.AI Undress
AI-powered app for creating realistic nude photos

AI Clothes Remover
Online AI tool for removing clothes from photos.

Undress AI Tool
Undress images for free

Clothoff.io
AI clothes remover

AI Hentai Generator
Generate AI Hentai for free.

Hot Article

Hot Tools

Notepad++7.3.1
Easy-to-use and free code editor

SublimeText3 Chinese version
Chinese version, very easy to use

Zend Studio 13.0.1
Powerful PHP integrated development environment

Dreamweaver CS6
Visual web development tools

SublimeText3 Mac version
God-level code editing software (SublimeText3)

Hot Topics
 1378
1378
 52
52
 Centos configuration IP address
Apr 14, 2025 pm 09:06 PM
Steps to configure IP address in CentOS: View the current network configuration: ip addr Edit the network configuration file: sudo vi /etc/sysconfig/network-scripts/ifcfg-eth0 Change IP address: Edit IPADDR= Line changes the subnet mask and gateway (optional): Edit NETMASK= and GATEWAY= Lines Restart the network service: sudo systemctl restart network verification IP address: ip addr
 How to optimize CentOS HDFS configuration
Apr 14, 2025 pm 07:15 PM
Improve HDFS performance on CentOS: A comprehensive optimization guide to optimize HDFS (Hadoop distributed file system) on CentOS requires comprehensive consideration of hardware, system configuration and network settings. This article provides a series of optimization strategies to help you improve HDFS performance. 1. Hardware upgrade and selection resource expansion: Increase the CPU, memory and storage capacity of the server as much as possible. High-performance hardware: adopts high-performance network cards and switches to improve network throughput. 2. System configuration fine-tuning kernel parameter adjustment: Modify /etc/sysctl.conf file to optimize kernel parameters such as TCP connection number, file handle number and memory management. For example, adjust TCP connection status and buffer size
 Difference between centos and ubuntu
Apr 14, 2025 pm 09:09 PM
The key differences between CentOS and Ubuntu are: origin (CentOS originates from Red Hat, for enterprises; Ubuntu originates from Debian, for individuals), package management (CentOS uses yum, focusing on stability; Ubuntu uses apt, for high update frequency), support cycle (CentOS provides 10 years of support, Ubuntu provides 5 years of LTS support), community support (CentOS focuses on stability, Ubuntu provides a wide range of tutorials and documents), uses (CentOS is biased towards servers, Ubuntu is suitable for servers and desktops), other differences include installation simplicity (CentOS is thin)
 Centos shutdown command line
Apr 14, 2025 pm 09:12 PM
The CentOS shutdown command is shutdown, and the syntax is shutdown [Options] Time [Information]. Options include: -h Stop the system immediately; -P Turn off the power after shutdown; -r restart; -t Waiting time. Times can be specified as immediate (now), minutes ( minutes), or a specific time (hh:mm). Added information can be displayed in system messages.
 CentOS HDFS performance tuning tips
Apr 14, 2025 pm 06:00 PM
CentOS Platform Hadoop Distributed File System (HDFS) Performance Optimization Guide Optimizing HDFS Performance is a multi-faceted issue, and multiple parameters need to be adjusted for specific situations. The following are some key optimization strategies: 1. Memory management adjusts the NameNode and DataNode memory configuration: reasonably configure the HADOOP_NAMENODE_OPTS and HADOOP_DATANODE_OPTS environment variables according to the actual memory size of the server to optimize memory utilization. Enable large page memory: For high memory consumption applications (such as HDFS), enabling large page memory can reduce memory page allocation and management overhead and improve efficiency. 2. Disk I/O optimization uses high-speed storage
 Centos stops maintenance 2024
Apr 14, 2025 pm 08:39 PM
CentOS will be shut down in 2024 because its upstream distribution, RHEL 8, has been shut down. This shutdown will affect the CentOS 8 system, preventing it from continuing to receive updates. Users should plan for migration, and recommended options include CentOS Stream, AlmaLinux, and Rocky Linux to keep the system safe and stable.
 What files do you need to modify in HDFS configuration CentOS?
Apr 14, 2025 pm 07:27 PM
When configuring Hadoop Distributed File System (HDFS) on CentOS, the following key configuration files need to be modified: core-site.xml: fs.defaultFS: Specifies the default file system address of HDFS, such as hdfs://localhost:9000. hadoop.tmp.dir: Specifies the storage directory for Hadoop temporary files. hadoop.proxyuser.root.hosts and hadoop.proxyuser.ro
 How to install centos
Apr 14, 2025 pm 09:03 PM
CentOS installation steps: Download the ISO image and burn bootable media; boot and select the installation source; select the language and keyboard layout; configure the network; partition the hard disk; set the system clock; create the root user; select the software package; start the installation; restart and boot from the hard disk after the installation is completed.


