
 System Tutorial
Windows Series
Detailed methods to solve the network connection exclamation mark problem in Win10 system
System Tutorial
Windows Series
Detailed methods to solve the network connection exclamation mark problem in Win10 system
Detailed methods to solve the network connection exclamation mark problem in Win10 system

The win10 system is currently the mainstream operating system on the market. Many users who have just used the win10 system may not know how to solve the problem of win10 failures. Recently, someone asked the editor what to do about the network exclamation mark in the win10 system? Here is the solution.
What to do about the network exclamation mark in win10 system:
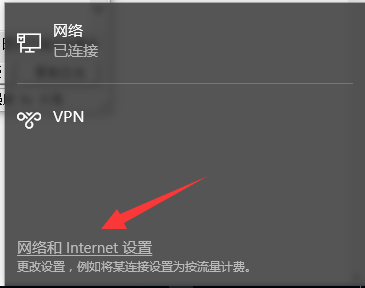
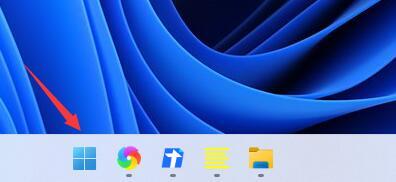
1. Click the network icon on the taskbar, and then click Network and Internet Settings.
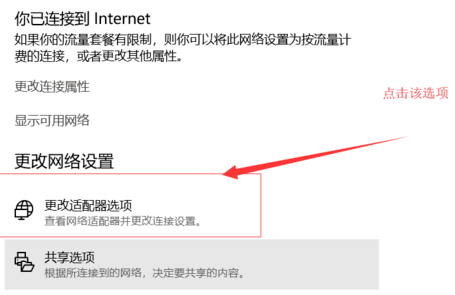
2. Find Change Network Settings on the right side of the settings window, and click the Change Adapter option below.
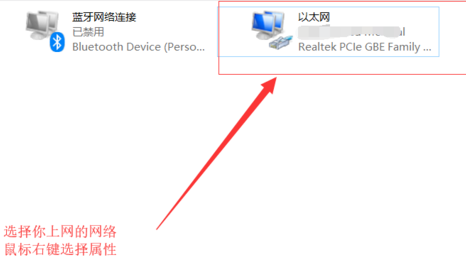
3. Right-click on the network you are using and select Properties.
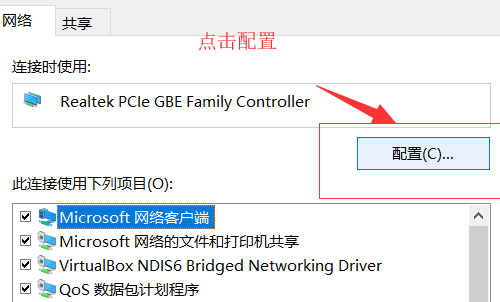
4. Click Configuration in the Network tab of the properties window.
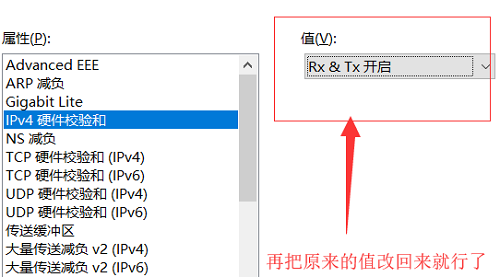
5. Select the Advanced tab, click IPv4 Hardware Checksum in the Properties drop-down, and select Close on the right.

6. If the network will return to normal at this time, then we can go back and re-enable the IPv4 hardware checksum value.
The above is the detailed content of Detailed methods to solve the network connection exclamation mark problem in Win10 system. For more information, please follow other related articles on the PHP Chinese website!

Hot AI Tools

Undresser.AI Undress
AI-powered app for creating realistic nude photos

AI Clothes Remover
Online AI tool for removing clothes from photos.

Undress AI Tool
Undress images for free

Clothoff.io
AI clothes remover

AI Hentai Generator
Generate AI Hentai for free.

Hot Article
Hot Tools

Notepad++7.3.1
Easy-to-use and free code editor

SublimeText3 Chinese version
Chinese version, very easy to use

Zend Studio 13.0.1
Powerful PHP integrated development environment

Dreamweaver CS6
Visual web development tools

SublimeText3 Mac version
God-level code editing software (SublimeText3)
Hot Topics
 1378
1378
 52
52

![WLAN expansion module has stopped [fix]](https://img.php.cn/upload/article/000/465/014/170832352052603.gif?x-oss-process=image/resize,m_fill,h_207,w_330) WLAN expansion module has stopped [fix]
Feb 19, 2024 pm 02:18 PM
WLAN expansion module has stopped [fix]
Feb 19, 2024 pm 02:18 PM
If there is a problem with the WLAN expansion module on your Windows computer, it may cause you to be disconnected from the Internet. This situation is often frustrating, but fortunately, this article provides some simple suggestions that can help you solve this problem and get your wireless connection working properly again. Fix WLAN Extensibility Module Has Stopped If the WLAN Extensibility Module has stopped working on your Windows computer, follow these suggestions to fix it: Run the Network and Internet Troubleshooter to disable and re-enable wireless network connections Restart the WLAN Autoconfiguration Service Modify Power Options Modify Advanced Power Settings Reinstall Network Adapter Driver Run Some Network Commands Now, let’s look at it in detail
 How to solve win11 DNS server error
Jan 10, 2024 pm 09:02 PM
How to solve win11 DNS server error
Jan 10, 2024 pm 09:02 PM
We need to use the correct DNS when connecting to the Internet to access the Internet. In the same way, if we use the wrong dns settings, it will prompt a dns server error. At this time, we can try to solve the problem by selecting to automatically obtain dns in the network settings. Let’s take a look at the specific solutions. How to solve win11 network dns server error. Method 1: Reset DNS 1. First, click Start in the taskbar to enter, find and click the "Settings" icon button. 2. Then click the "Network & Internet" option command in the left column. 3. Then find the "Ethernet" option on the right and click to enter. 4. After that, click "Edit" in the DNS server assignment, and finally set DNS to "Automatic (D
 What should I do if the earth is displayed in the lower right corner of Windows 10 when I cannot access the Internet? Various solutions to the problem that the Earth cannot access the Internet in Win10
Feb 29, 2024 am 09:52 AM
What should I do if the earth is displayed in the lower right corner of Windows 10 when I cannot access the Internet? Various solutions to the problem that the Earth cannot access the Internet in Win10
Feb 29, 2024 am 09:52 AM
This article will introduce the solution to the problem that the globe symbol is displayed on the Win10 system network but cannot access the Internet. The article will provide detailed steps to help readers solve the problem of Win10 network showing that the earth cannot access the Internet. Method 1: Restart directly. First check whether the network cable is not plugged in properly and whether the broadband is in arrears. The router or optical modem may be stuck. In this case, you need to restart the router or optical modem. If there are no important things being done on the computer, you can restart the computer directly. Most minor problems can be quickly solved by restarting the computer. If it is determined that the broadband is not in arrears and the network is normal, that is another matter. Method 2: 1. Press the [Win] key, or click [Start Menu] in the lower left corner. In the menu item that opens, click the gear icon above the power button. This is [Settings].
 Detailed explanation of the steps to obtain Win11 system administrator permissions
Mar 08, 2024 pm 09:09 PM
Detailed explanation of the steps to obtain Win11 system administrator permissions
Mar 08, 2024 pm 09:09 PM
Windows 11, as the latest operating system launched by Microsoft, is deeply loved by users. In the process of using Windows 11, sometimes we need to obtain system administrator rights in order to perform some operations that require permissions. Next, we will introduce in detail the steps to obtain system administrator rights in Windows 11. The first step is to click "Start Menu". You can see the Windows icon in the lower left corner. Click the icon to open the "Start Menu". In the second step, find and click "
 Check network connection: lol cannot connect to the server
Feb 19, 2024 pm 12:10 PM
Check network connection: lol cannot connect to the server
Feb 19, 2024 pm 12:10 PM
LOL cannot connect to the server, please check the network. In recent years, online games have become a daily entertainment activity for many people. Among them, League of Legends (LOL) is a very popular multiplayer online game, attracting the participation and interest of hundreds of millions of players. However, sometimes when we play LOL, we will encounter the error message "Unable to connect to the server, please check the network", which undoubtedly brings some trouble to players. Next, we will discuss the causes and solutions of this error. First of all, the problem that LOL cannot connect to the server may be
 What's going on when the network can't connect to the wifi?
Apr 03, 2024 pm 12:11 PM
What's going on when the network can't connect to the wifi?
Apr 03, 2024 pm 12:11 PM
1. Check the wifi password: Make sure the wifi password you entered is correct and pay attention to case sensitivity. 2. Confirm whether the wifi is working properly: Check whether the wifi router is running normally. You can connect other devices to the same router to determine whether the problem lies with the device. 3. Restart the device and router: Sometimes, there is a malfunction or network problem with the device or router, and restarting the device and router may solve the problem. 4. Check the device settings: Make sure the wireless function of the device is turned on and the wifi function is not disabled.
 ICLR'24 new ideas without pictures! LaneSegNet: map learning based on lane segmentation awareness
Jan 19, 2024 am 11:12 AM
ICLR'24 new ideas without pictures! LaneSegNet: map learning based on lane segmentation awareness
Jan 19, 2024 am 11:12 AM
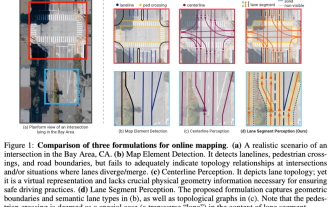
Written above & The author’s personal understanding of maps as key information for downstream applications of autonomous driving systems is usually represented by lanes or center lines. However, the existing map learning literature mainly focuses on detecting geometry-based topological relationships of lanes or sensing centerlines. Both methods ignore the inherent relationship between lane lines and center lines, that is, lane lines bind center lines. Although simply predicting two types of lanes in one model are mutually exclusive in the learning objective, this paper proposes lanesegment as a new representation that seamlessly combines geometric and topological information, thus proposing LaneSegNet. This is the first end-to-end mapping network that generates lanesegments to obtain a complete representation of road structure. LaneSegNet has two levels
 How to initialize the computer in win7
Jan 07, 2024 am 11:53 AM
How to initialize the computer in win7
Jan 07, 2024 am 11:53 AM
The win7 system is a very excellent high-performance system. During the continuous use of win7, many friends are asking how to initialize the computer in win7! Today, the editor will bring you how to restore the factory settings of a win7 computer. Related information on how to initialize the computer in win7: Detailed instructions with pictures and text. Steps: 1. Open the "Start Menu" and enter. 2. Click to enter the settings at the bottom of the left side. 3. In the Win10 update and recovery settings interface, select. 4. Click below "Remove all content and reinstall Windows". 5. You can see the following "Initialization" settings, and then click. 6. Enter the "Your computer has multiple drives" setting option. There are two options here, you can choose according to the situation.
