
 System Tutorial
LINUX
Use the graphic guide to teach you how to install dual-system Ubuntu 18.04 on Windows 10
System Tutorial
LINUX
Use the graphic guide to teach you how to install dual-system Ubuntu 18.04 on Windows 10
Use the graphic guide to teach you how to install dual-system Ubuntu 18.04 on Windows 10

Written in front: This tutorial is a tutorial for installing ubuntu18.04 (64-bit) dual system on Windows 10. It is a summary of my experience in installing dual systems many times. The installation method is also applicable to ubuntu16.04 (64-bit). In order to be intuitive and easy to understand, I will try my best to include pictures and texts, and complete this tutorial in the most popular language. Although the methods of installing ubuntu18.04 and ubuntu16.04 are exactly the same, in order to satisfy patients with obsessive-compulsive disorder, I specially copied the tutorial content and reposted it. If necessary, please enter: Windows 10 dual system installation ubuntu16.04 tutorial
1. Check computer information
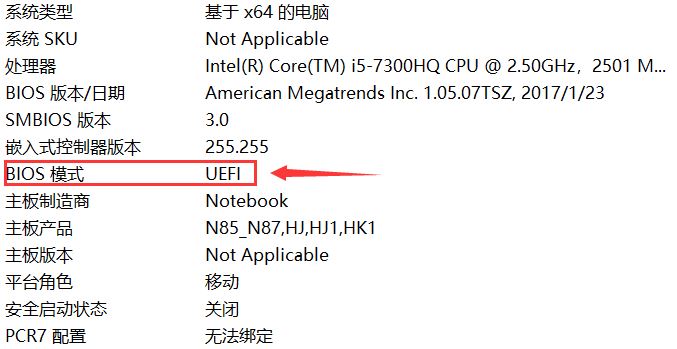
1. Check BIOS mode
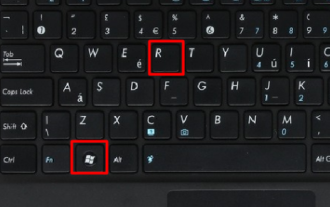
"Win r" shortcut key to enter "Run", enter "msinfo32" and press Enter. The following interface will appear, you can view the BIOS mode:
UEFI mode:
Traditional MBR mode:
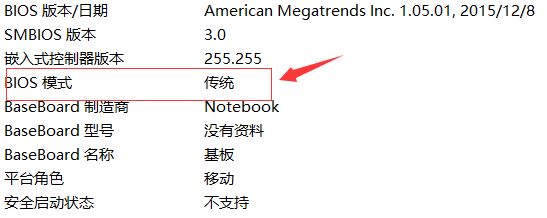
BIOS modes include traditional MBR mode and new UEFI mode, which will have a direct impact on the method of installing dual systems. At present, most computers are in the new UEFI mode, but there are also some old machines that are still in the traditional MBR mode. This tutorial only introduces the dual-system installation method in the new UEFI mode. If your computer is in the traditional MBR mode, it is strongly recommended that you reinstall the Windows system to update the BIOS mode to UEFI.
2. Find out the number of hard drives on your computer
I hope you know this when you buy a computer. This is also one of the selling points. If you don’t know this, please don’t give up on yourself and continue reading.
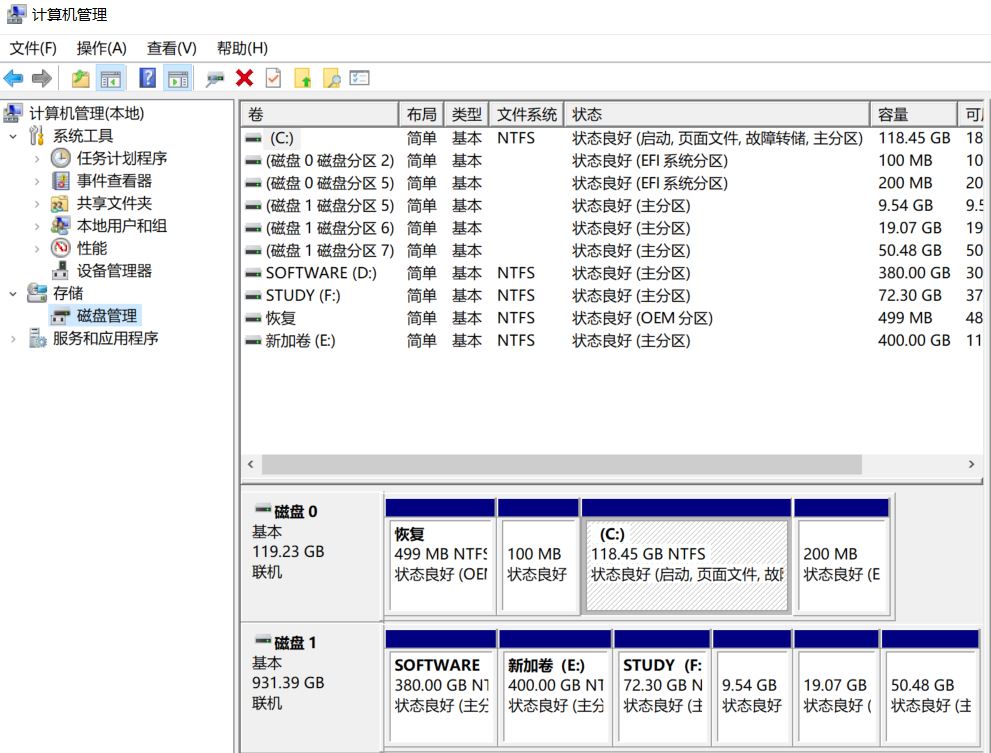
Right-click "This Computer", click "Manage", click "Disk Management":
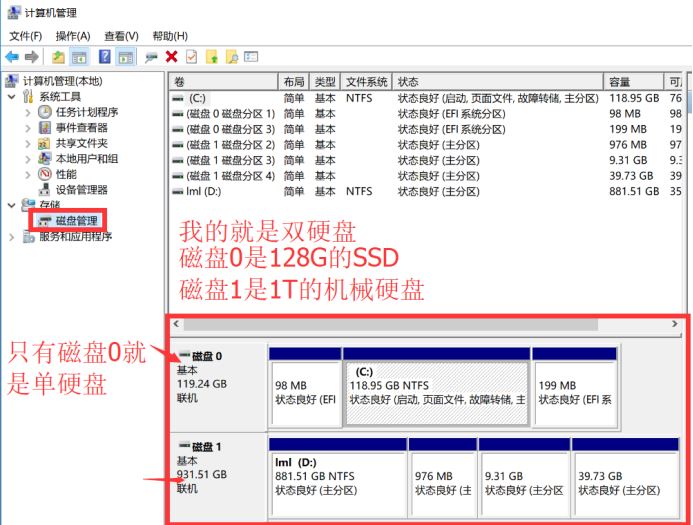
I believe you already know the information about your computer. Please pay attention to the section that distinguishes between "single hard drive" and "dual hard drive" operations.
2. Making system disk
You need to prepare the following tools:
①ubuntu system image
② Burning software, "Floppy Disc Pass" is recommended, you will be prompted to register, just choose to continue the trial
③A USB flash drive larger than 2G
1. Install and open Floppy Disk Pass, plug in the USB flash drive, and it is best to back up your USB flash drive because it will need to be formatted later;
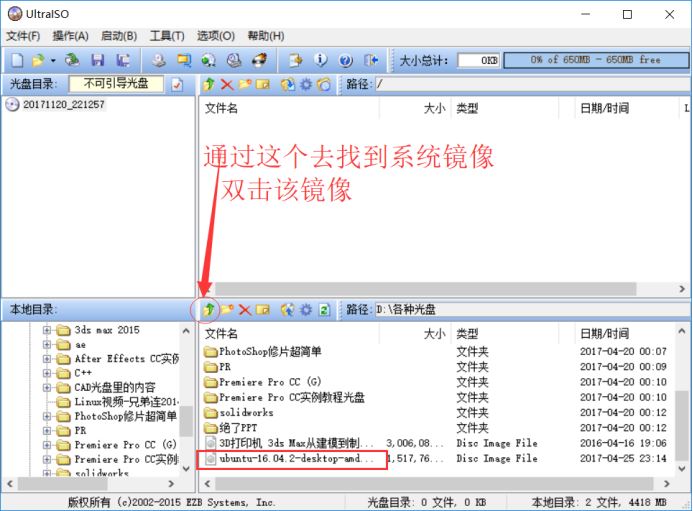
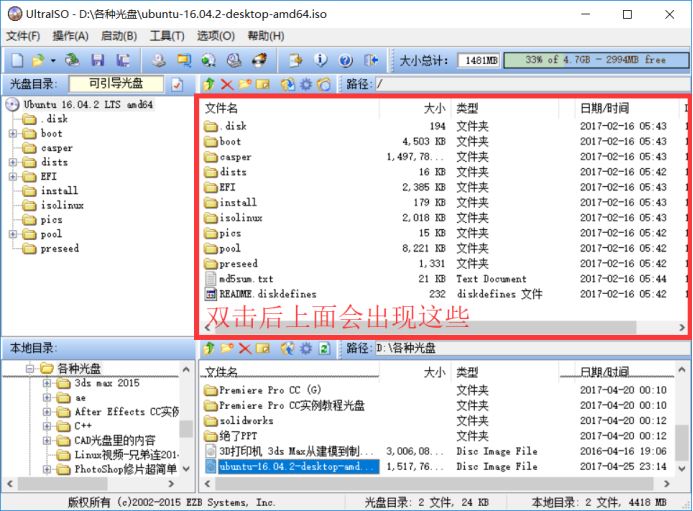
2. Enter FDD, select the file, browse to the directory where your ubuntu image is located, select the ubuntu image file, and double-click to open it, as shown in the figure:
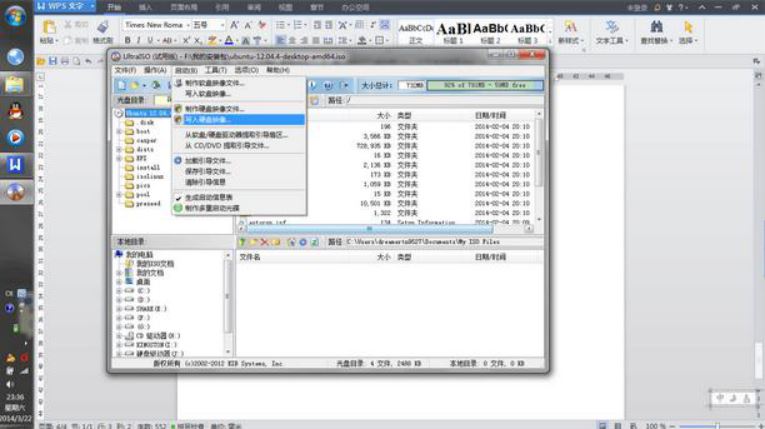
3. Select "Start" in the menu bar of the FDD interface and select "Write Hard Disk Image", as shown in the figure:
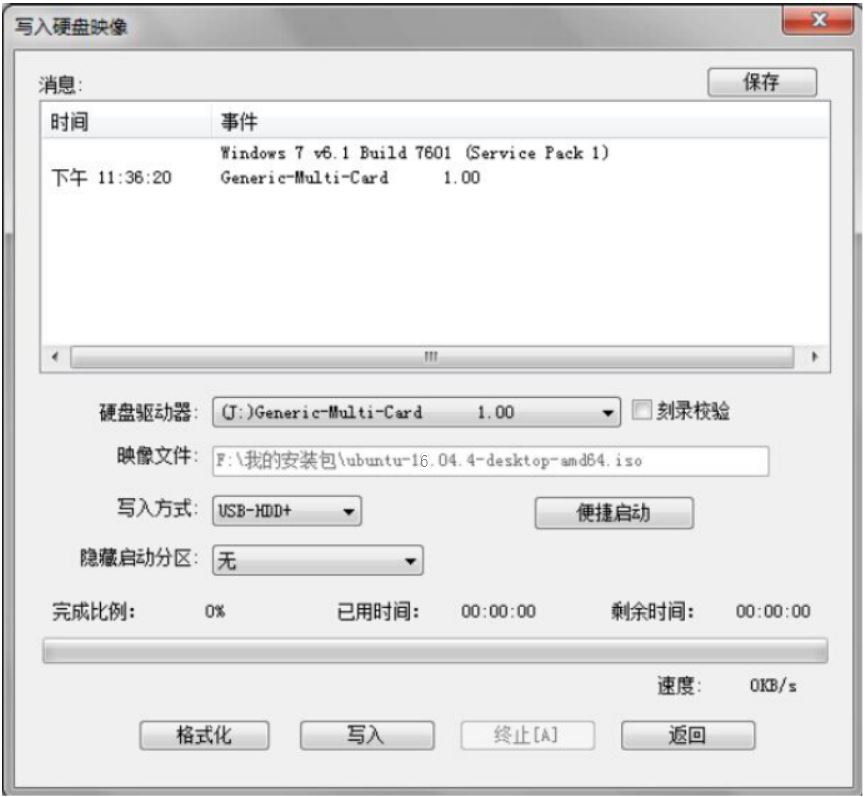
The next step is very important, pay attention to the order:
1) Check whether your hard drive corresponds to your USB flash drive (must be), generally the default is;
2) Check whether the image file corresponds to your ubuntu image;
3) If there are no errors in the above, select format, and then your USB flash drive will be formatted;
4) After the U disk is formatted, select write, and then wait slowly for the writing to be completed;
5) Step 2 is completed.
3. Create a blank partition under windows
Note: This step is to allocate space for the ubuntu system. There is a little difference between single hard drive and dual hard drive.
1. Right-click "This Computer", click "Manage", click "Disk Management":

2. Allocate space for ubuntu
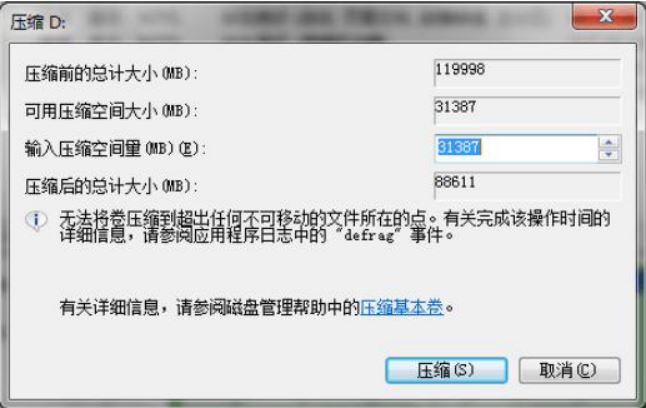
(1) If it is a single hard disk, select the last disk (for example, the last one of the two CD disks is the D disk, the last one of the CDE disk is the E disk, the last one of the CDEF disk is the F disk, and so on) , right-click the disk and select Compress Volume, as shown below, enter the amount of compression space in M. If there is enough space, it is recommended to allocate 80G or 100G. If there is insufficient space, you can also allocate 60G (1G=1024M):
If the capacity of your last disk is too small and it is not enough to divide 60G, you need to even out some from other disks. You need to use the tool DiskGenius. The specific operation is not introduced here. I hope you can solve it by yourself.
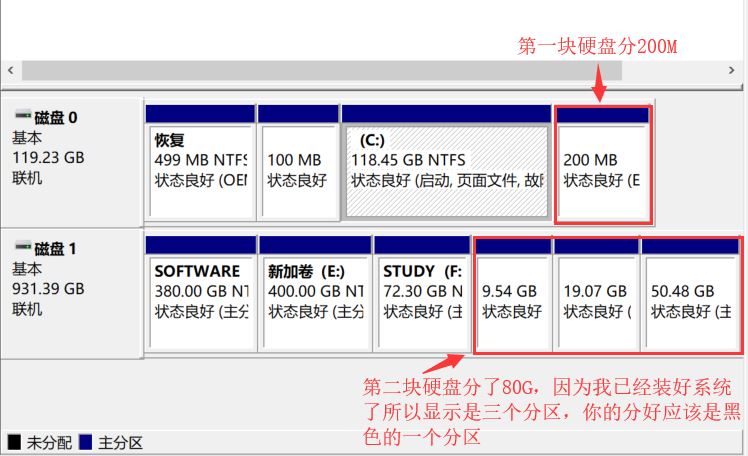
(2) If it is a dual hard drive, you need to first separate a 200M blank partition on the C drive (which is logically the first hard drive of the computer. Some computer systems are installed strangely and install the second hard drive). to install the ubuntu startup items, and then select the last disk on another hard disk (for example, the last one of the two CD disks is the D disk, the last one of the CDE disk is the E disk, and the last one of the CDEF disk is the F disk, so By analogy), right-click on the disk and select Compress Volume, as shown below. Enter the amount of compression space in M. If there is enough space, it is recommended to allocate 80G or 100G. If there is insufficient space, you can also allocate 60G (1G=1024M):

Two questions are explained here:
(1) Why are there differences in partitions between single and double hard drives: You can see that the difference in partitions is that when there are two hard drives, 200M is allocated on the C drive to install startup items. When the computer is turned on, it will automatically search for startup items on the hard disk where the C drive is located to start the system. Of course, we hope that the installed ubuntu startup items can also be searched, so we need to install the startup items here so that they will be searched when the computer is turned on. Go to the two startup items of windows and ubuntu, we can manually choose which system to enter. Of course, the "startup items need to be installed on the hard drive where the C drive is located" is not absolute. It is just to automatically search for the startup items when booting. It can also be installed on other hard drives. It is just that you need to enter the boot manager every time you boot to find ubuntu to start. It is more troublesome, so it is recommended to partition according to my method.
(2) Why choose the last disk to compress the volume: The file storage formats of windows and ubuntu are different. Our partition operation only divides a part of the disk to ubuntu. In fact, the two systems still share a disk. In order to prevent two systems with different storage formats from affecting each other, we compressed the Ubuntu partition from the last disk to the last section of the disk, that is, the front part of a disk is the Windows partition, and the back part is the Ubuntu partition.
My computer has dual hard drives. Here is my partition result:
4. Install the system using the prepared system disk
Note: Because the shortcut keys for starting the computer bios and boot manager of each manufacturer are different, please search for how to enter the bios and boot manager.
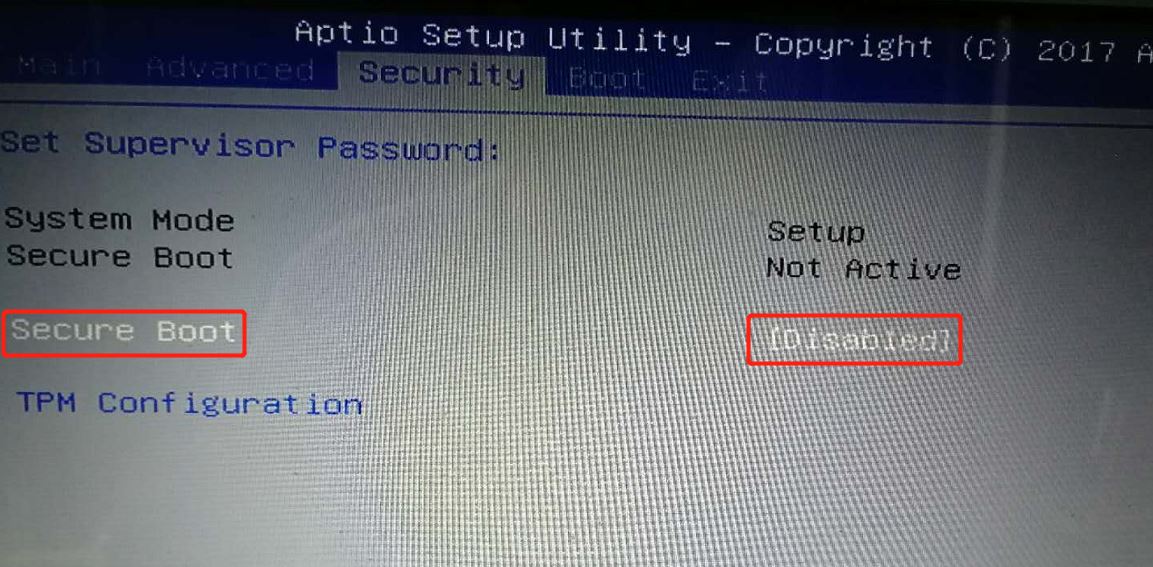
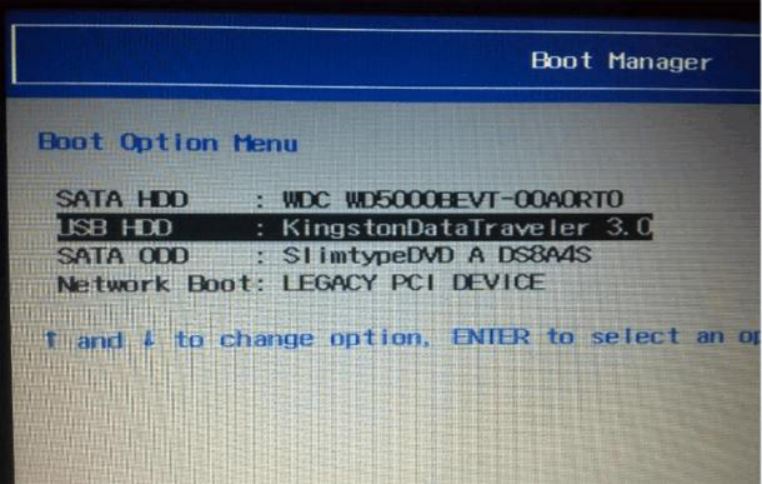
1. Insert the system disk, restart the computer, boot into bios, on the Security page, turn off secure boot (secure boot may be in different locations on different computers), then go to the Boot page, if there is a Fast Boot item (part Lenovo computers have), also turn it off without ignoring it; then save the changes, select USB boot in the boot item at the bottom of the Boot page, and press Enter. If you successfully enter the installation page, continue; if you cannot enter by clicking the USB boot item, Save and exit, the computer will restart. Press the corresponding keys according to your computer to enter the boot manager, find the USB boot item, and press Enter to enter.
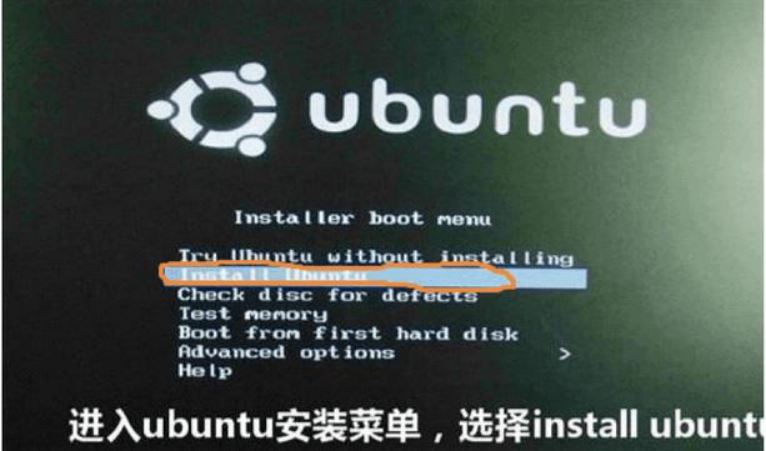
2. Then you will enter this interface, select Install Ubuntu, and press Enter to confirm
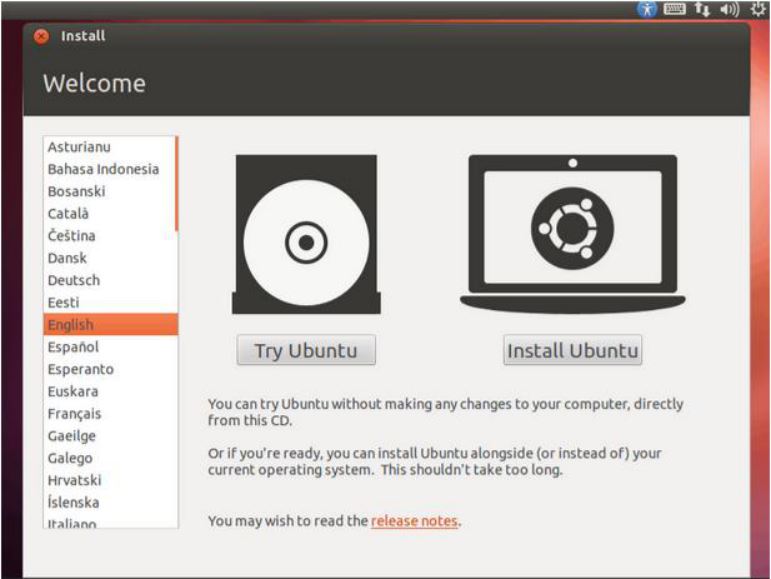
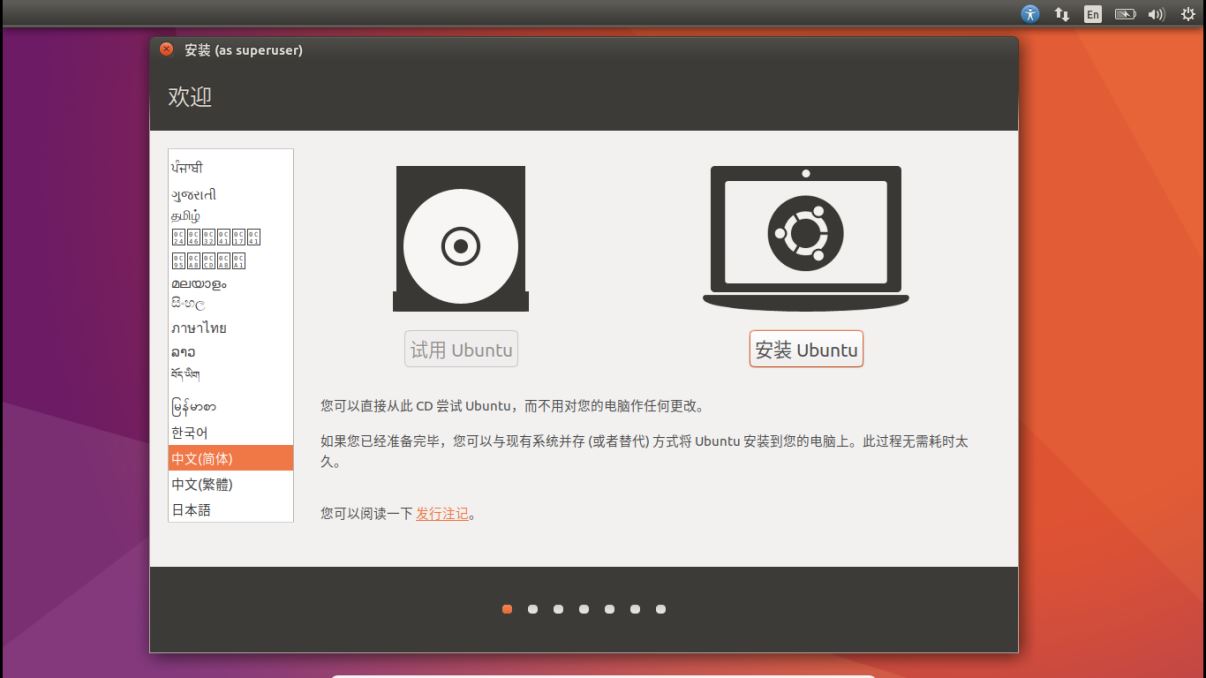
3. There may not be the previous interface, but there must be the following interface. Different images will have some differences, but the meaning is the same. Pull down the language bar and there will be Chinese
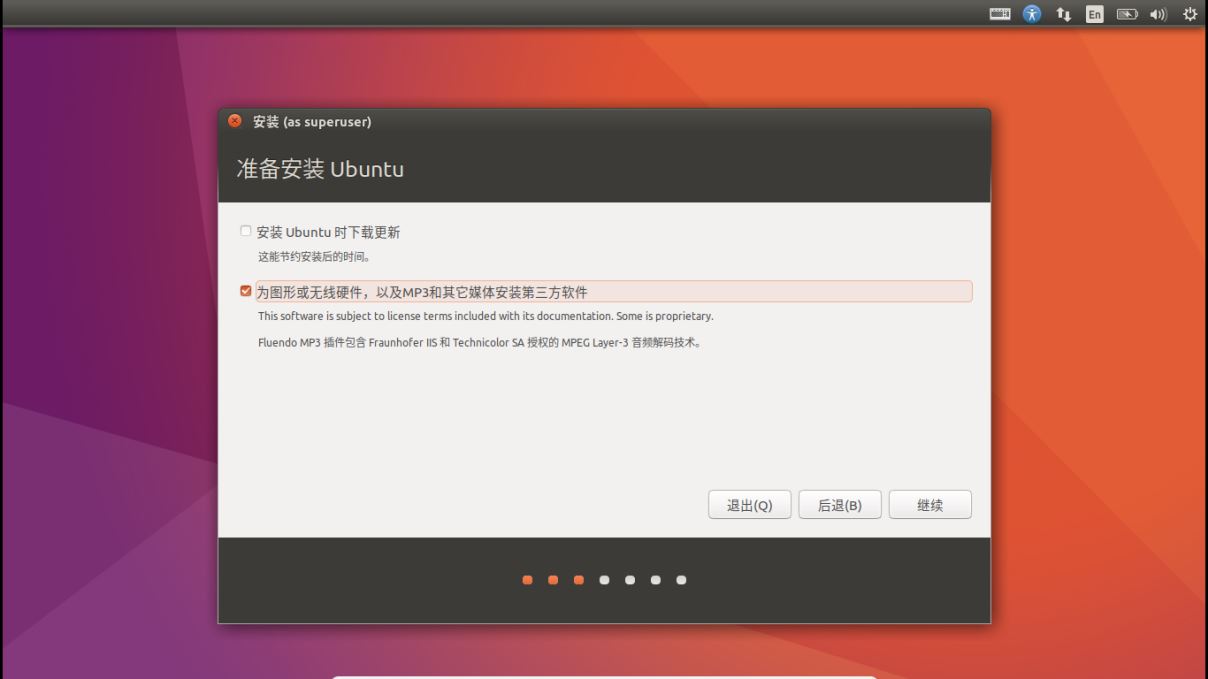
4. Click "Install Ubuntu", and when the following or similar interface appears, just select "Install third-party software for graphics or wireless hardware, as well as MP3 and other media". If you do not select the first one, it will be very slow to download updates while installing. Click "Continue"
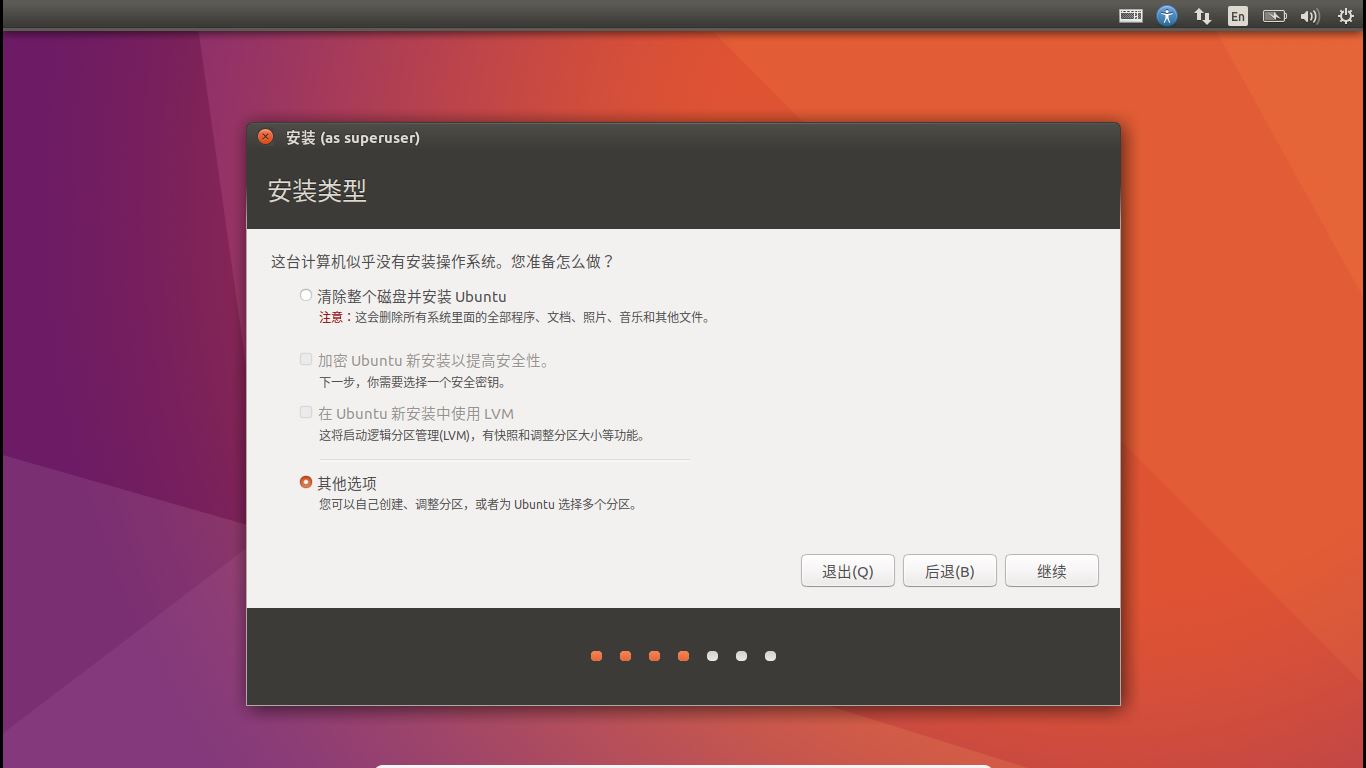
5. When the following or similar interface appears, be sure to select "Other Options" because manual partitioning is required
6. The partition interface is as follows
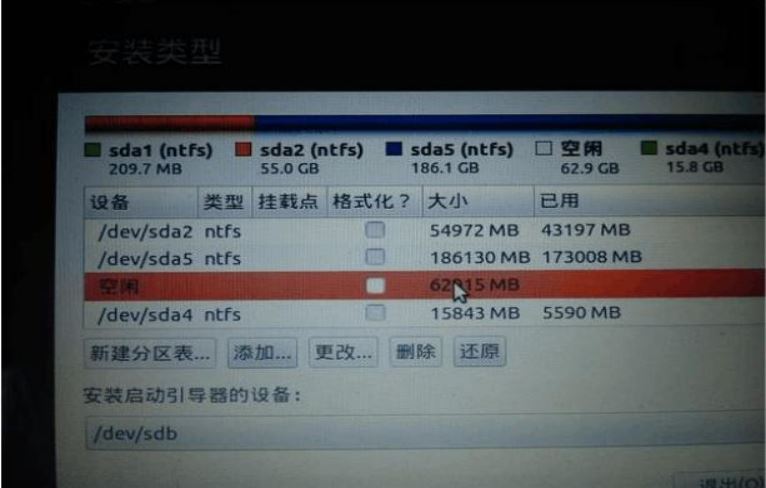
Here, you can see the free partitions that have been divided in the third step. The picture above is for a single hard disk. There is only one free partition, and the size is the one you gave when partitioning. If you have two hard disks, you can still see it. Another free partition is about 200M in size, so there is a little difference between single and double hard drives in the following partition operations.
Here, we perform manual partitioning. Assume that the free partition you set aside is 80G. Click on the free drive letter and click " " to partition, as follows:
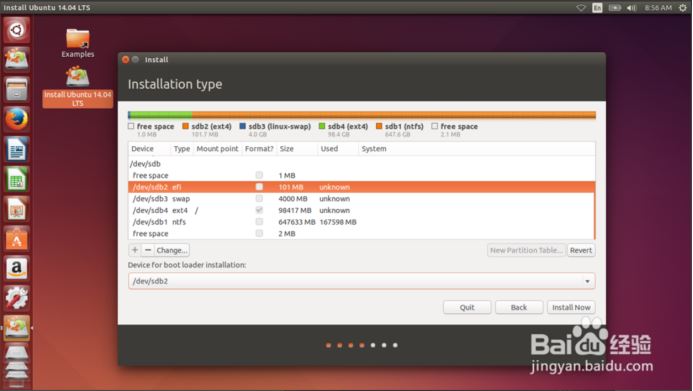
1) efi: If it is a single hard disk, add it to the only free partition, size 200M, logical partition, space starting position, for efi; if it is a dual hard disk, find the 200M free partition that has been divided in advance and add it , logical partition, space starting position, used for efi. This partition is essential and is used to install Ubuntu startup items. The following steps are the same for single and double hard drives. They all add
to the 80G free partition.2) Swap: Chinese means "swap space", which serves as the virtual memory of Ubuntu. The general size is about 2 times the physical memory of the computer. It can be divided into 8G, logical partition, and the starting position of the space, used for " swap" or "swap space"
3) /: This is the root directory of ubuntu, which is used to install systems and software. It is equivalent to the C drive of Windows. We divide it into 20G, the main partition, the starting position of the space, and is used for the "ext4 log file system" ", the mount point is "/" (it can be larger according to your disk space, after all, Ubuntu installation software is installed in the root directory by default)
4)/home: Equivalent to other Windows disks, all the rest are allocated to it, logical partition, space starting position, used for "ext4 log file system", the mount point is "/home"
Okay, the partitioning is completed. You can completely partition according to the above description without any problems. At least this is what I have always done (strongly recommended). Of course, you can also divide it in more detail. The specific division can be found on Baidu.
The following step is very important: at the bottom of the partition interface, select the location to install the startup items. Didn’t we just create a 200M efi partition? Now look at the number in front of this area, such as /dev /sda1, different machines will have different numbers, select this efi partition number from the drop-down list (it must be noted here that the startup item of windows is also an efi file, the size is about 500M, and the efi size of ubuntu we created is 200M, it must be (to select the correct one), then click "Install Now"
(The picture below is not accurate on Baidu)!
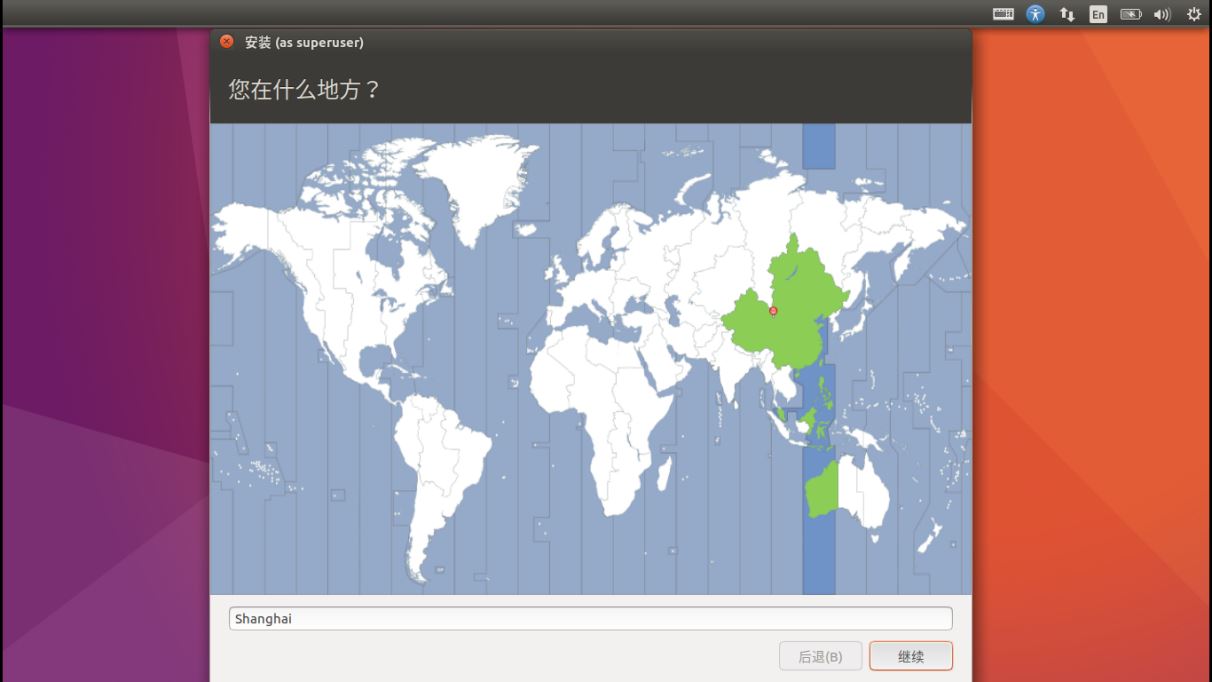
7. Setting the region is not important. Set it according to your needs, or you can continue directly without affecting
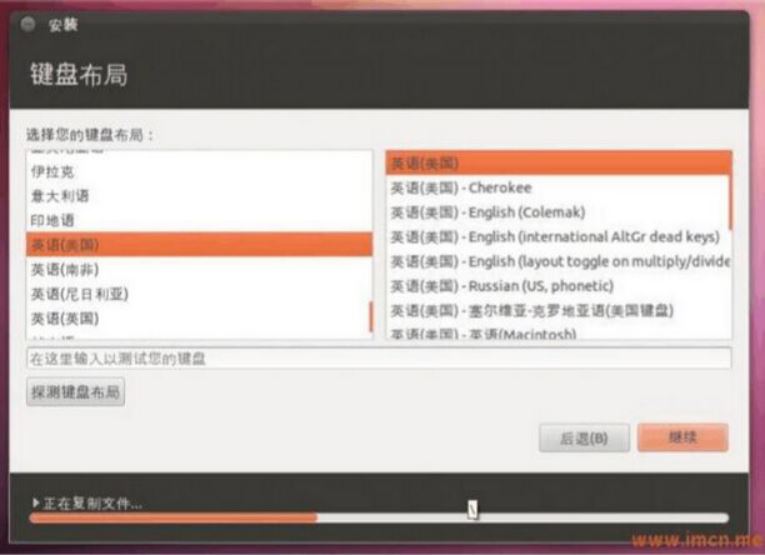
8. The default keyboard layout is English, it is recommended not to change it (the default Chinese is also acceptable)
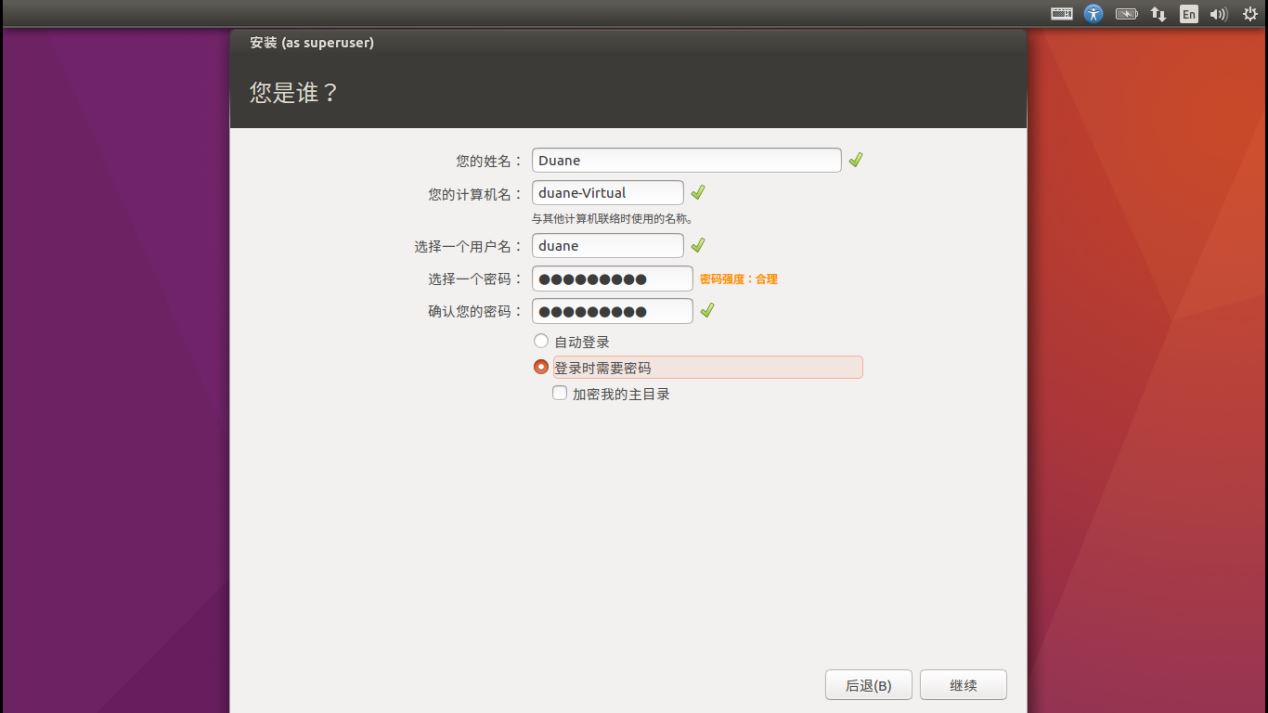
9. Set the user here, just enter it yourself, such as English letters, keep it as simple as possible, and the password should also be simple
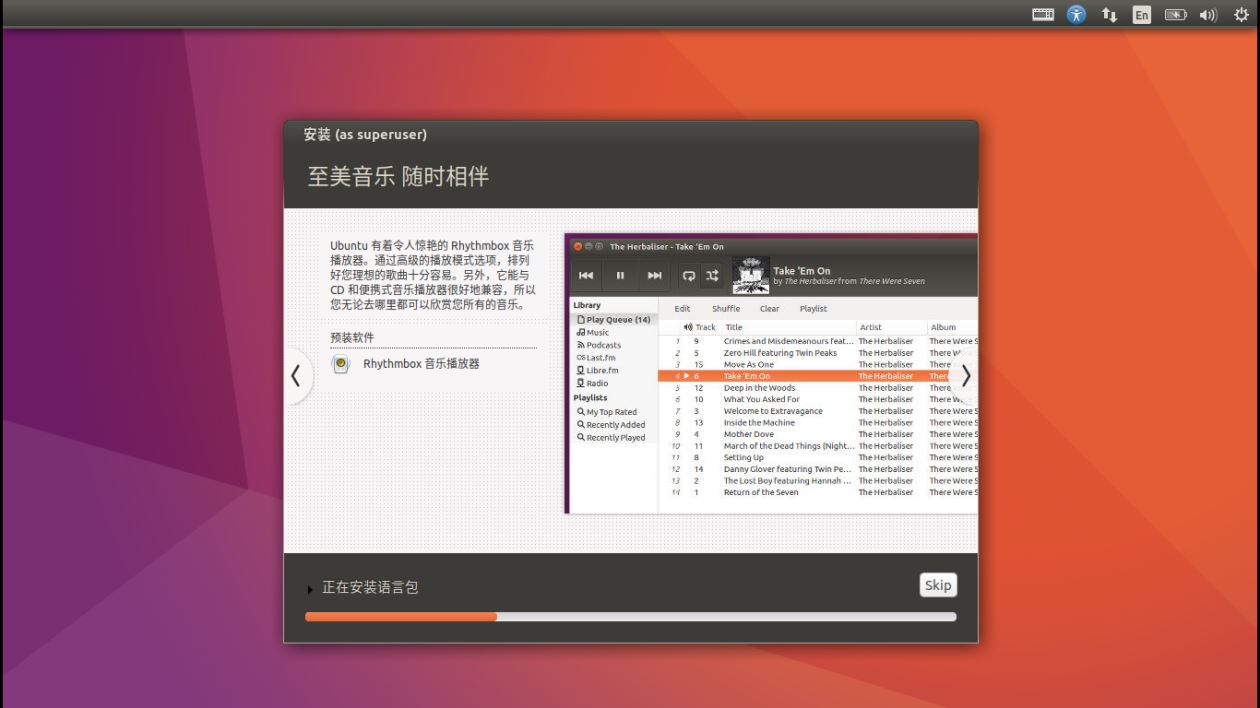
10. The system starts to install, just wait patiently for the installation to complete
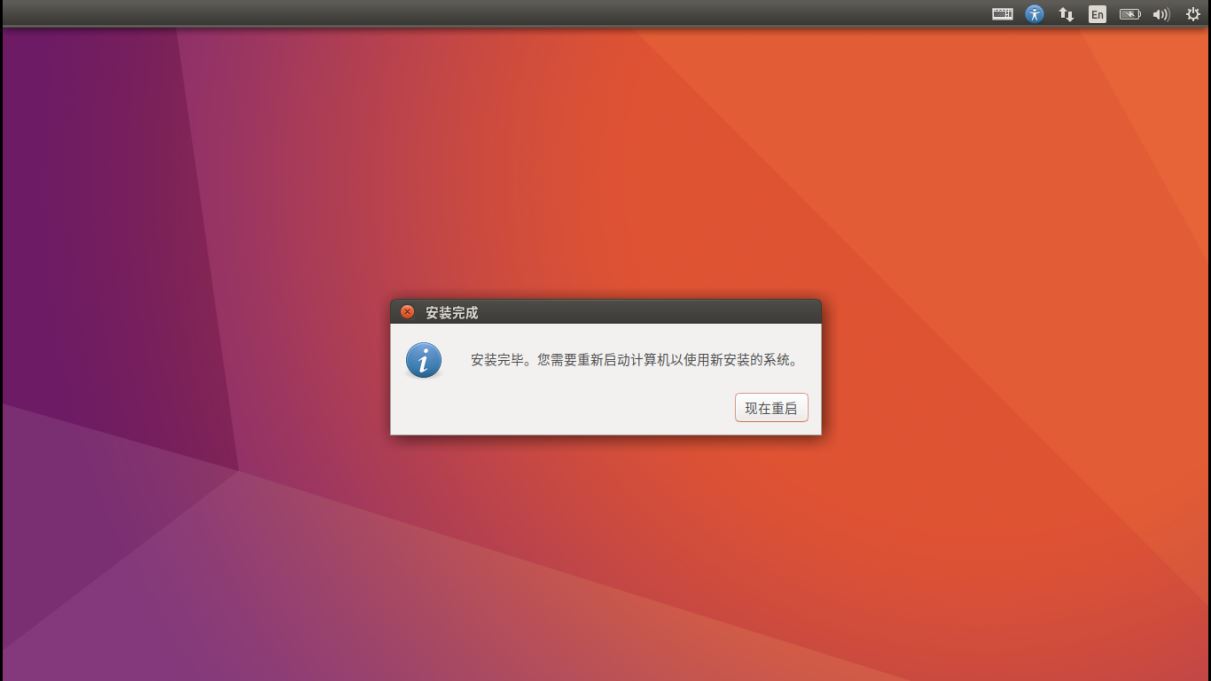
11. After everything is completed, you will be reminded to restart. Pull out the USB flash drive and click "Restart Now". If it freezes, just force shut down and restart.
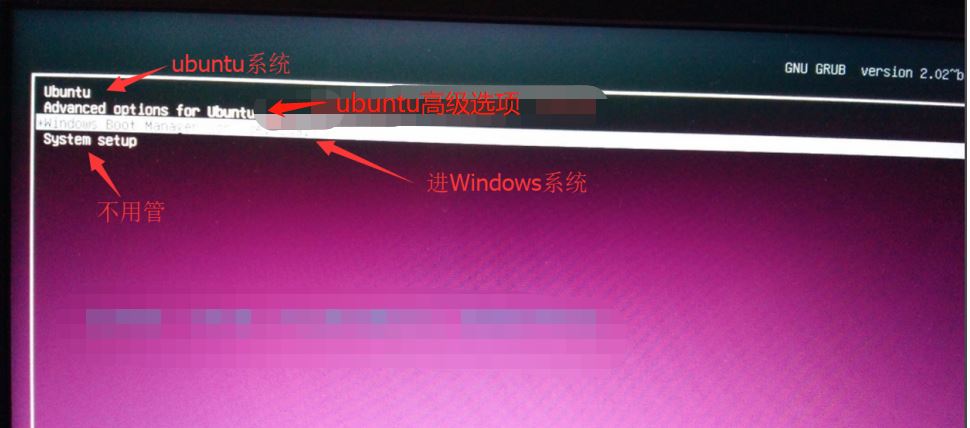
12. After restarting, you will see the following interface. The first item is the ubuntu startup item, the second item is the ubuntu advanced settings, the third item is the windows startup item, and the fourth item is ignored. The default selection is the first one. Press Enter to enter the ubuntu system
13. Maybe you have installed the system and successfully entered it, then congratulations, you can leave; but if you restart after installation and find that you are stuck on the startup interface and cannot move, this is probably your fault. The computer has a special independent graphics card, which is caused by the lack of drivers under the ubuntu system. You can refer to my other blog to solve the problem: https://www.jb51.net/article/176276.htm.
The above is the detailed content of Use the graphic guide to teach you how to install dual-system Ubuntu 18.04 on Windows 10. For more information, please follow other related articles on the PHP Chinese website!

Hot AI Tools

Undresser.AI Undress
AI-powered app for creating realistic nude photos

AI Clothes Remover
Online AI tool for removing clothes from photos.

Undress AI Tool
Undress images for free

Clothoff.io
AI clothes remover

AI Hentai Generator
Generate AI Hentai for free.
Hot Article
Hot Tools

Notepad++7.3.1
Easy-to-use and free code editor

SublimeText3 Chinese version
Chinese version, very easy to use

Zend Studio 13.0.1
Powerful PHP integrated development environment

Dreamweaver CS6
Visual web development tools

SublimeText3 Mac version
God-level code editing software (SublimeText3)
Hot Topics
 1378
1378
 52
52

 How to switch phones between oppo dual systems 'Detailed introduction: How to enable the clone function of Oppo mobile phone system'
Feb 07, 2024 pm 07:24 PM
How to switch phones between oppo dual systems 'Detailed introduction: How to enable the clone function of Oppo mobile phone system'
Feb 07, 2024 pm 07:24 PM
Nowadays, many mobile phones support application clones. It is nothing new to log in to two WeChat accounts on one mobile phone at the same time. But have you ever imagined that one mobile phone can be used as two mobile phones? The "system clone" function that comes with the OPPO mobile phone ColorOS11 system can satisfy such imagination. With just a move of your fingers, another completely independent system can be separated on the phone. The two systems are distinguished by different lock screen passwords. Ordinary files are placed in the common system, and important files are placed in the clone system, so as to maximize the convenience of the system. Privacy and security are guaranteed. Let's take the OPPOReno5 series mobile phone as an example and let's see how to turn on the system clone. The system clone is a kind of privacy function. Open "Settings" and enter "Privacy".
 How to set the boot priority of Apple dual system
Feb 19, 2024 pm 06:49 PM
How to set the boot priority of Apple dual system
Feb 19, 2024 pm 06:49 PM
As technology continues to develop, the need to use different operating systems is becoming more and more common. For Apple users, sometimes you may need to install and use two different operating systems on one device, such as macOS and Windows. In this case, it is particularly important to set the startup sequence of the dual system. This article will introduce how to set up Apple devices to start the dual system first when turning on the device. First, we need to make sure that both operating systems have been successfully installed on the Apple device. You can use BootCamp this Apple
 How to implement dual system switching in Win10 system
Jan 03, 2024 pm 05:41 PM
How to implement dual system switching in Win10 system
Jan 03, 2024 pm 05:41 PM
Many friends may not be used to the win system when they first come into contact with it. There are dual systems in the computer. At this time, you can actually switch between the two systems. Let's take a look at the detailed steps for switching between the two systems. How to switch between two systems in win10 system 1. Shortcut key switching 1. Press the "win" + "R" keys to open Run 2. Enter "msconfig" in the run box and click "OK" 3. In the open "System Configuration" In the interface, select the system you need and click "Set as Default". After completion, "Restart" can complete the switch. Method 2. Select switch when booting 1. When you have dual systems, a selection operation interface will appear when booting. You can use the keyboard " Up and down keys to select the system
 How to switch between dual systems and reset password on Huawei mobile phone
Feb 19, 2024 am 09:05 AM
How to switch between dual systems and reset password on Huawei mobile phone
Feb 19, 2024 am 09:05 AM
With the continuous advancement of technology, mobile phones have become one of the indispensable tools in our daily lives. As a well-known mobile phone brand, Huawei is deeply loved by consumers. The dual-system function in Huawei mobile phones allows users to easily switch between different operating systems and enjoy different usage experiences. However, what should we do if we forget the dual-system switching password? Next, I will introduce several solutions for you. The first solution is to reset the password through the official service channel of the mobile phone. For Huawei mobile phones, users can
 How to delete one of the two systems after starting them? Solution to how to delete one of the two computer systems
Feb 13, 2024 pm 10:30 PM
How to delete one of the two systems after starting them? Solution to how to delete one of the two computer systems
Feb 13, 2024 pm 10:30 PM
How to delete one of the two systems after starting them? Many users find that linking each system is not very useful after installing dual systems, so how do they delete the other system? Users can directly use the command prompt to directly configure the system, and then enter the boot startup items to perform operations. Let this site carefully introduce to users how to delete a dual-system computer. solution. Solution to how to delete one of the two computer systems: 1. Press the win+r keys on the keyboard to enter run. 2. In "Run", enter "msconfig" and click "OK". 3. Click "Guide &
 How to delete one of the two systems
Feb 26, 2024 pm 04:38 PM
How to delete one of the two systems
Feb 26, 2024 pm 04:38 PM
Method 1: Delete unnecessary systems during booting: 1. Press the win+r keys to enter the run window page; 2. Enter "msconfig" in the opened operation page and confirm; 3. Click the "Boot" function. Two operating systems can be seen; 4. Select an operating system and click Delete. Method 2: Delete the system disk: 1. Find the drive letter where the dual system is installed; 2. Right-click the drive letter and click "Format" in the pop-up options; 3. After confirming that the information is correct, click "Start" below. delete.
 Win11 installation tutorial: Installation steps for dual-system computers
Jan 09, 2024 pm 12:41 PM
Win11 installation tutorial: Installation steps for dual-system computers
Jan 09, 2024 pm 12:41 PM
Many users of win11 system have installed it, but for dual-system computer users, there are still many users who have not updated. First, they don’t know how to install it, and second, they are worried that the installation will affect the use of dual systems, so today we have brought a dual-system update. How to install win11 on system computer, come and try it together. How to install win11 on a dual-system computer: 1. First open this computer, then right-click this computer to select it, and click "Manage". 2. Then click "Disk Management", right-click the newly added volume, and click "Compress Volume". 3. Enter "32768" in the space amount and click Compress. 4. Then click "New Simple Volume". 5. Press next step all the way to complete the installation. 6. Then click "Browse" to join the win11 system. 7. After entering the installation interface, click
 How to enable dual system on OnePlus 9r_Tutorial on enabling dual system on OnePlus 9r
Mar 22, 2024 pm 08:46 PM
How to enable dual system on OnePlus 9r_Tutorial on enabling dual system on OnePlus 9r
Mar 22, 2024 pm 08:46 PM
1. Click [Privacy] in the phone settings menu. 2. Click [System Clone]. 3. Click [Create system clone]. 4. Enter the lock screen password and wait for about a second or two, and the system clone will be created. 5. After creation, we need to set a password that is different from the main system to enter the clone system (the clone is exactly the same as the main system, and the password cannot be retrieved if you forget it).
